Search for a Recipe

Pages

Monday, 30 March 2015

Rustic Brown Bread Round Loaves

I brought a loaf of this rustic bread to a church function last night and was asked by several people if I could post this tasty and EASY recipe asap. Here it is!  No bread pans necessary, just a cookie sheet and either silicon mat or parchment paper. Sometimes I'm looking for ways to simplify cooking, and this bread is perfect! This bread has a nice crispy crust and a fun shape!  This bread recipe is one that I really lucked out upon while experimenting.  It's similar in ingredients to the gluten-free sandwich bread without a mixer recipe, but I threw things together in the mixer and thought I'd try sticking in round mounds on a pan just to test things out.  It worked so well, I've done it again and again!  This bread has just a hint of molasses which gives it a little extra oomph in flavor and color.  This has been a hit with the whole family - they have eaten it plain, buttered, toasted, grilled, as sandwiches, and even as a hamburger bun substitute.
Gluten Free Rustic Brown Bread
Gluten Free Rustic Brown Bread Loaves - Fresh out of the oven! 
Gluten Free Rustic Brown Bread Sandwiches!
Seriously tasty sandwiches - aoili garlic mustard, avocado, lettuce, cilantro, jalapeno yogurt cheese (Heini's Amish cheese in Ohio makes the MOST delicious yogurt cheese - It's lactose-free!), and turkey. Yum!

Rustic Brown Bread Round Loaves
Makes 2 large loaves

Preheat oven to 350F.
Line a cookie sheet with silicon sheet or parchment paper.

In a mixer, combine the following:
3 1/2 cups brown rice flour
1 cup sorghum flour
1 cup arrowroot starch
2 Tbsp rapid-rise/quick yeast
2 Tbsp xanthan gum
2 tsp salt

Add the following, then mix slowly (just to combine), and then mix on medium/medium-high for 4 minutes (this helps the yeast become activated, so set a timer and let it mix 4 full minutes):
2 cups warm milk (lactose-free works great - also great with unsweetened almond milk)
6 eggs
4 Tbsp avocado oil (or another oil)
3 Tbsp honey
1 Tbsp molasses (use a lightly flavored molasses)
2 tsp apple cider vinegar

After letting dough beat 4 minutes, scoop into two even mounds on your prepared cookie sheet.  Smooth the tops with the spatula.  I like to just scrap the dough around in a circle to get a smooth-ish look to it.  

Let rise in a warm location ~40 minutes, until bread has nicely puffed up, but not quite doubled in size.
These loaves were spread a bit flatter, but they still puff up during rising.  

Bake at 350 for 50-55 minutes.  I find the bread looks like it could be done by about 25-30 minutes, but let it cook that extra 30 minutes.  This will ensure you have a nice crispy crust with a soft, fluffy inside.

Let cool on cooling rack. Slice and enjoy!  It's wonderful with butter and jam, made into sandwiches, used in grilled cheese, etc.  Best fresh within a day, or after cooling and slicing it freezes well! Enjoy!
Gluten Free Rustic Brown Bread
Fresh sliced bread - nice and fluffy!

Friday, 27 March 2015

Delicious Risotto!!!

Risotto is one of those easy to whip up dishes where you get an all-inclusive sort of meal. The kids all love it, and I vary what vegetables and meats get thrown in based on what I have around, although what I've listed here is the most typical sorts of things I add in.  I've also listed at the bottom an easy way to make fresh chicken broth that you can use for things like this risotto.  Enjoy!
Gluten Free Risotto with ham and spinach
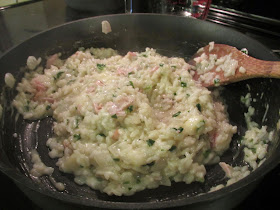
Fresh risotto with onion, spinach, ham and parmesan cheese. Yum!

Delicious Risotto!
Serves 4

Heat in a large frying pan over medium heat:
1-2 Tbsp olive oil

Add and cook 2-3 minutes:
1 onion or two large shallots, diced
1 tsp garlic, minced (optional)
1 carrot, peeled and grated (optional)

Push vegetables to the side, then add and let saute 1-2 minutes:
1 Tbsp olive oil
1 cup arborio risotto

Add 3 cups chicken broth *see note below, 1 cup at a time over about 15-20 minutes.  Stir regularly and let most of each cup of liquid absorb before adding the next.

You can make the risotto creamier or more dry depending on how much liquid you let absorb/cook off during this time.
Just after adding the last cup of broth - I added the spinach a bit earlier here, to let it really soften.
Risotto made with homemade chicken broth, which included some cooked carrots and extra onions - this required a bit more cooking to let the liquid absorb. In this case, I didn't add grated carrot because I already had cooked carrot from the broth - it also gives the risotto more of a orange color. 

When you're almost done cooking, add:
1/2 - 1 cup cooked chicken, diced OR 1/2 cup diced sliced ham or turkey
1 cup finely chopped spinach (optional)
salt and pepper, to taste

Remove from heat and stir in:
1/2 cup fresh mozzarella, diced (optional, makes for a thicker, cheesier risotto)
1/4 cup fresh grated parmesan cheese (optional, but adds a great flavor and I almost always add a bit of parmesan to my risotto)
Gluten Free Cheesy Risotto with ham and spinach
Thicker, cheesy risotto when you add both mozzarella and parmesan.  Leave out the mozzarella if you're using this as a side dish, or you'll end up with too heavy a dish.
Gluten Free Cheesy Risotto with ham, spinach and parmesan
After folding in some parmesan, ready to eat!

*Note about chicken broth: You can make your own broth if you cover a chicken carcass with water and add some sliced carrots, onions, salt, pepper, parsley, pinch of tumeric and paprika. Bring to a boil, then lower heat and let things simmer for a couple hours. This is great because after letting things simmer for a couple hours, you will have a rich, tasty chicken broth.  Often, the onions and carrots are well-cooked, and can easily be added right into the risotto as well - perfectly soft and great if there are little kids around.  You can also use GF boullion or my favorite, use mushroom seasoning to make your broth. 

Monday, 23 March 2015

Glazed Chocolate Donut Holes!

When the spring weather is crazy... sometimes we just need donuts.
PEI snow - winter 2014-2015
My son in the driveway - after the second or third blizzard of the week (I'm losing count...).

Donuts are such a fun and delicious treat.  These taste wonderful, and have a delicious crisp edge.  I even freeze extras once cooled and re-heated in the toaster oven, they retain their crisp outside and soft insides. Yum! The kids love them, although I'm often grateful they forget extras are in the freezer so I can sneak them for snacks.   These are SO easy and quick to whip up, I'm sure they'll become a favorite special treat. Enjoy!
Gluten Free Glazed Chocolate Donut Holes
Gluten Free Glazed Chocolate Donut Holes!!! I whipped up a couple batches, one of plain donut holes and one of chocolates donut holes!  You can add sprinkles just after dipping in gaze, if desired. Yum!

Delicious Chocolate Donut Holes!
Makes ~36 donut holes or a combination of mini donuts/donut holes

In a bowl, whisk together:
1 1/2 cups Kristin's Gluten-Free Flour Mix
1/2 cup cocoa powder
1/2 cup sugar
3 tsp baking powder
1 tsp cinnamon
1/2 tsp salt

Start heating 1" Avocado Oil (or other frying oil of your choice, but this makes the MOST delicious crisp edges on the donut holes) in a high-sided frying pan over medium-heat.  I tend to re-use frying oil several times, particularly if frying non-meat/fish items like donuts.  I strain it for crumbs, and then I'll use it again for things like blueberry fry pies and samosas!

In a small bowl mix together:
1 cup milk (lactose-free works great!)
1 egg
1 tsp vanilla bean paste (or extract)

Mix wet ingredients with dry ingredients with a spoon until thoroughly combined.  Let rest 5-10 minutes.

While the batter rests, whisk together a quick sugar glaze. (I aim for a more liquid-like glaze, but you can make it thick so it's more of a frosting). 
Sugar Glaze:
Whisk together the following:
1 - 1 1/2 cups powdered sugar
1/2 - 1 tsp vanilla extract
cold water, until desired consistency (a little thicker than milk)

Set the glaze aside to dip the donuts in after frying.

Line 1 cookie sheet with parchment paper or a silicon mat to place glazed donuts.  Line 1 cookie sheet with a double layer of paper towel to place cooked donuts to drain.

Use a small (1 Tbsp) sized cookie scoop to scoop batter into the 1" hot oil.  It's hard to tell how browned the chocolate donut holes are getting, but I find a couple minutes per side usually gets them nice and crispy on the outside with a soft interior.  If you have at least 1" of oil they tend to flip themselves, too, which helps with the timing. 

Set donut holes on paper towel-lined tray to drain and cool slightly.  While still warm, dip in sugar glaze.  Set on a parchment paper-lined pan and let set.  Enjoy!!! 


Friday, 20 March 2015

Fried Rice with Vegetables and Chicken

This fried rice recipe has become a great favorite with everyone around here.  There's a few things I find that really have helped make this work for me -- 1. using white jasmine rice - not wet, or your stir-fried rice will stick together a bit; 2. Have all items prepared in bowls beforehand, since cooking time is quick; 3. Don't stir too much, since you want things to cook at the high heat before you rotate ingredients in the pan; 4. I really prefer using a can of green chilies instead of fresh red or green pepper in my stir-fry - I find the taste is less overwhelming and blends nicely with the other ingredients.  I started with a recipe from a kids cookbook, "Around the World" by Abigail Dodge, and found it worked really well if I used canned chilies instead of fresh ones.  However, the recipe didn't make quite enough for our family of 4 (counting little girls as 1 adult), so I tweaked it, also discovering that I needed to make sure the rice was properly cooked and then dried out a bit in order to get the right texture.  I also found that using the avocado oil for frying worked wonderfully.

Gluten Free Fried Rice
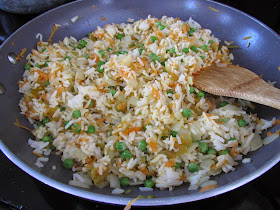
Gluten Free Fried Rice - Freshly cooked chicken and vegetable fried rice! 

Fried Rice with Vegetables and Chicken
Serves 4

Make 1 cup white jasmine rice (or rice of your choice) - this yields about 3 cups.  If you're making it fresh, let it cook a few minutes longer than normal and sit with the lid cracked after cooking so it dries out a bit.  Or, you can use day-old rice so it's a bit more dried out.

In a large frying pan or wok over medium-high to high heat, heat up:
3 Tbsp avocado oil (or another oil with a high smoke point, good for stir-frying)

Cook the following for 3 minutes:
1 onion, chopped
1 tsp minced garlic
1 can (4 oz/127 g) green chilies
GF Fried Rice - onions, garlic and chilies
Cook onions, garlic and chilies for 3 minutes.

Add and cook 4 minutes:
3 cups cooked white jasmine rice (or another cooked rice)
1/2 - 1 cup frozen peas
1 carrot, peeled and shredded
GF Fried Rice
Add rice, peas and shredded carrots and cook 4 minutes.

Push everything to the edge of the wok/pan.
Add, and then scramble:
1 Tbsp avocado oil
2-3 eggs, whisked
GF Fried Rice with Egg
Cooking quickly, I missed getting a picture of all the rice at the edge and egg in the middle - but here is after it's all scrambled and mixed together.

Mix everything together and add, cooking 1-2 minutes:
4 Tbsp GF soy sauce (I used Bragg's Liquid Soy Sauce)
1 cup finely diced cooked chicken (optional)

Serve hot!  Enjoy!
Gluten Free Fried Rice with Vegetables and Chicken
Add the GF soy sauce and chicken and let cook one more minute before serving.  Enjoy! 

Tuesday, 17 March 2015

Mint Chocolate Brownies

These are a family favorite. My son even requested these this year instead of a birthday cake.  I prefer them at room temperature, but they're nice chilled or warmed a bit.  Just make sure to let them set before cutting them the first time.  With that nice minty green layer, they're a perfect St. Patrick's Day treat, too!
Gluten Free Mint Chocolate Brownies
Gluten Free Mint Chocolate Brownies - They're rich, so I tend to cut these tasty treats into small squares.  Delicious!

Mint Chocolate Brownies
Makes 8x8 tray of brownies (~16)

Preheat oven to 350F. Line 8x8 pan with parchment paper, then butter parchment paper and sprinkle with cocoa powder.  (I find if I don't then I end up needing to use a fork or spoon to scrap the bottom off, even after buttering the pan.)

In a large microwave-safe glass bowl, melt:
1/2 cup butter

Mix in until smooth:
1/4 cup cocoa powder

Add and mix in:
2 eggs
1/2 cup white sugar
1/2 cup brown sugar

Then add and mix in, just until combined:
1/4 cup + 2 Tbsp Kristin's Gluten-Free Flour Mix
1/4 tsp baking powder

Pour into prepared 8x8 pan and bake at 350F for 22-25 minutes.
Before and after baking
Let brownies cool completely.  Then top with the following:
1. Mint layer
Mix together and spread on top of brownies:
1 cup powdered sugar
2 Tbsp butter, melted
1 Tbsp milk
1-2 drops peppermint essential oil* (Add one drop at a time, then mix) (or use peppermint extract)
1-2 drops green food coloring

Taste the mint layer to make sure it's minty enough. 
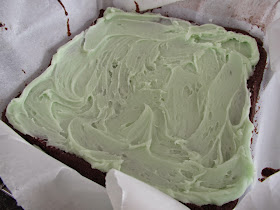
Mint layer spreads easily over the brownies.
2. Chocolate Layer:
Melt together in a small microwave-safe bowl:
1/2 cup semi-sweet chocolate
2 Tbsp butter
Coated with chocolate
Spread thinly on top of brownies.  Let set in the refrigerator at least 15-30 minutes (to allow the chocolate layer to set).  Remove from refrigerator. Slice and serve!   I find these are best at room temperature, but I typically store them in the refrigerator and remove 20-30 minutes before serving.
Gluten Free Mint Chocolate Brownies
Mint brownies, ready to eat!  They can easily be lifted out of the pan using the parchment paper, to make for easier cutting.

* I love using the DoTerra Peppermint Essential Oil in my cooking.  You can find it at my friend Christine's online store:  mydoterra.com/cstolworthy

Friday, 13 March 2015

Blueberry Coffee Cake

I was always confused about the word coffee cake growing up, since there's no coffee to be found in this sort of cake.  But I have always associated it with cake, fruity or cinnamon-filled, with a crumb topping.  My default is to whip up muffins, but sometimes it's nice to have something a little different, something that can be considered a little fancier.  This was a hit with the family.  We'll definitely be making it again! Enjoy!
Gluten Free Blueberry Coffee Cake
Gluten Free Blueberry Coffee Cake - sliced and ready to eat!

Blueberry Coffee Cake
Makes 8" x 8" pan

Line an 8" x 8" pan with parchment paper.  Preheat oven to 400F.

In a large bowl, mix together:
½ cup corn flour OR ½ cup GF oat flour 
½ cup white OR brown rice flour (or half brown/half white flours)
½ cup tapioca starch
½ tsp xanthan gum
½ cup sugar
2 tsp. baking powder
½ tsp. salt
½ tsp. cinnamon

Add and mix in just until combined (don't overmix, it's okay if there are a few lumps):
¾ cup milk (lactose-free or other milk substitutes work as well)
¼ cup coconut oil, melted
1 egg

Add & fold in:
1 cup fresh or frozen blueberries

Spread into the prepared pan.  

In another bowl, chop with a pastry cutter until crumbly:
¼ cup butter, chilled
¼ cup brown sugar
¼ cup brown rice flour
½ tsp cinnamon
pinch salt

Bake at 400F for 25-30 minutes, until nicely browned on top (cooking time varies depending on whether you use frozen or fresh blueberries).

Place pan on cooling rack and let rest 5-10 minutes.  Then you can use the parchment paper to help remove the cake from the pan to continue cooling.  Great warm or cooled. Enjoy!
Gluten Free Blueberry Coffee Cake
Gluten Free Blueberry Coffee Cake fresh from the oven! 

Monday, 9 March 2015

Fluffy Chocolate Chip Pancakes with Coconut Flour

We really do love pancakes around here.  But I'm always mixing it up, experimenting with flour mixes, and seeing how things turn out.  I'm always playing around with the proper ratio of coconut flour to add into things (since you have to adjust liquid when you add coconut flour).  These versions have been a hit! We've made them over and over.  Occasionally, I will double the recipe so we have plenty of leftovers.  They store well in the refrigerator (if there's leftovers).  And, if I make sure they're fully cooled, the freeze well, too.  Win-win for us around here since they make for easy, quick breakfasts.  You can make them so they're thicker/fluffier, or thinner/not as fluffy by adjusting the amount of milk you use.  Enjoy!


Fluffy Chocolate Chip Pancakes with Coconut Flour
Makes ~36  4" - 5" pancakes

Mix in a large bowl:
3/4 cup brown rice flour
1/4 cup coconut flour
1/4 cup white rice flour
1/4 cup tapioca starch
1/4 tsp xanthan gum
2 Tbsp brown sugar
1 Tbsp baking powder
1/2 tsp salt
1 tsp cinnamon

Add and mix until most lumps are gone:
2 eggs
4 Tbsp oil
1 tsp vanilla bean paste (or extract)
1 3/4 cup milk (Less or More depending on how thin/thick you prefer your pancakes; lactose-free works great)

Add in:
1/4 - 1/2 cup mini semi-sweet chocolate chips

Cook over medium-low to medium heat.  I usually wait until I can see the bottoms are browning and then flip.  I also tend to not need to use butter after the first batch in my pan, but it depends on what sort of pan you use.

These are great with maple syrup and coconut whipped cream (they sell this now in the squirt cans the kids love, or you can make your own by whipping the thick part of canned coconut milk with a bit of powdered sugar and touch of vanilla).

Leftovers store great in the refrigerator.  You can even freeze them - but make sure they're fully cooled to help them avoid sticking together.

Enjoy! 

With a bit of coconut whipped cream on top. Yum!

Monday, 2 March 2015

Pizza Stuffed Rolls

These are a great and easy thing to whip up for a meal or for made-in-advance lunches!  Everyone around here loves pizza, so this is like pizza in a sandwich!  Make sure you find gluten-free pepperoni, since many are not GF.  Enjoy!
A pizza stuffed roll sliced open so you can see the fillings. Yum!

Pizza Stuffed Rolls
Makes 6 large filled rolls

Line a cookie sheet with parchment paper or silicon mat.  Preheat oven to 350F.

Prepare fillings: 
Have ready:
Spaghetti Sauce
GF pepperoni slices

Slice:
~12 large slices fresh mozzarella cheese

Mix in a small bowl:
1/4 cup ricotta cheese
1/4 - 1/2 cup diced red bell pepper
salt + pepper
2 Tbsp parmesan cheese (optional)

In a mixer with paddle attachment, combine the dry ingredients (you have 2 flour options, use Kristin's GF mix for a more robust, slightly denser roll, and the other flours for a lighter, fluffier roll - I tend to make the lighter, fluffier version):
2 tsp quick-rise yeast
1 tsp salt
and
3 cups Kristin's gluten-free flour mix + 1 tsp xanthan gum
OR
1 cup brown rice flour
1/2 cup white rice flour
1/2 cup tapioca starch
1/2 cup potato starch
1/2 cup arrowroot starch
2 tsp xanthan gum

Add:
1 1/4 cup lukewarm water
1 Tbsp honey (or maple syrup)
1 1/2 Tbsp maple syrup (or honey)
4 Tbsp oil
3 eggs
1 tsp apple cider vinegar

Beat 3-4 minutes at medium speed.

Place batter in a ziploc freezer bag (make sure you use a high-quality freezer bag or it will tear as you try to pipe out your dough).  Cut 1/2" off one corner.

Pipe 6 swirls of dough onto parchment-lined or silicon-lined cookie sheet.  Try to use a little less than 1/2 the dough.
Fill each roll with the following, careful to leave a bit of space near the edge of the dough so it will seal properly when you pipe on the top:
Slices of fresh mozzarella
Spoonful of spaghetti sauce
3-4 pieces of GF pepperoni
Spoonful of ricotta cheese mixture

Pipe swirls of dough on top, starting from the outside swirling inward, so you get the best seal.  You can always wet your fingers to smooth any areas if you are worried you left gaps.

Place a cookie sheet upside-down on top of your cookie sheet to cover the rolls as they rise. (Put a bit of plastic wrap around the edges of the pans if they don't fit together well)  Let rise ~45 minutes in a warm location, until puffed up.  Bake at 350F for ~35 minutes, until nicely golden brown.  Cool on wire rack.  Enjoy!!!
Yes, cheese will ooze out of these while they cook, but no worries - they'll be plenty of cheese and delicious flavors still inside! 

I like to make these, slice them in half and freeze them in snack-sized ziploc bags for easy lunches!  They've quickly become a favorite with everyone!