Search for a Recipe

Pages

Friday, 26 June 2015

Thin-cut Pan-fried Herb Chicken with Mushrooms

Delicious and gorgeous meals can be made in one large frying pan in a tiny kitchen!  This was a delicious dish I whipped together while visiting Rome recently with my family (hence the gorgeous plates and platters - I don't think the pictures do them justice).  I used fresh mushrooms and shallots from the local market and fresh thinly sliced chicken.  The great thing about this dish is the chicken cooks up quickly because it's so thinly sliced!  It's flavorful and delicious while using a minimum number of ingredients - important while travelling.  You can serve it alongside salad, rice, or GF bread.  It's also a great dish for summer when you don't want to stand for long over a hot stove. Enjoy!
Gluten Free Pan-Fried Herb Chicken and Mushrooms
Ready to eat, with mushrooms spread across the tops of the chicken.  A delicious meal in Rome after a day of sight-seeing.  We served it alongside leftover risotto and salad, and some pizza from around the corner for those without gluten-allergies.

Pan-fried Herb Chicken with Mushrooms
Serves 4

Ask butcher to slice two chicken breasts 1/4" thick.  You can do it by hand, but I find it's hard to get it evenly thin everywhere.

Mix together marinade in a large platter: (you can adjust the amounts of each ingredients, the measurements give a place to start)
4-5 Tbsp olive oil
2-3 Tbsp vinegar (apple cider or white wine)
1/2 - 1 tsp salt
1/2 tsp pepper
1/2 - 1 tsp dried oregano
1/2 - 1 tsp dried basil

Place thinly sliced chicken breast in marinade, turning to coat all sides.  Let rest 10-15 minutes while you prep and cook the mushrooms.
Chicken in marinade on left and after cooking on right.
Saute in 1 Tbsp butter and 1 Tbsp olive oil:
1 cup mushrooms, thinly sliced
1-2 shallots, sliced or diced
3 cloves garlic, minced

After cooking mushrooms, remove them from the pan and set them aside while you quickly pan-fry the chicken.

Using just enough olive oil to coat the bottom of the frying pan.  Fry each slice of chicken on both sides until the chicken is fully cooked.  The thinner the chicken, the faster it cooks.  If your slices of chicken are too thick, you can let it sear on each side and remove to a baking pan. Then bake 15 minutes at 375F until your chicken is fully cooked.  
Mushrooms set aside, with chicken frying in the pan.
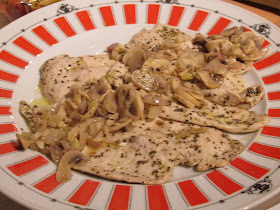
Serve on a platter with the mushrooms and shallots drizzled overtop.  Enjoy!!! 

Tuesday, 23 June 2015

Flavorful Hearty Bagels

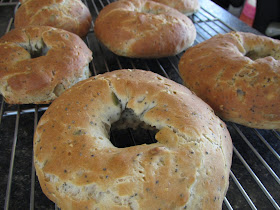
Making tasty gluten-free bagels is surprisingly easy. Every time I whip some up, I'm constantly amazed at how delicious they are without the traditional boiling required by non-GF bagel recipes.  These tasty bagels are filled with seeds of all kinds.  The variety of seeds add a wonderful nutty crunch and flavor to these bagels. They're great toasted with cream cheese - or just plain fresh out of the oven!  You can even slice and fill with sandwich toppings, too.  Like a hearty bread.  Enjoy!
Gluten Free Flavorful Hearty Bagels
Piping hot and ready to eat. 

Flavorful Hearty Bagels
Makes 8 bagels

Line 2 cookie sheets with silicon mat or parchment paper.

In a 2 cup measuring cup mix and let rest 5 minutes:
2/3 cup warm water
4 Tbsp honey
2 tsp rapid rise yeast (quick-rise yeast)

Add to yeast mixture:
2 egg
4 Tbsp oil

Set liquids aside, and mix together in a mixer (it's important to mix the dry ingredients so the xanthan gum gets thoroughly mixed in):
1 1/3 cup tapioca starch
1 cup brown rice flour
4 Tbsp potato starch
2 1/2 tsp xanthan gum
1 tsp salt

Add liquids to mixer.  Mix on low, until combined.  Then mix on medium speed, scraping occasionally, for 2-3 minutes.  Batter will be nice and smooth.

Add and let mix until seeds are evenly spread: 
1-2 Tbsp poppyseeds
1-2 Tbsp pumpkin seeds
1-2 Tbsp sunflower seeds
1/2 - 1 Tbsp sesame seeds

Put batter into a Ziploc (I like the freezer bags because they’re stronger).  Cut ¾” – 1” off one corner.  Pipe 4 bagels onto each prepared cookie sheet. Using wet hands, spread bagels so the holes are nice and big. You can also smooth out any areas that are a bit lumpy.  Wet bagels even if you don't re-shape them.


Let rise in a warm location for 30-40 minutes.  They’ll look a bit puffier, but won’t fully double in size.

Gluten Free Bagels before rising
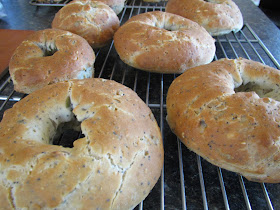
Pipe out and use wet hands to smooth bagels.  Even if you don't want to reshape the bagels, brush with water.  They'll puff up, but not quite double in size as seen on right.

Bake at 350F for 20-25 minutes until browned.  Cool on cooling rack.  The bagels are fabulous fresh and hot.  Once cooled, you can slice and freeze if you aren’t planning to eat them right away. These are great toasted with cream cheese.  Enjoy!
Gluten Free Hearty Bagels
Fresh from the oven!

Sunday, 21 June 2015

Kristin's no-refined-sugar Blueberry Muffins

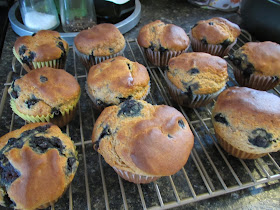
I often try to work out recipes with lower refined sugar content, and these are a great alternative to typical muffins.  They have a richer taste, more like a bran muffin flavor.  The blueberries add a natural sweetness, too!  These get inhaled at my house, and no one seems to notice the difference between these and any other blueberry muffins I might whip up, which is great.  For a richer flavor use butter instead of oil, but oil gives a fluffier muffin.  Both are tasty and delicious. Enjoy!
Gluten Free no-refined sugar Blueberry Muffins
Fresh blueberry muffins for Father's Day! 

Kristin’s no-refined-sugar Blueberry Muffins
Makes 12 muffins

Preheat oven to 400F.  Line muffin tin with 12 paper liners.

Mix in a large bowl:
3 tsp baking powder
½ tsp baking soda
½ tsp salt
¾ - 1 tsp cinnamon

Add and mix in:
8 drops liquid stevia (high quality)
1/8 cup honey
1/8 cup agave
1 ¼ cup coconut milk, unsweetened (or lactose-free milk)
3 oz oil OR melted butter (oil for fluffier, if preferred)
2 eggs

Mix in carefully:
100 - 150g fresh OR frozen blueberries* (this is around 1 – 1 ½ cups of blueberries)
*You can use 100g blueberries & a handful of dried cranberries for a variation.  If you use frozen blueberries, be prepared to add 5-8 minutes onto the baking time.

Pour evenly into prepared muffin cups.  They should be filled close to the top of the paper liner.  They will rise, but not too much. 

Bake at 400F for 20 minutes, if using fresh blueberries, OR 25-27 minutes, if using frozen blueberries.
Best warm with butter.
Enjoy!
Gluten Free no-refined sugar Blueberry Muffins

Monday, 15 June 2015

Italian-style Shrimp & Vegetable Risotto

Often while travelling, it can be difficult to whip together meals that everyone enjoys while in a small kitchen.  The great thing about risotto is that you can use all sorts of fresh, local vegetables and meats or fish and add them right into a tasty risotto without too much effort.  I got the idea of using a bit of tomato base in the risotto after being served a fish risotto at a little cafe in Rome.  It was so simple - they used just a mild tomato base with a bit of calamari, mussels and shrimp on top  (I used more spices/flavor).  That cafe dish was a perfect jumping off point to experiment a bit and expand the flavor palate in a way the entire family enjoyed.  This is for you, mom. Enjoy!

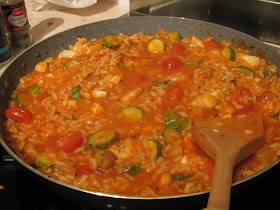
Gluten Free Italian Shrimp & Vegetable Risotto
Vegetables and shrimp ready to be mixed into the risotto.

Italian-style Shrimp & Vegetable Risotto
Serves 4-6

Heat a medium-sized frying pan and a large-sized frying pan each over medium to medium-high heat.  You will be cooking the vegetables in the smaller pan and the risotto in the larger pan at the same time.  I'll provide directions for both separately, just for clarity.

Risotto:
In the large frying pan, place:
2 Tbsp olive oil

Add and cook 2 minutes:
1-2 large shallots

Add and cook 1 minute:
1 cup Arborio risotto

Add 1 cup at a time, allowing most of the liquid to soak/cook into the rice before adding the next cup, cooking about 15-20 minutes:
1 cup tomato sauce
2 - 2 1/2 cups water

Add along with the first bit of water/tomato sauce: (Adjust spices towards the end of the cooking, paying attention to whether or not your tomato sauce includes salt)
1/4 - 1/2 tsp salt
1/4 - 1/2 tsp pepper
1/4 - 1/2 tsp dried oregano
1/4 - 1/2 tsp dried basil


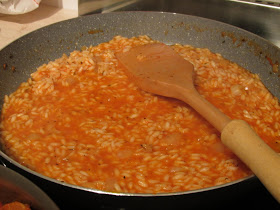
Gluten Free Risotto with Tomato Sauce
Risotto close to being done, notice how most of the liquid has been absorbed.

When the risotto has reached the desired consistency (you can leave it with a bit extra liquid or you can let it be a bit drier), remove from heat and fold in:
1/2 - 3/4 cup fresh buffalo mozzarella, diced
1/4 cup Pecorino Romano, crumbled

Fold in the following cooked vegetables and shrimp, below.  Serve warm! Enjoy!!!

Vegetables & Shrimp:
In the medium sized frying pan, place:
2 Tbsp olive oil

Add and cook until just tender ~10 minutes:
2-3 small zucchini, sliced
3 shallots, chopped
1/4 - 1/2 tsp salt
1/4 - 1/2 tsp pepper
1/4 - 1/2 tsp dried oregano
1/4 - 1/2 tsp dried basil

Add and cook 2-3 minutes:
3-4 cloves garlic, finely chopped

Add and let cook 3-4 minutes:
8-10 mini tomatoes, sliced in half 
2 handfuls baby spinach, sliced (optional)

Add 1 minute before adding into risotto, just so it has time to warm up:
2 handfuls cooked, peeled shrimp

Fold into cooked risotto. Serve and enjoy!
Gluten Free Italian Shrimp & Vegetable Risotto
Delicious vegetables and shrimp risotto in a tomato base. Delicious! 

Sunday, 7 June 2015

Tasty Potato, Zucchini & Leek Side Dish

You can make this dish to serve more or less people, as desired, which makes it a nice and versatile side dish for any meal.  Wonderful with roasted ham and other side salads.  I whipped this together using lovely fresh vegetables from a local farmer's market while visiting Belgium.  Some potatoes are softer than others when cooked, so it's best to ask at your local grocer which potatoes would be best for boiling and then frying in a pan. Some potatoes start to break apart during frying (the taste is still great, but it won't end up as nice and crisp at the end).  The mix of butter, oil and leeks makes for a delicious and tasty dish.
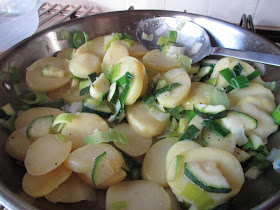
Gluten Free Potato, Zucchini, Leek Side Dish
Potato, Zucchini and Leek Side Dish frying over medium-high heat, a few minutes from being ready to serve!

Tasty Potato, Zucchini & Leek Side Dish
Serves 4-6

Wash well, then boil in water (usually takes about 10-12 minutes for small potatoes) & then slice:
6-10 baby potatoes (I aim for 2-3 large handfuls, you can also peel the potatoes, if desired)

In a large frying pan over medium-high heat, place:
1-2 Tbsp butter
1-2 Tbsp olive oil

Add and let cook 3-5 minutes, until leeks are just starting to soften:
1 small zucchini, sliced and chopped
1 leek, thinly sliced and well-washed
1-2 shallots, finely chopped (optional)
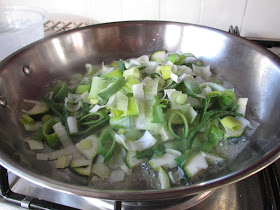
Pan-fried Leeks
Leeks and shallots cooking in butter
Add boiled, sliced potatoes and continue cooking over medium heat until vegetables are at your desired crispiness. You can let them brown a bit, or leave them just nice and hot but not browned/crispy.  Best served hot.  Enjoy!
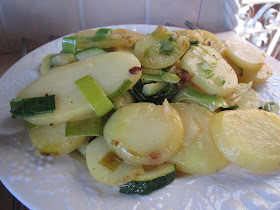
Gluten Free Potato, Zucchini, Leek Side Dish
Just crisped and ready to serve alongside some local roast ham.