Search for a Recipe

Pages

Sunday, 24 April 2016

Nachos Supreme - topped with spicy sauteed veggies!

For my awesome brother Mike, who needs some variety and enhancing of his nachos in his nacho-eating life.  I put together all the toppings, with help from my kids, who then were thrilled they were able to assemble their own plates.  I was thoroughly shocked at the variety of toppings they added and ate!  I've found my kids love to help prep and cook food, and it makes them more likely to eat vegetables they otherwise might shy away from.   The addition of sauteed vegetables made with spices has been a wonderful addition to our tacos and nachos lately.  We were SO lucky to have found all the vegetables & locally made refried beans at the farmer's market. Yum! Enjoy!

The ten year old's fully loaded nachos!  Cheese, refried beans, sauteed veggies, tomatoes, avocados, green peppers, pea shoots, and alfalfa sprouts.

Nachos Supreme - topped with spicy sauteed veggies!

Saute over medium-high heat 4-5 minutes:
2 Tbsp olive oil
1-2 cups thinly sliced cabbage
1-2 cups thinly sliced kale
1 carrot, grated
1/2 onion, sliced

Add, then cook until desired vegetable crispiness/softness (approx. another 3-6 minutes):
1-2 tsp chili powder (add more for a spicier topping)
1-2 tsp cumin powder
1-2 tsp garlic powder
salt & pepper, to taste

While cooking the vegetables, warm tortilla chips topped with cheddar or mexican cheese blend in the oven at 375 F until melted, 3-5 minutes.

Serve tortilla chips onto plates and top with the following:
sauteed vegetables, from above
cheddar or mexican blend cheese
refried beans, warmed
pea shoots
alfalfa sprouts
diced tomatoes
diced green pepper
avocado (not local)

Served w/ cucumber & pears on the side just because the kids love them.
The 5 year old's nacho plate!  She ate it all - including all those wonderful vegetables - with a couple pieces of diced pear thrown in. 

Tuesday, 19 April 2016

Raspberry Baked Oatmeal

I've tried a variety of baked oatmeal breakfasts, but most fell short in their overall flavor without adding a little extra maple syrup.  I wanted something that we could slice and freeze to pop into lunches or slice and refrigerate to take as on-the-go breakfasts.  This hits the mark!  Raspberries add that extra pop of flavor that many of the other fruits I tried lacked.  While we love this best warmed up, it's been devoured cold, too.  A fun rotation to add as another gluten-free breakfast idea (just use GF oats).   Enjoy!
A slice of raspberry baked oatmeal, ready to eat! 

Raspberry Baked Oatmeal

Preheat oven to 375 F.  Line an 8" x 8" pan with parchment paper.

Mix together:
2 cups whole oats (use gluten-free if Celiac or sensitive)
1 tsp cinnamon
1/2 tsp salt
1 1/2 tsp baking powder

Add and mix in:
2 cups milk (lactose-free or dairy-free options work, too!)
1/3 cup maple syrup
1 cup frozen raspberries

Pour into parchment lined pan.  Bake at 375 F for 35 minutes.
Raspberry baked oatmeal, ready for the oven.  Fresh from the oven and set to cool. 
Set pan to cool on wire rack.  The dish will thicken as it cools.  Best enjoyed warm.  Once cool, it slices nicely and can be refrigerated or frozen in individually wrapped bars or squares to warm up anytime for breakfast or snacks.  We've often taken it frozen with us to eat later, like a granola bar.  Technically, you can eat it with a little maple syrup on top, but I found with the addition of the sweet raspberries, it didn't need any! Enjoy!  

Monday, 11 April 2016

Chicken Vegetable Pie and Biscuits

This dish is packed with veggies - leeks, mushrooms, onions, carrots, celery, peas topped with flaky biscuits.  I have listed this recipe in such a way that while things are cooking, you can stir occasionally and chop the remaining vegetables while things are simmering/cooking.  I, personally, find it helpful to have recipes listed in such a way that the ingredients and instructions are intertwined rather than having a large list of ingredients at the top followed by instructions at the bottom.  I hope you'll agree it's a helpful way to have a recipe, even if you have to skim through it all to find all the ingredients needed.  Ingredients are always in bold to help with this.  In this recipe, the addition of leeks adds wonderful flavor to the chicken vegetable pot pie taste.  The biscuits that cook right on top are wonderful! Light, soft, delicious.  A perfect accompaniment to this dish.  Enjoy!!!
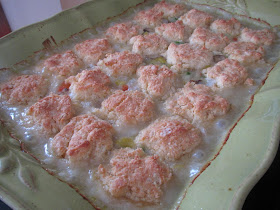
A delicious biscuit topping a pile of tasty vegetables & chicken. Yum! 

Chicken Vegetable Pie & Biscuits


Preheat oven to 400 F.


Melt in large, heavy pan:
½ cup butter

Stir vegetables occasionally, so you can chop veggies & cook at the same time! 

Add & cook for 5 minutes:
1 onion, coarsely chopped
3 carrots, sliced thinly

Add & cook 2-3 minutes: 
1 leek, sliced and rinsed

Add & cook 5 minutes:
3 celery stalks, diced
1 cup sliced mushrooms

Add & cook until bubbling, lower heat to medium-low and let simmer 5 minutes:
2 1/2 cups hot chicken broth/stock
Season w/ salt & pepper

Mix together first and then mix into bubbling vegetables to thicken:
1/3 cup milk
2 Tbsp cornstarch

Stir in and let simmer over low to medium-low heat for 5-10 minutes:
1 cup cooked chicken, chopped
½ cup frozen peas

While chicken and vegetables are simmering, prepare the biscuits for the top:

Make buttermilk in a measuring cup.  In a measuring cup place:
1 Tbsp lemon juice

Fill so you have a total of:
1/2 cup milk

Mix in a large bowl: 
1/2 cup brown rice flour
1/2 cup tapioca starch
1/4 cup corn flour (or corn starch, if you don't have corn flour)
1/4 cup potato starch
1/4 tsp xanthan gum
2 tsp baking powder
2 tsp sugar
1/2 tsp salt
1/4 tsp baking soda

Dice in with a pastry cutter:
5 Tbsp butter

Add & mix in just until a dough is formed:
1/2 cup buttermilk, from above

Put vegetables/chicken in large dish (9x13 size).  Cover with small scoops of biscuit dough pressed into little flat circles using your hands.  Bake at 400 F for 15-17 minutes until golden brown.   Serve and enjoy! 
Chicken Pot Pie & Biscuits, ready to cook! 
This dish is absolutely beautiful coming out of the oven with those golden biscuits.  

Tuesday, 5 April 2016

Homemade Funnel Cakes!!!!!!!!!

These are SO much fun to make.  The entire family loved them.  It was a little sad my eldest couldn't remember ever eating one of these at a fair, but now he can enjoy the taste of fair-fresh funnel cake at home! (Actually, my husband had no recollection of ever having a funnel cake either).  This recipe doesn't seem like it would make much, but it does make a lot, so I'd recommend making half a recipe unless you've got a big crew around to feed.  You can store batter covered in the refrigerator up to a few days, if you don't want to make them all at once.  Enjoy!
My very happy two year old with her funnel cake.
Pretty funnel cakes, crazy squiggly cakes were so fun to make!

Homemade Funnel Cakes!
Serves 12-15 easily.  A great recipe when you have lots of friends or family around to share!

Heat over medium-high heat in a high-sided frying pan:
1/2 - 1" avocado oil (or another frying oil of your choice - I love frying in avocado oil as I find it lends a light flavor and provides a nice crispness)

Mix together until smooth (an immersion blender works nicely):
1 1/2 cup milk
2 eggs
1/2 cup light brown sugar
2 1/2 cups Kristin's Gluten-Free Flour Mix
2 tsp baking powder
1/4 tsp cinnamon
pinch nutmeg
Fresh batter, poured into a squirt bottle to pipe onto the hot oil.

Pour carefully into a squeeze bottle.  Drizzle onto hot oil, as desired.  Make sure they're not too large so you can easily flip them with a large, slotted spatula.

Cook about 1-2 minutes until funnel cakes are looking browned.  Flip over carefully.  Let cook an additional 30 sec - 1 minute before removing to paper towel-lined cookie sheet.
These cook up quickly, so keep your eyes on them! 

You may need to add a little extra oil to the pan if you're running low.  These don't need a lot of oil to cook in.
Fresh, hot funnel cakes, ready to eat!
Serve warm/hot with powdered sugar sprinkled over top!  Pretend you're at a fair and enjoy!

Saturday, 2 April 2016

Aussie Bites!

These are so delicious!  I'm actually posting it now because it's much easier to read than my terrible handwriting, and I want to whip up another batch!   We love to have granola bar type snacks around, and this is a great option, packed with a variety of seeds, oats and cranberries or raisins.  The little bit of brown sugar in these adds just a touch of caramelized taste.  And who ever knew honey, butter, vanilla and baking soda would smell so wonderful mixed together.  Enjoy!

Gluten Free Aussie Bites!!! 

Aussie Bites!
Makes 16 larger bites or 32 smaller bites

Set oven to 350 F. Lightly butter/grease mini muffin pans.

Mix in a small bowl:
1 Tbsp chia seeds (I used coarsely ground white chia seeds)
3 Tbsp warm water

Melt together:
2 Tbsp honey
1/3 cup butter

Mix briefly together in a small bowl, then add to melted butter/honey mixture:
2 tsp hot water
3/4 tsp baking soda
1/2 - 1 tsp vanilla

Set aside melted butter while you mix together the following dry ingredients in a large bowl:
2/3 cup whole oats (use gluten-free if sensitive or Celiac)
1/3 cup oat flour (use gluten-free if sensitive or Celiac)
1/2 cup unsweetened shredded coconut (fine)
1/4 cup dark brown sugar
1/3 cup raisins and/or dried cranberries
2 Tbsp raw sunflower seeds
2 Tbsp small pumpkin seeds
1 Tbsp sesame seeds
1/8 - 1/4 tsp salt

Mix both the butter/honey/baking soda mixture and chia seeds mixture into the dry ingredients until thoroughly incorporated.  Scoop 2 Tbsp scoops into each buttered mini muffin pan hole.  (You can make smaller ones, just add 1 Tbsp batter per muffin pan hole, and lower the baking time by 2-3 minutes).
Batter in buttered muffin tins, ready for baking!
Bake at 350 F for about 9-11 minutes, until golden brown.  Let rest in the pan for 10-15 minutes before removing carefully to wire rack.  You may want to cut briefly around the edges of each tin to release the muffins from the side.  Cool fully on wire rack.  Enjoy!!!
Fresh from the oven!  Let them rest 10-15 minutes like this before removing.
Tasty Aussie bites, ready to eat! 
Enjoy!