Search for a Recipe

Pages

Wednesday, 23 October 2024

Low Refined-Sugar Pumpkin Cake!

A delicious pumpkin cake, with low refined-sugar and some extra eggs and cottage cheese (or sour cream) for a bit of extra protein. Is it still a cake? Yes. But it's less sweet than my usual pumpkin spice layer cake. We like having a slice for breakfast, too.  Enjoy! 
A yummy slice of pumpkin cake

Low Refined-Sugar Pumpkin Cake!

Preheat oven to 350 F. If desired, line 9 x 13 pan with parchment paper. Or butter lightly. 

Note* You can halve this recipe and still bake in a 9 x 13 pan. It works perfectly, and just bakes in about 30-35 minutes instead of 50.

In a bowl, whisk the dry ingredients: 
1 - 1 1/2 tsp cinnamon
1/2 tsp nutmeg
1/2 tsp allspice
1/2 tsp ginger
1/4 tsp cloves
2 tsp baking powder
1 tsp baking soda
1/2 tsp salt

In a large bowl, mix together or blend to smooth it out a bit (you can use a stick blender to smooth, or mix the wet ingredients together in a blender):
2 cups pumpkin puree (homemade or canned 100% pumpkin)
6 eggs
1 cup cottage cheese OR 1 cup sour cream
2 tsp vanilla bean paste or extract
1/2 cup oil
1/2 cup maple syrup OR agave syrup
1/2 cup brown sugar
1/4 cup molasses

Mix together the dry and wet ingredients, just until combined.  Spread in a 9" x 13" pan lined with parchment paper.  
Batter, ready to pop in the pan.
Ready to bake!
Bake at 350 F for ~50 minutes, until nicely browned.  (If you've halved the recipe - or want divide this and to bake two thinner pans of cake, bake for ~30-35 minutes)


Cool on cooling rack. You can remove from the pan using the parchment paper to support once it's cooled 15-20 minutes.  Let the cake fully cool before frosting.  If you're impatient, you can eat it while warm and just add a dollop of frosting onto each piece before serving.

Beat the following by hand OR in a mixer until nice and smooth:
2 Tbsp butter, softened
3 oz cream cheese, softened
1 - 2 cups powdered sugar  (I find you can just adjust how much milk is added depending on the amount of powdered sugar being used, and it ends up being quite nice either way)
1 tsp vanilla bean paste OR vanilla extract
1-2 tsp milk, added slowly, until desired thickness

Spread the top with the cream cheese frosting. Serve and enjoy!  Leftovers can be stored in the refrigerator. 
A yummy healthy pumpkin cake, ready to eat!

Healthy-style Pumpkin Cake Recipe by Successfully Gluten Free!

Monday, 14 October 2024

Pumpkin Scones

 After tasting some delicious gluten-free pumpkin scones at a bakery down in the US, it was time to do some experimenting to create some at home. We've all been very happy eating the results of my experimenting. These yummy scones are soft and fluffy and just delicious. Enjoy! 

A delicious light and fluffy pumpkin scone - these with a bit more of a "glaze' than I'd normally go for, but my daughter was working with me and wanted a generous amount of cream cheese glaze on these ones.  Other glaze options are listed below!
Fresh from the oven!

Pumpkin Scones

Preheat oven to 425 F. Line a cookie sheet with parchment paper. 

In a large bowl, mix together: 
1/4 cup white sugar
1/4 cup brown sugar
2 tsp baking powder
1 tsp salt
1 tsp pumpkin spice blend

Chop in with a pastry blender until the butter is small pea-sized pieces or smaller throughout: 
1/2 cup butter, chilled (not softened)

In a small bowl, whisk together (you'll use ~1/2 for the dough and the rest for brushing the tops of your scones):
1 egg
1/4 cup heavy/whipping cream

Mix into your flour mixture: 
3/4 cup pumpkin puree (homemade or canned)
~ 1/2 of the egg/cream mixture (If your pumpkin puree is very wet, you can use less of this mixture - if your pumpkin puree is on the drier side, you'll want to use more. You'll use the rest of the egg/cream mixture for brushing the tops of your scones)

Work quickly, and knead the dough a few times.  Most people like to flatten their dough and cut out the pieces, but I find with this dough it's best to quickly scoop using a large cookie scoop and flatten or shape by hand, as desired, on a parchment-lined pan.  
You can easily and quickly shape this dough into triangles, if you prefer those for your scones. Personally, I find being able to scoop and flatten quickly works well for me! Especially while cooking with my daughter - who took many of these photos as we baked these.

Brush the top of the scones with:
leftover egg/cream mixture
Brushing the tops with the leftover egg + cream mixture. (Exciting moment here - I'm actually in a photo!)

Sprinkle the tops with a bit of coarse sugar or a bit of extra brown or white sugar.
Sprinkled with sugar and ready for baking!

Bake at 425 F for 17 - 20 minutes, until nicely browned.   

Let rest for a few minutes before removing scones to a cooling rack. 
Cooked and cooling. You can glaze while warm and eat them immediately, if you prefer. 

Whisk together a quick glaze to drizzle on top of your pumpkin scones. There are a few options: 
1) 1 Tbsp butter, softened + 1.5 oz cream cheese, softened + 1 cup powdered sugar + 1-2 tsp milk (or a little more to desired consistency)
OR 
2) 1 Tbsp maple syrup + powdered sugar to desired consistency
OR
2) 2 tsp milk + 1 tsp vanilla extract + powdered sugar to desired consistency

You can drizzle it with a spoon, or scoop your drizzle into a ziploc baggie, snip the corner, and neatly drizzle over your scones.  
These ones are obviously with the cream cheese glaze - and a very generous amount of it.  Which glaze you use depends on your preference and mood at the time. ;) 


Pumpkin Scones Recipe by Successfully Gluten Free!

Monday, 7 October 2024

Pigs In A Blanket

 Fun and easy gluten-free pigs in a blanket! The dough is based off my naan bread recipe, which remains one of our favorite breads and pizza crusts to make.  By piping the dough onto a bit of cornstarch, you can use a nice soft dough to end up with a soft breading around your pigs in a blanket, which is so delicious! I find that you need a much wetter batter when making gluten-free breads, which can make the dough difficult to work with and shape.  This method worked great! My girls love helping make these. Enjoy!
Fresh, homemade pigs in a blanket
Brushing them with butter before rising and baking. 

Pigs In A Blanket

Makes 20 pigs in a blanket, plus any extra stuffed cheese balls or pizza crust you'd like to make with excess batter. 

Preheat oven to 425 - 450 F. Line a pan with parchment paper. 

Slice in half and set aside: 
1 package hot dogs (I like to use no nitrate ones)

Typically 10 hot dogs are in a package, so you'll end up with 20 half hot dogs to roll up for your pigs in a blanket. 

In a mixer, combine: 
2 tsp xanthan gum (there is some in the flour mix, but you'll want a little extra)
1 Tbsp rapid-rise/quick yeast
2 tsp garlic powder
1 Tbsp dried onion flakes (optional)
1/2 - 1 tsp red chili pepper flakes (optional)
1 tsp freeze-dried or dried cilantro (optional)

Add, and beat 2-3 minutes, until nice and smooth: 
2 1/4 cup milk, a little warmer than room temperature (lactose-free works well)
2 eggs
1 tsp apple cider vinegar (optional)

Scoop the batter into a large freezer ziploc bag. Cut off ~1/2" from the corner.  

To make your pigs in a blanket, have arranged on the counter your parchment-lined baking sheet, one or two pieces of plastic wrap, and the plate with cornstarch, below. 

On a plate put: 
~1/2 cup cornstarch
They love making these. 

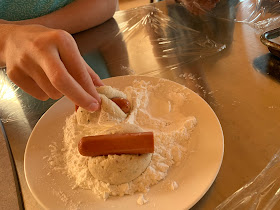
Pipe dollops of dough onto the cornstarch. Press a hot dog piece down into the middle of a dollop of dough. Gently fold the dough up and around the hot dog, using a bit of cornstarch on the dough to avoid sticking.  Lift your pig in a blanket onto the piece of plastic wrap, and gently roll back and forth to smooth it a bit and remove a bit of excess cornstarch.  Place seam side down on the parchment-lined pan.  Repeat with the remaining hot dog halves until you have a full pan of pigs in a blanket. 

After piping a dollop of dough, press the hot dog into the center.
Gently pull up, using a bit of cornstarch, to avoid sticking.
Place on a piece of plastic wrap (helps make for easier clean-up)
Roll gently to smooth out the dough.
Place your pigs in a blanket on a parchment-lined baking pan. 
They did a great job!
Brush the rolled pigs in a blanket with:
1/4 cup melted butter

Happily brushing with melted butter. 
Ah, now she's happily brushing with melted butter.

If you have extra dough, you have a couple fun options to do with the excess: 
1. You can spread the dough on a parchment-lined pan and bake to make a pizza crust. Bake immediately or let rise and bake ~10-12 minutes, or until a deep golden brown.
2. You can pipe dough onto the cornstarch and then fill with chunks of cheese instead of hot dog, then fully wrap the dough around the cheese, placing seam-side down on the pan. Rise and bake like the hot dogs. Some may leak cheese, but we find they're a delicious treat.
Here's a few cheese-filled rolls made with extra dough. Also brushed with butter prior to rising.

Let the pigs in a blanket rest to rise for ~15 minutes.  Bake at 425 - 450 F for ~17 - 20 minutes, until a deep golden brown.  Remove from oven and place your hot dog filled rolls on a wire rack to cool. 
Resting to rise 15 minutes prior to baking.
Fresh from the oven. 
These can be served right away! We like to put whatever your preferred hot dog toppings directly onto the plate and dip the pigs in a blanket into them.  Cooled leftovers can be placed in a ziploc bag and frozen. My girls love taking these for school lunches with a little container of ketchup. They're defrosted by lunch and they can warm them briefly in the microwave at school. Fun! Enjoy! 
Cooling after baking. Ready to eat!

Pigs In A Blanket Recipe by Successfully Gluten Free!