Search for a Recipe

Thursday, 21 November 2013

Garlic and Spinach Fusilli

Garlic, spinach,  parmesan and feta (optional, but recommended!) on fusilli make for a delicious combination in this easy, throw together-type meal.  I was looking for something light (i.e. without tomatoes) to make over pasta that used up some of the organic baby spinach I had, and ended up with this yummy dish.  We've made it many times since, and it's a delicious meal the whole family has loved. Enjoy!


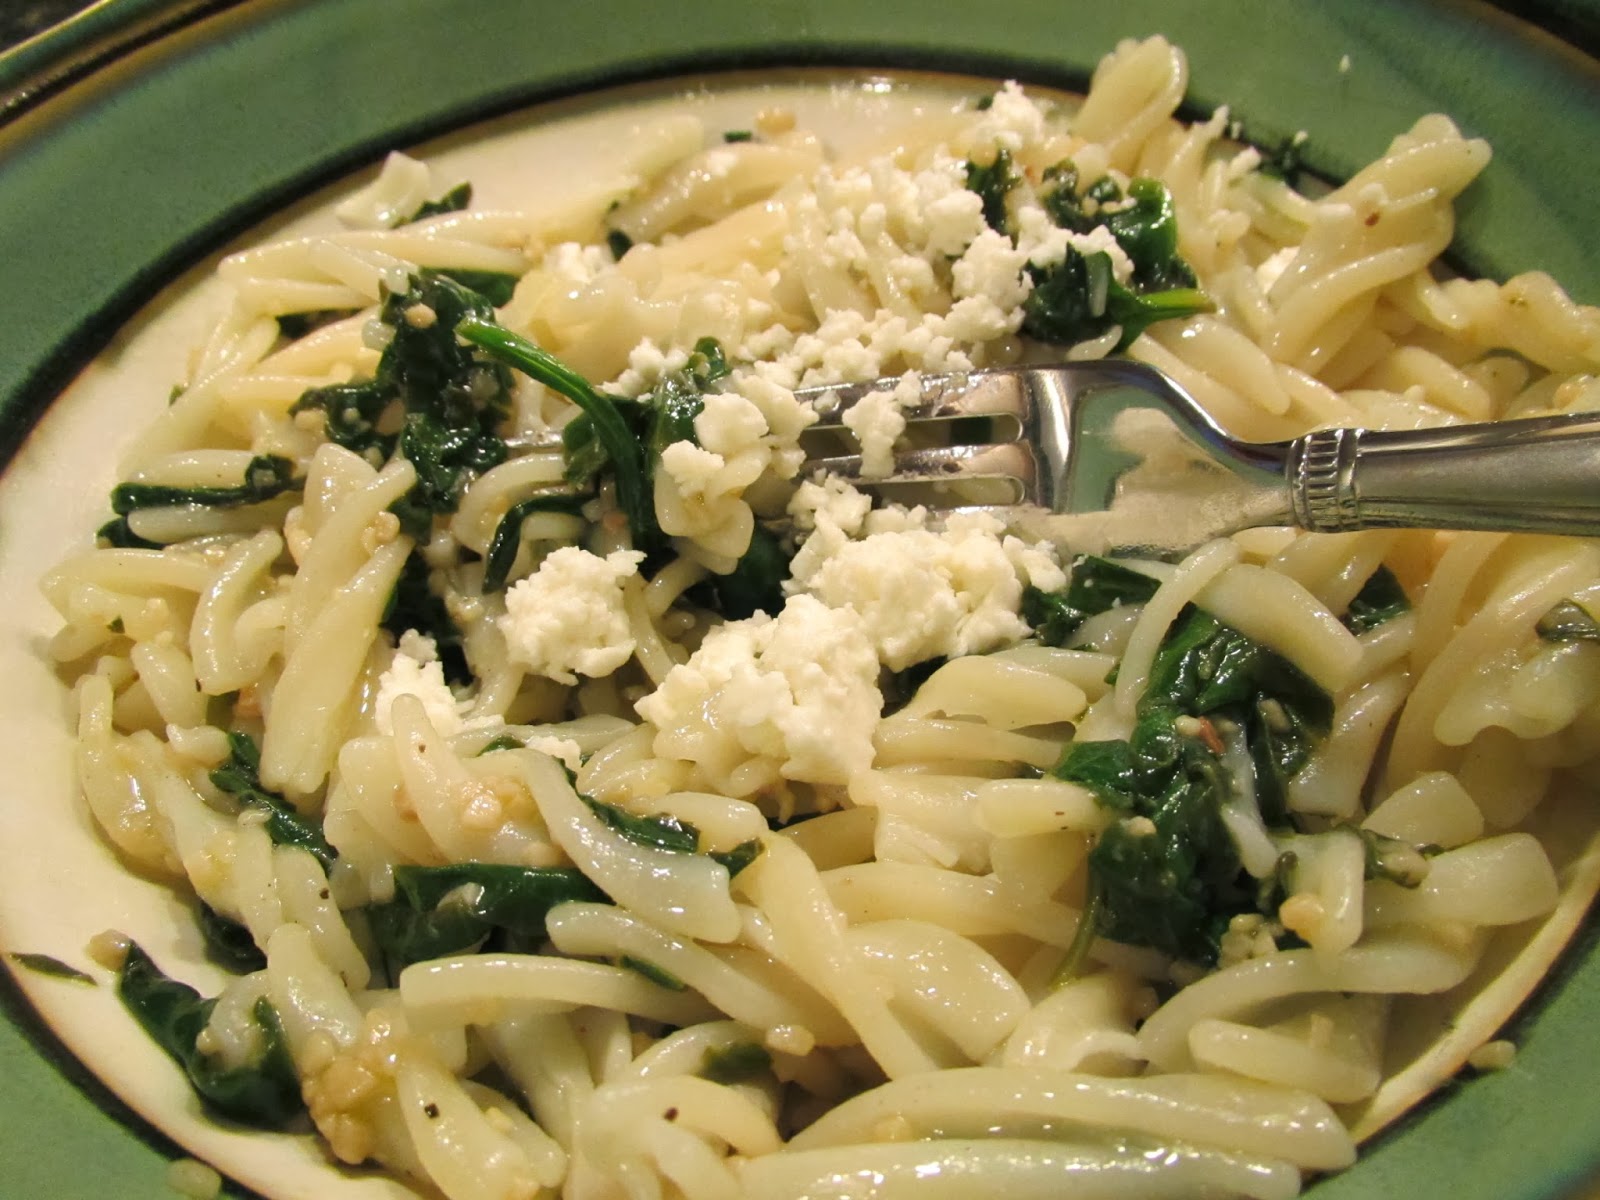
Garlic & Spinach Fusilli
Serves 4
Recipe modified from GoGoQuinoa

Cook 1 pkg (225g) gluten-free fusilli pasta according to directions, tasting occasionally towards the end so you get the noodle cooked as you prefer.  (A quinoa-rice fusilli noodle adds nice flavor and fiber)

Once you have the pasta cooking, prepare the following:

Heat in a large frying pan over medium heat:
4 Tbsp olive oil (If you have access to flavored olive oils, this is best - something with a bit of lemon or basil/oregano is perfect - I like to use a Melanese-flavored olive oil from Liquid Gold)

Add an cook 1-2 minutes:
2-3 tsp minced garlic

Add and mix in, just until softened:
1 bag pre-washed baby spinach, sliced (bunch spinach together with your hands and slice through several times with a large knife)

Add some salt & pepper and cook 2-3 minutes.

Remove from heat and mix in:
1/4 cup grated parmesan cheese

Toss spinach mixture with drained/rinsed fusilli noodles, and serve hot. 
Sprinkle some crumbled feta cheese over the top before serving (optional, but the combination of garlic/spinach and parmesan/feta is very nice).
Enjoy!!!


Wednesday, 20 November 2013

Chewy Gingersnap Cookies

These are delicious, chewy, and puffy gingersnap cookies - perfect for the winter season.  And, the best part about them is you don't have to refrigerate the dough before you roll it in sugar and bake it!  This turned out to be a happy side-effect of turning my friend Julie's recipe into a gluten-free version of her favorite chewy gingersnap cookies.  One thing I love is converting long-loved recipes into gluten-free versions so they can still be happily enjoyed.  You can make these cookies flatter (just flatten a bit more) or keep them puffier (don't flatten as much).   Perfect for the holidays, too! Enjoy!

Julie's favorite Chewy Gingersnaps (now Gluten-Free!) fresh from the oven!

Chewy Gingersnap Cookies
Makes 48 small (1Tbsp) or 24 large (2 Tbsp) cookies

Preheat oven to 375F.  Line 2-3 cookie sheets with parchment paper or silicon lining.

In a large bowl, mix dry ingredients: (it is important to mix dry ingredients separately in GF baking to avoid clumping/uneven cooking)
1 cup white rice flour
1/2 cup brown rice flour
1/4 cup tapioca starch
1/4 cup potato starch
3/4 tsp xanthan gum
2 tsp baking soda
1/2 tsp salt
1 tsp ground cinnamon
1/2 tsp ground ginger
1/4 tsp ground cloves

Beat in a mixer until fluffy:
1/2 cup + 2-3 Tbsp brown sugar
1/2 cup butter
3-4 Tbsp oil

Add an mix in:
1/4 cup molasses
1 egg

Mix dry ingredients into wet ingredients until thoroughly combined.

Prepare a plate or bowl with white granulated sugar

Scoop 1 Tbsp or 2 Tbsp scoops of cookie dough into the sugar and roll until evenly coated.  Place on prepared cookie sheets.   Press lightly with a fork to flatten a bit. 

Bake at 375F 5-7 minutes for smaller cookies and 7-9 minutes for larger cookies.  (If you cook the cookies longer than this, you'll end up with crispier cookies instead of chewy ones)
1 Tbsp sized cookies pre- and post-baking.

Cool on cooling rack.  These cookies store really well in a tupperware at room temperature for several days.  We found they tasted even better the next day!
Enjoy!

Thursday, 14 November 2013

Delicious Gluten-Free Carrot Cake (nut-free!)

One of my favorite types of cake is a nice carrot cake with cream cheese frosting.  I've made all sorts of renditions of this cake over the years, some with parsnips, some with nuts, some with pineapple and coconut.  However, I wanted to come up with a proper gluten-free carrot cake that is just that - a carrot cake, without any of those other ingredients.  My brother inspired me to get the ball rolling on this recipe since he had a friend in the hospital (with many allergies, one of which is an allergy to gluten) whose one food request was a gluten-free carrot cake.   I am so proud of him for taking the initiative and making this cake, and I hope it was enjoyed as much by his friend as much as it was in my own house.  Enjoy!

If you're patient (which I clearly wasn't), and let your cake chill for 1-2 hours in the refrigerator, the cake will slice very cleanly if you use a serrated knife.  Yes, I should've taken another picture, but we preferred just to eat the cake rather than take pictures of it. Enjoy!

Delicious Gluten-Free Carrot Cake
Makes 9x13 cake OR two 9" rounds to be stacked

Preheat oven to 350F.
Grease/butter & flour (using GF flour mix) either 9x13 pan OR two 9" round pans.

Mix in one bowl:
3 cups grated carrots (4-5 carrots)
1 1/2 cups sugar
4 eggs
1 cup vegetable oil
2 tsp vanilla extract or vanilla bean paste

In a separate bowl, mix the following:
2 cups Kristin's Gluten-Free Flour Mix
1/2 tsp xanthan gum
1 1/2 tsp baking powder
1 1/2 tsp baking soda
1/2 tsp salt
2 tsp ground cinnamon

Combine dry ingredients with wet and mix with a spoon until well combined.  Pour into 9x13 OR two 9" round pans. 

Bake round pans 30 minutes or rectangle for 40 minutes.  If you use a toothpick to check, it should come out clean when inserted into the center of the cakes.

Cool round pans on wire rack 10 minutes.  Then, carefully remove from pan and let fully cool on the cooling rack.  If you make the 9x13 cake, place the pan on a wire rack and leave the cake in the pan to fully cool. 

Once cake(s) are fully cool (1-2 hours), frosting with cream cheese frosting, below.

Cream Cheese Frosting:
For a lighter frosting, use this amount.*  If you like a generous frosting, double this recipe. 
*Note: It's tricky to frost a layered cake with a lighter amount of frosting.  If you're not feeling confident in your cake-frosting skills, double the batch and you won't have anything to worry about. 

Beat in a mixer:
4 oz cream cheese, softened
3 Tbsp butter, softened
1 tsp vanilla extract or vanilla bean paste

Add and mix in, 1/2 cup at a time:
3 cups powdered sugar

Frost top-only of the 9x13 cake.

To frost the two rounds and make a layered cake, put 1/3 of the frosting on top of one layer. 

Carefully place the other layer on top.  Put a very thin layer of frosting over the top and sides of both cakes.  Let this sit in the refrigerator 15 minutes, just to set the frosting. (This is a great technique you can use with any cake.  It traps any small crumbs of cake into a very thin layer of frosting, so when you put on the remainder of the frosting you won't end up with any cake-crumbs in your frosting! Yay!) 
Lightly frosted cake, chilled in the refrigerator, making the remaining frosting job much easier.

Using the remaining frosting, frost first the top and then sides of your cake.  You can use swirling motions to create a bit of a decorative pattern in your completed cake. 

My double-layer cake with lighter frosting, and some swirls added around the top.
Lacking patience to wait for the cake to chill, which make the slices much cleaner.
One of my brother's cakes.  He made 2 round cakes, but didn't stack them.  Great job, Mike!

Enjoy!

Spinach & Grape Tomato Pasta

This is just a simple, but filling meal for those weekdays when you're short on time.  The nice organic grape tomatoes were at the grocery store, and combining that with organic baby spinach seemed like a great way to add some good veggies to our evening meal.  It's hard to show in a picture, but the grated parmesan melted right into the dish. Yum!  It was delicious, and we'll definitely be having this quick and easy meal again. Enjoy!

Freshly tossed pasta - ready to eat! 

Spinach & Grape Tomato Pasta
Serves 4

Boil a large pot of water for your gluten-free pasta.  Cook pasta according to package.  (I used a 4 grain gluten-free spaghetti pasta here)

As soon as you put water on to boil, begin making your sauce as follows:

Heat in a large frying pan over medium heat:
2 Tbsp olive oil

Add and cook 1-2 minutes:
1 Tbsp minced garlic

Add and cook until just starting to wilt:
2 big handfuls baby spinach, sliced (I used about half a bag - this recipe is forgiving, so use more/less as you like.  To slice spinach, bunch together and slice through with a knife, like you would with fresh herbs)

Add and mix in:
1/2 - 3/4 cup grape tomatoes, sliced in half

Cook, stirring, until spinach is nicely wilted.  Then cook another 1-2 minutes. 

Add 1/2 jar of your favorite pasta sauce.  (I love the Classico 4 cheese sauce in this recipe).   Let simmer 5-10 minutes, while your pasta is cooking. 

Remove from heat.  Mix in:
1/4 - 1/2 cup grated parmesan. 

Toss pasta with sauce (make sure you rinse your GF pasta to remove excess salt)
Serve and Enjoy!

Wednesday, 13 November 2013

Chicken, Spinach & Feta Quiche w/ Buttermilk Biscuit Crust

Once the weather turns cooler, we love to have quiche around here.  I've previously posted recipes for veggie quiche and broccoli-bacon quiche, but I often forget to pay attention to what I'm throwing together when I make quiche.  So, I've been trying to be better about making notes so I can post recipes when they turn out particularly well.  I put this together for a dinner with friends.  The quiche recipe turned out wonderfully! It's definitely flavor-filled, with lots of fresh veggies and herbs enhanced by the feta cheese.  It was delicious both hot and cold.  Enjoy!

Gluten Free Chicken Spinach and Feta Quiche with Buttermilk Biscuit Crust
GF Quiche - A slice of quiche - look at all those colors!


Chicken, Spinach & Feta Quiche w/ Buttermilk Biscuit Crust

Heat oven to 425F.  Get yourself out a pie pan.
I tend to make a full batch of buttermilk biscuits and use half for the crust and just cook the other half as biscuits.  But, if you just want to make the quiche, mix the crust as in the recipe below. I sometimes add a little bit of flaxseed and corn flour to my quiche biscuit crust.
First, prepare the veggie filling:

Heat 1 Tbsp olive oil in large saucepan over medium heat.

Add and sauté 3-5 minutes:
½ cup red bell pepper, finely chopped
¼ - 1/3 cup fresh chives, chopped
Just before adding in minced garlic to sautee.  I wanted to give an idea of how I coarsely chop my spinach - it doens't need to be done finely at all.
Add and sauté 1-2 minutes:
1-2 Tbsp garlic, minced

Add and mix in, cooking until spinach has wilted:
1 bag fresh spinach, sliced (bunch the spinach together, and slice through with a knife to coarsely slice)

Set veggies aside to cool and prepare the rest of the quiche.

To ready the crust:
First, make your buttermilk (or just use ¼ cup buttermilk)
In a measuring cup place:
1 ½ tsp lemon juice OR white vinegar

Fill so you have total of:
¼ cup milk (lactose-free works great)

Mix in a bowl:
¼ cup brown rice flour
¼ cup tapioca starch
2 Tbsp cup cornstarch OR corn flour (not cornmeal) for a heartier crust
2 Tbsp cup potato starch
1 Tbsp flaxseed meal (optional, but a nice addition, I find)
1/8 tsp xanthan gum
¾ tsp sugar
1 tsp baking powder
¼ tsp salt
pinch of baking soda

Add and dice in with a pastry cutter:
2 ½ Tbsp butter

Add and mix with a spoon, just until combined:
¼ cup buttermilk (from above)

Spread biscuit dough as evenly around pan as you can, using spoon. Press biscuit dough gently into pie pan.  If the batter is sticky, put a tiny bit of water on your fingertips to help. (I find it tends to be sticky, but don’t worry about it not being evenly spread – it will rise during baking)

Don't worry about it being perfect. The best part about a buttermilk biscuit crust in quiche is that is is very forgiving since it rises/spreads while cooking! 

Spread on the bottom of the biscuit crust:
¾ cup crumbled feta cheese

On top of cheese spread:
Cooked veggies
Feta topped with sauteed veggies

Sprinkle over veggies:
1 cup cooked chicken, chopped
¼ cup fresh basil, sliced/diced

I find it's best to have the basil mixed up a bit with the chicken, so you don't end up with all the basil on the top of your quiche.

Mix together in a separate bowl:
4-6 eggs (4 cooks faster, but you’ll have a smaller quiche, I prefer 6 myself, especially for this quiche which has a lot of filling)
1/3 - ½ cup milk (lactose free works great)
Salt
Pepper (be generous)

Pour egg mixture carefully and evenly over the top of the fillings.   Pop in the oven!

Bake 10 min at 425F. Lower heat to 350F and cook 20-25 minutes more, until center is set (doesn’t jiggle when you gently shake the pan).

Remove from oven. Let cool 10-15 minutes before cutting. 
Fresh out of the oven!
Great warm or cold!   Enjoy!

Sunday, 10 November 2013

Oatmeal Peach & Mango Bars

I regularly make my Oatmeal Berry Jam Bars, then slice and freeze them so we have snacks for lunches or other occasions.  This alternate version of those bars was so different in taste (and yet equally delicious), I thought it was worth posting on it's own.  I used a deliciously chunky peach-based jam for these bars.  In fact, they were being eaten so quickly in my house, I had to quickly snatch a handful out to freeze for lunches!  Enjoy!


Oatmeal Peach & Mango Bar

Preheat oven to 350F. Butter a 9x13 pan.
Mix the following:
1 ½ cups Kristin’s Gluten-free Flour Mix *see note below
¼ tsp xanthan gum
1 ½ cups regular oats (make sure they’re gluten-free, if Celiac or sensitive)
1 cup packed brown sugar
1 ½ tsp baking powder
¼ tsp salt
Add and cut in with pastry cutter until you have coarse crumbs:
¾ cup + 1 Tbsp butter

Put half the mixture in your pan. Press gently to flatten a bit.
Spread evenly (and gently) over the base:
2 cups peach-based jam (I love using a peach, mango and orange preserves jam by E.D. Smith, but any nice peach (or peach-mango)-based jam will work as well.  If the jam is more chunky than smooth, I find this is even better in the end result!)
Sprinkle the top with the other half of the mixture. Press down gently.

Bake ~40-45 minutes until golden brown. Let cool before cutting. I find these are best eaten after waiting several hours to overnight. We love to cut them into squares and put in those snack-sized freezer bags and freeze. Pop them in the kid’s lunches for a snack! Enjoy!
* If you don’t want to make a full batch of Kristin’s GF flour mix – just use the following for this recipe:
¾ cup brown rice flour, ¼ cup sorghum flour, ¼ cup cornstarch OR 3 Tbsp arrowroot starch, 2 Tbsp potato starch, 2 Tbsp tapioca starch, ¾ tsp xanthan gum

Wednesday, 6 November 2013

Julie's Brown Bread - Gluten-Free!

My friend Julie has a brown bread recipe that she likes to make every year for the holidays.  She cooks it up in large metal tins (like the kind a large pineapple juice may come in), so it ends up round.  It's both tasty and fun!  Since Julie has a wheat allergy and feels better eating a gluten-free diet, so I thought it was important to convert her favorite bread recipe into a delicious gluten-free version!  I made the recipe for 2 large regular bread loaves here, but you can make this recipe into round loaves, too. Just butter your large tin cans - and I'd use 3 cans in place of 2 loaves of bread.  *Update: you can also make it in 6 mini loaf pans, too!  Shortens your rising and baking time, too! 

A large loaf, fresh out of the oven! 
Mini loaves, fresh from the oven. Yum!  (I removed them from the pan just after taking this picture).

Julie's Brown Bread - Gluten Free!

Makes 2 large loaves or 6 mini loaves.

Butter 2 large bread pans or 6 mini loaf pans. (Or line with parchment paper)  Preheat oven to 350F.

In a 4 - 6 cup bowl or measuring cup, pour 1 1/2 cups boiling water over:
1 cup whole oats (Use gluten-free oats for Celiac or if you are sensitive)
1/4 cup butter, chopped
Mix together and set aside to soak/cool.

In a large bowl, mix dry ingredients: (It's important to mix dry ingredients separately from wet ingredients in gluten-free cooking)
2 Tbsp rapid-rise/quick yeast
2 Tbsp xanthan gum
2 tsp salt
3 cups brown rice flour
2/3 cup sorghum flour
1/2 cup arrowroot starch (or cornstarch)

In a mixer, mix together:
1/2 cup milk
2 tsp apple cider vinegar
5 Tbsp sugar (OR 2 Tbsp sugar + 3 Tbsp honey)
4 Tbsp molasses
6 eggs (or 4 eggs + 4 egg whites)

Add in dry ingredients + oats/butter mixture.  Mix 3 minutes on medium speed.   Separate between two bread pans, smoothing tops as best you can.  I find it best to wet your hands and use them to smooth the tops of the loaves nicely.  Pans should be 3/4 full.

Let rise, uncovered, in a warm location until the dough has risen just so it's even with the top of your pan (20-30 minutes). 
  
Batter scooped in and ready to rise.  Let it rise until it's even or just puffing over the top of the pan. 
Mini loaf pans were also filled 3/4 full, flatted with wet hands, then sat to rise uncovered on top of the warm stove.  Just after they reached the height of the pan, they went in the oven. 

Bake at 350F ~45 minutes for large loaves, ~30 minutes for mini loaves.  Remove from pan to wire rack to cool. 
I used silicon bread pans here, so they widen a bit during cooking. 

Slice and serve with butter (or butter + molasses, a New Brunswick tradition and a PEI favorite).  It is also nice for sandwiches, too!
Enjoy!
Freshly sliced and ready for butter!