Search for a Recipe

Tuesday, 29 March 2016

Light & Delicious Spring Salad

Recently, we've discovered pea shoots and how very much we all love them.  They're one of the few salad-type greens that all three of my kids love and devour without complaint!  They eat them plain like they'd eat sugar snap peas. We've been finding fresh pea shoots and alfalfa sprouts (and other sprouts!) at the local farmer's market for the past month or so, although I think we may have to try growing some ourselves sometime soon.  Everything in this salad except the avocado was grown locally!  Such a delicious blend of early summer goodness with a dash of flavorful balsamic & olive oil on top.  Enjoy!
Spring Salad packed with pea shoots and alfalfa sprouts! 

Light & Delicious Spring Salad

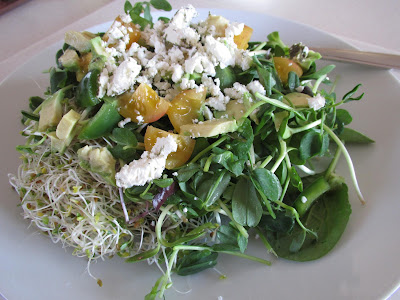
Prepare salad with the following: (feel free to add other ingredients, if desired)
baby spinach
pea shoots, rinsed & dried
alfalfa sprouts, rinsed & dried
avocado, diced
yellow tomatoes, diced
green peppers, diced
herb goat cheese, crumbled

Drizzle overtop, or mix together in a small bowl and then drizzle overtop:
ginger-blackberry balsamic vinegar*
olive oil

If desired, you could add fresh or dried fruits like pear, apple, or cranberries.  Pecan nuts would taste nice with this salad.  You could also add grilled shrimp, grilled chicken, or black beans on top for extra protein.

Enjoy!

*Flavor-infused balsamic vinegar & olive oil are becoming more widely available.  I found mine locally at Liquid Gold olive oils & vinegars in downtown Charlottetown. 

Sunday, 20 March 2016

Homemade Peach Salsa (mild, medium & hot options)

This is a wonderfully delicious peach salsa my friend Julie and I make each year.  I've included a mini-batch measurement below, in case you want to just cook some up to pop into the refrigerator to enjoy.  And I've included a larger batch below.  Everyone who's eaten it likes it so much, when we make peach salsa we tend to make a day of it and whip up a lot of batches of the large batch listed below so we have plenty to share with friends.  I've included a picture at the end of what our fall peach salsa making day looked.  We're the first to admit we may have a problem.   I'm happily supplying this recipe as requested by some church friends.  We love peach salsa with tortilla chips or on extreme nachos or homemade tacos.  Enjoy!!!

Fresh, hot peach salsa.  Using red cayenne and scotchbonnet peppers will give a more red overall salsa.  The green jalapenos will give a more orange color to your salsa. 

Homemade Peach Salsa
Make a mini or large batch - both recipes are listed below:

A few notes before you get started:

1. Use ripe peaches.  Under-ripe will lack the sweetness.  Over-ripe will be difficult to work with.  Perfectly ripe peaches can be peeled quickly with a veggie peeler and dice neatly and quickly in the food processor.  You can use the food processor to chop the onions, red peppers, and hot peppers, too!

2. Options for adjusting the spice-level are listed in each recipe.  You can adjust by altering type and amounts of hot peppers used - described in each recipe where it lists jalapenos.  You can also lower the amount of ground cayenne pepper used, although I'd recommend keeping at least 1/2 the recommended amount since you want a little spice to counter the sweetness of the peaches.

MINI Batch of Peach Salsa: 
Makes ~2.5-3 500 ml jars of salsa (~5-6 cups salsa)

Prepare the following fruits, vegetables and herbs and mix together in a medium-sized pot:
3-4 lbs ripe peaches (peel with veggie peeler, remove pit, and chopped fine to medium-fine in a food processor)
1 1/4 cups red onion, chopped (about 3-4 red onions)
4 jalapenos, finely chopped (mild - remove seeds for very mild salsa) OR 1/2 scotch bonnet, finely chopped (medium) OR (1 scotchbonnet + 1-2 cayenne pepper, finely chopped) (hot)
1 red peppers, chopped
1/3 cup cilantro, chopped & loosely packed
1/2 cup white vinegar
2 Tbsp honey
1 1/2 tsp minced garlic
1 1/4 tsp ground cumin
1/2 tsp ground cayenne pepper (less, if you prefer less spicy salsa)

Bring to a boil over medium-high heat, stirring regularly. (If you want to process your jars, boil 5 minutes and proceed as instructed in the large batch recipe, below).  For a refrigerator batch, boil salsa 10-15 minutes. You can lower the heat a bit while this is cooking if it's boiling too much.  Remove from heat.  Cool and store in the refrigerator.  Best enjoyed within 1-2 weeks.

LARGE Batch of Peach Salsa - to can in glass jars
Makes about 8-9 500 ml jars of salsa (~16-18 cups)

Prepare the following fruits, vegetables and herbs and mix together in a large pot:
~10 lbs ripe peaches (peel with veggie peeler, pitted, and chopped fine to medium-fine in a food processor)
3 3/4 cups red onion, chopped (about 3-4 red onions)
12 jalapenos, finely chopped (mild - remove seeds for very mild salsa) OR 1 scotch bonnet + 1-2 cayenne peppers, finely chopped (medium) OR (3 scotch bonnets + 3-4 cayenne peppers, finely chopped) (hot)
3 red peppers, chopped
3/4 - 1 cup cilantro, chopped & loosely packed
1 1/2 cup white vinegar
6 Tbsp honey
3-4 tsp minced garlic
4 1/2 tsp ground cumin
1 1/2 tsp ground cayenne pepper (less, if you prefer less spicy salsa)

Cook in very large pot over medium-high heat, stirring regularly until salsa mixture comes to a boil.  Boil 5 minutes.  Can in hot, prepared 500 ml glass jars.  Water bath jars for 10 minutes to process.  Pull out of the boiling water.  Let rest 5-10 minutes before removing to a table to fully cool.  Store jars in a cool, dry location (like you would other canned items).

Peach Salsa!!!  Mild, Medium, & Hot.  We like peach salsa just a little bit. 

Wednesday, 16 March 2016

Homemade Oreos!!!

These were such a hit, we've made them several times since!  You can leave them plain or sprinkle the edges with holiday sprinkles.  Perhaps green for St. Patty's Day this week?!   If you cook them less, they'll be nice and soft.  But you can cook them a little longer to get the nice, crunchy Oreo cookie taste, too!  Enjoy!!!
Gluten-Free Homemade Oreo Cookies!!! 

Homemade Oreos!!!
Makes ~ 14 oreos (it really depends on the size of cookie you make)

Mix together in a small bowl:
1/2 cup cocoa powder (I used a light Dutch Barry Callebaut cocoa powder)
1 cup Kristin's Gluten-Free Flour Mix
1/2 tsp baking soda
1/2 tsp cream of tartar

Beat in a mixer:
1/2 cup butter, softened
3/4 cup powdered sugar

Add to butter/sugar:
1/2 egg, mixed (mix up 1 egg, then pour about half into the batter, or just double the recipe)
1 tsp vanilla extract (or vanilla bean paste)

Mix dry ingredients into wet ingredients, just until thoroughly combined.

Scoop small 1-2 tsp sized scoops onto parchment paper or silicon-lined baking pan.
Flatten with a piece of plastic wrap oven your hand (or the bottom of a glass).
Scoop small cookies on your prepared tray and flatten. 

Bake cookies at 375 F for about 6-8 minutes.  Less time will give a chewy cookie, more time will let the cookie crisp up nicely.  Just don't let them cook too long or they'll burn!
Let cool and then fill with frosting! 

Let cool on a cooling rack.  Fill cookies with my favorite Marshmallow Frosting recipe.  Roll in coarse sugar or sprinkles, if desired.   These store nicely in a tupperware.
Pink sprinkles requested by my daughter.
One happy son helping decorate Valentine's cookies. 

Wednesday, 9 March 2016

Delicious Peanut Butter Granola Bars

These delicious Peanut Butter Granola Bars have had rave reviews from all family and friends who have tried them.   They are SO easy to whip together, too! They're a wonderful mix of toasted oats & seeds and peanut butter & honey.   They're great for school or to bring to work.   They have a lovely mix of salty and sweet, which is delicious in a granola bar.  The freshness will make you never again want to eat a store-bought bar.  Enjoy!
Wonderful, creamy, nutty, peanut butter granola bars! 

Delicious Peanut Butter Granola Bars
Makes one 8" x 8" pan.  Serves ~12

Preheat oven to 325 F.

Mix together in a large bowl:
2 1/2 cup large rolled oats (use gluten-free if Celiac or sensitive)
1/2 cup pumpkin seeds
1/2 cup sunflower seeds
1/8 tsp salt
4 Tbsp oil (I used Canola oil)

Spread onto an unlined cookie/baking sheet.
Oats & seeds ready to toast lightly in the oven! 

Bake at 325 F for about 15 - 20 minutes, until just starting to brown.  Remove pan to cooling rack.  (You don't need to let these cool.  Just mix the following together after you remove the oats/seeds from the oven).

Mix together in a large bowl (you can use the same bowl as before):
1/2 cup raisins
2/3 cup creamy peanut butter *
1/4 honey
1/4 cup agave nectar

Add and mix thoroughly:
Oven-roasted oats/pumpkin seeds/sunflower seeds, from above

Press into an 8" x 8" pan lined with aluminum foil.
Bars before covering/pressing down with plastic wrap.

Press top of bars down with plastic wrap.  Refrigerate, covered by plastic wrap, at least 4 hours until cool.  Slice and wrap individually, if desired.  Store a couple weeks in the refrigerator, slicing off pieces as you want.  Or, you can slice and freeze individual pieces for later!
Enjoy!

* I used Skippy Brand creamy peanut butter.  I do find different brands of peanut butter have different tastes, and this is one of our favorite types - although we like the natural butters a lot, too! 

Friday, 4 March 2016

Gluten-Free Hearty Crepes (with Buckwheat Flour)

A wonderful, delicious breakfast, lunch or dinner!  We love crepes around here!  The combination of flours I've used here work really well together.  The addition of rich buckwheat flavor in combination with other flours gives a hearty taste without seeming overwhelming.  I've made crepes using all or mostly all buckwheat flour before, and they're nice with savory fillings, but the flavor tends to be a bit too strong for my preference.  Dinner guests had rave reviews for these crepes, too! The crepes even worked well using them in lieu of tortillas and whipping up quesadillas for the kids.  They were terrific!  Enjoy!
Gluten Free Hearty Crepes!
Hearty Gluten-Free Crepes with buckwheat flour! 

Gluten-Free Hearty Crepes

Makes 24

Heat crepe pan over medium-high heat.  I use it to melt the butter.

Blend together until smooth. I use a stick blender.
4 eggs
2 cups milk
2/3 cup cold water
1/2 cup arrowroot starch (or cornstarch, if you don't have arrowroot starch)
1/2 cup cornstarch (or you can replace with an additional 1/2 cup buckwheat flour)
1/2 cup buckwheat
1/2 cup brown rice
1/2 tsp baking soda
1/2 tsp salt
2 tsp cinnamon
4 Tbsp melted butter

Add about 1/4 - 1/3 cup batter to pan, swirling so it spreads evenly and thinly over crepe pan.   Cook until it looks dried on one side. Flip and cook briefly on the other side until crepe is fully finished.  Slide onto a plate and repeat with remaining batter, stacking crepes directly on top of one another until done.

Serve with sweet or savory fillings.  My kids love them with nutella, banana and whipped cream after they've had their savory-filled crepe.  One savory crepe idea is shown below. Enjoy!
Throw some sharp cheddar, cooked chicken, and roasted veggies inside a crepe and heat for a delicious sandwich! 
A hearty crepe filled with roasted veggies, meat & cheese served along with salad for a full meal.  

Gluten-Free Hearty Crepes with Buckwheat Flour by Successfully Gluten Free!

Sunday, 28 February 2016

Kristin's Homemade Rice Crackers

Finally!  A delicious cracker that's both easy, crispy (and stays crispy for several days!), and can be easily modified to add desired flavors.  I've tried many cracker recipes that just didn't have the taste and texture I was wanting - which mean I often ended up making our favorite 'cheez-it' style crackers.  But, I still wanted a plain cracker that could be used for dipping or topping without having cheese added into the dough.  The trick, I found, is using cooked short-grain brown rice - it's stickiness is perfect for these crackers.  I loved brushing these with a spicy chipotle-infused olive oil before baking, but you can use the olive oil of your choice.  These are ready to eat fresh out of the oven, or you can cool them to eat later.  Enjoy!
Homemade Gluten Free Rice Crackers
Delicious homemade gluten-free crackers, ready for toppings!  

Kristin's Homemade Rice Crackers
Makes about 24

Preheat oven to 350 F.

Mix together with a spoon:
1/2 cup cooked short-grain brown rice
1/2 cup Kristin's Gluten-Free Flour Mix
1/4 tsp salt
1/8 tsp baking soda

Add:
5 Tbsp cold water

Mix until dough just holds together.  You can add another tablespoon of water if it's too crumbly.  

Scoop dough onto parchment paper.  Top with plastic wrap and roll dough until it's nice and thin - however thing you want your crackers is how thin you should roll it.  Remove plastic wrap.  Slice the parchment paper onto a cookie sheet.

Brush the top with:
1 Tbsp olive oil (herb-infused or chipotle-flavored olive oils are delicious)

Sprinkle the top lightly with:
fresh ground salt

Bake at 350 F for 15 minutes.  Remove from oven.  Slice into cracker-sized squares and flip all squares over. (OR, you can flip the whole thing first, then slice into cracker-sized squares). 
Bake an additional 5-10 minutes.
Gluten Free Homemade Rice Crackers

Cool on a wire rack and eat hot, warm or cool.  Great with sharp cheddar cheese, or any favorite cracker toppings.  Store in a tightly-sealed Tupperware.  These are best within the first few days to retain crispness.   

Monday, 22 February 2016

Fabulous Caramel-filled Brownie Petit Fours

In my opinion, a 'petit fours' should be small, beautiful and delicious - and typically look like a mini cake.  Often petit fours are coated in a glaze or frosting on the outside, but they don't need to be.  I created this recipe for my son's 10th birthday.  He took some to school and we had some (many) for home celebrations, too!  They were a great success!  They're wonderful at room temperature, but we soon found out that if you warm them up just enough that the frosting starts to melt, they turn themselves into a delicious version of a molten chocolate cake.  Such fun!  Enjoy!

Caramel-Filled Brownie Petit Fours that my son took to school to share on his birthday.  

Fabulous Caramel-filled Brownie Petit Fours
Makes ~24 two-layered petit fours

Preheat oven to 350 F.  Line a cookie sheet with parchment paper.

Mix together in a large bowl until smooth (a spoon or whisk will work fine):
1/2 cup butter, melted
1/2 cup oil
1/2 cup cocoa powder

Add and mix in until smooth:
4 eggs
1 cup white sugar
1 cup brown sugar

Mix in gently, just until combined:
1 cup Kristin's Gluten-Free Flour Mix
1/2 tsp baking powder
1/2 tsp salt

Pour batter onto parchment paper-lined cookie sheet.
Don't worry about pushing the batter all the way to the edges.  It will spread naturally during baking and fill the pan.
Bake at 350 F for ~18-20 minutes.  Place pan on a wire rack.  You can either slice immediately into small squares (2" - 3" depending on the size you'd like) or cool completely and then slice into squares.  I have found waiting until the brownies are cool gives a sharper edge to the squares.
I cut 6 x 8 squares, with little edges left over for snacking.
Allow brownies to cool completely.  While brownies are cooking, make a small batch of caramels, as follows:

Homemade Caramels: 

Butter one 8"x8" pan.

In a medium-sized saucepan over medium heat, combine:
2 Tbsp butter
3/4 cup whipping/heavy cream
1 cup brown sugar
1/4 cup light corn syrup
pinch salt

Cook until caramel reaches 234-235 F on a candy thermometer.  Immediately remove from heat and mix in:
3/4 tsp vanilla bean paste OR vanilla extract

Pour caramels into buttered 8 x 8 pan and set on wire rack to cool.

Once brownies are completely cool and caramels are mostly cool (they can be a little warm to assemble and it's fine), prepare one batch of my Chocolate Marshmallow Fluff Frosting.

To assemble, place a brownie on a new piece of parchment paper.  Pipe chocolate frosting around the edges of the top of the brownie square.  Cut and place a square of homemade caramel in the center of the brownie, inside the frosting (this keeps the caramel in nicely).  Top with a 2nd brownie square.  Pipe a little swirl of frosting on top.  (I had a little extra white marshmallow fluff frosting, so I did swirls on the tops of a few of them).
Brownie squares with a piping of frosting and square of homemade caramel between.  
Chocolate two-layered petit fours are the in the back of this photo.  They were so pretty and delicious, too!

You can serve immediately or store in a closed container.  These can be stored several days in the refrigerator.  Allow them to come to room temperature before serving, or heat them up a little, just until the frosting is melting, for more of a molten-chocolate cake type dessert.   Enjoy!!!!
Chocolate & Vanilla/raspberry (recipe to come) petit fours served with extra caramel warmed up and drizzled overtop! 
One happy birthday boy (and his equally happy sister)!