Search for a Recipe

Monday, 18 July 2016

Monkey Bread!

There's nothing yummier than warm monkey bread.  This gluten-free version is easy to mix together, and then you can scoop with a spoon to dip in butter and then your cinnamon sugar mixture.  Drizzle a little frosting on top to turn it into 'gorilla bread'.  Once cooled, you can also slice thick slices and toast or use in homemade french toast.  Suggestions for a stickier/gooier monkey bread are at the bottom**.  This bread is similar to my popular cinnamon swirl bread -  but the monkey bread adds a fun dimension with pull-apart cinnamon-buttery goodness. Enjoy!
Homemade Gluten-Free Monkey Bread! 

Monkey Bread
Makes two large loaf pans or one 9 x 13 pan

Preheat oven to 350 F.  Butter 2 large loaf pans.

Mix together in a mixer:
1 cup brown rice flour
1/2 cup white rice flour
1/2 cup tapioca starch
1/2 cup potato starch
1/2 cup arrowroot starch
2 tsp xanthan gum
2 tsp quick rise yeast
1 tsp salt

Add, mix in slowly.  Increase speed and beat 3-4 minutes:
1 1/4 cup warm water
1 Tbsp honey
1 1/2 Tbsp maple syrup
4 Tbsp oil
3 eggs
1 tsp apple cider vinegar

While dough is beating, prepare the following:
1/3 - 1/2 cup melted butter

In another small bowl, mix:
1/2 cup brown sugar
1 - 2 Tbsp ground cinnamon

Dip heaping teaspoonfuls of dough half into melted butter, then in cinnamon-sugar mixture.  Using a second spoon, scrap into large bread pans.  Repeat until each pan is 1/2 filled.  Cover with plastic wrap and let rise in a warm location until doubled in size.


Bake at 350 F for 35 - 40 minutes.  Let rest 5 minutes before removing to cooling rack to cool.   This bread can be pulled apart to eat or cooled and sliced.  Slice and freeze leftovers. Leftover slices reheat nicely in a toaster oven.

To turn your "monkey bread" into "gorilla bread" by whisking together a little cream cheese frosting and drizzling over the top of your bread once it's on the cooling rack.

Cream cheese frosting: 
Mix together until smooth:
1.5 oz cream cheese, softened
1 Tbsp butter, softened
3/4 tsp vanilla extract
1 cup powdered sugar
milk, to desired consistency

**For a stickier/gooier bread, scoop spoonfuls into a buttered 9 x 13 pan.  Heat together an additional 1/2 cup butter + 1/4 cup brown sugar until sugar crystals have dissolved.  Drizzle over pan before baking.  Bake 30 - 35 minutes until nicely browned.   Serve warm and upside down for a nice sticky sweet bread. 

Enjoy!

Wednesday, 13 July 2016

Homemade Strawberry Ice Cream! (with lactose-free option)

Up here on Prince Edward Island it's strawberry season, so it seemed the perfect time to whip up a batch of easy, homemade strawberry ice cream!  This recipe does require the use of an ice cream maker.  I have a Kitchen-aid ice cream maker that connects into my regular machine that I've been happy with.  My parents and sister have a Donvier, which they both love.  This recipe is for machines that suggest a typical timeframe of ~25 minutes to churn out a batch of ice cream.  Remember ice cream expands during churning, so your bowl will look only 1/3-1/2 full at the beginning, but will look quite full by the end!

Freshly churned strawberry ice cream after chilling for a few hours in the freezer post-churn.

Homemade Strawberry Ice Cream! (lactose-free)
Makes ~ 1.5 quarts

Prepare strawberries (below) before beginning to use your ice cream maker.

Mix together:
1 cup whole cream + 2 cups 2% milk OR 3 cups half/half cream OR 3 cups 10% lactose-free cream (If they sold 15% lactose-free cream, that is what I'd use, so go with what's available near you.)
1 cup sugar
3 Tbsp fresh lemon juice
1 tsp vanilla extract (or vanilla bean paste - my preference in ice cream)

Freeze in machine for about half of the freezing time directed (I usually mix between 12-15 minutes before adding fruit).  Then, add:
1 cup finely diced strawberries + 1 Tbsp sugar (once diced, chill in the refrigerator at least 1 hour)

Continue mixing in the ice cream maker for another 10-15 minutes (or until directed by your machine).

Once ice cream has frozen you can eat it!  Or, if it's seeming like it's mostly frozen - sometimes with lower fat content, using the 10% cream, the ice cream struggles getting thick enough in the mixer alone - working as quickly as you can, transfer your strawberry ice cream to a container with lid you can put in the freezer.  Immediately place covered ice cream in the freezer.  Let ice cream fully harden for at least 3-4 hours.  The ice cream will have a nice light texture and taste amazing once fully chilled.

Yes, you can eat it immediately after making it in the container, but I always find it melts quickly because it hasn't had the extra freeze time.  If you want to scoop proper ice cream cone-style scoops, it's best to freeze first.  Scoop and enjoy!!!!

Tuesday, 5 July 2016

Peanut Butter Chocolate Chip Cookies - Gluten Free & Dairy Free!

These delicious, chewy peanut butter chocolate chip cookies are free from both gluten and dairy, something I found myself needing to make for allergy purposes.  Of course, they do have peanut butter, so don't eat them, mom!  On the day of, these cookies have a chewy inside and crispy edge to them.  Stored overnight in a tupperware and they'll be a bit softer and chewier - absolutely delicious.  They went quickly! Enjoy! 
Fresh gluten-free and dairy-free peanut butter chocolate chip cookies!  Yum! 

Peanut Butter Chocolate Chip Cookies - Gluten Free & Dairy Free! 
Makes ~48 small cookies

Preheat oven to 350 F.  Line cookie sheets with parchment paper.

In a large bowl mix the dry ingredients:
¼ tsp xanthan gum
¾ tsp baking soda
¾ tsp salt

Cream the following either in a mixer or by hand:
½ cup coconut oil (use as a soft solid at room temperature, not in liquid form)
¾ cup creamy peanut butter
1 cup brown sugar (light or dark, depending on flavor preference)

Add and mix:
1 egg
1 - 2 Tbsp dairy-free milk (coconut, almond, soy - less for puffier cookies, more for more spread out cookies)
1 Tbsp vanilla extract

Add the dry ingredients into the wet ingredients and mix until combined.

Add the following and stir to combine:
½ cup mini semi-sweet chocolate chips (make sure they're labelled as milk-free, if needed - there is a nice brand that is milk, soy, nut free that we like)

Scoop 12 cookies per cookie sheet, using heaping teaspoon OR 1 Tbsp mini cookie scoop.  

Bake at 350 F for 9-10 minutes.  Let cool briefly on pan before removing to wire rack to fully cook.   

Cool fully before serving.  Store in a sealed container at room temperature, or freeze for later.  We found these are the sort of cookies that taste even chewier (and some might say even better) a day later when they've had a chance for the flavors to meld together, becoming tastier, softer and chewy.  Enjoy! 

Wednesday, 29 June 2016

Sauteed Beet Greens

I have never been so pleased to be wrong about a vegetable in my life.  Beet greens - the green, leafy tops of fresh beets are delicious! (Beet greens are best eaten within a day or two of picking, but are okay in the refrigerator up to a week in a plastic bag).  I'm not really a fan of beets.  I enjoy them in small quantities grated in a salad.  I will eat a piece or two if roasted, and the occasional pickled beet is a nice addition to a summer BBQ.  But beet greens are their own vegetable entirely.  They remind me of collard greens but without all the cooking time.  Delicious, easy, a nice side dish to add to a wide variety of meals.  The following is based on the recipe posted by Heartbeet Organics, where we get our tasty summer vegetables.  Enjoy!

Sauteed Beet Greens

Over medium heat cook for 1-2 minutes:
2 Tbsp olive oil
2-3 garlic cloves, minced
1 small onion, diced

Add and cook until greens are nicely softened:
1 bunch beet greens, torn into 2-3" pieces (don't worry about them being even, they shrink up nicely)

Add salt and pepper, to taste.

Serve alongside your meal as a healthy, hearty side.

- I served it as a side with bagels with lox and cream cheese.  It was delicious piled on top of the bagel alongside fresh arugula and dill.
- Any BBQ-style meal would be nicely enhanced with freshly sauteed beet greens.
- Rice & beet greens would be nice to accompany pan-fried pork or a similar dish.

Enjoy! 

Saturday, 25 June 2016

Tasty Chicken Saag

We just love Indian food around here.  I love that it's always packed with vegetables, and leftovers are fun to use on top of things like pizza or in sandwiches.  We get creative.  This dish has several steps, though many are short and easy.  I've written it out so directions and ingredients are interspersed.  All ingredients are in bold, making it easy to skim through and make sure you have all you need to prepare this tasty dish.  Every time I've whipped this together, I get cheers - which I find entertaining coming from a 2, 5 and 10 year old (plus my husband).  I'll be posting a fun pizza recipe to make with leftovers soon, too.  Enjoy!
GF Chicken Saag served with basmati rice!  

Tasty Chicken Saag
Based off a recipe from "Best Ever Indian" by Baljekar, Fernandeze, Husain & Kanani 
Serves 4-6

Mix together in a small bowl, set aside:
250 g/8 oz frozen spinach, thawed (OR fresh spinach,  diced and wilted in a pot with lid w/ no extra water)
2 tsp grated ginger
2 tsp minced or grated garlic
1 finely minced chili OR dried, finely chopped chili ~1 tsp

In a large, low side frying pan with lid cook over medium to medium-high heat for 2 minutes:
1 Tbsp oil (olive oil or similar will work)
1/4 tsp peppercorns
1-2 bay leaves (REMOVE before serving, but leave in while cooking)

Add and cook 5 minutes:
1 onion, diced
1 cup mushrooms, sliced (optional)
Nicely sauteed, just browning mushrooms and onions
Add and cook 2 minutes:
2 cups diced canned tomatoes
2-4 tsp curry powder (this adjusts the spice level, depending on your curry powder)
1 tsp salt
1 tsp chili powder

Stir in spinach mixture from above, lower heat to medium-low and simmer 5 minutes.
Ready to add yogurt, milk and broth
Add the following and continue simmering, covered for 15 minutes:
3 Tbsp plain yogurt
3 Tbsp milk or cream
1/2 - 3/4 cup GF chicken broth or stock OR water + 2 tsp Asian Mushroom seasoning

Add the following and then simmer an additional 5 minutes, uncovered if you'd like to thicken it up a bit:
1 - 2 cups cooked, diced chicken
OR
1-2 cups diced paneer (an Indian cheese)
Fresh Chicken Saag, ready to eat! 
Serve the tasty chicken saag over fresh brown or white basmati rice.   Enjoy!
Delicious chicken saag, served with basmati and a lentil, potato, rice dish I'd whipped up, too.

Monday, 20 June 2016

Our Favorite Fried Noodles with Vegetables (and shrimp or chicken)

This is a dish I experimented with many times until I came up with a version I was really happy with.   You can use white or brown rice vermicelli noodles (although the white noodles tend to hold together better during frying).  We always loved getting fried noodles at the farmer's market, but I wanted a way to make them gluten-free and with more vegetables.  You can throw in any sort of meat you like, but I tend to use either shrimp or chicken when I whip this up.  The fried noodles have gotten rave reviews (and requests) since I first served them up.  It's a great summer dish when a wide variety of fresh vegetables are in season.  Enjoy!
Fried Noodles with Veggies - you can serve as-is or add shrimp or chicken! 

Fried Noodles with Vegetables (and Shrimp)

Bring water to a boil in a large pot.
Add:
1/2 - 1 package white or brown rice vermicelli noodles (depending on how many you want to serve. I make 1/2 package to serve ~4)
Let noodles boil for 1 minute at a rolling boil.  Remove from heat.  Drain and rinse well with water to remove starch.

Place noodles in a large bowl and mix with:
4 Tbsp avocado oil (or similar oil good for high-heat cooking)
4 Tbsp GF soy sauce (liquid Bragg's soy seasoning)

Set noodles aside while you cook the vegetables.

In a wok or similar large frying pan, saute over medium-high to high heat for 2-3 minutes:
2-3 Tbsp avocado oil (or similar oil good for high-heat cooking)
1/2 - 1 onion, sliced
1-2 carrots, thinly sliced

Add, and saute an additional 2-3 minutes:
1/2 celery root, thinly sliced & chopped to bite size pieces
1/2 red bell pepper, diced
1/2 - 1 cup mushrooms, finely diced

Add and cook 1 minute:
1 cup broccoli, chopped to bite-sized pieces.

Place vegetables in a large serving dish.

In small batches, fry noodles in additional oil 2-3 minutes.  Once fried, place noodles on top of hot vegetables.
Once all noodles are fried, in pan heat 1-2 minutes:
1 Tbsp oil
1-2 Tbsp GF soy sauce
1-2 cups cooked chicken, diced 
OR
1-2 cups cooked shrimp (thawed, deveined, no shell)

Put shrimp or chicken on top of noodles.  Toss together.  Serve immediately.  Enjoy!!!

Sunday, 12 June 2016

Kristin's Mint Triple Chocolate Cookies

These are one of my all-time favorite cookies!  I love them. My kids love them. My friends love them.  They're an all-time favorite.  I even whipped some up for my brother's big GF wedding dessert reception I did 18 months ago (my how time flies).  I have to make these tasty mint triple chocolate cookies sparingly, so I don't inhale them all.  Use high quality cocoa powder and chips.   Leftovers freeze perfectly, so you can definitely make ahead if you have a summer event to attend.  Enjoy!
Gluten Free Mint Triple Chocolate Cookies
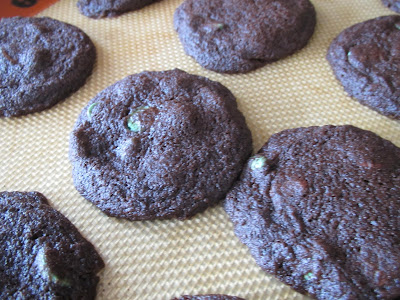
Gluten Free Mint Triple Chocolate Cookies! 
Kristin's Mint Triple Chocolate Cookies
Makes ~36

Heat oven to 350F
Line cookie sheets with parchment paper or silicon baking mat.

Mix together in a bowl:
1 cup white rice flour
1/3 cup dark cocoa powder (there are some extra dark cocoa powders, which have a different taste b/c of how they’re processed. I prefer the dark cocoa powder in this recipe to a normal cocoa powder)
½ tsp xanthan gum
½ tsp baking soda
½ tsp salt

In a mixer, beat until fluffy:
2/3 + 1 Tbsp butter
1/3 cup white sugar
½ cup light brown sugar

Add, and beat in:
1 egg
1.5 tsp vanilla

Add flour/cocoa mixture and mix, just until combined.

Add, and mix:
¼ - ½ cup milk chocolate chips
¼ - ½ cup semi-sweet OR dark chocolate chips
½ cup mint chips

Spoon by small cookie scoop (1 Tbsp-sized) onto baking sheets.  You can leave as-is, or flatten slightly, depending on your preference.

Bake 7-8 minutes.  It’s difficult to tell when chocolate cookies are done, but it should be clear that the cookie is cooked and no longer gooey in the center. Avoid over-baking!

Let rest a few minutes on the cookie sheet, then use spatula to remove from baking sheets to wire racks to cool.
Enjoy!
Gluten Free Mint Triple Chocolate Cookies
Gluten Free Mint Triple Chocolate Cookies!!!