Search for a Recipe

Monday, 30 January 2017

Hearty Round Rustic Loaf

The crust of this bread is nice and soft, although I'll be continuing to work on methods to also create a hearty bread with a thicker, crusty edge.  However, this is a wonderful bread-making method for times when I don't want the bother of buttering pans, or when I want something not loaf-shaped.  The addition of gluten-free sweet potato flour adds a rich, sweet taste to the bread.  Enjoy!

Hearty and delicious gluten-free round bread loaf

Hearty Round Rustic Loaf
Makes 1 loaf

Preheat oven to 350F.  Line a cookie sheet with parchment paper.

In a mixer combine:
1 1/2 cups brown rice flour
1/3 cup sorghum flour
1/3 cup sweet potato flour
1/3 cup arrowroot starch/flour
1 Tbsp xanthan gum
1 Tbsp rapid yeast
1 1/4 tsp salt

Add and beat 3-4 minutes:
1 cup warm water
1 tsp apple cider vinegar
2 Tbsp oil 
2 Tbsp honey 
2 Tbsp maple syrup
3 eggs

Fold in: 
1-2 Tbsp sunflower seeds (de-shelled, can use roasted)
1-2 Tbsp pumpkin seeds

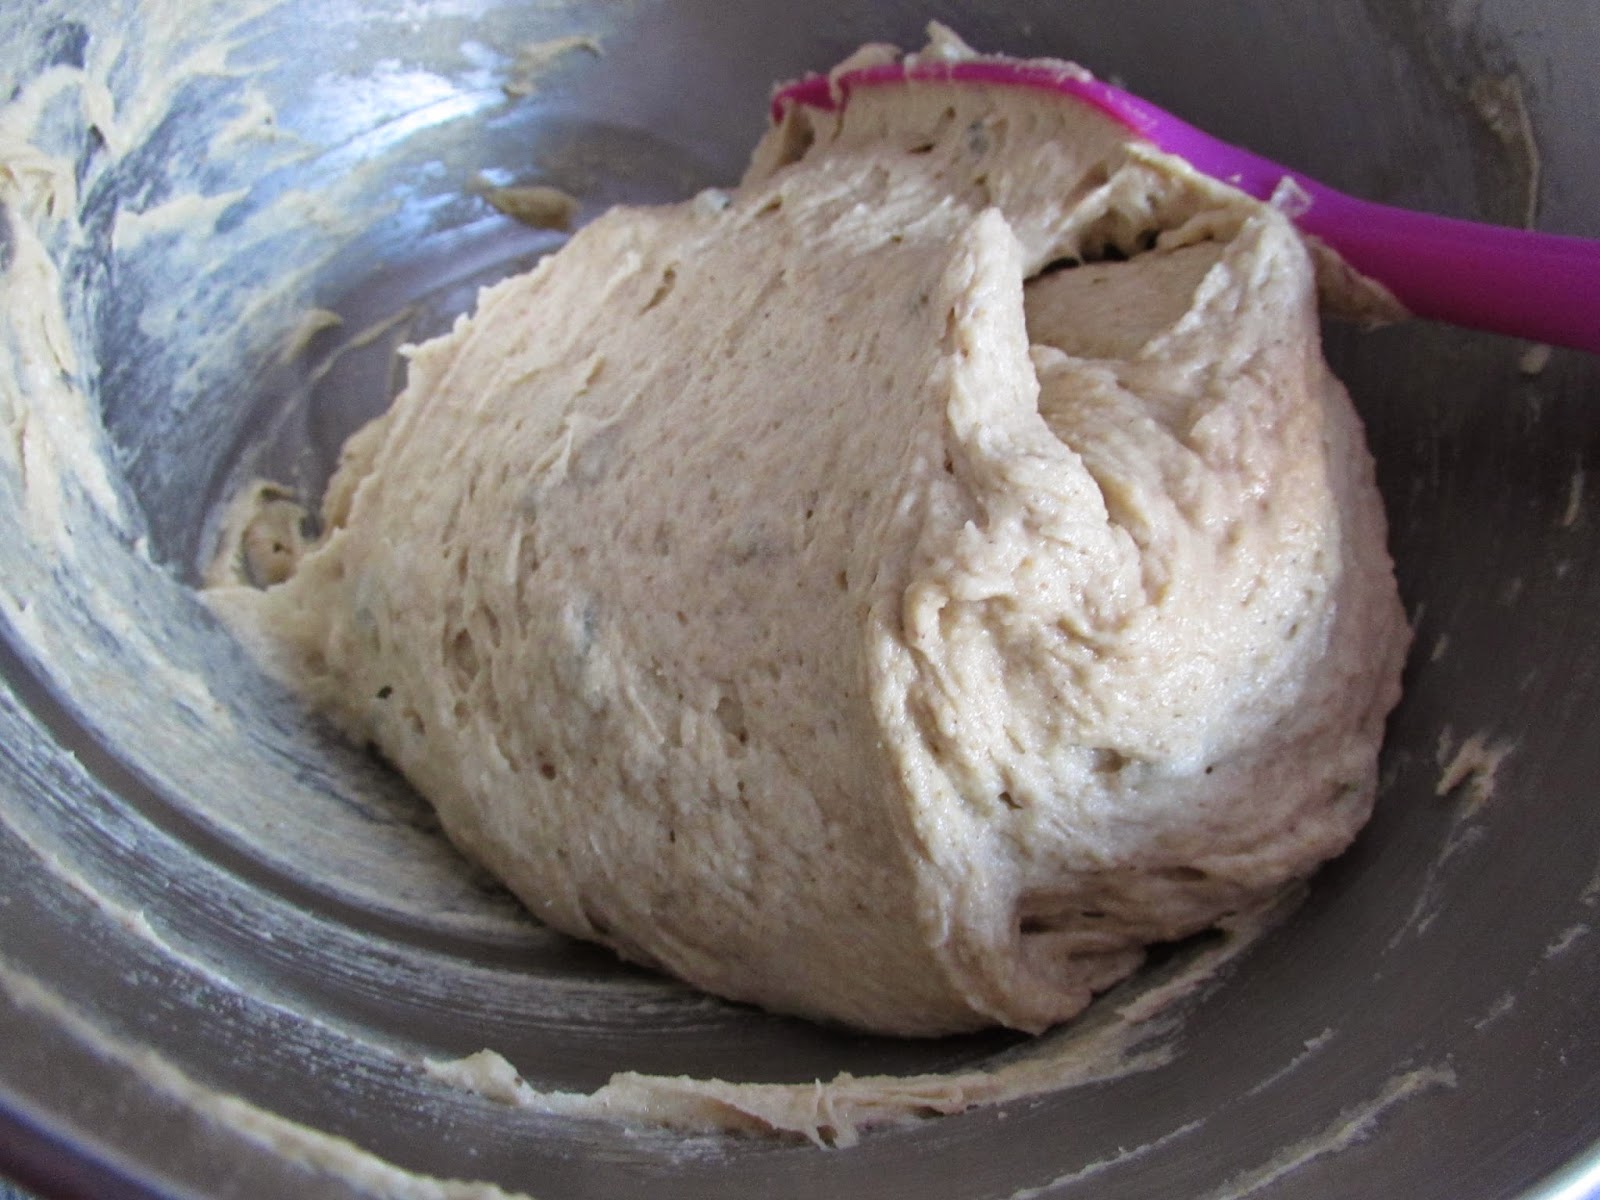
Using a spatula, scoop around the bowl to get a nice ball of dough.  Carefully spoon dough onto prepared pan.  Smooth top and sides, as desired, using spatula.  
Dough scrapped into a ball in the bowl using a spatula.
Spread the dough on parchment or silicon-lined pan and smooth out the edges.

Let rise in a warm location 30-45 minutes, until risen, but not yet doubled in size.  

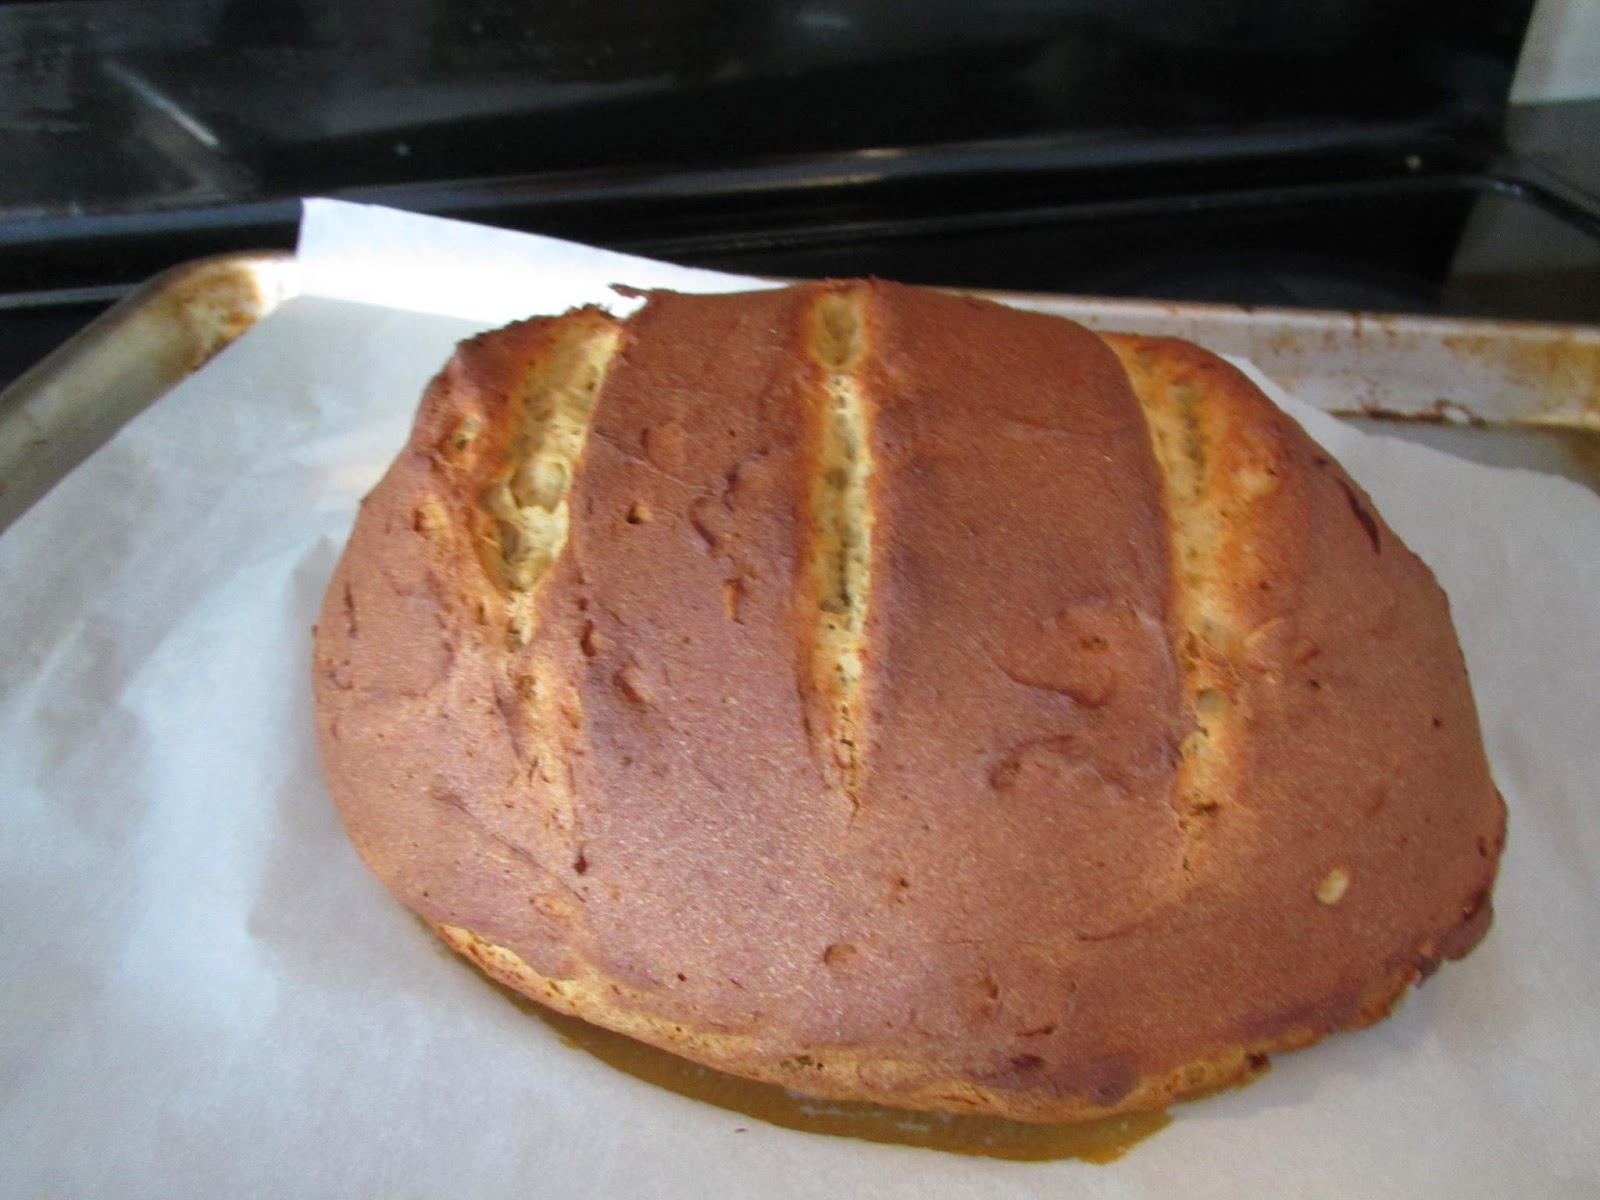
If desired, add a few slashes on top just before baking. It will keep the bread from cracking at random locations as it bakes.  Bake at 350F for 40-45 minutes, until dark golden brown.  Let cool on a cooling rack.   The bread will deflate slightly while cooling (similar to what happens with a regular loaf of bread).   Once cool, slice and serve.  Slice and freeze leftovers - they reheat well.
After the dough has risen, decorative slashes were made in the top of the loaf to give it a rustic look.
Bread after baking - it will have a nice, dark brown color.

Monday, 23 January 2017

Chocolate Coconut Donut Holes! (dairy-free option!)

These are similar to my glazed chocolate donut holes, only with some delicious tasty additions!  They were a huge hit with my family and the visitors we had over.  There are slightly different tastes in canned coconut, so you might have to experiment a couple times (such hardship to eat extra donuts) to see what your favorite brand is near you.  Some have a stronger coconut flavor and others are more subtle, letting the coconut flakes do the work for you.  If you wanted, you could toast your coconut for an extra crunch on the outside of your donut holes! Yum! Enjoy!

Gluten Free Chocolate Coconut Donuts
Gluten Free Chocolate Coconut Donut Holes, ready to eat! 

Chocolate Coconut Donut Holes! (dairy-free)
Makes ~36 donut holes or a combination of mini donuts/donut holes

In a bowl, whisk together:
1 1/2 cups Kristin's Gluten-Free Flour Mix
1/2 cup cocoa powder
1/2 cup sugar
3 tsp baking powder
1 tsp cinnamon
1/2 tsp salt

Start heating 1" Avocado Oil (or other frying oil of your choice, but this makes the MOST delicious crisp edges on the donut holes) in a high-sided frying pan over medium-heat.  I tend to re-use frying oil several times, particularly if frying non-meat/fish items like donuts.  I strain it for crumbs, and then I'll use it again for things like blueberry fry pies and samosas!

In a 2 cup measuring cup mix together:
1 cup coconut milk (OR use regular milk or lactose-free - they all will work great!)
1 egg
1 tsp vanilla bean paste (or extract)

Mix wet ingredients with dry ingredients with a spoon until thoroughly combined.  Let rest 5-10 minutes.

While the batter rests, whisk together a coconut glaze. 

Coconut Glaze:
Whisk together the following (aim for a consistency just a bit thicker than milk):
1 1/2 cups powdered sugar
1/2 tsp vanilla extract
~1/2 cup canned coconut milk, until desired consistency (Make sure you use both the thick and liquid parts of the canned coconut milk)
add extra water, if needed to thin a bit

Set the glaze aside to dip the donuts in after frying.

Line 1 cookie sheet with parchment paper or a silicon mat to place glazed donuts.  Line 1 cookie sheet with a double layer of paper towel to place cooked donuts to drain.

Use a small (1 Tbsp) sized cookie scoop to scoop batter into the 1" hot oil.  It's hard to tell how browned the chocolate donut holes are getting, but I find a couple minutes per side usually gets them nice and crispy on the outside with a soft interior.  If you have at least 1" of oil they tend to flip themselves, too, which helps with the timing. 

Set donut holes on paper towel-lined tray to drain and cool slightly.

While donut holes are still warm, dip each donut hole in the coconut glaze.  Immediately roll or sprinkle with shredded coconut.  Set on a parchment paper-lined pan and let set.

These are my favorite fresh, but they are also delicious as leftovers.  Store extras in the refrigerator.  Eat chilled or reheat in a toaster oven on a bit of foil. (We rarely get to the reheating step). Enjoy!

Tuesday, 17 January 2017

Easy Oven-Baked Dill & Lemon Salmon

For a delicious show-stopper with minimal effort, I present give you one of my favorites - an easy to prepare and bake salmon.  Fresh dill and lemon flavor and moisten the salmon as it bakes.  The best is that you can increase or decrease the size of your salmon slab depending on how many you aim to feed.  I usually account for about a 2" slab per person.

Delicious dill and lemon salmon, fresh from the oven! 

Easy Oven-Baked Dill & Lemon Salmon

Preheat oven to 425 F.

The piece of salmon pictured was about 10-12" long.

Place your salmon on a foil-lined tray.  Make diagonal slices along with the grain about every 2" of your salmon.

Stuff slices with:
fresh dill
lemon, thinly sliced (and those slices cut in half - so you have semi-circles to put into the salmon)

Drizzle the salmon with:
olive oil

Sprinkle the top of the salmon with:
salt
pepper
paprika
dried parsley

Bake the salmon at 425 F for ~20 minutes.  Check the center of the salmon with a fork to make sure it's cooked thoroughly. It may need an additional 2-4 minutes, depending on the size and thickness of your salmon.

Absolutely delicious served with homemade latkes.  Great with other delicious potato sides, too, like pan-fried potatoes.  Enjoy! 

Sunday, 8 January 2017

Lemon Magdalena Cakes

These are a lovely, rich muffin that still has a light fluffy texture.  They are meant to be eaten as a breakfast or snack-type dish with something like rich hot chocolate.  My little brother requested this recipe and we have been happily eating them.  Enjoy!

GF Magdalena Cakes
Tasty gluten-free Magdalena cakes, fresh from the oven! 

Lemon Magdalena Cakes

Preheat oven to 375 F.  Line muffin tin with 12 paper liners.

In a small bowl, mix together dry ingredients (It's important to do this in gluten-free cooking to avoid clumping): 
1/2 cup Kristin's Gluten-Free Flour Mix
1/3 cup coconut flour
1 1/2 tsp baking powder
pinch salt (leave out if your butter if salted)

In a mixer beat until fluffy (1 minute):
2 eggs
1/4 cup + 2 Tbsp sugar

Add and mix in:
zest from 1 lemon
1 tsp vanilla extract
1 Tbsp lemon juice
1/3 cup milk
2 oz melted butter

Scoop evenly into 12 muffin tins.  They should be filled halfway.  Smooth tops, if desired.

Sprinkle 1 tsp sugar over the top of each muffin.
GF Magdalena Cakes
Magdalena cakes, ready for the oven after having a bit of sugar sprinkled on top. 

Bake at 375 F for 15-16 minutes.

Cool on a wire rack and enjoy with homemade hot chocolate!
GF Magdalena Cakes
Fresh from the oven - you can see how much they puff up - doubling in size.


Wednesday, 21 December 2016

Garlic (& Poppyseed) Bagels & Bagel Sticks - Gluten-Free and Easy!

Gluten Free Garlic and Poppyseed Bagel Sticks and Bagels are a hit around here!  I have little kids, and little kids can sometimes be picky.  They will suddenly refuse to eat things they ordinarily love.  This pickiness is how I ended up piping what were going to be mini bagels into bagel sticks.  Identical in taste, the new shape transformed them into something fabulously new.  The bagel sticks were raved over!  I've been making them regularly ever since.  They even work well for little lunchtime sandwiches when we're not in the mood for some delicious smoked salmon and cream cheese (we are usually in the mood for smoked salmon and cream cheese, but it's not always in the refrigerator).   These bagels/bagel sticks are SO easy to whip together in your mixer and pipe out on a pan.  Enjoy!

A fresh toasted mini garlic poppyseed bagel with cream cheese. Yum! 
This recipe can make a lot - I often lose count because it depends on how you pipe them out, but I love making a mix of mini bagels and bagel sticks.  My little girls and my mom LOVE the bagel sticks. 


Garlic (& Poppyseed) Bagels and Bagel Sticks! 
Makes ~30 bagel sticks

Preheat oven to 350 F.  Line 2-3 cookie sheets with parchment paper or silicon mats.

In a small bowl, combine and let rest 5 minutes, until nice and puffy:
1 1/4 cup warm water
6 Tbsp honey
1 Tbsp rapid-rise yeast

Add to yeast mixture:
3 eggs
6 Tbsp oil

In a mixer, combine:
2 cups tapioca starch
1 1/2 cups brown rice flour (or sprouted brown rice flour)
6 Tbsp potato starch
3 3/4 tsp xanthan gum
1 1/2 tsp salt
1 1/2 - 2 Tbsp dried garlic flakes
1 Tbsp poppyseeds (optional) 

Beat dough for 2-3 minutes, until nice and smooth.   The dough should be thick, but still soft enough that you would be able to pipe in a ziploc bag - if necessary, add an extra tablespoon or two of water.  I find when I make larger batches of bagels, sometimes I end up with more flour when measuring a cup at a time than when I use a 1/3 or 1/2 cup measuring cup in smaller batch recipes.
Put bagel dough in a large freezer ziploc and cut off about 1/2" from a corner.  Pipe sticks or mini bagels onto parchment paper lined pans.  I usually make the bagel sticks about 4-5" long and bagels of a similar size. I find two pans works for making all bagel sticks, and you'll need 3 pans if you make both bagels & bagel sticks.

Using your hands or pastry brush, gently brush/wipe tops of bagels/bagel sticks with warm water.  Let rise in a warm location ~30 minutes, until puffed up, but not quite doubled in size.

Bake at 350 F for ~20 minutes, until nicely browned.   Remove to a cooling rack.  Once cooled, you can slice and freeze any you won't eat right away.  They reheat perfectly in a toaster oven.  Enjoy!!!

A delicious garlic bagel stick with cream cheese.  

Monday, 12 December 2016

Crepes - w/ a delicious maple apple pie filling

Crepes with a delicious maple-apple compote filling are a perfect wintry breakfast to make using those late fall apples.  (Any apples good for pie or apple sauce are good to use in this recipe).   Crepes are wonderfully versatile, and you can fill them with sweet or savory fillings.  My kids love to have a small vegetable omelet inside a crepe followed by a sweet-filled crepe for breakfast.  We even make them for dinner on special occasions! Enjoy!
GF Crepes with Maple Apple Filling
Maple-Apple filling warming while the crepes are cooking

Crepes - with a maple-apple pie filling

Makes 24, 10" crepes

Preheat 10" crepe pan over medium-high heat.

Blend together with a stick blender:
4 eggs
2 cups milk (lactose-free works great)
2/3 cup cold water
3/4 cups cornstarch
3/4 cups arrowroot starch (if you don't have arrowroot starch, you can use extra cornstarch)
1/2 cup brown rice flour
1/2 tsp baking soda
1/2 tsp salt
2 tsp cinnamon

Add and blend in:
4 Tbsp butter, melted

Butter pan only for 1st crepe.  Pour ~1/4 cup batter into pan, quickly pick up and rotate the pan around so the batter spreads out thinly.

Cook until batter appears dry, then flip crepe.  Cook briefly on the other side.  Each side should be lightly browned.  They cook up quickly, so keep a close eye on things.

Put on plate, then repeat.  They can be stacked right on top of one another.  To save leftovers, cover plate with crepes with plastic wrap and refrigerate.  Warm briefly in the microwave if they are sticking to each other. (I find they only stick together a bit after being refrigerated. Fresh crepes won't stick together and are a great make-ahead for a meal or dessert)

Serve with your choice of apple pie-type filling in the crepes.  A delicious option - which can be refined-sugar free, too, is my maple-apple compote, retyped here for convenience.  It's great with small scoops of ice cream, too! Enjoy!
GF Crepes with Maple Apple Filling over Ice Cream
A delicious crepe topped with ice cream and maple-apple compote for dessert! 

Maple-Apple Compote

Saute over medium heat about 8 minutes:
1-2 Tbsp butter
3 cups sliced or diced apples (peeled & cored)

Add an cook briefly:
1/4 cup maple syrup OR 1/4 cup brown sugar OR 1/4 cup honey
1/2 tsp cinnamon
1/4 tsp nutmeg (optional)

Serve your maple-apple compote over crepes, pancakes, puffy oven pancakes, oatmeal, etc.!


Crepes with a maple apple filling by Successfully Gluten Free!

Thursday, 1 December 2016

Rich & Creamy Homemade Chocolate Pudding!!!

I've always preferred homemade pudding to any other type.  Chocolate pudding, while delicious, can be a bit temperamental compared to making vanilla pudding.  This method, where you add hot, but not yet boiling, milk to the eggs before adding them to the pot works perfectly to any lumpiness.  The result is a delicious, creamy pudding.  If you are a fan of pots de chocolats, you may enjoy making this with a light cream instead of milk.  I find the taste of your cocoa powder will completely change the taste of your final pudding.  I vary what I use depending on my mood, sometimes a dark, rich cocoa powder, other times a light, mild one.  If you use one that is a bit more on the bitter side, this recipe will need an extra 1/4 cup of sugar.  Enjoy!
Homemade GF Chocolate Pudding
Homemade GF Rich and Creamy Chocolate Pudding. Yum! 

Rich & Creamy Homemade Chocolate Pudding!!!
Makes ~ 6 servings

In a separate small bowl, whisk together until smooth.  Set aside to add in later:
4 egg yolks
1/4 cup milk
1/4 cup cornstarch

Whisk together in a medium-size saucepan:
1/2 cup sugar
1/4 cup cocoa powder (some cocoa powders are naturally sweeter, some are more bitter - you can use a little extra sugar if necessary)
1/2 tsp salt
pinch cinnamon (optional)

Add and whisk the following into the sugar/cocoa mixture:
2 3/4 cup milk (higher percentage of fat is best - you can even use a combination of 10% cream and milk for a really rich pudding)

Stir milk/cocoa mixture regularly while heating over medium heat until mixture almost comes to a boil **you don't want it to be at a boil, just very hot because you'll add a bit to the eggs and if it is boiling, you'll curdle the eggs a bit** 

Using your mixture of "almost" boiling hot chocolate milk, whisk 1/4 cup milk into your egg yolk mixture.  Add an additional 1/4 cup milk, whisking in.  Add a final 1/4 cup milk, whisking in.  This allows your eggs to heat up a bit slower, so you don't end up with lumps in your pudding.

Add egg mixture back into the pot.  Stirring constantly, mix until mixture comes to a boil and begins to bubble and thicken.  Keep on heat no more than 1 minute after mixture has begin boiling.

Remove from heat and add:
1/2 - 1 tsp vanilla extract or bean paste (optional)
Homemade chocolate pudding - just off the heat. 
Put immediately into desired cups or bowls.  Cover with plastic wrap (make sure plastic wrap is on the surface of the pudding to avoid any 'skin' being formed on top of your pudding).  Let cool.  Great hot, warm or chilled.  Enjoy! 

Homemade GF Chocolate Pudding