Search for a Recipe

Thursday, 19 July 2018

BBQ Teriyaki Chicken

This is a favorite of my family, although we usually have made it with very thinly sliced beef.  You can use this same marinade sauce with beef, if you prefer.  But I absolutely love it made with chicken.  It's easy to whip together, and because the chicken is nice and thin, it cooks up quickly on the BBQ.  It's delicious served alongside brown jasmine rice, cooking instructions below, too.  Enjoy!
Gluten Free BBQ Teriyaki Chicken
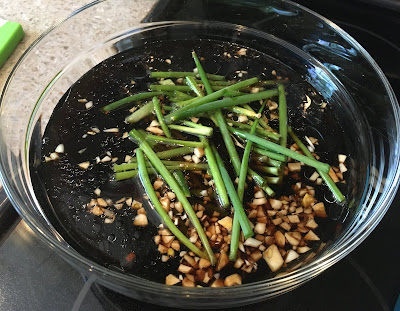
Marinade sauce, ready for meat! 
Gluten Free BBQ Teriyaki Chicken
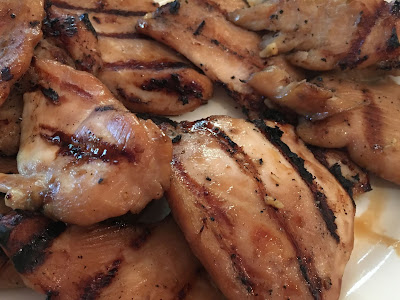
BBQ Teriyaki Chicken, fresh off the barbecue! 

BBQ Teriyaki Chicken

2 - 3 lbs chicken, thinly sliced or pounded flat
(The best is if you can find scallopini-style, very thinly sliced breasts)

In a large bowl, mix together marinade:
3/4 cup Bragg's soy seasoning sauce (substitute for soy sauce, which is not GF)
3/4 - 1 cup water
1/4 cup sugar
2 Tbsp honey
1 - 1 1/2 Tbsp fresh ginger, grated
4 cloves garlic, minced
3-4 green onions, chopped into 4" pieces

Marinate chicken for 2-3 hours, stirring/rotating pieces once or twice.

BBQ chicken pieces over medium heat, about 5 minutes per side, or until they are cooked through in the thickest parts of your chicken pieces.

This BBQ Teriyaki chicken is fabulous served with brown jasmine rice, cooking instructions below or another rice of your choice. Enjoy!

Brown Jasmine Rice
For about 3 cups cooked rice, thoroughly rinse:
1 cup jasmine rice

In a pot with a tight lid, place:
1 cup rinsed jasmine rice
2 cups water
1-2 tsp oil

Heat, uncovered over high heat until boiling.  Lower heat to low, cover, and simmer 45 minutes.  Remove from heat and let rest 10-15 minutes before serving.
Monday, 9 July 2018

Rhubarb-filled Muffins!

I sometimes whip up rhubarb crisp, or strawberry-rhubarb crisp or pie, but I was looking for something a little different.  I sometimes have pan-cooked fruits, essentially making pie filling, and then used them in crepes or over pancakes.  However, this is a fun alternative - rhubarb-filled muffins!  They were a hit!   The tangy rhubarb with the rich muffin base was a delicious treat. Enjoy!
rhubarb-filled GF muffins
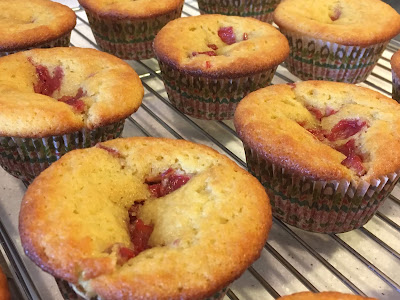
Fun, rhubarb-filled muffins!  A perfect summer treat! 

Rhubarb-filled Muffins!
Makes 18 - 24 muffins

Preheat oven to 350 F.  Line 24 muffin tins with paper liners.

In a frying pan, cook over medium heat until rhubarb softens and the mixture becomes a chunky jam consistency:
~6 stalks rhubarb, diced
1/3 cup sugar
1/4 - 1/2 tsp cinnamon
dash salt

Set aside rhubarb.  In a large bowl, mix together the following:
1/2 cup coconut flour
1/2 cup white rice flour
scant 1 cup sugar
1/2 tsp baking soda
1/2 tsp salt

Mix in until smooth:
1 cup milk (lactose-free options work well)
1/2 cup oil 
1 tsp vanilla extract

Add and mix in until smooth:
6 eggs

The batter will be runny. This is okay because coconut flour absorbs a lot of liquid while cooking.
Fill each cupcake liner about 1/2 - 2/3 full.

Divide the rhubarb mixture evenly among the muffins.  It will sink during cooking.
I filled each cup a bit higher here, but I'd recommend filling them a bit less for a neater finished product.
Bake at 350 F for 15-20 minutes, until lightly golden brown.
Fresh out of the oven! 
Cool on a wire rack and enjoy!!!
Time to make more... these went fast! 

Friday, 29 June 2018

Pineapple Fried Rice!

We love whipping together fried rice around here.  Usually, we make a chicken and vegetable fried rice or a summer mushroom and veggie fried rice, if they're in season.   In this case, I wanted something light to add to a Hawaiian-themed meal, and this was the perfect accompaniment!

A few tips for successful, tasty friend rice: 1. using white jasmine rice, not overly wet after cooking - cook it a few minutes extra (to dry it out a bit), or your stir-fried rice will stick together a bit; 2. Have ALL ingredients prepared in bowls or on cutting boards beforehand, since cooking time is quick (I type all ingredients in bold for ease during cooking; 3. Don't stir too much, since you want things to cook at the high heat before you rotate ingredients in the pan.
Gluten Free Pineapple Fried Rice
So delicious, flavorful, packed with vegetables and pineapple. Yum! 

Pineapple Fried Rice
Serves 4

Make 1 cup white jasmine rice (or rice of your choice) - this yields about 3 cups.  If you're making it fresh, let it cook a few minutes longer than normal and sit with the lid cracked after cooking so it dries out a bit.  Or, you can use day-old rice so it's a bit more dried out.

In a large frying pan or wok over medium-high to high heat, heat up:
3 Tbsp avocado oil (or another oil with a high smoke point, good for stir-frying)

Cook the following for 3 minutes:
1 onion, chopped
1 tsp minced garlic
1 can (4 oz/127 g) green chilies
1 bell pepper, diced (optional)

Add and cook 4 minutes:
3 cups cooked white jasmine rice (or another cooked rice)
1 baby bok choy, diced (1-2 cups)
1 carrot, peeled and shredded
1-2 cups mushrooms, diced

Push everything to the edge of the wok/pan.
Add, and then scramble:
1 Tbsp avocado oil
2-3 eggs, whisked

Mix everything together and add, cooking 1 minute:
4 Tbsp GF soy sauce (I used Bragg's Liquid Soy Sauce)
Fried rice, just before adding fresh pineapple! 

Add, stirring briefly, then serve hot:
1 cup finely diced fresh pineapple

Enjoy!

Thursday, 21 June 2018

White Chocolate Vanilla Cake, White Chocolate Ganache, Strawberry Filling & Strawberry Coulis Sauce

This is a rich, delicious cake that was a huge success with my entire family.  The white chocolate in the cake batter and the ganache topping adds a richness to this cake that I find perfectly pairs with the strawberry filling and coulis sauce.  While the cake is made of several different parts, all are easy to whip together.  The cake can be made in advance and left in the refrigerator for a day or two before serving.  Delicious! Enjoy!
Gluten Free White Chocolate Strawberry Cake
A delicious piece of white chocolate vanilla cake, filled with strawberry frosting, topped with a white chocolate ganache and served with homemade strawberry coulis sauce.  Decadent?  Yes! 
Gluten Free White Chocolate Cake
I somehow managed to only have really huge strawberries the day I made this, but they still looked cute on the top.  It was the beauty upon serving, however, that really added the wow factor. 

White Chocolate Vanilla Cake, White Chocolate Ganache, Strawberry Filling & Strawberry Coulis Sauce
Makes one large cake, serves 8-12 generously

White Chocolate Vanilla Cake: 
Butter and line two round 8" or 9" pans with parchment paper.  Preheat oven to 350 F.

Melt together - you can melt in 30-60 second increments in a microwave at 50% power:
4 oz high quality white chocolate
1 cup milk
1/2 cup butter
2 tsp vanilla bean paste (or vanilla extract)

Beat in a mixer until light and frothy (I find it takes at least 5 minutes):
6 eggs
1 cup sugar

Mix into eggs and sugar mixture:
chocolate/butter mixture from above
1/2 cup coconut flour
1/2 cup white rice flour
1/2 tsp salt
1/2 tsp baking soda

Divide batter between prepared baking pans.  Bake at 350 F for about 20 minutes, until set in center.
Cakes separated in pans prior to baking.
Let cool 5 minutes before carefully removing from pans to complete cooling on wire racks.

Strawberry Coulis:
Wash strawberries from a 2 pint container, saving a few to decorate the top, if desired.
In a medium pot, combine:
strawberries, cleaned and diced
4-6 Tbsp powdered sugar
2 tsp lemon zest
1-2 Tbsp lemon juice

Bring to a boil over medium heat.  Puree with a stick blender, then return to heat and cook a few more minutes.  Strain coulis sauce with a sieve to remove seeds.  Refrigerate sauce until ready to serve.

Strawberry Frosting:
In a mixer, beat together several minutes until fluffy and smooth:
1/2 cup butter, softened
2 cups powdered sugar
1 tsp milk
3 Tbsp high quality strawberry jam
1 tsp vanilla extract
1 cup marshmallow fluff

Use the strawberry frosting to fill the cake and spread around edges, for a more even look.  If you're wanting things really neatly done, you can refrigerate the cake at this point until the frosting is harder, and smooth it more evenly.
Strawberry frosting filled White Chocolate Cake, ready for ganache topping! 

White Chocolate Ganache: 
Over medium heat, bring to a boil in a small saucepan or frying pan:
1/4 cup + 2 Tbsp heavy cream (whipping cream)
1 Tbsp butter
3/4 tsp vanilla extract or bean paste

Remove from heat and add, stirring until melted and smooth:
6 1/2 oz high quality white chocolate

Place in a bowl to cool.  You can pour over the cake when it's mostly cooled, or once fully cooled this ganache can be whipped in a mixer and then spread on the cake, which I find works best for me.
Word of warning, working with warm ganache can be tricky.  Too warm and it will just spread, but ooze down around the cake.  I find it far easier to work with cooled ganache, whip it and top the cake.  It also gives a lighter appearance to the final cake.  
Gluten Free White Chocolate Cake
I'm drooling just thinking how tasty this cake was to eat. Yum! 

Thursday, 7 June 2018

Rustic Sour Cream Topped Cheesecake - with Raspberry Coulis Sauce

I'm normally not a huge cheesecake person, but this cheesecake has a delicious, light texture. I'm a fan.  It's made with plenty of lemon zest throughout, and topped with an extra sour cream layer towards the end of the baking time, giving it a little something extra.  I love the taste of lemon and raspberry, so a homemade raspberry coulis sauce is the perfect accompaniment to this cheesecake.  Every time I make a coulis sauce, I'm amazed by how easy it is to prepare.  Leftovers are perfect over waffles, crepes, or pancakes, too!  Enjoy!
Gluten Free Cheesecake
A delicious piece of cheesecake topped with homemade raspberry coulis sauce.  
Gluten Free Cheesecake
A chilled rustic sour cream topped cheesecake, ready for slicing and eating!  

Rustic Sour Cream Topped Cheesecake - with Raspberry Coulis Sauce

This recipe was based off a recipe from the Cook's book of Everything, quite a fun (and large) cookbook I stumbled upon years ago. 

Preheat oven to 350 F.
Butter and then line an 8" or 9" spring-form pan with parchment paper, pressing it into the pan as best you can (the folded edges will add the rustic look to your cheesecake).

In a ziploc bag (or bowl), combine:
9 oz crushed GF cookies and/or GF graham crackers (A mixture of cookies and graham crackers works nicely. I like to use my homemade chocolate chip cookies or homemade GF vanilla wafer cookies, (If you use the homemade chocolate chip cookies, just make them without the chocolate chips, and cooked just a touch longer than normal so they're nice and crispy.  You can make them, crush, and freeze them to use later.) 
1/2 tsp ground cinnamon
pinch ground allspice
pinch ground cloves
pinch ground coriander
pinch nutmeg
scant 1/2 cup butter, melted

Press the mixture into the parchment-paper lined spring-form pan, making sure to press evenly along the bottom and up the sides of the pan an inch or two (as best you can).  Set to chill in the refrigerator for 15-20 minutes.

In a large bowl or mixer, beat together the following until smooth:
16 oz cream cheese (two 8-oz containers)
2/3 cup sugar
1 tsp vanilla bean paste (or vanilla extract)
1 Tbsp fresh lemon zest
1 Tbsp fresh squeezed lemon juice

Add and beat in until smooth:
4 eggs

Pour cream cheese mixture over the chilled crust.  Bake at 350 F for 30-35 minutes.  There may be a couple spots that brown slightly on the top, and that's just fine.
Gluten Free Cheesecake
The cheesecake, ready to be topped with the sour cream mixture.  Don't mind any little browned spots as they'll be covered by the sour cream! (plus, it just adds to the rustic look)

While the cake is baking, mix together the following:
1 cup sour cream
1 Tbsp fresh lemon juice
1-2 Tbsp sugar
1 tsp lemon zest
1/2 tsp vanilla extract

Remove the cake from the oven, and pour the sour cream mixture on top.  Return to the oven and bake an additional 6-8 minutes. 
Gluten Free Cheesecake
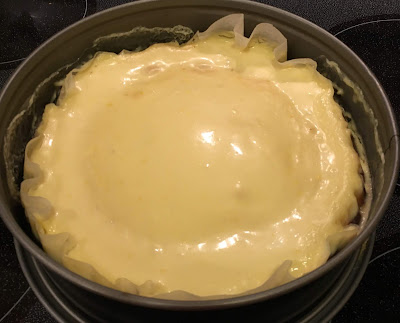
The cheesecake topped with the sour cream mixture and ready for the last bit of baking.

I like to remove from the oven and set on a wire rack to cool, but you can leave the oven door ajar to let it cool more slowly and help avoid cracking.  I just don't mind, since I'm pouring a delicious raspberry coulis sauce on top!   Let the cake cool at room temperature, then place in the refrigerator for at least two hours before serving.  You can make this a day in advance, if needed.
Gluten Free Cheesecake
The cheesecake fresh out of the oven.  The parchment paper gives the edges a rustic look once everything has cooled and you remove the outer ring and the paper.   

When the cake is cooling, you can prepare a raspberry coulis sauce to top the cheesecake.  This can also be made in advance and left covered in the refrigerator for a day or two.   Once fully cooled, you can remove the ring and carefully remove the outer edges of the parchment paper.  I found the cake can pretty easily be slid off the parchment paper and onto a serving platter, if desired.

The amounts listed here are general guidelines.  You can use more or less berries and more or less sugar, to taste.  I find you can't really go wrong provided you let things come to a boil nicely and press the coulis through a sieve to remove the seeds before serving. 

Raspberry Coulis Sauce

Bring to a boil:
8-12 oz fresh or frozen raspberries 
2-6 Tbsp powdered sugar, to taste
1 tsp lemon zest, optional
1-2 tsp lemon juice, optional

Let the coulis boil gently for a few minutes.  You can blend it with a stick blender to help break up the berries.  Return to heat and boil an additional 3-4 minutes.

You can blend some more and then serve as-is, but I recommend pressing the sauce through a sieve, using the back of a spoon to help remove the seeds.  I rub the spoon back and forth along the sieve to help move around the seeds and let the coulis sauce through.

The sauce can be used warm or chilled before serving over-top the chilled cheesecake.  Enjoy!!!
Gluten Free Cheesecake
This is making me hungry.  It was so creamy and delicious with a nice hint of lemon throughout.  

Friday, 1 June 2018

Gluten-Free Rich, Creamy Pasta Sauce

This sauce is a bit of a combination of traditional Alfredo sauce with a nod to Carbonara sauce.  I first whipped together this sauce while we were staying in Rome since I wanted the richness egg adds to the sauce, but couldn't fold it right into hot noodles, since the gluten-free noodles requiring rinsing post-cooking to remove starch.  This rich sauce is a nice mixture of cream, egg and Italian hard cheeses.  It's simple and quick to whip together and tastes delicious. Enjoy!

Gluten-Free Rich, Creamy Pasta Sauce

In a large frying pan over medium heat combine:
3-4 Tbsp butter
1 cup heavy cream (lactose-free works well if you can find it)

Bring to a low boil.  Remove from heat and quickly whisk in (this is similar to a carbonara style sauce, only in carborana you mix the egg right into piping hot noodles):
1 egg (fresh is best!)

Immediately add:
1/2 - 1 cup hard Italian cheeses, finely grated (i.e. Parmesan, Pecorino Romano - high quality, freshly grated is best)

Continue whisking until cheeses are melted.  You can place the pan back on the burner if it needs a little extra heat to melt the cheeses thoroughly. 

Fold into fresh cooked and rinsed gluten-free pasta.
Enjoy!

Sunday, 20 May 2018

Flavorful Foil-Wrapped Potatoes on the BBQ (or oven)

This is one of my favorite potato recipes for the BBQ in warm months.  The best part is that it cooks relatively quickly because the potatoes are all diced.   You want to make sure to tightly seal the wrapped potatoes by pinching foil together well, then double wrapping the entire package.  This helps avoid leaks from the oil or butter onto the grill if you prefer to flip your potato packages over for even browning, though this isn't necessary.
twice wrapped potatoes on the BBQ
Potatoes and toppings, ready for the BBQ! 

Flavorful Foil-Wrapped Potatoes on the BBQ (or oven)

The amount of potatoes you dice and fill in packages is entirely up to you.  I would aim for a small handful of potatoes per package, so you have something like what looks like the picture above.  You want to be able to pull together the foil and pinch and roll it tightly to seal well along all ends.   Then, double-wrap your entire package in another layer of heavy duty foil.  If you've done this well, you can flip your package during cooking to get even browning on your potatoes.

*Don't overfill. You want your layer of potatoes to lie relatively flat, even when the foil has been pinched/sealed together.

Place on pieces of foil:
potatoes, diced
shallots, sliced
green onions, sliced
drizzle of olive oil
topped with a couple thin slabs of butter
salt (lightly, if your butter is salted)
pepper


Tightly wrapped packages can be cooked on a barbeque that's heated to approximately 400 F over direct heat.  Cook for 25-30 minutes, then slice open and cook an additional 5-10 minutes, until desired crispness. You can stir them around a bit at this time, if necessary.  If desired (and your package is well sealed) you can flip after ~15-20 minutes of cooking, but it's not necessary.   Sometimes I open the packages and let them cook a bit longer on the BBQ to get a little more crispiness to the potatoes.

You can also cook these in a regular oven at 400 F for ~30 minutes, or until desired crispness.

Open carefully, as foil packets will be hot!  Enjoy!
I usually make between 2-3 foil packages if we have company.  Otherwise two is plenty for a hearty family meal.  Great alongside any summer BBQ meal!