Search for a Recipe

Sunday, 24 October 2021

Gluten Free Sugar Cookies

This recipe is a bit different from my favorite frosted sugar cookie recipe, topped with my marshmallow fluff frosting.  It was a bit of a roundabout method to get to these - since I had originally posted a yummy sugar cookie bars recipe, then flipped that bar recipe around to make these yummy (and EASY) soft sugar cookies!  We plan to whip some up again soon! 
Decorating cookies is so fun for kids.
The back of the spoon works perfect for little kids to spread the frosting.

Gluten Free Sugar Cookies

Makes about 3 dozen

In a large bowl, whisk together: (it's important to mix dry ingredients separately in GF baking to avoid lumps)
2 cups Kristin's Gluten Free Flour Mix
3/4 cup white rice flour
1/2 tsp xanthan gum
1/2 tsp baking soda
1/2 tsp salt

In a mixer, cream together:
1 cup butter, softened
8 oz cream cheese, softened
1 1/2 cup white sugar

Add and mix in, scraping down a few times:
1 egg
2 tsp vanilla bean paste (or vanilla extract)

Add the dry ingredients in, and mix just until combined.  

Scoop the cookies onto parchment-lined pans.  Use a flat glass, wrapped in plastic wrap.  Dip it briefly in water and flatten each cookie.  Dip between every 1-2 cookies to keep it from sticking to the dough.  
Flattened and ready to bake.
They worked as a team to flatten each pan of cookies.
A surprisingly drama-free kitchen - everyone loves making cookies!

Bake each tray of flattened cookies at 350 F for 7-9 minutes, until light browned on edges.   

Remove from oven and let rest a few minutes before moving the cookies to a wire rack to fully cool.   After fully cooled, frost as desired - but my favorite on these cookies is the marshmallow frosting with just a hint of lemon and vanilla, below. 
They'll just have a hint of browning at the edges.  If you want crispier cookies, you can bake these a bit longer, but I like them to be nice and soft with the frosting.  

Frosting:

Mix together frosting in a mixer, beating well until light and fluffy:
6 Tbsp butter, softened
2 cup powdered sugar
1/2 cup marshmallow fluff
2 drops lemon essential oil OR 2 tsp fresh lemon juice
1 tsp vanilla bean paste (or vanilla extract)
1/4 tsp salt
drops food coloring, if desired

Slowly add heavy cream OR milk 1 tsp at a time until you have a smooth consistency.  I find 1 - 2 Tbsp cream or milk works well.

Spread (or pipe if you're feeling fancy) overtop the cookies.  Add sprinkles, if desired. 

Color frosting and decorate as desired! 

Gluten Free Sugar Cookies Recipe by Successfully Gluten Free! 

Monday, 11 October 2021

Apple Cider Muffins with Crumb Topping

When I asked my youngest how she liked the apple muffin she was eating as a snack, she said "I love these peach chunks you put in them."  Ha!  Love the silly things kids say.  Needless to say, the bits of cooked apple in these crumb-topped apple cider muffins are a tasty addition.  I hope you enjoy them!
I think all muffins with crumb topping are so pretty. 

Apple Cider Muffins with Crumb Topping

Preheat oven to 350 F.  Prep 18-20 muffin tins with paper liners. 

Sautéed apples:

In a sauté pan, cook the following over medium heat ~15-20 minutes, until apples are tender: 
1-2 Tbsp butter
2-3 cooking apples, peeled, cored & diced (Use a variety of apple that doesn't turn to mush/applesauce while cooking. Many apple varieties hold their shape nicely.  I usually choose a tart cooking apple). 
1 Tbsp cinnamon

In last minute of cooking, add and stir in: 
1 Tbsp maple syrup

Remove from heat and set aside to cool. 

Crumb topping:

In a large bowl, chop together with a pastry cutter (or crumble with fingers):
1 Tbsp coconut flour
1 Tbsp brown rice flour
1 Tbsp brown sugar
1 Tbsp butter

Set crumb topping in the refrigerator to stay cold while you prepare the muffin batter. 

Muffin batter:

In a large bowl, mix together the dry ingredients (It's important to do this in GF baking to avoid clumps):
1 3/4 cup Kristin's Gluten-Free Flour Mix (OR 1/2 cup brown rice flour, 1/2 cup white rice flour, 1/2 cup tapioca starch, 1/4 cup cornstarch, 1/2 tsp xanthan gum)
3/4 cup brown sugar (you can make these with less sugar - 1/4 brown sugar instead of the 3/4 cup - just add an extra 1/4 cup apple butter/sauce and you'll be good to go!)
1/4 cup white sugar
1 tsp baking powder
1/2 tsp baking soda
1 tsp cinnamon
1/2 tsp nutmeg

Add and mix well: 
1/2 cup apple cider (fresh pressed apple juice)
6 Tbsp oil
1/4 cup apple butter OR apple sauce (or a bit of both - I find apple butter adds some nice spices and a richer flavor)
2 eggs
1 tsp vanilla extract
cooled apples from above (warm is okay, just not piping hot) 

Divide batter between 18-20 muffin tins, lined with paper liners.  Fill 2/3 with batter.  

Batter divided into muffin tins.

Divide the crumb topping from above on top of the muffins.  

Topped with crumb topping!

Bake at 350 F for 20-23 minutes, until nicely browned.  Remove and let rest 5-10 minutes before removing to a cooling rack to cool.  Enjoy!!!

Fresh from the oven! Let these rest 5-10 minutes before removing to the cooling racks.  


Apple Cider Muffins with Crumb Topping by Successfully Gluten Free!

Monday, 27 September 2021

Quick Cod & Vegetable Curry


A twist on my speedy chicken curry and vegetables recipe.  This one uses cod, and adds a wonderful flavor to an easy dish.  My dad was the one who first suggested it.  Great idea, dad!  It's delicious! Enjoy! 
Cod Curry, ready to serve over rice or with some homemade GF Naan bread

Quick Cod & Vegetable Curry

Serves ~4-6

This takes ~40 minutes to cook & simmer.  So, start some brown or plain basmati rice cooking, if desired.  You can also serve this with some quick GF Naan bread.

Heat in a large high-sided frying pan over medium to medium-high heat:
2 Tbsp butter
2 Tbsp olive oil 

Add & cook ~2-3 minutes, until starting to become tender:
1/2 onion, chopped

Add and cook 1 minute:
3 cloves garlic, finely chopped

Add, cooking 2-3 minutes:
1 medium zucchini, chopped

Add to the pan and allow to cook, stirring regularly for ~3 minutes:
4 Tbsp curry powder (more or less, to taste - it really depends on the strength of your curry powder blend) OR curry paste, start with 1 Tbsp and add more, to taste.

Add to pan, cook 10 minutes, stirring occasionally:
3 1/2 - 4 cups chopped fresh tomatoes (You can substitute diced, canned tomatoes if fresh ones aren't readily available)
Veggies, cooking up nicely with the spices.

Add, allowing mixture to come to a boil/simmer:
3 cups cod, diced into large chunks (more or less, to taste)

Put a lid on your pan.  Lower heat, and allow curry to simmer at least 20 minutes before serving, stirring occasionally.  If your curry not as thick as you'd like, you can remove the lid to allow excess liquid to evaporate.
Ready to eating! Cod Curry! 

Serve with a side of basmati rice and/or fresh naan bread.  A couple different options are: Quick BBQ or oven naan  OR my favorite quick and easy naan bread.  Enjoy!


Quick Cod & Vegetable Curry by Successfully Gluten Free!


Saturday, 18 September 2021

Baked Apple Cider Donuts

Inspired by a recipe from the NYTimes, I came up with these yummy baked apple cider donuts.  A recommendation - don't forget to butter and flour the pan or you'll end up pulling out the donut holes in pieces and having cake crumble instead of donuts.  I only have one donut pan, so I had to make these in batches, which worked.  I ran the back of the pan in cold water, wiped out the pan and re-buttered and floured between batches.   These are such a fun, special treat! Enjoy! 
Gluten Free Apple Cider Donuts
Tasty Baked Apple Cider Donuts!  They're nice and light and airy, too.  

Baked Apple Cider Donuts

Makes ~18 donuts

Preheat oven to 350 F.  Butter and flour your metal donut baking pan (with GF flour mix or just brown or white rice flour).  This will make ~18 donuts, so I make mine in batches since I only have one pan.   Do NOT miss any spots with the butter and flour or the donuts can stick.  

In a large bowl, mix together: (It's important to mix dry ingredients in GF baking to avoid clumping)
1 3/4 cup Kristin's Gluten-Free Flour Mix (OR 1/2 cup brown rice flour, 1/2 cup white rice flour, 1/2 cup tapioca starch, 1/4 cup cornstarch & 1/2 tsp xanthan gum)
1 tsp cinnamon
1 tsp baking powder
3/4 tsp salt
1/2 tsp baking soda
1/2 tsp nutmeg

In another large bowl or in a mixer, mix until well combined: 
1/2 cup apple cider
6 Tbsp oil
1/4 cup apple butter or applesauce
3/4 cup brown sugar (you can make these with less sugar - 1/4 brown sugar instead of the 3/4 cup - just add an extra 1/4 cup apple butter/sauce and you'll be good to go!)
1/4 cup sugar
2 eggs
1 tsp vanilla

Mix dry ingredients into wet and stir until smooth.  Spoon the batter into the prepared donut pan filling them about 1/2 full.   
Filled 1/2 full, ready to bake.  
Bake at 350 F for about 12-15 minutes, until a nice, golden browned.   

While the donuts are baking, prepare the butter and cinnamon sugar mixture for the topping. 

Melt in a small bowl: 
6 Tbsp butter

Mix in a separate bowl: 
1/2 cup sugar
1 Tbsp cinnamon

Remove cooked donuts from pan to wire rack.  

Brush the donuts with melted butter and immediately sprinkle with cinnamon sugar mixture.  These are best piping hot from the oven.  However, leftovers do store well for a day or two on the counter in a tupperware.  You can also freeze them.  Reheat leftovers for the best taste.  Enjoy!!! 
Freshly buttered and sprinkled with cinnamon-sugar.  My kids love helping with this part. 
An Apple Cider Donut - Yum!


Baked Apple Cider Donuts Recipe by Successfully Gluten Free!

Saturday, 4 September 2021

Oat & Buckwheat Blueberry Waffles (wheat-free, GF)

 You'll have to make sure you use GF oat flour if you're sensitive, but buckwheat flour is naturally gluten-free despite the misleading name.   These waffles have become a favorite around here - they have a lovely flavor and the wild blueberries are delicious in them. Yum! 
Freshly made waffles with a little butter and fresh maple syrup. 

Oat & Buckwheat Blueberry Waffles

Preheat waffle iron.  This recipe makes ~ 36 individual waffles, but obviously will depend on the size of your waffle iron. (Mine makes 6, so I make 6 batches of 6 waffles, then freeze cooled leftovers). 

Defrost in a bowl: 
1 cup wild blueberries

Mix together dry ingredients in a large bowl:
1 cup oat flour (use GF if Celiac or sensitive)
1/2 cup buckwheat flour (despite the name, buckwheat is a gluten-free grain)
1/2 cup white rice flour
1/2 cup tapioca starch
1/2 cup potato starch
1/4 cup sugar
2 - 3 Tbsp baking powder
1 tsp xanthan gum
2 tsp cinnamon
1 tsp salt

Mix together: 
3 1/2 cup milk
1/2 cup oil 
1/2 cup applesauce
4 eggs

Mix dry ingredients into the wet ingredients, just until combined.  Add and fold in the blueberries.  

Cook waffles as directed on your waffle iron, buttering between each batch.  Serve piping hot, or remove waffles to cooling racks.  Fully cool extras on a cooling rack.  These can then be frozen to toast later for delicious breakfasts!  Delicious served with maple syrup.  Enjoy! 


Oat & Buckwheat Blueberry Waffles (wheat-free, GF) by Successfully Gluten Free!

Tuesday, 24 August 2021

Mini Blueberry Banana Cakes with Cream Cheese Frosting and Blueberry Sauce

 My husband is a huge fan of all things blueberry, so my girls and I wanted to come up with something fun for his birthday.  We decided to make little blueberry banana cakes that we topped with a dollop of cream cheese frosting and homemade blueberry jam sauce.  It was a hit!  You can, of course, make these in cupcake tins, but one of my favorite purchases has been a couple square shaped cupcake-style tins.  These are delicious! Enjoy!
Served up for a birthday treat!
Very happy eaters at this house.

Mini Blueberry Banana Cakes with Cream Cheese Frosting and Blueberry Sauce


Makes 24 cupcake-size cakes

Preheat the oven to 350 F.  Butter 24 muffin-sized square or round tins. 

In a large bowl, mix together the dry ingredients: 
1/2 cup coconut flour
1 tsp xanthan gum
1 tsp baking soda
1/2 tsp cinnamon
1/2 tsp salt

In a mixer or bowl combine:
3 overripe bananas, mashed
3/4 cup milk
1 cup sugar
1/4 cup oil
2 eggs
1 tsp vanilla extract or vanilla bean paste

In a small bowl, toss together:  *(This helps the blueberries from sinking in the batter, keeping them nicely suspended)*
1 - 1 1/2 cup frozen wild blueberries

Add the dry ingredients to the wet ingredients.   Carefully fold in the blueberries, just until evenly combined.  Divide the batter evenly between the 24 buttered tins.   

Ready to bake!
Bake at 350 F for 17-20 minutes, until nicely golden.  Remove from oven, let rest 2-3 minutes, then remove the cakes from the pan onto a cooling rack to fully cool.  
Fresh from the oven.  Resting 2-3 minutes before removing from pans.
We enjoyed these. Yum!
They were so pretty. 

Top each cooled cake with a small piping of cream cheese frosting and a generous spoonful of blueberry jam sauce. 

Blueberry Jam Sauce

In a medium saucepan, bring to a boil over medium heat, let simmer for 10-15 minutes: 
2 cups frozen wild blueberries
1/2 cup sugar
3/4 cup water

If you'd like it a little thicker (I do!), mix together in a small bowl: 
1/4 cup water
1 - 2 Tbsp cornstarch

Mix in just enough of the cornstarch to thicken the sauce to desired consistency.  Aim for a looser consistency, since it will thicken more as it cools.  Transfer to a glass dish and let cool at room temperature.  You can refrigerate any leftovers. 
Blueberry jam, just cooling before serving!

Cream Cheese Frosting

This makes a light amount of frosting.  If you'd like more, double the recipe here. 
1 1/2 cups powdered sugar
1 - 2 Tbsp butter, softened
2 oz. cream cheese, softened
1/2 - 1 tsp vanilla extract

Beat until nice and fluffy.  If you find you'd like it thinner, you can add a little milk to use it more as a drizzle than a frosting.   Transfer cream cheese frosting into a freezer ziploc bag, snip the end, and pipe over cooled cakes.  

Topped with cream cheese frosting!  So cute!
Mmm... 
Ready to serve! Yum!

Gluten Free Blueberry Banana Cakes with Cream Cheese Frosting and Blueberry Jam Sauce by Successfully Gluten Free! 


Tuesday, 17 August 2021

Easy Coconut Shrimp

 My dad makes these all the time and they're such a big hit with everyone.  He's become quite the expert at whipping them up.  He sent me a picture of the ones he made just the other day (along with some yummy looking crabcakes).  I love the little bite that the bit of cayenne adds to these to counteract the sweetness of the coconut.  They're a tasty summer meal!  Enjoy! 
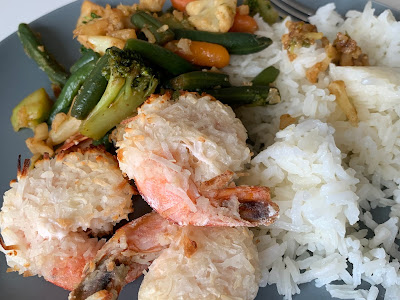
Tasty coconut shrimp served with rice and vegetables tossed in a Asian-style sauce (note: most of those are gluten-free, but please check the labels)
Picture of my dad's meal of coconut shrimp, crab cakes, salad, bread, and fruit.  He always makes it look so pretty! He served the shrimp with a bang-bang sauce and Thai chili/peach preserves sauce (mix 1/2 and 1/2 of each for a nice topping).  A homemade tartar sauce was made for the crab cake (mayo, dill relish, salt, pepper and dried or fresh dill).  Great job, Dad!

Easy Coconut Shrimp

Preheat oven to 400 F.  Line a cookie sheet with parchment paper.

Defrost and drain:
1 bag large frozen shrimp, peeled, deveined with tails on

In a wide low bowl, mix together: 
1/4 - 1/3 cup corn flour (white corn flour is ideal in this recipe - it's texture is between cornmeal and cornstarch)
1/4 - 1/2 tsp cayenne powder
1/4 tsp salt

In another wide, low bowl, whisk until frothy (just whisk with a fork for a minute or two, it just needs to have some froth but not be like soft or stiff peaks, just bubbly): 
3 - 4 egg whites

In a third wide, low bowl, place: 
1 cup sweetened shredded coconut (more will likely be needed, but start with this and add more if necessary so you don't waste coconut)

Dip each shrimp in the corn flour mixture, then dip it in the frothy egg whites, and finally dip it in the shredded coconut.  Place on the parchment-lined pan.  *Make sure you use parchment paper, or they'll stick.*  Repeat with all shrimp.  You can always mix up more of any of the three dips, if you find you're running out.  
Shrimp dipped and ready for baking!


Bake shrimp at 400 F for 10 minutes.  Carefully flip each shrimp, then bake another 8-10 minutes.  

It always ends up looking a little messy, but that's just because the shrimp get flipped.  

These are really tasty served with a sweet chili sauce.  You can mix the Thai chili sauce with peach preserves for a nice, sweet sauce accompaniment.  I find most brands are gluten-free, which is great!  Enjoy! 


Easy Coconut Shrimp Recipe by Successfully Gluten Free!