Search for a Recipe

Sunday, 27 February 2022

Easy Raisin Cinnamon Swirl Bread

A tasty gluten-free raisin (and/or cranberry, currant, cherries) cinnamon swirl bread.  It's nice and fluffy, and a bit easier than my other favorite cinnamon swirl-style breads: apple-cinnamon swirl breadcinnamon swirl bread, monkey breadmonkey bread with drizzle, hearty-bread with cinnamon-raisin option, and pumpkin swirl bread. Enjoy!
Cinnamon Swirl Bread with currants, cranberries, and raisins. Yum!

Easy Raisin Cinnamon Swirl Bread!

Makes 2 large loaves, 6 mini loaves, or 3 mini loaves and 1 large loaf (it's versatile!)


Preheat oven to 375 F.  Line pans with parchment paper. 

In a mixer combine:
2 cups brown rice flour
1 cup white rice flour
1 cup potato starch
3/4 cup tapioca starch
1/3 cup sugar
2 Tbsp cinnamon
4 tsp rapid-rise/quick yeast
4 tsp xanthan gum
2 1/2 tsp salt
2 tsp baking powder

Add, and let beat 3-4 minutes:
2 cups warm water
6 eggs
1/4 cup butter, softened
2 Tbsp oil 
4 tsp apple cider vinegar

Fold in: 
1 cup dried fruit, like cranberries, currants, raisins, or cherries 
A combination of cranberries, currants, and raisins is my favorite, but I've done the following and it's also been delicious:
1/2 dried cranberries + 1/2 raisins
1/2 dried cherries + 1/2 currants
1/2 golden raisins + 1/2 currants
Batter ready to be scooped into prepared pans.
Scoop into prepared baking pans, filling about 2/3 full.  Smooth the tops with wet hands.  Let rise in a warm location until the dough has puffed up just above the sides of the pan.  
Mini pans filled and flattened with wet hands.
Large pan filled and flattened with wet hands, ready to rise.
Puffed nicely just over the edges, ready to bake!

Bake the loaves at 375 F.  Mini loaves will bake for ~30 minutes.  Large loaves will bake for ~45-50 minutes.   Let cool out of the pan.  Slice and enjoy!  These slice reasonably well even while still a bit warm.  We often have enjoyed this fresh with butter.  This bread will slice and toast nicely.  Delicious used in French toast, too.  Leftovers can be sliced and frozen.  Enjoy! 
Fresh from the oven.
Fresh from the oven and cooling.  These always smell so nice!
Golden raisins and dried cherries in this loaf! 

Easy Raisin Cinnamon Swirl Bread Recipe by Successfully Gluten Free!

Tuesday, 8 February 2022

Giant Chocolate Chip Cookie/Chocolate Chip Cookie Pie

A large, oversized chocolate chip cookie is a fun alternative to regular chocolate chip cookies.  You can, of course, vary the sorts of chips you put in your giant chocolate chip cookie.  A handful of mint chips is nice for the holidays.  If you're in the mood for smaller cookies, I've posted LOTS of options:  Amazing Chocolate Chip Cookies, Triple Chocolate Cookies, Fabulous Chocolate Chip Cookies, Delicious, Soft Chocolate Chip Cookies, Coconut Chocolate Chip Cookies, Brownie Chocolate Chip Swirl Cookies, Mint Chocolate Chip Cookies, Huge Cake-Style Chocolate Chip Cookies, Oatmeal Chocolate Chip Cookies, and many other cookie varieties!

Heart-shaped for Valentine's Day! 
A slice of chocolate chip cookie pie! 

Giant Chocolate Chip Cookie Recipe


Preheat oven to 350F.  Generously butter a 10" pie dish or cast iron baking dish.  You can also gently heat your cast iron baking dish with 1-2 Tbsp butter until butter is melted.

Cream the following:
1/2 cup butter
1/4 cup +2 Tbsp. white sugar
1/4 cup + 2 Tbsp. dark brown sugar

Then add and mix lightly:
1 tsp vanilla
1 egg

In a separate bowl, mix together: (you want to mix gluten-free flours with xanthan gum before adding it to the wet ingredients, so you don’t get clumping)
1 cup white rice flour
1/4 - 1/2 tsp xanthan gum (aka, heaping 1/4 tsp)
1/2 tsp baking soda
1/2 tsp salt

Add dry ingredients to wet ingredients, mix.
For generously filled Chocolate Chip Cookie Pie, fold in:
1 - 1 1/2 cup semi-sweet chocolate chips (you can use less if you prefer)

Ready to bake! 
In a cast iron skillet, ready to bake!

Gently press the dough into your prepared 10" cast iron pan OR prepared smaller pans, like the smaller heart baking dishes.  Bake your chocolate chip cookie pies at 350 F for 15-17 minutes for smaller pans and ~25-27 minutes for your larger pan until nicely golden.  Cool at least 5-10 minutes before slicing and serving.  These are delicious served hot with ice cream! A fun treat!
Fresh from the oven! Yum!
Served warm, it won't slice as neatly, but will be gooey and delicious!

Giant Chocolate Chip Cookie Recipe/Chocolate Chip Cookie Pie by Successfully Gluten Free!

Tuesday, 1 February 2022

GF Pork Stuffed Rolls!

These are a fun alternative to make when you don't want the mess of frying egg rolls.  They use the same filling, including the rice vermicelli noodles, but then you make a nice soft dough to wrap around the filling. If you're not up for making the rolls, you can always serve the pork filling and noodles as it's own dish. Enjoy!  
Pork stuffed bun, sliced open. Yum! 
Cooling pork stuffed rolls! 

Gluten Free Pork Stuffed Rolls!

Makes ~12-18 stuffed buns, depending on size you make them

Pork & Veggie Filling:

In a large frying pan over medium heat cook: 
1 lb ground pork
3 carrots, grated
1/4 - 1/2 tsp salt (omit or add just a dash if you're using a GF soy sauce that isn't Bragg's Soy Seasoning)
1/4 - 1/2 tsp pepper

Once the pork is about halfway cooked, add and continue cooking until pork is fully cooked: 
1 bell pepper, finely diced

When the pork is fully cooked, add and cook 1-2 minutes: 
2 Tbsp fresh ginger, grated
6-7 garlic cloves, minced OR 1 heaping Tbsp minced cloves (they sell jars in the vegetable areas at most large supermarkets)
2 Tbsp freeze dried red onion, optional

Add and cook 1-2 minutes: 
4 Tbsp Bragg's Liquid Soy Seasoning OR Gluten-Free Soy Sauce
1-2 tsp agave
Pork and vegetable filling, ready to cool a bit.
Remove from the heat and let cool while you prepare the noodles and dough. 

Rice Noodles:

Fill a large pot halfway full with water and 1 Tbsp salt.  Bring to a full, rolling boil.  Add to the pot:
Half or whole package of very thin rice noodles (I like the Maifun rice sticks for this recipe - the amount you cook depends on if you'd like any leftover noodles to eat with cooked pork filling if you get tired of making and wrapping egg rolls)  

Turn off the heat and leave noodles to rest in the pot for 10 minutes.  They are then ready to use!  You can just use them straight from the pot.  Drain and remove a portion of noodles into a small bowl for convenience when you're going to use them.    

Dough:

Here, you'll be making a tangzhong-style dough by first cooking part of the liquid and flour on the stovetop.  It helps the texture of your final dough. 

In a small/medium pot, stir over medium-low heat until lines appear in dough as you pull your spoon back and forth:
1 cup water OR liquid part of canned coconut milk

Remove from heat and set aside while you prepare the dry ingredients.  

In a mixer, combine: 
1 1/4 cup tapioca starch
1 cup brown rice flour
1/2 cup potato starch
1/4 cup cornstarch
2 tsp xanthan gum
1 tsp salt
5 Tbsp sugar
2 tsp quick (rapid-rise) yeast

Add and mix in, letting it beat at medium speed for 3-4 minutes: 
1/2 cup full-fat coconut milk (thick part of canned coconut milk)
1/2 cup tangzhong stovetop mixture from above
2 Tbsp butter
2 tsp apple cider vinegar
1 egg

Use wet hands (just dip in a little bowl of water) anytime you need to handle the dough.  You can also use a small-medium sized cookie scoop to get evenly sized rolls. 

Assembling your rolls:

Preheat oven to 375 F.  Line baking pan with parchment paper. 

Take a small piece of dough.  Roll it out between plastic wrap.  Fill with a bit of pork filling and top with some rice noodles. Use the plastic wrap to help you wrap the dough up and over the filling, pinching together at the top.  Use wet hands to carefully place your roll on the prepared parchment-lined pan.   Repeat with the remaining dough.  
Dough filled with pork & noodles
Pinched together around the filling.
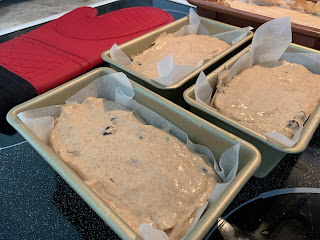
Placed on the pan to rise, then be brushed with an egg wash. These are 1/4 sized baking sheets, so half the size of a normal cookie sheet. 
Let the buns rise in a warm location for ~30 minutes, until nicely puffed up.  I find if I put another pan upside-down on top of the pans, it helps them rise faster.  

Beat in a small bowl 1 egg + 1 tsp water.  Brush the tops of your puffed buns after they've risen.  If desired, you can sprinkle with sesame seeds before baking.  I'd recommend sprinkling the sesame seeds, then adding the egg wash. It helps hold the seeds on top. 
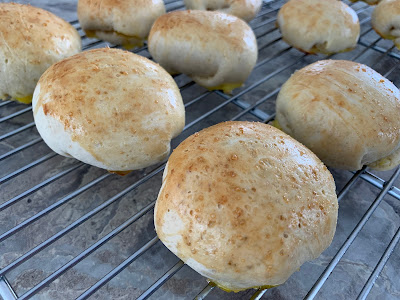
Risen and ready to bake!
Bake your pork stuffed buns at 375 F for 25-30 minutes, until nice and golden brown.  The filling has been pre-cooked, which is helpful, so you just want your bread dough to be thoroughly cooked.   Let rest a few minutes on the pan before removing to a wire rack to cool.    These are delicious served with a simple dipping sauce, like a sweet chili sauce or the one below. 

Dipping Sauce:

Mix together the following:
1/4 cup rice vinegar
3 Tbsp Bragg's soy seasoning (or GF soy sauce)
1-2 tsp agave
1/2 tsp garlic powder
1/2 tsp ground ginger
1 tsp garlic-chili sauce

Fresh from the oven! 
Cooling after baking. Yum! 

Gluten-Free Pork Stuffed Rolls/Buns Recipe by Successfully Gluten Free!

Saturday, 22 January 2022

Dark Chocolate Raspberry Opera-Style Cake (nut-free!)

 We have a lot of winter birthdays around here, so lots of experimenting with cakes.  My daughter wanted another opera cake, like her birthday last year, but I convinced her to let me tweak it a bit and turn it into a raspberry chocolate version for her 11th birthday.  The addition of chocolate to the sponge makes the recipe a little less straight-forward, but it isn't too tricky and can be mixed up in a bowl with a whisk.  Beautiful and delicious!  My youngest helped me make this cake for her sister, and we especially love how the raspberry frosting turned out (based on a strawberry frosting that's a favorite).  Enjoy! 
A pretty four layer chocolate opera-style cake! Hard to see some of the layers with the dark chocolate ganache & jam between the chocolate from this angle, but they're there! So yummy!
Slices of birthday cake for my now 11 year old served with a little ice cream on the side. 

Dark Chocolate Raspberry Opera-Style Cake (nut-free!) 

Chocolate Sponge Cakes:

Preheat the oven to 350 F.  Butter the edges and line 2 quarter sheet baking pans with parchment paper (quarter sheet baking pans are approx 8x12 inner dimension or 9x13outer dimension metal cookie sheets - I LOVE this size.  Perfect for the toaster oven, and perfect when you have multiple things you want to roast separately in the regular oven, and of course, opera-style cakes!)

Melt together, then set aside:
1/4 cup butter
1/4 cup dark chocolate chips

In a small measuring cup, combine to make a "buttermilk": 
2 Tbsp white vinegar
milk to equal 1 cup (lactose-free or milk substitutes work)

In a large bowl, whisk together: 
1/2 cup coconut flour
1/4 cup cocoa powder
1/4 cup white rice flour
1 cup sugar
1/2 tsp baking soda
1/2 tsp salt

Add and whisk in until smooth: 
1 cup buttermilk, from above
melted butter & dark chocolate, from above
1/4 cup oil
6 large eggs
2 tsp vanilla bean paste or vanilla extract

Batter whisked and ready to put into the prepared pans.

Divide between the two parchment-lined pans.  Bake at 350 F for approximately 15-18 minutes.  These are nice and thin, so they cook quickly.  They should look nicely dried, but not burned or too dark on the edges. They should look no longer wet in the center.  Depending on your oven, they may need an extra minute or two.

Batter divided and ready for baking.
Out of the oven.  You can see how it's nicely dried out. Chocolate cake always smells so good.

Remove from oven.  Let rest 5 minutes before flipping onto cooling racks to cool.  Once cool, carefully slice each cake in half so you'll have four even layers for your cake.  

Chocolate Ganache:

Once cakes are set to cool, prepare your chocolate ganache.  It will need some time to cool a bit on the counter before assembling the cakes, so timing-wise, I found this worked well.  

In a saucepan over medium heat combine and heat until bubbling gently: 
1/2 cup butter
1/2 cup whole cream/whipping cream
1/2 tsp vanilla bean paste or extract

Remove from heat and stir in until smooth (this takes a bit of patience, usually a few minutes): 
8 oz high quality semi-sweet or bittersweet chocolate

Once the ganache is nice and smooth, you can divide it into a couple bowls so it will cool down a bit faster.  If you use it right away, it'll just pour off and be too thin.  I find if I just let it rest on the counter while I prepare the chocolate-sugar syrup and frosting, it's perfect. 

Chocolate-Sugar Syrup: 

(This is in place of the traditional coffee syrup - which is coffee mixed with sugar - the cocoa powder gave a perfect bitterness to the syrup so it worked wonderfully to brush on the cake layers!)
In a mug, combine: 
1/2 cup boiling water
1 Tbsp cocoa powder
1/4 cup sugar

Stir until sugar is completely dissolved and you have a nice, smooth sugar syrup to use to brush on your cakes.

Raspberry Marshmallow Frosting:

Once cakes have cooled, you can prepare your frosting, as it's time to assemble! 

Beat together in a mixer until light and fluffy - 2-3 minutes: 
1/2 cup butter, softened
2 cups powdered sugar
1 cup marshmallow fluff
3 Tbsp good quality raspberry jam
1 tsp vanilla extract
1 tsp (or more if needed) cream or milk (I typically don't find I need it bc the jam adds some liquid)

Assembling your cake:

To assemble cakes: 
1. Brush each cake layer with your chocolate-sugar syrup

2. Spread one layer with 2/3 of the raspberry frosting.  Spread the remaining frosting on one layer (this will be your top layer). 

3. Gently spread some high quality raspberry jam on top of the two layers that have no frosting.  Then, carefully spread chocolate ganache on top of the jam.   Make sure you have at least 1/3 to 1/2 of the ganache remaining.

4. (Optional, but helps them stack a bit more neatly).  Place the frosted/ganache covered layers in the refrigerator for 10 minutes to help set just briefly.  

5.  Carefully, assemble your cake as desired  I like to assemble in the following order: Bottom - jam & ganache, Second to bottom - all frosting, Third layer - jam & ganache, and then the top layer with your frosting.  I like to add the last layer of ganache and decoration after assembling for a neater look.    
Starting to plate the cake.  Bottom layer with jam & ganache here, to be followed by the frosted layer, than another jam layer, then the top layer! 

6.  Once assembled, spread the remaining chocolate ganache on top of the layer with 1/3 icing (your top layer).  The ganache should be warm enough to spread and give a beautiful sheen to your layers. If the ganache isn't warm enough, you can gently heat for 10 seconds in the microwave to warm it up.   Save some extra ganache for decorating the top!!! Let rest briefly, then pipe decoration of your choice on top using extra ganache.  I like to place ganache in a ziploc bag with the corner snipped off.  If you pipe warm (not hot) ganache onto slightly cooled, but not set ganache, you can end up with a beautiful look that defines the top of most proper opera cakes.  
Layered and stacked with decoration piped on. Don't worry about drips or edges since those get trimmed off!
It always looks so neat when you can get the timing right and the ganache piping flows nicely into the rest of the ganache layer.

7.  Refrigerate 15-20 minutes.  *I find if you refrigerate it too long, you'll lose the beautiful sheen because the ganache sets too hard.  Although it does tend to warm up and still look nice once it's left at room temperature.*

8.  Using a large knife (you can heat it if you like, but I found just wiping it well with a paper towel between slices worked for me), slice off the edges to create the clean, beautiful edges that define a proper opera cake. 

Trimming the edges off the cake.  

We love how this ends up looking!  So neat! 

9.  Carefully wipe off the edges of your platter OR remove the parchment paper pieces.  Try to touch the cake as little as possible on the top to avoid messing up the beautiful sheen.   Leave at room temperature until serving.  Serve in thin slices or small squares to show off your pretty layers!  Yum! 

This cake is best served at room temperature and made on the day you're serving because of the beautiful shine on the ganache.  However, leftover cake stores perfectly sliced in the refrigerator in tupperware - and it tastes just as delicious a day or two after assembling.   You could even freeze slices, let them defrost in the bag and then serve at room temperature as well for leftovers! Enjoy !

One very happy 11 year old! 

Dark Chocolate Raspberry Opera-Style Cake by Successfully Gluten Free!

Saturday, 8 January 2022

Easy Peach Pancakes

Some days, a quick, comforting meal is what everyone around here is hoping to eat.  I was lucky enough to make a bunch of homemade peach jams from some neighbors peaches they weren't going to use - turns out it's perfect in peach pancakes!  My jam was definitely more of a loose, homemade pectin-free variety, but just use slightly less jam and extra milk if yours is a thicker jam.  You're aiming for a typical pancake batter texture. The jam is the sweetener in these pancakes.  These have been a hit with everyone around here each time we've made them.  Leftovers freeze well, which we love for easy breakfasts.  Enjoy!  
Fresh peach pancakes - great snatched up without any toppings at all!
Pancakes cooking to a nice golden brown.
A picture of the fall peaches. It was so fun to pick them.

Easy Peach Pancakes

Mix together in a large bowl: 
1/2 cup brown rice flour
1/2 cup white rice flour
1/2 cup tapioca starch
1 tsp xanthan gum
1 Tbsp baking powder
1/2 tsp salt
1/2 tsp cinnamon

Add and mix in just until combined: 
2 eggs
1 cup peach jam (I use a homemade peach jam that is quite thin - if you use a thicker jam, add a bit less jam and a bit extra milk to balance out the thickness of your batter)
3/4 cup milk (or dairy-free option) (Add extra milk if you have thicker jam.  I'd recommend 3/4 cup peach jam and 1 cup milk, with perhaps a little extra milk if your jam is thick)
1/4 cup oil

You want a typical pancake consistency.  Not too thick, not too thin.  These will make nice, fluffy pancakes.  

Over a medium-low heat, cook pancakes until browned on one side, then flip and cook on the other side.  I like to check the center of a pancake to make sure they're fully cooked inside.  If you have a nonstick griddle, these can be made without added butter to cook.  Otherwise, butter and cook pancakes like you would any regular pancakes.  

These are just firming up at the edges and showing signs of bubbles in the middle of each pancake, which I usually use as a sign that it's time to flip. 
Yummy pancakes! Ready to serve! 

These are delicious plain or with some maple syrup.  Enjoy! 


Easy Peach Pancakes by Successfully Gluten Free!

Saturday, 1 January 2022

Delicious Free-From Bread (No eggs, dairy, gluten, rice, seeds, or nuts)

This is a yummy GF bread recipe that I've nicknamed my "free-from bread" since it's free from all sorts of things commonly found in a gluten-free bread - two more unusual ones I needed to remove were rice and eggs in addition to dairy, gluten, nuts and seeds.   I have done a bit of playing around with recipe replacements for eggs that don't require any sort of seed (like chia, flaxseed, etc.)  I have found that a combination of applesauce and oil works really nicely.  Combining that with a need for a gluten-free bread that didn't include rice flour and I ended up with this recipe below! A winner, in my opinion!  It was soft and delicious.  It has a nice taste that isn't too sweet, so it was delicious alongside a beef stew my friend made, but would be equally tasty with a dollop of jam on top.  If you're OK with rice and eggs, my go-to sandwich bread is my French-bread style sandwich bread
Sliced "free-from" bread! 

Fresh from the oven - dairy-free, gluten-free, rice-free, seed-free, nut-free, egg-free bread! 

Delicious Free-From Bread (No Eggs, Dairy, Gluten, Rice, Seeds, or Nuts)

Makes 6 mini loaves

Preheat oven to 375 F.  Line 6 mini loaf pans with parchment paper. 

In a mixer, combine: 
292 g tapioca starch/flour (~2 1/4 - 2 1/3 cups) 
200 g oat flour (~2 - 2 1/4 cups) (make sure GF if Celiac or sensitive)
90 g potato starch (~2/3 cup)
70 g arrowroot starch (~1/2 cup)
1/2 cup quick cook steel cut oats (make sure GF if Celiac or sensitive)
3 Tbsp sugar
1 Tbsp xanthan gum
1 Tbsp rapid-rise/quick yeast
1 Tbsp baking powder
2 tsp salt

Add and beat 4-5 minutes: 
450 ml (15 oz) warm water (not hot)
180 ml (6 oz) applesauce (unsweetened, natural)
162 ml (5 1/2 oz) oil
1 Tbsp apple cider vinegar

Divide evenly between 6 parchment-lined mini loaf pans.  Use wet hands to smooth and flatten the tops of the loaves.  Set in a warm location to rise.  Cover by placing an upside down baking sheet over the tops of the loaf pans.  Let rise ~30 - 45 minutes, until the dough is just puffing up above the top of the pans when you look at them from the side.

Bake risen loaves for ~45 minutes at 375 F.  Remove from oven.  After 1-2 minutes, remove the loaves from the pans and parchment paper and place them on a cooling rack to cool.  You can tear into them to snack on right away, but best to let them fully cool before slicing.  These are tender, so thicker slices are perfect for this bread.  Great alongside something like a tasty beef stew or topped with jam.  Enjoy!    
Nice and airy bread. We all loved the texture and the applesauce lends a nice, natural sweetness to the bread. 

Delicious Free-From Bread (No eggs, dairy, gluten, rice, seeds, or nuts) by Successfully Gluten Free!

Sunday, 26 December 2021

Monty's Specialty Muffins (aka Brownie Bites with Chocolate Truffles inside)

My son, Monty, and I came up with these yummy brownies!  This year, he asked if we could make his "specialty muffins" for Christmas.  I couldn't figure out what he was talking about until he explained it's the brownies with chocolate truffles baked inside made in muffin tins.  LOL.  These brownies are definitely not muffins, but they are made in muffin tins.  They're really delicious brownie bites.  Use your favorite gluten-free chocolate truffles OR make homemade truffles, dipped in chocolate. 
(If you are OK with gluten, you may enjoy using the Peppermint Cookie Lindor Truffles in the center.  However, Lindt (Lindor) truffles DO contain barley malt extract, which contains gluten, and therefore is NOT gluten-free.)  
The brownie batter is similar to the one used in Our Favorite Chocolate Brownie recipe.  Enjoy!

Truffle in the center of this yummy GF Brownie bite!
You can leave them wrapped or unwrapped. We only had oversized muffin liners that we could locate, so normally it doesn't look quite this small in the muffin liner. 
Cooled for an hour or so, the chocolate is still a bit melted in the middle. Yum! 

Monty's Specialty Muffins (aka Brownie Bites with Chocolate Truffles)

Makes 18 individual brownies

Preheat oven to 375 F.  Line 18 muffin tins with paper liners.  

Unwrap 18 GF Chocolate Truffles and set aside.  (You can make homemade truffles, dip in chocolate, and use for this recipe)

Melt in a microwave safe bowl: (I like to microwave chocolate at 50% power in the microwave in small, 30-45 second increments, stirring regularly to avoid any burning - yes, chocolate can burn and it's very sad when it does)
7 oz high-quality dark chocolate (70% is my favorite)
3/4 cup + 1 - 2 Tbsp salted butter

Add and stir in thoroughly: 
1 1/4 cups sugar

Mix in, incorporating one at a time: 
4 eggs

Add and stir, just until incorporated: 
1/3 cup Kristin's Gluten-Free Flour Mix (or GF mix of your choice)

Scoop 2 Tbsp. brownie batter into each prepared muffin tin.  Gently press a Chocolate Truffle into the center of each brownie.  Scoop an additional 1 Tbsp. brownie batter on top of the chocolates.  
Brownie batter divided between 18 muffin tins, each with a truffle inside. 

Bake your specialty muffins (aka, brownies) at 375 F for approximately 15 minutes, until just set in the middle.  Remove and place on a wire rack to fully cool.  Once they've cooled 10-15 minutes, you can remove the brownies from the pan to completely cool. 
Fresh from the oven! They smell SO good. 
 These are best served completely cooled (2-3 hours).  Any leftovers can be kept in a Tupperware on the counter for a couple days.  (They've never lasted longer than that at our house).  Enjoy!  
After cooling completely, these are a bit neater but still have a nice, soft inside. 
Another picture fresh from the oven. 

Monty's Specialty Muffins, aka Gluten-Free Brownie Bites with Chocolate Truffles Inside Recipe by Successfully Gluten Free!