Search for a Recipe

Monday, 16 September 2024

Tomato-Basil Soup

 It's that time of year when the days are starting to cool a bit here, and things like a tasty tomato-basil soup with grilled cheese make a perfect dinner.  If you have fresh tomatoes, then check out one of my other tomato soup recipes - they're both delicious. One is a roasted tomato soup recipe, and the other is a fresh summer tomato & basil soup recipe.  Alas, this recipe came about because all my tomatoes are itty bitty (delicious, but not really soup tomatoes) but I did still have some fresh basil available. Enjoy!
A bowl of fresh tomato-basil soup, ready to eat with our open-faced grilled cheese. Yum!

Tomato-Basil Soup

Makes ~7 cups of soup

In a large pot, heat until bubbling:
1 Tbsp extra virgin olive oil
2 Tbsp butter

Add and cook until just softened,
1 medium to large onion, chopped

Stir in, letting cook 1 minute:
1 large can (796 ml / 27 oz) diced tomatoes
2 - 3 tsp minced garlic

Add:
3 1/2 cups chicken stock (I often just fill the diced tomato can with water & add GF chicken bouillon or Asian mushroom seasoning)
2 - 3 Tbsp tomato paste
1/4 - 1/2 tsp chili sauce or harissa paste *see below
1/4 cup fresh basil leaves (I've often added this later, but it adds a wonderful depth to simmer along with everything)
1/2 tsp pepper
1/2 tsp salt

Bring to a boil, then lower heat and simmer 20 minutes.  

Puree the soup with a stick blender to desired consistency.

Taste & season with additional salt & pepper, as desired.

Serve hot with fresh ground pepper & grilled cheese sandwiches! 
We often place slices of bread on a pan and top with sliced cheese, then just heat it all in the oven and eat these open-faced "grilled cheese" breads with our tomato soup.
Enjoy!


*A bit more about Harissa: This amount will add just a touch of depth to the taste, but not spiciness - add a bit more if you want more spice. Harissa is a hot chili paste that incorporate a few others spices as well. It tends to come in small containers, like a small jar.  If you don't have harissa, you can add a small pinch of cayenne powder or little scoop of any hot chili paste.

Tomato-Basil Soup Recipe by Successfully Gluten Free!

Friday, 6 September 2024

Banana Oatmeal Pancakes

I'll give a little background on how I ended up creating these yummy (& healthy) banana oatmeal pancakes. Years ago my blender broke. And when I say years ago, I mean back when I had one kid. I now have 3 and the youngest is 10, so it's been awhile since I had a blender. The stick blender and I are still friends, but I have a new blender and it's been so fun to play around with throwing things together quickly. These banana oatmeal pancakes do have to be cooked on medium-low, but you can toss everything into a blender and just let it blend for a minute, and voila, the batter is ready! Feel free to add in mini chocolate chips if you'd like to make your youngest happy, too. Enjoy!
Banana Oatmeal Pancakes drizzled with maple syrup

Banana Oatmeal Pancakes

Makes ~24 pancakes
In a blender, add the following: (Don't have a blender? You can mix this in a large bowl with a stick blender)
4-5 overripe bananas
4 eggs
1 cup milk
2 tsp vanilla bean paste or vanilla extract
2 cup GF oats
1 Tbsp baking powder
1 tsp cinnamon
1/2 tsp salt
2 Tbsp oil (optional)
2 Tbsp sugar (optional)

Blend for 1 minute. 
If desired, mix in before cooking pancakes: 
2-3 Tbsp mini chocolate chips

Scoop and cook pancakes over medium-low heat. I prefer to butter the pan between batches.  
My kids prefer all pancakes with mini chocolate chips added, but either way works great. 

Place cooked pancakes on a plate or platter. Leftover pancakes can be cooled and frozen for easy breakfasts. Enjoy!
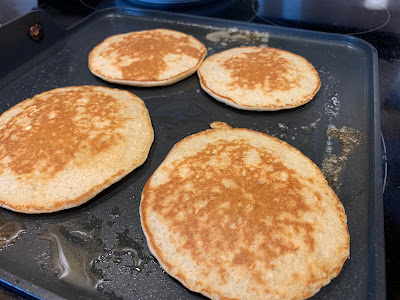
Cooking up yummy banana oatmeal pancakes! 

Banana Oatmeal Pancakes Recipe by Successfully Gluten Free!

Monday, 19 August 2024

Delicious Cinnamon Donuts

 These yummy cinnamon donuts are made using yeast, but are still easy to whip together and taste delicious. Another fun and tasty donut to add to my collection of donut recipes and experiments.

Freshly fried cinnamon donuts. Yum!

Delicious Cinnamon Donuts

Makes 36 donuts
Cut parchment paper cut into 36 squares (for piping donuts).

Mix together in a mixer: 
1 cup white rice flour
1/2 cup brown rice flour
1/2 cup tapioca starch
1/4 cup potato starch
1/4 cup arrowroot starch or cornstarch
1 tsp xanthan gum
2 tsp rapid-rise/quick yeast
1/2 tsp salt
3 Tbsp sugar
1/2 tsp baking soda
2 tsp cinnamon
1/2 tsp nutmeg

Add, then beat until nice and smooth, 2-3 minutes: 
3 eggs
3/4 cup milk, warmed
1/4 cup butter, softened
1 tsp vanilla bean paste OR vanilla extract
1 tsp apple cider vinegar

Put batter into a large freezer ziploc.  Snip 1/4" off one corner. (I like these to be thinner and more churro-like than my regular donuts, so I make thinner large donut circles). Pipe donut rounds onto each of the pre-cut pieces of parchment paper.  Lightly smooth the piped donuts with water, as needed.  Let rise in a warm location for 20-30 minutes.  
Cinnamon donuts, piped onto parchment squares and ready for frying!
While donuts are rising, you can heat your oil.  I like to use avocado oil for frying, but you can use canola or whatever kind you prefer for frying.  Heat to ~165C - 170C / 325 F - 338 F. Using the pieces of parchment paper, gently lower the donuts into the oil in small batches (this depends on the size of your fryer or pot used for frying - I can usually fry 6 - 9 at a time). The donuts initially sink, then will bob back up, and you can use tongs or chopsticks to grab the pieces of parchment paper and pull them carefully out of the oil. I put the donuts in with the parchment paper on the bottom side, which I find makes it easier to slide away from the cooking donut. Cook 2 minutes per side, until nicely golden. 
Cinnamon donuts - almost done frying!
Remove donuts from fryer and place on a paper towel-lined pan.  

While donuts are still nice and hot, dip or press both sides of the donuts in a bowl of: 
white granulated sugar
*Make sure to dip in the sugar while the donuts are still piping hot, or you'll have trouble with the sugar sticking to the donuts*. 

Put sugar-dipped donuts on a fresh parchment-lined pan. They're ready to eat!  You can eat them hot or let them cool.  Cooled donuts can be frozen in a freezer ziploc and thawed/heated to eat anytime.  Enjoy!
Freshly made and dipped in sugar.
A happy donut taste-tester!

Delicious Cinnamon Donuts Recipe by Successfully Gluten Free!

Thursday, 8 August 2024

Delicious Brown Bread

Sweetening with a bit of honey and molasses creates the brown color of this tasty bread. I'm always looking for yummy family-friendly breads that everyone enjoys. This recipe makes 3 nicely sized loaves.  Cooled bread can be neatly sliced and freezes perfectly. Enjoy!
Fresh yummy bread!
Fresh from the oven before moving to the cooling racks. Yum.

Delicious Brown Bread

Makes 3 regular sized loaves

In a mixer, combine: 
3 1/2 cups brown rice flour
3/4 cup sorghum flour
2/3 cup arrowroot starch/flour (or cornstarch)
1/4 cup potato starch
1/2 cup GF steel cut quick oats (optional - if you leave our use 1/2 less water)
1 1/2 Tbsp xanthan gum
2 Tbsp rapid-rise yeast
2 tsp salt

Add and mix, then beat 4 minutes: 
2 1/2 cup warm water
1/2 cup applesauce
2 tsp apple cider vinegar
4 Tbsp oil (olive oil works nicely)
4 Tbsp honey
2 Tbsp molasses
6 eggs

Divide into 3 loaf pans lined with parchment paper.  Cover with an inverted baking tray.  Let rise ~45 minutes, until nicely puffing over the top of your pans.  


Pans ready to cover and let rise.
Covered with an inverted baking sheet.
Risen and ready to bake!
Bake at 375 F for 50 minutes.  Let rest a few minutes in pan before removing from pan and parchment paper to fully cool on wire racks.  Once fully cool, bread can be sliced. I prefer freezing sliced bread, which helps it maintain it's fresh consistency.  Enjoy!
Baked bread! Yum!
Cooling delicious GF brown bread loaves. 

Delicious Brown Bread Recipe by Successfully Gluten Free!

Saturday, 20 July 2024

Banana-Date Bread

 A delicious GF banana bread - and low to no refined sugar, which is great!  You can mash the bananas by hand to get a more chunky look to your bread, or literally throw all the wet ingredients into a blender (or use a stick blender) to mix together. Delicious with and without the addition of mini-chocolate chips.  Enjoy!
Delicious banana-date bread!  This was mixed by hand, but I often will use the blender for a less chunky version of this banana-date bread. Either way is great!

Banana-Date Bread

Makes 4 mini loaves
Preheat oven to 350 F. Line 4 mini loaf pans with parchment paper. 

Heat 1 1/2 minutes in the microwave:
1/2 cup milk
5 oz dates

Let rest 5-10 minutes.  Then puree with a stick blender.  (If you don't have a stick blender, there are a couple of other options: 1. Finely dice your dates before heating them with the milk OR 2. After 5-10 minutes of resting - just so your milk/date mixture isn't quite so hot, blend in a blender all the wet ingredients.

In a bowl, mix together: 
1 tsp xanthan gum
1 1/2 tsp baking soda
1/2 tsp salt
1 tsp cinnamon

In a large bowl mix together: (If you're using a blender, you can put all of these plus the date/milk mixture (unblended) in and then mix, then stir into the flour mixture, above)
4 overripe bananas
4 Tbsp oil 
1/4 cup sugar OR 1/4 cup agave nectar
1 tsp vanilla extract
2 eggs
Date/milk puree, from above

Mix together dry and wet ingredients.  If desired, you can add: 
1/2 cup dark chocolate chips (optional)

Spread batter between the four mini loaf pans lined with parchment paper.  Bake at 350 F for 35 minutes, until nicely browned.  Let rest a few minutes in the pan, then remove from pans & parchment paper onto wire racks to full cool. Leftover bread can be sliced and frozen in ziploc bags.  Enjoy!

Fresh from the oven, just cooling a bit before removing to fully cool on a wire rack.

Banana-date bread recipe by Successfully Gluten Free!

Sunday, 7 July 2024

Crispy Lemon Cookies!

 These yummy crispy lemon cookies are a request from my dad - and what a perfect summertime request they are! They're lovely and light. And leftovers freeze perfectly, for little treats anytime! 
Enjoy! 
Delicious crispy lemon cookies - cook to a slightly darker brown for a crispier cookie. These had a slight softness to the center. 
I recommend at least this brown, but add an extra minute or two for a fully crispy cookie. 

Crispy Gluten-Free Lemon Cookies!

Makes ~36-45 (depends on size of your scoops)

Preheat oven to 375 F. 

In a large bowl, whisk together the dry ingredients (it's important to do this in GF baking to avoid clumping):
1 cup white rice flour
1/4 - 1/2 tsp xanthan gum
1/2 tsp baking powder
1/2 tsp salt

In a mixer, beat until light and fluffy:
1/2 cup butter, softened
3/4 cup white sugar

Add and mix in until thoroughly combined and still light and fluffy: 
2 egg whites
zest 2 lemons
1 tsp milk (you may need a little extra if you find your cookies don't spread as much as you like)
3-6 drops lemon essential oil
Light and fluffy wet ingredients, ready to mix in the dry ingredients.

Add and mix in dry ingredients, just until combined.  Scoop small Tbsp size scoops onto the pan. You can flatten a bit, if desired, for a slightly wider cookie.  
Small scoops - these do spread when baking - and you can flatten a bit before baking for thinner & wider cookies. 

Bake at 375 F for ~10 minutes, or until a nice light golden brown.  For less crispy cookies, they can be a bit pale on top and browned on the edges, and for a crispier cookie, cook an extra couple minutes until nicely light browned on top. 
Fresh from the oven - these are a lighter brown, so end up with a slight softness left in the center, but are wonderfully crispy around all the edges. Cook til fully light browned on top for a crispier overall lemon cookie. 
Cooling on the cooling rack - with one flipped over to show the light browned bottom. I recommend at least this brown, if not a bit darker for a crispier cookie. 

Let rest a minute or two before removing to cooling racks to fully cool.  Leftovers store perfectly in the freezer!  These lemon cookies are great on their own, or served with homemade lemon curd or ice cream. Enjoy!

Crispy Lemon Cookies Recipe by Successfully Gluten Free!

Saturday, 22 June 2024

Blueberry Cobbler!

 A perfect summer recipe! This delicious cobbler is so easy to whip together. It's a nice addition to that many blueberry recipes I've shared.  This recipe can be combined with my peach cobbler or tart cherry cobbler recipes, if desired.  I find if you'd like a thicker topping, you can just make the single 8 x 8 pan of blueberry cobbler, or if you like less topping overall, you can divide the topping between two 8 x 8 pans of fruit. Either way, it disappears within a day around here. Enjoy! 
A pan of blueberry cobbler and peach cobbler, with the lighter topping option. 

Blueberry Cobbler!

In an 8" x 8" glass pan, fill halfway with:
frozen wild blueberries  (I'd estimate 4-6 cups blueberries are needed, but it's always tricky to gauge measuring, so I just go by filling the 8 x 8 pan halfway. You can also make this recipe with fresh blueberries.)

If you want to make a pan of peach (or tart cherry) at the same time you can put the sliced peaches in an 8 x 8 pan, and add the following to the peaches, same as the blueberries.

Add and mix in: 
2 - 4 Tbsp sugar
2 - 4 Tbsp Kristin's Gluten-free Flour Mix
1 tsp cinnamon

Mix together in a large bowl (if you want a lighter topping, make half the amount listed here - it'll work perfectly well, too!  Or, make the full amount and split it between the blueberry pan and make the peach cobbler, too! That's usually what I do since there's more to go around.):
1 cup Kristin's Gluten-free Flour Mix
3/4 - 1 cup sugar
1 tsp baking powder
1/2 tsp salt

Add, chopping in with a pastry cutter until you have a crumbly topping:
3 Tbsp butter, chilled
1 egg
1 tsp vanilla extract or vanilla bean paste

Sprinkle the crumb topping over the prepared blueberries.  Bake at 350 F for ~50 minutes, until topping is nicely browned.  Great served hot or warm.  The cobbler can be served alone - but we love it with a tiny dollop of vanilla ice cream or whipped cream needed! We enjoy leftovers chilled or reheated. Enjoy!
A pan of peach and blueberry cobbler with the lighter cobbler topping option. Gone within a day!

Blueberry Cobbler Recipe by Successfully Gluten Free!