Search for a Recipe

Monday, 25 January 2021

Opera-style Cake (nut-free!)

 Oh my goodness, I can't even begin to describe how delicious this cake was for my little girl's 10th birthday.  A light vanilla sponge, chocolate ganache and marshmallow vanilla frosting - it was beautiful and scrumptious.  Nothing about this cake is difficult to make, but it does require a bit of time to allow things to cool before assembling.  My daughter wanted a chocolate and vanilla cake, but left the details up to me (I love when they do that).  The coconut flour in the batter gives the wonderful moistness to the sponge in lieu of the more traditional almond flour used in opera cakes.  The ganache is rich but lovely in thin layers throughout the cake.  And just a bit of marshmallow fluff in the frosting lightens up the buttercream parts.  A proper opera cake uses a coffee sugar syrup brushed onto each sponge layer, but I created a simple cocoa-sugar syrup which worked perfectly.  It was such a beautiful cake, too.  We were so excited cutting and serving the cake we almost forgot to sing!  Enjoy! 
Opera Cake Gluten Free
Side view of the beautiful opera-style cake for my daughter's birthday. 
Nut Free Gluten Free Opera Cake
My cursive G leaves much to be desired, but Gwen was very happy with her cake. 
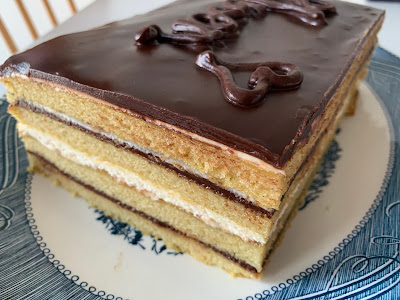
A beautiful slice for the birthday girl! 

Opera-style Cake

Makes a cake approximately 6" x 8"

Sponge Cakes:

Preheat the oven to 350 F.  Butter the edges and line 2 quarter sheet baking pans with parchment paper (quarter sheet baking pans are approx 8x12 inner dimension or 9x13outer dimension metal cookie sheets - I LOVE this size.  Perfect for the toaster oven, and perfect when you have multiple things you want to roast separately in the regular oven, and of course, opera-style cakes!)

In a large bowl, whisk together: 
1/2 cup coconut flour
1/2 cup white rice flour
1 cup sugar
1/2 tsp baking soda
1/2 tsp salt

Add and whisk in until smooth: 
1 cup milk
1/2 cup oil
6 large eggs
2 tsp vanilla bean paste or vanilla extract

Divide between the two parchment-lined pans.  Bake at 350 F for approximately 15-18 minutes.  These are nice and thin, so they cook quickly.  They should look lightly browned on the edges and no longer wet in the center.  Depending on your oven, they may need an extra minute or two.  

Remove from oven.  Let rest 5 minutes before flipping onto cooling racks to cool.  Once cool, carefully slice each cake in half so you'll have four even layers for your cake.  
Cakes fresh from the oven - a lovely pale gold with light browned edges
Each of the cakes were sliced in half, so there are four even layers. 

Ganache:

Once cakes are set to cool, prepare your chocolate ganache.  It will need some time to cool a bit on the counter before assembling the cakes, so timing-wise, I found this worked well.  

In a saucepan over medium heat combine and heat until bubbling gently: 
1/2 cup butter
1/2 cup whole cream/whipping cream
1/2 tsp vanilla bean paste or extract

Remove from heat and stir in until smooth (this takes a bit of patience, usually a few minutes): 
8 oz high quality semi-sweet or bittersweet chocolate chips (or bars chopped well)

Once the ganache is nice and smooth, you can divide it into a couple bowls so it will cool down a bit faster.  If you use it right away, it'll just pour off and be too thin.  I prefer to let it cool down sitting out on the counter rather than in the refrigerator.  But if you're in a bind, you can help it chill faster by placing it in the refrigerator. 

Chocolate-Sugar Syrup: 

(This is in place of the traditional coffee syrup - which is coffee mixed with sugar - the cocoa powder gave a perfect bitterness to the syrup so it worked wonderfully to brush on the cake layers!)
In a mug, combine: 
1/2 cup boiling water
1 Tbsp cocoa powder
1/4 cup sugar

Stir until sugar is completely dissolved and you have a nice, smooth sugar syrup to use to brush on your cakes.

Vanilla-Marshmallow Frosting:

Once cakes have cooled, you can prepare your frosting, as it's time to assemble! 

Beat together in a mixer until light and fluffy - 2-3 minutes: 
1/2 cup butter, softened
1 1/2 cup powdered sugar
1/4 - 1/2 cup marshmallow fluff
1/2 - 1 tsp vanilla extract
1 - 2 tsp (or more if needed) cream or milk

Assembling your cake:

To assemble cakes: 
1. Brush each cake layer with your chocolate-sugar syrup

2. Spread one layer with 2/3 of the frosting.  Spread the remaining frosting on one layer (this will be your top layer). 

3. Gently spread some chocolate ganache on top of the two layers that have no frosting.  Then, spread the chocolate ganache on top of the layer with 1/3 icing (your top layer).  *You may have to add a second layer of ganache to some areas if it spreads too thin.  The ganache should be warm enough to spread and give a beautiful sheen to your layers. If the ganache isn't warm enough, you can gently heat for 10 seconds in the microwave to warm it up.   I didn't use all my ganache and had some leftover.  You do want some extra saved in order to pipe decoration on the top.  I also had a tiny bit of extra frosting left, so I spread that on top of one of the ganache layers - since extra frosting is always nice.   
The far cake has just been brushed with the chocolate sugar syrup.  The front was brushed with the chocolate sugar syrup, then had some frosting and ganache spread on top. 
Covered layers, ready for their brief refrigeration.  I did spread a little extra frosting I had on top of one of the ganache layers.

4.  Place the frosted/ganache covered layers in the refrigerator for 10-15 minutes.  

5.  Remove from the refrigerator and pipe decoration onto the top layer using ganache in a ziploc bag with the corner snipped off, if desired.  For a proper opera cake, they write the word "opera" in beautiful cursive.  I wrote "Gwen", since it was my daughter's birthday.  You want to pipe everything before it sets, although I did add an extra layer of ganache on top of the original "Gwen" so it would stand out a little extra for the birthday girl. 
If you pipe warm (not hot) ganache onto slightly cooled, but not set ganache, you can end up with a beautiful look that defines the top of most proper opera cakes.  I added an extra layers to make her name really stand out, but it looked very pretty before I added that layer. 

6.  Carefully, assemble your cake as desired (I prefer to assemble on a wire rack and then slide it onto the platter, but you can assemble it on a platter and slide strips of parchment paper under each side to remove after you're done assembling and cutting.  I like to assemble in the following order: Bottom - all ganache, Second to bottom - all frosting, Third layer - all ganache, and then the top layer with your decoration.  

7.  Refrigerate another 15 minutes.  *I find if you refrigerate it too long, you'll lose the beautiful sheen because the ganache sets too hard.  Although it does tend to warm up and still look nice once it's left at room temperature.*

8.  Using a large knife (you can heat it if you like, but I found just wiping it well with a paper towel between slices worked for me), slice off the edges to create the clean, beautiful edges that define a proper opera cake. 
Edges being sliced clean.  No one complained about having to taste-test the cut-off edges.
It looked so pretty! 

9.  Carefully slide the cake onto your prepared serving platter OR remove the parchment paper pieces.  Try to touch it as little as possible on the top to avoid messing up the beautiful sheen.   Leave at room temperature until serving.  Serve in thin slices or small squares to show off your pretty layers!  Yum! 

This cake is best served at room temperature and made on the day you're serving because of the beautiful shine on the ganache.  However, leftover cake stores perfectly sliced in the refrigerator in tupperware - and it tastes just as delicious a day or two after assembling.   You could even freeze slices, let them defrost in the bag and then serve at room temperature as well for leftovers! Enjoy !

A birthday cake to remember! 
Opera-Style Cake (nut-free) Recipe by Successfully Gluten Free!

Tuesday, 19 January 2021

Chocolate Rugelach!

I always loved rugelach cookies growing up.  And I still like them - although I only get to eat them when I make them these days.  I'll happily eat any flavor - a nice tart jam works well, but my favorite has always been chocolate rugelach.  I've made these chocolate rugelach many times now, and I love the flakiness of the dough combined with the chocolate filling.  They use a dough similar to the jam-filled hamentashen recipe. Yum! If you want extra chocolatey-filled rugelach, you can double the filling amount, but I find these were messier to work with, and I liked the balance of filling to dough that I've put here.  Enjoy!  
Fresh baked chocolate rugelach, ready for taste-testing!
Rugelach with added chopped chocolate to the filling. 

Chocolate Rugelach!

Preheat oven to 375 F (or wait and do this later if you're going to chill your dough).  Line 1-2 baking pans with parchment paper.

Chocolate Filling:

Melt together in a bowl:
3.5 oz semi-sweet or dark chocolate chips
1 Tbsp butter

Add and mix in thoroughly: 
scant 1/4 cup sugar
1/8 - 1/4 tsp salt

Optional - dice 1/2 cup chocolate chips to sprinkle on top of the chocolate spread

Set aside filling and prepare the dough.  

Dough:

Beat until light and fluffy:
1/2 cup butter, softened
3 oz cream cheese, softened
3 Tbsp sugar

Add and beat in until smooth:
1 egg
1 tsp vanilla extract
zest of 1 lemon

Mix in a small bowl  before adding to wet ingredients:
1 1/2 cup Kristin's Gluten-Free Flour Mix
1/2 tsp xanthan gum
1/4 tsp salt

Mix dough together until smooth.   Most recipes recommend chilling, but I find because I am making these rolled between plastic wrap, I can just make them right away without any refrigeration.   Roll out the dough between plastic wrap to make a rectangle about 8" x 30".  

Spread the chocolate filling from above evenly over the dough.  Sprinkle extra diced chocolate chips if using on top of the chocolate spread.  Have a small bowl of water available to use to help with any stickiness while you're rolling and slicing your dough.  Use the plastic wrap and wet fingers, as needed, to tightly roll up the dough so you have a long, 30" log. 
A log of dough - ideally roll it a bit tighter than this version - it ended up being a little lopsided.

You have THREE options at this point.  You can chill the log of dough for 60-90 minutes before slicing (this does make for neater cuts, but I tend to go for speed), or you can slice the dough and chill them for 20-30 minutes on the baking pan before baking.   If you're short on time, you can just bake them right away, but you'll end up with neater rugelach cookies if you can chill them for the 20-30 minutes before baking. 

Use a sharp knife that you clean between each slice, slice the rugalach into 1" pieces and place them on the parchment-lined pan.  These don't spread much, so you can fit quite a lot on one pan.  

Just before baking, brush the tops of the rugelach with: 
1 egg, beaten

And sprinkle with: 
cinnamon-sugar (1/2 cup white sugar + 1-2 Tbsp cinnamon mixed together is a nice ratio)

Mmm.. pretty chocolate rugelach, ready to bake.
Bake trays of rugelach at 375 F for about 20-23 minutes, until a nice golden brown.  Let cool on the pans ~5 minutes before removing to wire racks to fully cool.  Enjoy!!! 

Fresh from the oven - a nice golden brown chocolate rugelach cookie.

Chocolate Rugelach Recipe by Successfully Gluten Free!

Saturday, 2 January 2021

Chunky Banana Pancakes

These yummy chunky banana pancakes are a fun combination of pancakes and banana bread.  You get the slightly crispy edges of a tasty pancake with the chunky bites of banana you might find in a banana bread (at least in my banana bread since I prefer it that way).  Perfect to whip together when you have 4 medium-ripe bananas (i.e. not yellow, but not brown - nicely speckled).  These were inspired by a recipe by Joanne Chang's cookbook Flour, too.  Although I prefer the spices here instead of the ground black pepper she uses in hers.  Enjoy! 
Gluten Free Banana Pancakes
Cooking up a meal of banana pancakes!

Chunky Banana Pancakes

Makes ~20 pancakes, depending on size

In a large bowl, mix together: 
2 tsp baking powder
1/2 tsp salt
1 tsp cinnamon
1 tsp allspice
2 Tbsp brown sugar

Add and mix in: 
4 medium-ripe bananas, diced into small pieces (i.e. use nicely speckled, but not really overripe - use those in banana bread or banana chocolate chip cookies)
1 cup milk (lactose-free or other dairy-free milks work well)
1 egg
2 Tbsp oil

Heat a non-stick skillet over medium-low heat.  Butter the skillet, then scoop 2-3 Tbsp. size scoops, flatten a bit with your spoon.  Let cook about 3 minutes on each side.  I like to hold the pancake up and butter the griddle again quickly before flipping each pancake.   Great served with a bit of maple syrup.  Delicious plain, too.  Enjoy! 
Flipping chunky GF banana pancakes. Yum! 

Chunky Banana Pancakes Recipe by Successfully Gluten Free!

Thursday, 24 December 2020

Gluten Free Gingerbread Cookies

These yummy gingerbread cookies are a fun alternative to gingerbread houses.  Personally, I love them plain, but they're delicious and pretty with piped with royal icing frosting.  They also work perfectly to have the kids use royal icing and decorate with candy!  These cookies are made with the same batter as my gingerbread houses, so if you'd like to make a double batch of dough, I find you can make 4 mini houses from one batch of gingerbread and your second batch of dough will make a pile of cookies for decorating! 
Fresh Gingerbread Cookies!  Yum! 

Gluten Free Gingerbread Cookies!

Makes ~25 cookies, depending on size

In a mixer, combine with a paddle attachment (not a whisk attachment!): 
2 3/4 c Kristin's Gluten-Free Flour Mix
1/3 cup brown sugar
3 tsp baking powder
1/2 tsp salt
1 tsp cinnamon
1 tsp ginger
1/8 tsp cloves

Add and mix in until nicely combined: 
1/2 cup oil
2/3 cup molasses
1 egg

Divide into two and roll each half of batter out between two large pieces of plastic wrap to 1/4" thick (Don't roll these too thin or they'll be hard to cut and lift off the plastic wrap).  Place each oval on a cookie sheet and put in the refrigerator to chill 30 minutes.  
Two of these sort of dough ovals were chilled. 
While dough is chilling, line cookie sheets with parchment paper.  Preheat oven to 325 F.   
Cut out a gingerbread shape.  I like to press down and wiggle the cutter around a bit to get nice, clean edges. Use the plastic wrap to help you lift the shape off the plastic wrap.  Carefully transfer to the parchment-lined pan.  
Cut the shapes and use the plastic wrap to help you lift them up and off. 
Gingerbread Men and a Candy Cane - ready to bake!
Repeat with your other gingerbread shapes.  It's best to try to have evenly sized cookies on each pan.  Once you've cut out all your gingerbread shapes from your flattened oval, you can use the plastic wrap to lump the dough back together.  Flatten again between the plastic wrap.  You can repeat this until the piece of gingerbread is too small.   Make sure you don't forget about your second piece of chilling gingerbread dough! 
Ready for the oven.  I had enough for about 4 pans worth of medium-sized cookies.
Bake each pan of gingerbread cookies at 325 F for ~15 minutes.  Small cookies may need only 10 minutes, and larger may need up to 18 or so.  I like the cookies to have puffed nicely, and look like they're just getting a touch of crispiness around the edge.  This keeps them slightly soft, but sturdy enough to handle and decorate once cooled.  
Fresh from the oven!  
Let the cookies cool 3-5 minutes on pans before removing them to cooling racks with a spatula.  
Once fully cool, decorate as desired!  Royal icing recipe is below.  Enjoy! 
Believe it or not, there are gingerbread cookies under those candies and icing.

Royal Icing:
Beat the following in a grease-free bowl until stiff: (If needed, add a bit more confectioner’s sugar (very slowly) until desired thickness)

3 egg whites (make sure NO yolk is in whites)
1 lb. confectioner’s sugar
½ tsp cream of tartar
1 tsp vanilla

You can keep the icing in a bowl with a tightly fitting lid if you want to make it in advance.  If you will be taking awhile to decorate, you'll want to keep bowl covered at all times with damp cloth because this icing dries fast and becomes hard.  You can pipe this frosting on, or you can just use a knife or back of a spoon to apply (which we tend to do while working with kids). Enjoy!
My youngest making her gingerbread house before she moved on to decorating gingerbread cookies. 

Gluten Free Gingerbread Cookies by Successfully Gluten Free!

Thursday, 17 December 2020

Easy Herb & Garlic Haddock Fillets

A delicious, quick meal to throw together.  Great with a side of potatoes, veggies or salad.  We've made it many times.  I find the really thin fillets of fish are perfect for this recipe.  They cook up quickly and more evenly than thicker cuts.  Enjoy! 
Fresh cooked haddock with a side of peas and potatoes. A comforting winter meal. 

Easy Herb & Garlic Haddock Fillets

Preheat oven to 400 F.

About 20 minutes before I'm going to start baking the haddock, I like to put into the oven some small, speared potatoes to bake, OR roast some baby potatoes or wedged potato slices that I've tossed in olive oil, salt, pepper, and whatever herbs I am in the mood for: oregano, chives, chili powder, dill, etc.  I find those blends go nicely with the fish.

On a baking sheet or glass dish lined with foil (to help with clean-up, you don't have to do this) place: 
3 - 4 thin haddock fillets

In a small bowl, mix together: 
2 heaping Tbsp. mayonnaise
2 tsp minced/crushed garlic (I love the jars of garlic you can buy and keep in the refrigerator)
1 tsp freeze-dried basil (or 1 tsp dried basil or 2-3 tsp fresh basil, minced)
1 tsp freeze-dried dill (or 1 tsp dried dill or 2-3 tsp fresh dill, minced)
1 tsp freeze-dried chives (or 1 tsp dried chives or 2-3 tsp fresh chives, finely sliced)
salt & pepper

Spread the herb mixture over the top of the haddock fillets.  Bake at 400 F for 15 minutes, or until fish is cooked and flaky.    
Fish topped with the herb mixture, ready to bake.
Flaky fish, fresh from the oven. 

Delicious served with roasted potatoes, baked potatoes, peas, green beans, or salad.  Enjoy! 


Easy Herb & Garlic Haddock Fillets by Successfully Gluten Free!

Thursday, 3 December 2020

Huge Cake-style Chocolate Chip Cookies!

 Sometimes it's fun to give or receive a present of just one oversized cookie.  This recipe is perfect for that!  These cookies are so large, you can only bake 6 on a cookie sheet.  So, here you have it - a chocolate-packed delicious cookie - perfect for sharing, giving, and/or freezing for later.  I like to make these packed with a variety of chocolate chips, mint chips, caramel chips, really whatever types of chips you like best together will work in these cookies!  They'd probably be fun with some m&m's or mini rolos, too.  The texture incorporates some coconut flour and egg white, which give a lighter texture than the traditional oversized cookie.  We've really liked them.  Enjoy! 
Gigantic Gluten Free Chocolate Chip Cookies
Fresh, gigantic cookies, ready for taste-testing! 
A fresh cookie packed with dark, semi and mint chips. Yum! 

Huge Cake-style Chocolate Chip Cookies

Makes 12 large chocolate filled cookies!

Preheat oven to 350 F.  Line a cookie sheet with parchment paper or silicon liner.

In a large bowl, combine: (It's important to mix flours first in gluten-free baking to avoid clumping)
1 cups white rice flour (or 1 cup white rice flour + 1 cup brown rice flour)
1/4 cup coconut flour
1/2 tsp xanthan gum
1/2 tsp baking soda
1/2 tsp salt

In a mixer, cream together: 
1/2 cup butter
1/2 cup sugar
1/4 cup brown sugar 

Add and mix in: 
3/4 cup egg white (approx 6 egg whites, but they do sell egg whites in cartons above/near the eggs at most grocery stores, which is really convenient for recipes like this)
1 tsp vanilla extract or vanilla bean paste

Add dry ingredients into wet ingredients.  

Add and mix in: 
3 1/2 - 4 cups variety of high quality chocolate chips (milk, semi, bittersweet, dark, mint, etc.)

Shape cookies into large scoops on a parchment-lined pan.  I find I can fit 6 large cookies on one tray.  I use the largest size cookie/ice cream scoop.  Wet your hands a little if you don't want them to stick and flatten the cookies a bit before baking.
These were just haphazardly pressed a bit flatter.
These were flattened using damp hands, which makes the cookies smoother after baking.

Bake at 350 F for 15 - 16 minutes.  Remove from oven and let rest on pan 5 minutes before moving to a cooling rack to cool.  Leftovers freeze well in a freezer ziploc.  Enjoy!!
These are the messy pressed down cookies.  They end up looking a bit more rustic.
These are the cookies that were smooth a bit more with wet hands, giving a smoother final look.  These were filled with mint chips and a blend of semi and dark chocolate chips.

Huge Cookie Cake-style Chocolate Chip Cookies by Successfully Gluten Free!

Friday, 27 November 2020

Easy Homemade Granola Bars

I can't be the only one that finds gluten-free granola bars expensive.  This recipe is great, because you can make your own big tray of granola bars, slice and store for eating through the week.   If desired, you could also add some nuts to the mixture that goes in the oven, if you like.  It was inspired by an easy kids recipe for homemade granola bars in my daughter's Highlight's magazine.  Several alterations later, and we have the recipe below!  The kids have been loving them.  Some of our other favorite homemade granola bars are: key lime granola bars, delicious peanut butter granola bars, oatmeal berry jam bars, raspberry baked oatmeal, and several cookie-style varieties like granola bar bites, Aussie bites, and pumpkin granola cookies.  And, if you want something more treat-like, you could make some yummy Monster cookies - a definite favorite!   Enjoy~!
Gluten Free Homemade Granola Bar
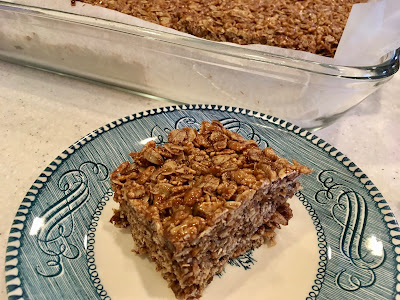
Freshly cut gluten-free granola bar.  Yum!

Easy Homemade Granola Bars

Makes 9 x 13 pan, which you can slice any size

Preheat oven to 325 F.  Line a cookie sheet with parchment paper.   Line a 9 x 13 pan with parchment paper, set aside for later.

In a large bowl, mix together:
1/4 cup brown sugar
1/4 cup oil
1 tsp ground cinnamon
pinch salt

Add, and mix in, until thoroughly covered with oil/sugar:
3 cups whole oats (GF if celiac or sensitive)
1 cup unsweetened shredded coconut
1/2 cup pumpkin seeds (optional)
1/2 cup sunflower seeds (optional)

Spread the oat mixture onto the parchment-lined pan.  Bake at 325 F for 15-20 minutes.  While this is baking, you can prepare the syrup mixture.
Oats, coconut and seeds (if desired), ready to toast.

In a medium-sized saucepan, mix over medium-low heat, 2-3 minutes, until the mixture is looking nice and smooth:
3/4 cup brown sugar
1/2 cup honey
1/2 cup agave

Add and mix in thoroughly:
6 Tbsp oil 
1 tsp salt
1 tsp vanilla extract

Set to low heat, and mix in, stirring til smooth (chips have melted):
1/2 cup high-quality semi-sweet or dark chocolate chips
Stirring in the chocolate chips - almost time to mix it all together.

In a large bowl (can be the same as before), toss together:
4-5 cups puffed, crispy rice cereal (I like to use the kind made with brown rice)
Oat/coconut/seed mixture from oven (It's fine if it's piping hot, fresh from the oven)

Give your chocolate syrup a final good mix, and then pour on top of the oats and crispy puffed rice mix.  Stir until evenly coated.  Scoop granola mixture into the 9 x 13 pan lined with parchment paper.  Press down with the back of your spoon or spatula.
Just after being pressed into the pan. (We could resist taste-testing before cooling)

Allow granola bars to fully cool.  You can put them in the refrigerator for an hour or so to help them cool faster.  Slice into desired sizes.  You can wrap them in plastic wrap, wax paper, or parchment paper and store for snacks and school lunches.  Enjoy!
Sliced granola bars
Individually wrapped bars

Easy Homemade Granola Bars by Successfully Gluten Free!