Search for a Recipe

Tuesday 27 October 2015

Pumpkin Cheesecake Chocolate Swirl Brownies!!!

The perfect grown-up Halloween pumpkin treat!  These are even fabulous if you forget... err... leave out the flour, too!  They're even more rich and dense.  It's a wonderful blend of pumpkin cheesecake and chocolate brownie.  And, it requires that perfectly small amount of pumpkin puree, so when you've only got a little left from your cooked or canned pumpkin, you'll have something tasty to make with it!  Enjoy!
Gluten Free Pumpkin Cheesecake Chocolate Swirl Brownies
Delicious Gluten-Free Pumpkin Cheesecake Chocolate Swirl Brownies - gorgeous AND tasty! 

Pumpkin Cheesecake Chocolate Swirl Brownies
Makes 8" x 8" pan

Line an 8x8 pan (or similar sized pan) with parchment paper.

Mix until smooth: (in a mixer works best)
1 egg
1/2 cup (4 oz/112.5 g) cream cheese
1/2 cup 100% pumpkin puree (use canned or make your own!)
1/4 cup white sugar
1 tsp vanilla bean paste
1 1/2 tsp pumpkin pie spice

In a large microwave-safe bowl, melt:
4 oz (~ 3/4 cup) dark chocolate (over 70% is best)
1/2 cup butter

Mix in:
3/4 cup brown sugar

Add in:
2 eggs

Fold in:  (flour can be left out for more dense/rich brownies!)
1/2 cup Kristin's Gluten-Free Flour Mix  OR 1/2 cup flour/flour mix of your choice

Spread 2/3 of the chocolate brownie batter in prepared pan.  Spread the pumpkin batter on top.  Top with dollops of brownie batter.  Swirl with a knife.
Gluten Free Pumpkin Cheesecake Chocolate Swirl Brownies
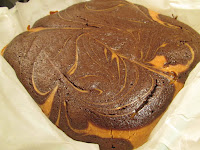
Swirled brownie, ready to bake!

Bake at 325F 30-35 minutes (depending on the size of your pan), until the brownies are just set in the centre. I just shake the pan a little bit to see if it still jiggles a lot. Once it doesn't really jiggle anymore, they're done!  These should have just a tiny bit of browning starting to happen around the edges when they're finished.

Let cool completely in pan OR let cool in pan a bit, then you can remove the brownies (using the parchment paper to pick it all up) and put it on a cooling rack if you want to help them cool faster.  Cut into squares of whatever size you desire and enjoy!

Gluten Free Pumpkin Cheesecake Chocolate Swirl BrowniesGluten Free Pumpkin Cheesecake Chocolate Swirl Brownies
Brownies will be a little puffy when done, but will sink down a little once cooled. 

Tuesday 20 October 2015

Gluten Free Apple Fritters!!!

Apple + Donuts = Apple Fritters!!!  I used fresh-picked MacIntosh apples we picked at local Olde Towne Orchard.  (It's gorgeous and located in the midst of fall-coloured leaves at the moment).  You'll want to make sure you use apples that are the quick-cooking kind, or you'll end up with bites of crunchy apple throughout your fritters.  The MacIntosh were perfect for fritters, because they soften very quickly during cooking.  These are so easy to whip together and fry.  You can roll them in cinnamon-sugar when done or drizzle in a butterscotch (this purchased buttermilk syrup mix is delicious, though not appropriate for those who are more sensitive to gluten) OR homemade caramel sauce, which is equally delicious.  Enjoy!
Gluten Free Apple Fritters
Fresh Gluten-Free Apple Fritters rolled in Cinnamon-Sugar

Gluten Free Apple Fritters!!!
makes ~36 small fritters

I chop the apples first so they're ready to be mixed in.

Whisk together in a large bowl:
2 cups Kristin's Gluten-Free Flour Mix
1/2 cup sugar
3 tsp baking powder
1 tsp ground cinnamon
1/2 tsp salt

Start heating 1" Avocado Oil (or other frying oil of your choice, but this makes the MOST delicious crisp edges on the donut holes) in a high-sided frying pan over medium to medium-high heat.  I tend to re-use frying oil several times, particularly if frying non-meat/fish items like donuts.  I'll use this again for Navajo tacos, hand-held fruit fry pies, and samosas!  *I aim for 350F - 375F*

In a small bowl mix together:
1 cup milk (lactose-free works great!)
1 egg
1 tsp vanilla bean paste (or extract)

Add to dry ingredients:
2 cups diced & peeled Macintosh apples (or other type of apple that cooks quickly) 
Milk mixture

Mix with a spoon until thoroughly combined.  Let rest 5-10 minutes.

Prepare a small bowl of cinnamon sugar (1/2 cup sugar/1-2 Tbsp cinnamon) to roll donuts (optional).

Line 1 cookie sheet with foil to place donuts after cooling a bit and/or rolling in cinnamon-sugar.  Line 1 cookie sheet with a double layer of paper towel to place cooked donuts to drain.

Use a small (1 Tbsp) sized cookie scoop to scoop batter into the hot oil.  I tend to make more messy scoops for fritters compared to donut holes.

In either case, let the apple fritters cook until browned on one side before flipping to the other side.  I usually give them about two minutes per side.   A lighter brown will give you a softer fritter and a darker brown will give you a more crispy fritter.
Gluten Free Apple Fritters Fried in Avocado Oil
GF Apple Fritters browning in Avocado Oil 
Remove donuts to paper towel-lined pan to drain/cool.   Repeat with remaining batter.
Gluten Free Apple Fritters on Paper Towels
GF Apple Fritters after frying
When fritters have cooled enough for you to touch but are still hot, roll fritters in cinnamon-sugar and place on foil-lined pan OR transfer directly to foil-lined pan to eat later when drizzled in caramel sauce.
Gluten Free Apple Fritters in Cinnamon Sugar
GF Apple Fritters are delicious rolled in cinnamon-sugar
You can use a store-bought butterscotch or caramel sauce OR make your own homemade caramel sauce to serve alongside apple fritters, if desired.
Enjoy!!!
Gluten Free Apple Fritters Drizzled with Caramel Sauce
We drizzled these with a delicious butterscotch sauce, but you can use any kind you like! 

Tuesday 13 October 2015

Chicken & Rice Soup

I came up with this yummy soup quite by accident.  We had family visiting and I needed something that could be eaten late at night when they arrived.  It turned out so flavorful and delicious, everyone loved it!  My kids both wanted seconds!  This is a great recipe if you have leftover roast chicken (or even turkey).  The only thing I realized is that it's next to impossible to take a nice picture of soup - but it's packed full of chicken, veggies and rice, and a nice, quick meal.  And, the only one I remembered to get a picture of is when I was being lazy and threw in a bag of grated carrots I had purchased on a whim instead of dicing the carrots.  They look a little funky, but the taste was still great.  Enjoy!
A picture at last!  Only it looks a little odd made with grated carrots. Sometimes it's just good to use what is available in the refrigerator. :) 

Chicken & Rice Soup

Serves 8-10

Put in a large pot:
3 ½ - 4 quarts chicken broth (or water + GF bouillon. Use ~ 1 tsp/cup water *see note below)
½ - 1 tsp ground turmeric
2 Tbsp chopped fresh parsley (OR 1 Tbsp freeze dried or dried)
1 Tbsp chopped fresh dill (OR 1/2 - 3/4 Tbsp freeze dried or dried)
Salt & pepper (use sparingly now - season more towards end)
2-3 cups mix medley of diced veggies (carrot, onion, celery, potato, turnip, celery root, fennel bulb & greens)
2-3 Tbsp olive oil 

Bring to boil over high heat. Once boiling, reduce heat to medium-low and cook 10 minutes, uncovered.  (* If you would like, you can saute the vegetables in olive oil for 5 minutes before adding chicken broth and spices, then bring to a boil and simmer an additional 5 minutes.  Either method of cooking will work well!!! *)

Add:
1 – 1 ½ cups basmati rice (rinse the rice & make sure it’s the cook in 15-20 minutes kind)
Simmer (uncovered) ~ 20 minutes, until rice is tender. 

Add:
2 cups cooked chicken, chopped or shredded
Season with additional salt/pepper, to taste.
Serve with chopped fresh parsley (optional).
Enjoy!

*Note: There is an Asian mushroom seasoning that is gluten-free, MSG-free, and absolutely delicious to use as a substitute for chicken bouillon. It’s my absolute favorite.  I find it adds a depth of flavor, but doesn’t add a ‘mushroom’ flavor.  It was recommended by our Vietnamese friend (and absolutely fabulous cook), Nam. I love it!

Another lovely picture of my strange looking soup made with grated carrots.  For a more normal looking soup, just slice or dice them. ;) 

Chicken and Rice Soup by Successfully Gluten Free!

Wednesday 7 October 2015

Apple Galette/Pie

Fall is here on PEI!  For me that meant a fun Saturday activity apple-picking with my youngest.  She didn't quite grasp the whole 'pick the apples, put them in the bag' idea, so she spent most of the time with an apple in each hand, eating away.  Macintosh and Cortland were the ones ready this past weekend, so of course we got a small bag of each.  MacIntosh cook up really quickly, making them perfect for apple fritters (I'll post the recipe soon, no worries!).  Cortland are more sturdy when cooked, and are a wonderful pie apple.   They're perfect in an open-faced apple galette, like the one here.  It would be a beautiful addition to anyone's Canadian Thanksgiving.  Enjoy!

Gluten Free Apple Galette
A gorgeous apple galette, fresh from the oven and ready to eat! 

Apple Galette
Serves 6-8

Prepare pastry crust.  Make a batch of  buttermilk pie pastry crust recipe.   You will use a 1/2 recipe for this galette. You can use the extra half for crust for quiche or another dessert-type pie.

Line a cookie sheet with parchment paper.
Roll out the crust between two pieces of plastic wrap.   Remove the top layer of plastic wrap.  Trim the edges of the dough so you have a neat, even circle.  Flip the dough onto parchment paper-lined pan.  Top with the following apple mixture:

Mix together in a large bowl:
2/3 cup brown sugar
1/3 cup Kristin's Gluten-Free Flour Mix
1/2 tsp cinnamon
1/4 tsp nutmeg
1/8 tsp allspice

Mix in, tossing gently until apples are thoroughly coated:
4 medium apples, peeled & thinly sliced (I used Cortland since they hold up well during cooking)
GF Apple Galette Pie
Arrange apples in the center of the crust.   Use the parchment paper to fold up the edges of the crust.  I tend to start at one location and then make my way around the galette.
Sprinkle 1 Tbsp butter over apples.
Sprinkle a bit of extra sugar on edges of galette crust.
GF Apple Galette Pie before baking

Cook at 425F for 30 minutes, until crust is a golden brown.

Place pan on wire rack to let cool.  Great hot, warm or cooled.  Delicious with whipped cream, ice cream, homemade vanilla pudding or just plain! Enjoy!
Gluten Free Apple Galette
These open-faced pies are beautifully rustic-looking.  I love making them. 

Thursday 1 October 2015

Gluten-Free Real Pumpkin Cinnamon Rolls!

October, month of pumpkins and winter squash is here!!! After quite a bit of trial and error, I finally discovered a way to make pumpkin cinnamon rolls that were fluffy and similar to regular cinnamon rolls!  Absolutely delicious, and approved by my friend Julie (who is an excellent cook, and I depend on her approval of baked goods often), in addition to the approval of my family, who inhaled them as quickly as possible.  The dough here is a bit trickier to work with than my normal fantastic cinnamon roll recipe, but it is also much EASIER than my normal cinnamon rolls, since you essentially just beat it all in a mixer.  Despite looking a bit messy in the pan, I found that, once cooked, they puffed up and looked like proper swirled cinnamon rolls.  They were so delicious, we ate most of them without frosting, too!

For both savory and sweet gluten-free pumpkin recipes, I have links to all my tasty pumpkin recipes here! Enjoy!
Gluten-Free Pumpkin Cinnamon Rolls
Gluten-Free Pumpkin Cinnamon Rolls!

Gluten-Free Pumpkin Cinnamon Rolls
Makes 12 (9x13 pan)

Butter a 9x13 baking pan.

Mix the dry ingredients in a big bowl and set aside:  It is important to mix dry ingredients first in gluten-free cooking. *Note: I have made this recipe with Kristin's GF flour mix, but I found I needed to use extra flour to keep things from sticking too much, and I did not find the end product to be as fluffy as this version.
3/4 cup brown rice flour
1 cup white rice flour
3/4 cup tapioca starch
2 tsp xanthan gum
1 tsp ground cinnamon
1/2 tsp ground ginger
1/4 tsp ground cloves
1/4 cup brown sugar
1 tsp salt
4 1/2 tsp rapid-rise/instant yeast

In a stand-mixer, mix together the following:
1 cup canned pumpkin or homemade pumpkin puree
1 egg
1/4 cup water (warm or cold work fine) ***see below***
1/4 cup softened butter

Add the dry ingredients into the wet ingredients.  Beat 4 minutes at medium/medium-high speed. 

While the dough is mixing, prepare the filling by mixing together:
2 tsp ground cinnamon
1/2 tsp ground allspice
1/2 tsp ground nutmeg
1/4 tsp ground cloves (optional)
3/4 cup brown sugar
1/4 cup butter, melted

Line two large sheets of plastic wrap side by side on the counter, overlapping a bit. 2 foot long pieces work well.
Spoon out large scoops of the dough and place along the middle of the plastic wrap.
Pull out another two large sheets of slightly overlapping plastic wrap to cover the dough. You’ll then flatten out the dough between the sheets until you have – more or less – a piece of dough that is flattened to somewhere near 15"x20". Try to make it nice and even. You have to slightly adjust the plastic wrap as you’re doing this, since it sometimes gets caught underneath the dough. But, you’ll find the dough doesn’t stick too much to the cling wrap, which is fantastic!  Use damp fingers to help un-stick dough, when necessary.
Carefully remove the top layer of plastic wrap. (NOTE: This dough IS stickier than my regular cinnamon rolls, raspberry-lemon swirl rolls OR lemon-blueberry rolls.  However, I have found that beating the dough 4 minutes, while making it a bit stickier to work with, results in a fluffier end result in the pumpkin cinnamon rolls, which I find is necessary since the pumpkin makes the rolls naturally more dense otherwise.)
Spread filling evenly over the dough. 
Carefully roll up the dough, so you have one 20" long roll of dough. Pulling up the plastic wrap can help you get the dough to roll over, since it will definitely stick to your hands if you try to use your hands!  This dough DOES get messy a bit, but it is worth it! 
One happy little girl making pumpkin cinnamon rolls. 
Once you have your long roll of dough, cut into 12 pieces as evenly as you can with a serated knife.  You can use slightly wet hands to help you lift each roll into the prepared pan.  I just tend to try to do it as quickly as possible and not worry that it is a little messy looking initially.  They will look fine once they rise and cook, but you can use slightly wet hands to fix any messy bits, if you like.  

Use a bit of saran wrap or damp hands to press down the tops of your pumpkin rolls a bit. 
Before and after rising uncovered.
Leave in a warm place uncovered to rise ~ 1 hour, or until your rolls looks significantly puffier, nearly doubled in size.

Bake at 375F for 25-30 minutes, until lightly browned at edges. 

Eat as-is, or top with a cream-cheese frosting, below.
Enjoy!!!


Cream Cheese Frosting (this is a very generous amount, so halve the recipe if you want a lighter bit of frosting/glaze):
In a bowl, warm in the microwave 20 seconds, or let sit to come to room temperature:
3 oz cream cheese
2 Tbsp butter
Add, and mix with a spoon until smooth (ish):
1 ½ tsp vanilla extract OR vanilla bean paste
Carefully add, ½ cup at a time:
2 cups powdered sugar
Milk, to desired consistency (add 1-2 tsp at a time)
Some people like a runny glaze, so they’ll find they end up adding more milk, others like a thick topping for cinnamon rolls, so you’ll just leave out the milk or add very little. Enjoy!

***If you want slightly fluffier rolls, you can use a bit of extra water - 1-3 Tbsp.  The dough will be stickier and harder to work with, but if you use wet hands, you can help undo any extra stickiness.