Search for a Recipe

Showing posts with label cheese. Show all posts

Monday, 23 June 2025

Cheddar Swirl Rolls!

 These rolls came about by chance.  I had a bit of extra dough from making pigs in a blanket, and rather than making cheese-stuffed buns, I haphazardly piped dollops of dough and stuck chunks of cheese on top.  The resulting rolls have quickly turned into a favorite - particularly good as hamburger buns! You can pipe them smaller or larger, depending on what size roll you'd like. Enjoy!

Rolls topped with chunks of cheddar cheese. 
Rolls topped with chunks of Monterey Jack cheese. Yum!

Cheddar Swirl Rolls!

Makes 12-18 rolls, depending on how you pipe.

Preheat oven to 425 - 450 F. Line 1-2 baking sheets with parchment paper. 

In a mixer, combine: 
OR 
1 1/2 cup brown rice flour
3/4 cup sorghum flour (or additional brown rice flour)
1/2 cup tapioca starch
1/2 cup arrowroot starch OR cornstarch
1/4 cup potato starch
1 tsp xanthan gum

Also add and combine in the mixer:  
2 tsp xanthan gum (there is some in the flour mix, but you'll want a little extra)
1 Tbsp rapid-rise/quick yeast
1 tsp salt
2 tsp garlic powder
1 Tbsp dried onion flakes 
1/2 - 1 tsp red chili pepper flakes 
1 tsp freeze-dried or dried cilantro 

Add, and beat 2-3 minutes, until nice and smooth: 
2 1/4 cup milk, a little warmer than room temperature (lactose-free works well - I usually pop this in the microwave for 1 minute)
2 eggs
1 tsp apple cider vinegar

Scoop the batter into a large freezer ziploc bag. Cut off ~1/2" from the corner.  

Pipe into swirls on a parchment-lined baking sheet. Use a second sheet, if needed. It depends how you pipe them.  You'll want the rolls to rise at least 15 minutes before baking, but you can dice the cheese, top and brush with butter during this time. 
These were slightly smaller, so I had enough dough to also pipe an additional 6 rolls on a second pan.

Top the rolls with: 
sharp cheddar (or similar), diced or chunks ~5 pieces per roll

Brush the rolls prior to baking with: 
1/4 cup butter, melted
Topped with cheddar chunks.
Brushed with butter, ready to bake after a 15-20 minute rise.

After rising 15-20 minutes, bake at 425-450 F for ~17 minutes, until nicely golden brown.  
Remove to a cooling rack to cool. They can be sliced and used as sandwich rolls or hamburger buns. Absolutely delicious! Enjoy! 

Fresh from the oven! This batch I had 12 on one pan and 6 extras (these) on a smaller second pan.

Cheddar Swirl Rolls Recipe by Successfully Gluten Free!

Tuesday, 3 September 2019

Easy Homemade Goat Cheese

The best, easiest recipe to make homemade goat's cheese!  Wahoo!  I am by no means a cheese-maker, but I've been dabbling lately and having some fun (this recipe) and some frustration (mozzarella, I am determined to find a way to make it reliably/consistently soon).  What do you need if you want to make sure this works out for you?  A thermometer, a pot that doesn't have any sort of non-stick coating on it, and plain pasteurized goat's milk.  If you like, you can add a little whipping/heavy/whole cream (totally a-okay to leave out), and it's fine if that is ultra-pasteurized.  The coolest thing about this recipe is you'll literally be finished in under an hour (A huge thank you to Claudia Lucero who wrote a great book called, "One Hour Cheese").   This goat's cheese is creamy and fresh.  Your flavor will vary depending on your goat's milk.  I find some varieties have a sharper taste than others. We love eating this goat's cheese with crackers, but I've used it on sandwiches, too.  Enjoy!
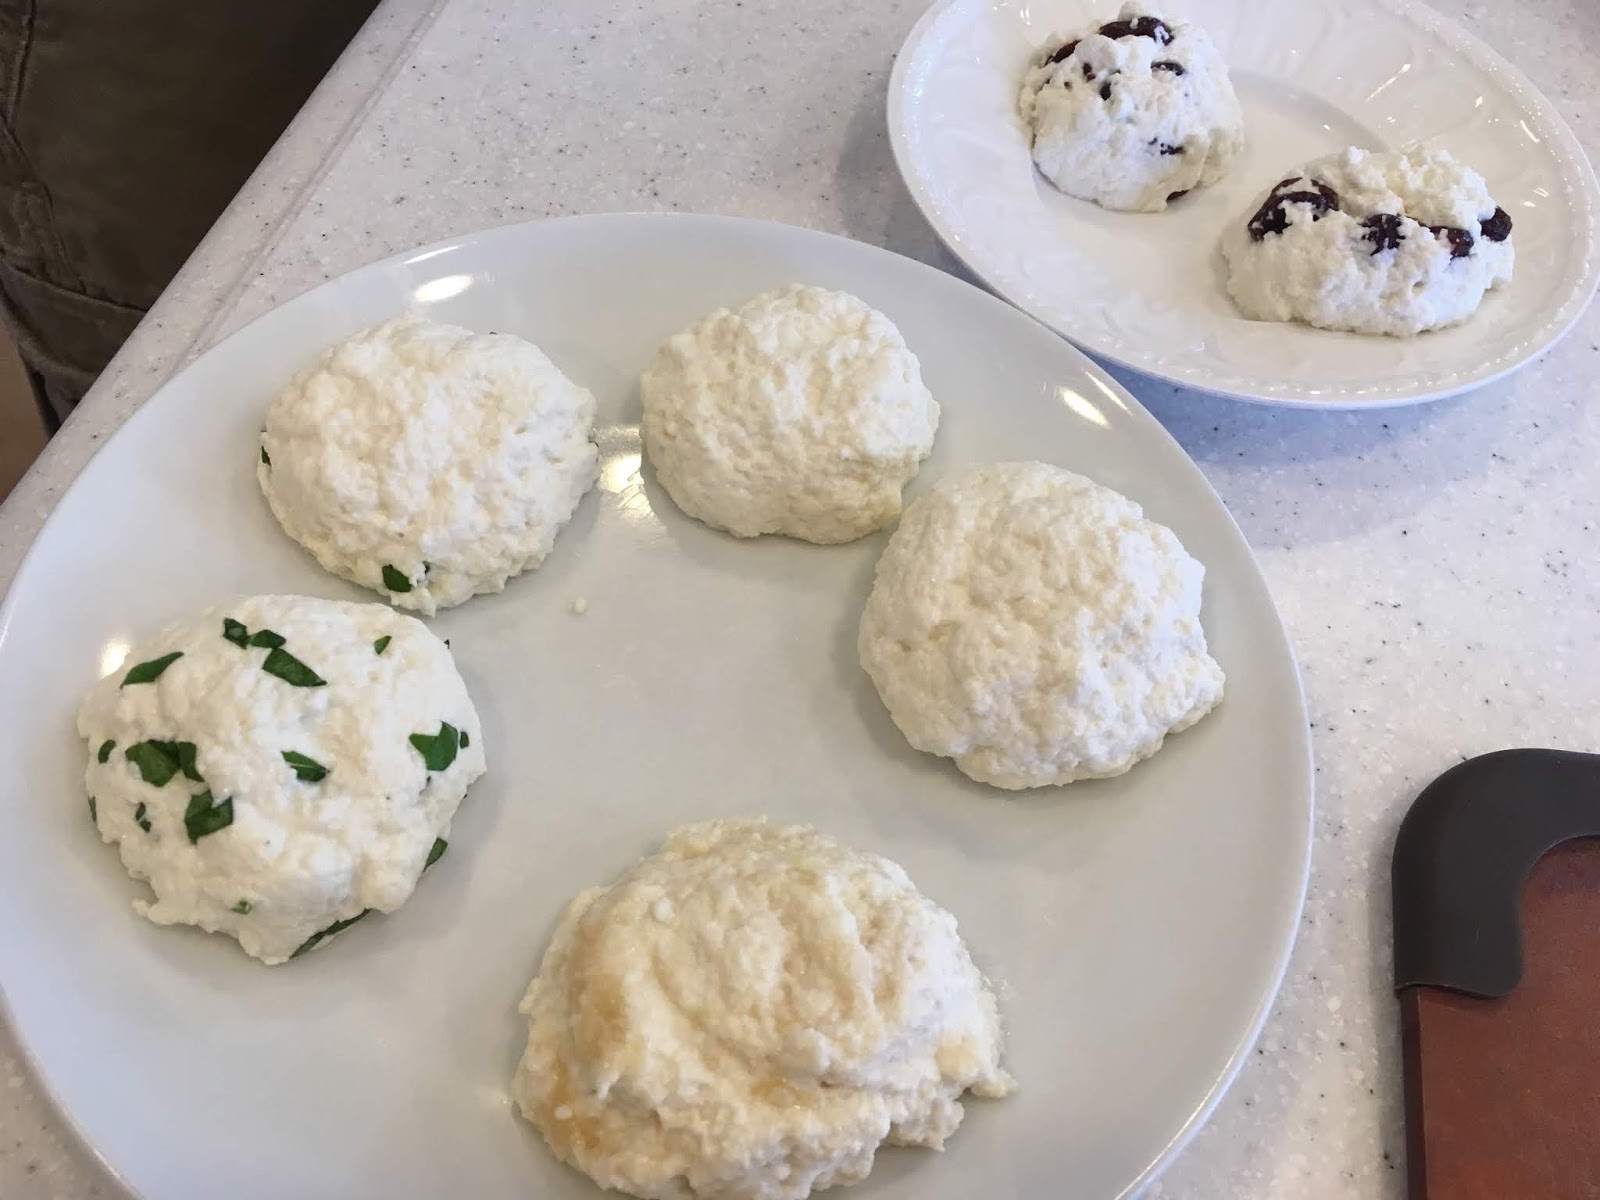
Fresh homemade goat cheese.  Mix-ins included basil (left), honey (bottom front), dried cranberries (top back), and a couple plain goat cheeses.  

Easy Homemade Goat Cheese

Based on a recipe from "One Hour Cheese" by Claudia Lucero  p.s. Her book is awesome!

*Keep your goat milk container to store the leftover "whey" that is produced after the cheese curds separate out.  You can use the whey to cook in any recipe that calls for milk, or in place of water in a bread recipe.*

In a medium saucepan (use a metal pan, not a non-stick) mix together:
1 quart goat milk (not ultra-pasteurized, regular pasteurized is fine)
1/2 cup whipping/whole/heavy cream (optional, you can leave out, but it adds an extra bit of creaminess, if desired.  Obviously makes it not 100% goat's milk cheese, too, if you add this.)
fresh basil leaves (optional - other fresh herbs will work, too, or you can just leave them out)

Heat over medium-low heat, stirring regularly to make sure the milk doesn't stick to your pan.   Heat to 185 F.  Immediately remove herbs and add:
1/8 cup apple cider vinegar

Stir in the apple cider vinegar with only a handful of strokes through the saucepan.
Lower the heat to the lowest possible setting.  Stir gently through the mixture every few seconds for about 2 minutes, no longer than 3 minutes.

Remove pot from heat.  Let sit untouched for 10 minutes.
Letting the curds rest for 10 minutes off the heat.
Draining curds in tight mesh cheesecloth over a bowl for 10 minutes.  I saved the liquid for using later in bread - worked great.
Line a colander with tight mesh cheesecloth (grade #90) over a large bowl or liquid measuring cup.  Pour curds into colander and let sit and drain untouched for 10 minutes. (You may have to pour some of the liquid (also known as whey) back into your milk container if the colander base is sitting in the liquid).

Scoop goat cheese curds into a bowl.  Add and mix in thoroughly, but gently with either your hands or a spoon:
1/4 - 1/2 tsp salt (I recommend using either fresh ground or a high quality salt)

Now, you can shape your goat cheese into mounds.  Scoop a little into your hand.  You can add fresh minced herbs (basil (my favorite!), chives, thyme, parsley, etc), or a dollop of fresh honey or dried fruit (currants, cranberries) into your scoops.  Place on plates to cool.
Basil-filled and honey-swirled fresh goat's cheese. Yum!

You can eat these right away!  Leftovers can be covered and stored in the refrigerator.  I like to try to eat fresh cheese within a few days of making.  Enjoy!


Gluten Free Easy Homemade Goat Cheese Recipe by Successfully Gluten Free!

Friday, 1 June 2018

Gluten-Free Rich, Creamy Pasta Sauce

This sauce is a bit of a combination of traditional Alfredo sauce with a nod to Carbonara sauce.  I first whipped together this sauce while we were staying in Rome since I wanted the richness egg adds to the sauce, but couldn't fold it right into hot noodles, since the gluten-free noodles requiring rinsing post-cooking to remove starch.  This rich sauce is a nice mixture of cream, egg and Italian hard cheeses.  It's simple and quick to whip together and tastes delicious. Enjoy!

Gluten-Free Rich, Creamy Pasta Sauce

In a large frying pan over medium heat combine:
3-4 Tbsp butter
1 cup heavy cream (lactose-free works well if you can find it)

Bring to a low boil.  Remove from heat and quickly whisk in (this is similar to a carbonara style sauce, only in carborana you mix the egg right into piping hot noodles):
1 egg (fresh is best!)

Immediately add:
1/2 - 1 cup hard Italian cheeses, finely grated (i.e. Parmesan, Pecorino Romano - high quality, freshly grated is best)

Continue whisking until cheeses are melted.  You can place the pan back on the burner if it needs a little extra heat to melt the cheeses thoroughly. 

Fold into fresh cooked and rinsed gluten-free pasta.
Enjoy!

Thursday, 5 April 2018

Tasty Cheddar Biscuits

I'm always looking for delicious shortcuts.  Something I can whip together when I want a tasty meal without all the effort.  These cheddar biscuits are perfect in a pinch.  They work great with something like my easy homemade pulled pork.  You can fry up eggs and make bacon and egg sandwiches.  They're great alongside any dish you enjoy with biscuits, perhaps a Southern-style biscuits with gravy.   The taste and crunch of cheddar is my favorite.  Make sure you use a flavorful cheddar cheese.  I like using sharp cheddar in my cooking.  Enjoy!
Homemade Cheddar Biscuit with Pulled Pork.
Homemade Cheddar Biscuits, fresh out of the oven.  These are flattened, so they can be used for sandwiches. 

Tasty Cheddar Biscuits
Preheat oven to 400 F.

Make buttermilk mixture in a measuring cup.  In a measuring cup place:
1 Tbsp lemon juice

Fill so you have a total of:
1/2 cup milk

Mix in a large bowl: 
1/2 cup brown rice flour
1/2 cup tapioca starch
1/4 cup corn flour (or corn starch, if you don't have corn flour)
1/4 cup potato starch
1/4 tsp xanthan gum
2 tsp baking powder
2 tsp sugar
1/2 tsp salt
1/4 tsp baking soda

Dice in with a pastry cutter:
5 Tbsp butter

Add & mix in just until a dough is formed:
1/2 cup buttermilk, from above

Add:
1 cup grated cheese (a nice, sharp cheddar or similar cheese works well)

Scoop onto a tray lined with a silicon mat or parchment paper.  Flatten and gather into neater rounds with hands.  Bake at 400 F for ~15 minutes (more or less, depending on size of biscuits and desired browning level).  I aim for a very light brown.  Cool on the pan or cooling rack.
Cheddar biscuits, flattened and shaped quickly before baking.
Out of the oven and ready to eat! 

Wonderful warm with pulled pork.  Great as a side with breakfast.  Works nicely without cheese as a strawberry shortcake base.  Enjoy!  

Wednesday, 17 February 2016

Delicious Cheesy Grits & BBQ Shrimp with homemade BBQ sauce!

My sister pointed out to me that I was lacking a cheesy grits recipe on my blog.  Grits, made from a coarse cornmeal, are naturally gluten-free.   I have posted a tasty polenta recipe we love, but cheesy grits are definitely something that needed it's very own recipe!  BBQ shrimp (made either on the BBQ or in the oven if your BBQ is covered in snow) are a perfect accompaniment to fresh, homemade grits.  Served alongside a salad and it's a delicious meal.  Enjoy!

Cheesy Grits and BBQ Shrimp with homemade BBQ sauce, served with salad on the side. Yum! 


Delicious Cheesy Grits & BBQ Shrimp (with homemade BBQ sauce!)
Serves 6

Prepare Homemade BBQ Sauce (can be made in advance and refrigerated up to a week): (or have your own favorite BBQ sauce at the ready)

Cook over medium heat ~ 5 minutes:
2 Tbsp butter
1 small onion, diced finely

Add and cook ~1 minute:
2 tsp minced garlic

Mix in:
1 cup tomato sauce
6 Tbsp apple cider vinegar
2 Tbsp vanilla extract
2 Tbsp water
2 Tbsp molasses
2 Tbsp honey
1 Tbsp Worcestershire sauce
2 Tbsp brown sugar
2 tsp Tabasco sauce
1/2 tsp dried thyme
1/2 tsp dried ground mustard
pinch cloves
salt & pepper, to taste (I used about 1/2 tsp of each - adding a little extra pepper at the end)

Simmer over low to medium-low heat for 30-40 minutes, stirring occasionally.  BBQ sauce will thicken as it cooks.  Store in the refrigerator until ready to use, up to 1 week.
My batch of BBQ sauce - a little over 1 1/2 cups after simmering.

Delicious Cheesy Grits
Preheat oven to 425 F or prepare your BBQ to heat (and/or cook) shrimp.

Bring to a boil:
4 cups chicken broth/stock (Asian mushroom seasoning works nicely in lieu of broth/stock)

Add, then lower heat to medium-low to cook:
1 cup grits (I used white grits, but yellow or white are both fine. Just don't use quick-cooking grits).
3/4 tsp garlic powder

Cook over medium-low heat, stirring regularly for 20 minutes. Start cooking shrimp (instructions below) when there are about 5-10 minutes remaining on your grits, so everything finishes at the same time.

After 20 minutes, grits will be tender at this point and the mixture will have thickened.
Remove grits from heat.  Stir in the following:
1/4 cup butter
2 Tbsp milk
1 - 1 1/2 cups grated cheese (sharp cheddar, Mexican cheese blend, cheddar blend)
salt & pepper, to taste (i use more pepper than salt, because of the salt in the butter and cheese)

Serve immediately with BBQ shrimp, below.
Cheesy Grits - Is there a way to take a nice picture of the entire pot?  I'm not sure there is, but they were wonderfully creamy and delicious.

BBQ Shrimp
You can use either the cooked shrimp or raw shrimp (allowing longer cooking time).  I like to use the peeled, deveined, pre-cooked shrimp bought frozen.  I thaw it and then use it as directed below:

Oven:
Spread shrimp on a baking sheet.  Drizzle with BBQ sauce.  Bake at 425 F for about 5-7 minutes, until hot through and BBQ sauce is bubbling nicely.
OR
BBQ:
Skewer shrimps for the BBQ or put them in a BBQ-proof cooking tray.  Heat on the BBQ, brushing a few times with additional sauce, about 5-7 minutes.

Serve with cheesy grits and extra BBQ sauce on the side.  Nice with a big side salad, too!  Enjoy! 

Friday, 25 April 2014

Broccoli-Cheddar Soup

This is a wonderfully easy and gluten-free soup recipe to whip together for a meal.  It's packed with flavor, but make sure you use good quality cheddar cheese (I've used a mix of a mild cheddar and sharper white cheddar here). You can serve it with gluten-free rolls, garlic bread, homemade croutons, or plain (with a bit of extra shredded cheese on top).  Enjoy!

Broccoli-Cheddar Soup
Based on a recipe by Emeril Lagasse
Serves 4

In a medium-large pot over medium heat, cook until onions are tender (3-4 minutes):
2-3 Tbsp butter
1/2 onion, chopped
1/4 tsp salt
1/4 tsp pepper
pinch nutmeg

Add and cook 30 seconds:
1/2 tsp minced garlic
pinch ground thyme

Add and cook 1 minute:
3 Tbsp Kristin's Gluten-Free Flour Mix

Add slowly, stirring regularly to allow mixture to thicken:
3 cups chicken broth (OR 3 cups water + 3-4 tsp Asian mushroom seasoning)

Let soup come to a boil and thicken (4-5 minutes).
Add:
3 cups broccoli heads/tops

Let cook ~10-15 minutes, until broccoli softens. You may need to lower the heat to medium-low if it starts boiling too much.

Blend with a stick blender.
Mix into hot soup:
1-2 cups cheddar cheese

Serve with extra shredded cheese.

Monday, 3 March 2014

Ham & Cheese-Filled Rolls

These are my latest favorite invention.  Gluten-free bread dough needs to be softer/runnier than non-GF bread dough if you want a light, soft bread at the end, so it tends to make working with it rather tricky.  As I've done in my bagel recipes, this recipe finds a work-around in piping the dough onto the pan in a swirl, adding fillings, then piping on the top!  This way, you end up with an easy-to-make and delicious stuffed sandwich!  These have gotten rave reviews from everyone who's tried them.  They freeze really well, too.   There are two options for flour in this recipe - one for a slightly denser more robust roll and another for a lighter, fluffier roll. Both have been delicious and happily eaten.  Enjoy!
A roll made with the lighter flour mix (described in the recipe below).
A roll made with Kristin's Gluten-Free Flour Mix for a more robust roll. 

Ham & Cheese-Filled Rolls
Makes 6 large filled rolls

Line a cookie sheet with parchment paper or silicon mat.  Preheat oven to 350F.

In a mixer with paddle attachment, combine the dry ingredients (you have 2 flour options, use Kristin's GF mix for a more robust, slightly denser roll, and the other flours for a lighter, fluffier roll - I tend to make the lighter, fluffier version):
2 tsp quick-rise yeast
1 tsp salt
and
3 cups Kristin's gluten-free flour mix + 1 tsp xanthan gum
OR
1 cup brown rice flour
1/2 cup white rice flour
1/2 cup tapioca starch
1/2 cup potato starch
1/2 cup arrowroot starch
2 tsp xanthan gum

Add:
1 1/4 cup lukewarm water
1 Tbsp honey (or maple syrup)
1 1/2 Tbsp maple syrup (or honey)
4 Tbsp oil
3 eggs
1 tsp apple cider vinegar

Beat 3-4 minutes at medium speed.

Place batter in a ziploc freezer bag (make sure you use a high-quality freezer bag or it will tear as you try to pipe out your dough).  Cut 1/2" off one corner.

Pipe 6 swirls of dough onto parchment-lined or silicon-lined cookie sheet.  Try to use a little less than 1/2 the dough.

Fill each roll with the following, careful to leave a bit of space near the edge of the dough so it will seal properly when you pipe on the top: You can use more toppings than I have - I prefer less meat overall, but they'll work perfectly well with lots of ham piled on. I've made them both ways.
Slices of high-quality old cheddar cheese
Slices of ham
1-2 tsp ranch dressing on top of ham
Dough piped onto the pan, then topped with high quality cheddar cheese.
Top cheese with ham, you can use more/less as desired.  Then put a bit of ranch dressing on top of the ham.

Pipe swirls of dough on top, starting from the outside swirling inward, so you get the best seal.  You can always wet your fingers to smooth any areas if you are worried you left gaps.
You can smooth out any spots that aren't completely covered by the dough to close any gaps.

Place a cookie sheet upside-down on top of your cookie sheet to cover the rolls as they rise. (Put a bit of plastic wrap around the edges of the pans if they don't fit together well)  Let rise ~45 minutes in a warm location, until puffed up.  Bake at 350F for ~35 minutes, until nicely golden brown.  Cool on wire rack.  Enjoy!!!
Fresh from the oven and transferred to a cooling rack.  You can eat right away, let cool and then eat, or freeze for later. 

I like to make these, slice them in half and freeze them in ziploc bags for easy lunches!  They've quickly become a family favorite!  Enjoy!

Friday, 11 October 2013

Gluten-Free Ham & Cheese Roll-Ups

These are a fun and delicious lunch or dinner idea.  They're like savory cinnamon rolls - a light biscuity tasting dough (I have two variations included that you can use for your dough) filled with onions, ham and cheese.  Though I've never had a gluten-filled version of these, they're based on a recipe from one of my parents neighbors, Aundrea Esplin.  I thought the idea was so fun and could easily be converted into tasty gluten-free treats!  My family and friends have really enjoyed these.  I plan on future experimentation with alternate fillings, they're so delicious!  I find they're best warm, making them melt in your mouth! Enjoy!


Gluten-Free Ham & Cheese Roll-Ups
Makes 18 individual roll-up buns

Grease 18 muffin tins OR 9x13 pan (or make some in muffin tins, and some in a pan like cinnamon rolls) You can always fit most of them into a 9x13 pan and then put any extras in another small baking pan, since this recipe tends to make a bit more than comfortably fit into a 9x13 pan.

In a bowl, put 2 eggs (still in shells) in hot water - just to warm them up. Or just have your eggs ready at room temperature.

Mix and set aside to rest 5 minutes:
3/4 cup warm water (OR 1 cup warm water for fluffier* roll-ups)
3 tsp rapid rise yeast (OR 5 tsp rapid rise yeast for fluffier* roll-ups)
1 Tbsp sugar

*Fluffier rolls: I found the dough to be a bit more difficult to work with, but you do end up with a puffier end result.  Either way is great, it just depends on your personal taste.  The softer/fluffier the end result in GF cooking, the stickier your dough will be while you're working with it. 

Mix together in a small bowl:
1/3 cup butter, melted
2 Tbsp sugar
1 tsp salt

In a large bowl, mix together:
3 1/2 cups Kristin's Gluten-Free Flour Mix (This is a bit more than one batch of my flour mix)
1 1/2 tsp xanthan gum

Add to the dry ingredients:
yeast mixture
butter mixture
2 eggs, room temperature

Mix thoroughly with a large spoon, using the back of the spoon to help create a nice, smooth dough.

Line two large sheets of plastic wrap side by side on the counter, overlapping a bit.
Spoon out large scoops of the dough and place along the middle of the plastic wrap.
Pull out another two large sheets of slightly overlapping plastic wrap to cover the dough.You’ll then flatten out the dough between the sheets until you have – more or less – a piece of dough that is flattened to somewhere near 12"x20". Try to make it nice and even.You have to slightly adjust the plastic wrap as you’re doing this, since it sometimes gets caught underneath the dough.But, you’ll find the dough doesn’t stick at all to the cling wrap, which is fantastic!  Pull off the top layer of plastic wrap.
You can definitely flatten the dough with a rolling pin on top of the plastic wrap and it'll look a bit neater than this, but I tend to have little kids helping, and they like to help flatten things out.

Spread the dough with the following - the amount of filling is up to you, but the following will serve as guidelines, you may like more/less:
Ranch Dressing, a thin layer
1/4 - 1/2 onion, finely diced
ham, diced (I used 7-10 slices of ham, diced into small pieces)
3/4 - 1 cup grated cheddar cheese (A cheddar cheese blend works nicely)


Carefully roll up the dough, so you have one 20" long roll of dough.Pulling up the plastic wrap can help you get the dough to roll over.  Cut the dough, using a serated knife, into 18 equal pieces. (like you would for cinnamon rolls)

If you make the fluffier version, it won't cut as neatly during this part.

Place each section into a greased muffin tin OR 9x13 pan.   Set uncovered to rise in a warm location 30-45 minutes, until they appear that they have gotten a bit puffier.  (They won't double, but they will look a bit swollen).
The rolls on the left are the less fluffy version of the recipe, those on the right are the fluffier version. I used extra filling in the fluffier version, making them a bit messier during the roll-up.

Brush the top of each roll with:
1 egg, beaten + 1 Tbsp water

Sprinkle the tops with:
Grated parmesan OR romano cheese


Bake at 350F for 20-25 minutes for muffin cups, 30-35 minutes for 9x13 pan, until golden brown and cooked through. 

Store leftovers in the refrigerator.  Or, you can freeze individually so you have ready-packed roll-ups for lunches!  Best served warm.
Enjoy!


Sunday, 23 June 2013

Jalapeno & Cheddar Bagels

All I can say about these is they are fabulous!  Fresh out of the oven, you can eat them plain and they're so delicious.  They're also great toasted with cream cheese.  I find jalapenos vary in terms of how spicy they are, so you may want to nibble a piece before you add it to the dough.  If it isn't a very spicy one, you can add some of the jalapeno seeds into the batter as well.  (Seeds from a chili pepper tend to be where the spice really is).  These bagels are so easy to whip together and so delicious. Enjoy!!!

Jalapeno & Cheddar Bagels
Makes 6 bagels (you can easily double the recipe)
 
Line cookie sheet with silicon mat or parchment paper.
 
In a 1 cup measuring cup mix and let rest 5 minutes:
2/3 cup warm water
4 Tbsp honey
2 tsp rapid rise yeast (quick-rise yeast)
 
Add to yeast mixture:
2 egg
4 Tbsp oil
1 tsp apple cider vinegar
 
Set liquids aside, and mix together in a mixer:
1 1/3 cup tapioca starch
1 cup brown rice flour
5 Tbsp potato starch
1 ½ tsp xanthan gum
1 tsp salt
 
Add liquids to mixer.  Mix on low, until combined.  Then mix on medium speed, scraping occasionally, for 2-3 minutes.  Batter will be nice and smooth.
 
Fold in:
2 Jalapenos, seeded and diced (seeds add extra spice, so if you want spicier bagels, keep some of the seeds)
I use the mixer to just mix in quickly.
 
Put batter into a Ziploc (I like the freezer bags because they’re stronger).  Cut 1” off one corner.  Pipe 6 bagels onto prepared cookie sheet.

Don't worry about them being perfect, just try to make them evenly sized.

Using wet hands, spread bagels so the holes are nice and big. You can also smooth out any areas that are a bit lumpy. 
Smooth with wet hands. Imperfections will be hidden once they rise and have cheese on top, so don't worry too much about making them look perfectly smooth.

Let rise in a warm location for 30-40 minutes.  They’ll look a bit puffier, but won’t fully double in size.
Nice and puffy, ready to top and bake!

Sprinkle generously on top of bagels:
½ cup sharp cheddar cheese, grated
Mmm.. don't those look good.

Bake at 350F for 20-25 minutes until browned.  Transfer to a cooling rack to cool. 
Fresh out of the oven. Yum!

Once cooled, you can slice and freeze if you aren’t planning to get them right away. These are great toasted with cream cheese.
Enjoy!
 
A top-view.
Sliced and ready for toasting or topping.
 

Friday, 7 June 2013

Gluten-free 'Cheez-It' Style Crackers

I can't tell you how long it's been since I ate a cheez-it cracker, but I still remember the distinctive taste and these hit the spot!  In fact, these taste better than cheez-it crackers - they're freshly made, crunchy, cheesy, and so fun to whip up.  Enjoy!!!
These have little bits of cheese that bubbled out since I didn't mix it quite as thoroughly (I was working with a 2 year old, who doesn't have a huge amount of patience when she wants to be 'helping'), but they're wonderfully cheesy and crisp!

Gluten-free ‘Cheez-It’ Style Crackers
Makes 2 – 3 cookie trays of cheese crackers
 
Preheat oven to 400F. Line 2 cookie sheets with silicon mats or parchment paper.
 
Mix together using a pastry cutter:
1 ½ cup sharp cheddar cheese (I used Black Diamond Sharp Cheddar)
3 Tbsp butter (cold, not softened)
1 pinch cayenne powder
 
Once chopped and butter mixed thoroughly into the mixture, add and chop in:
1 egg yolk
 
Once the egg yolk is chopped in, chop/mix in:
2 Tbsp milk (lactose-free works well)
 
Roll out the cheese dough between 2 sheets of plastic wrap until 1/8” – ¼” thick (I tended toward the ¼” thick, which I found worked great.  Pull off the top sheet of plastic wrap. 
You can either 1. Use mini cookie cutters to cut out shapes, or 2. Slice into squares using a pizza cutter OR ravioli cutter. 
So easy a 2 year old can do it! Such fun!
If you use the cookie cutters, remove and place on a cookie sheet lined with parchment paper or a silicon mat.  Pile up remaining dough and re-roll out between sheets of plastic wrap.  Continue cutting until you’ve used up all your dough.  (* You may need to lift the plastic wrap up a bit to help remove the crackers from the wrap in order to place them on the mat.  But you will find they won’t stick.)
Lift up the plastic wrap a bit if you're having trouble picking up the crackers from the plastic wrap.
Line on the tray like this. They hardly spread out, so you can space them close together.
Sprinkle or grind fresh salt on top of the crackers prior to baking. Don’t forget this step!!! 
Don't forget to sprinkle with salt!!!
Bake 10-15 min, until nicely browned around edges.  Remove to cooling rack to cool. Store in a air-tight container. 
Enjoy!!!
 
My version made with my 2 year old daughter.
The version made by my brothers and parents ~3,000 miles away. They rolled out the dough and use a ravioli cutting to trim theirs into rectangular crackers. Don't they look great? Way to go, guys!