Search for a Recipe

Wednesday 23 December 2015

Homemade Gluten-Free Wedding Reception Ideas and Arrangements

Credit to Ali Sumsion Photography for the great food pictures here!  Thanks to Milli Garrett for the lovely table decorations.

One year ago, I spent a couple of weeks leading up to December 23rd preparing a fun, delicious, gluten-free dessert-themed wedding reception for my brother and sister-in-law.   In honor of their anniversary, I thought I'd post a few extra pictures from that lovely day.  And provide a few tips on ideas and arrangements that could be applied to any party or gathering.   A full list of all the foods, including links to the recipes are in my original wedding reception post.
Gluten-Free Dessert Wedding Reception
Two tables side-by-side filled with delicious gluten-free desserts. 
Gluten-Free Dessert Wedding Reception
Fresh fruit added color to the tables.  The Rocky Mountains were a majestic backdrop for this beautiful wedding reception. 
Gluten-Free Dessert Wedding Reception Pudding Cups
Fresh homemade vanilla pudding with strawberries and mini heart-shaped sugar cookies on top.
Gluten-Free Dessert Wedding Reception Fruit Decoration
So easy, but fresh fruit is a beautiful compliment to a big dessert table.
Gluten-Free Dessert Wedding Reception Cupcake Tiers
Tiered serving trays were a perfect location for GF cupcakes.  They were refilled throughout the night.
Gluten-Free Dessert Wedding Reception Table Flowers
Small flower arrangements added extra oomph to the dessert tables.
Gluten-Free Dessert Wedding Reception Tables
A view of one of the dessert serving areas.  There was space for guests to walk fully around the tables and enjoy the view, too.  Fresh fruit scattered throughout the tables added color as well as taste.
Gluten-Free Dessert Wedding Reception Treats
Beautiful and easy, homemade chocolate angels with edible shimmer dust and homemade peppermint bark were served alongside homemade candied orange peel next to the water pitchers (each water picture was half filled - one with lemon/lime slices and the other with orange slices/cranberries).
Gluten-Free Dessert Wedding Reception Table
The second dessert serving table.  Beautiful table clothes, a decorative flower arrangement, and serving platters at different heights made it look great!
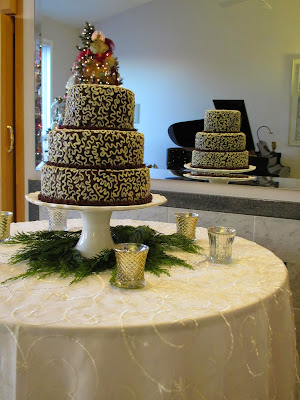
Gluten-Free Dessert Chocolate Wedding Cake
A chocolate gluten-free wedding cake - with different flavored fillings for each layer! Yum!  This was before food-safe fresh flowers were added to the cake (just before guests arrived).
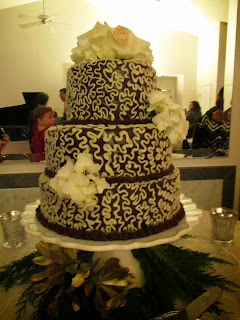
Gluten-Free Dessert Chocolate Wedding Cake
Fresh, food-safe flowers were added just before the start of the reception.  
Gluten-Free Dessert Chocolate Wedding Cake
One happy couple! Proud sister and nephew were looking on. 
Gluten-Free Dessert Chocolate Wedding Cake
Slices of delicious cake served around the top layer of the cake.  Peppermint-filled and raspberry-filled GF wedding cake slices were served at the reception.  I believe that's me in the striped sweater in the mirror reflection.  

Monday 21 December 2015

Eggnog Pudding (lactose-free option!)

This pudding is rich and delicious in flavor.  I served small cups of this pudding topped with a fresh gingerbread cookie decorated with icing to look like a snowflake at my brothers gluten-free wedding reception.  In hindsight, I should have made more because these delicacies went quickly once people tasted them.   The cookies were made by scooping and baking small cookies from my gingerbread house recipe, frosted with the royal icing from that recipe.  Served up on a gold platter in clear glasses, and they looked wedding-ready!  These are also absolutely delicious served with my chewy gingersnap cookies!  Enjoy!

Eggnog Pudding - Lactose and Gluten Free!
Eggnog pudding served up with homemade gingerbread cookies! Yum!

Eggnog Pudding
Makes ~2 1/2 cups pudding (Yes! You can double this recipe if you're serving a crowd.)

TWO methods for cooking: 

Method 1: 
In a medium saucepan, bring to a boil over medium-low to medium heat, stirring regularly with a whisk:
2 cups eggnog (lactose-free eggnog works!)
1/3 cup sugar
1/2 tsp salt
1/4 tsp nutmeg

In a small bowl, whisk together:
1/4 cup eggnog
3 egg yolks
3 Tbsp cornstarch

Once mixture has come to a boil, whisk in the egg yolk/cornstarch mixture.  Let mixture return to a boil for 1 minute, whisking constantly.  The pudding should thicken up nicely.

Remove from heat and add:
1 tsp vanilla extract

Place pudding in a bowl and cover tightly with plastic wrap to avoid a film forming on top.  Let cool a bit and then let cool completely in the refrigerator.

***Depending on the eggnog used in this recipe, you may find lumps forming.  Some eggnogs, like lactose-free versions, use thickener, like guar gum, within the eggnog, which can thicken into tiny lumps within your pudding.  No problem!  Just strain the pudding through a sieve (using a spoon to press it through) before serving to remove any lumps.

Method 2: 
In a medium saucepan, whisk together:
3 Tbsp cornstarch
1/3 cup sugar
1/2 tsp salt
1/4 tsp nutmeg

Whisk into dry ingredients:
2 - 2 1/4 cup eggnog
3 egg yolks

Whisking constantly (you can pause every so often, but you never want the bottom of the pan to heat too quickly), cook pudding over medium-low heat.   Once the pudding has warmed through, and is starting to get hotter, you can increase the heat a bit, but don't go hotter than medium heat or you can curdle your eggs.  Be patient! You don't want your pudding to cook too quickly.
Stir constantly until your pudding has thickened and is just starting to bubble.

Remove from heat and immediately stir in:
1 tsp vanilla extract

Place pudding in a bowl and cover tightly with plastic wrap to avoid a film forming on top.  Let cool a bit and then let cool completely in the refrigerator.

***Depending on the eggnog used in this recipe, you may find lumps forming (although I have not found that to be the case with Method 2, because of the slow and steady cooking).  Some eggnogs, like lactose-free versions, use thickener, like guar gum, within the eggnog, which can thicken into tiny lumps within your pudding.  No problem!  Just strain the pudding through a sieve (using a spoon to press it through) before serving to remove any lumps.

Great served with gingerbread cookies or chewy gingersnap cookies.  Enjoy!
 Extra gingerbread cookies, topped with snowflakes, served up nicely on a platter once all the eggnog pudding was gone. 

Wednesday 16 December 2015

Gingerbread Ganache Truffles

These were a very successful experiment I whipped up for my brother's gluten-free wedding reception.  They were so delicious, it's a miracle any made it out to be served.  These are a perfect truffle filling for winter.   The combination of flavors would also be great on top of a rich chocolate brownie.  I'll definitely be whipping these up again soon as part of my yearly assortment of chocolates for friends and teachers.  Enjoy!!!
Homemade Gingerbread Truffles
Gingerbread Truffles - inside molded dark chocolate with musical notes to decorate!

Gingerbread Ganache

In saucepan over medium heat combine:
1/4 cup heavy cream (whipping cream)
1/4 cup butter
1/2 tsp ground cinnamon
1/4 tsp ground ginger
1/8 tsp ground cloves
pinch nutmeg
pinch allspice optional
*mix together the spices first in a little bowl before adding to the pan, just to make sure you don't have lumps of any one spice.

Remove from heat and mix in until smooth:
4 oz semi-sweet chocolate OR 5 oz milk chocolate

You can use the ganache in a few ways:
1. Use warm over ice cream or brownies
2. Chill, then roll into balls, chill again, then dip in chocolate for truffles
3. Make molded chocolates - For the chocolates above, I made them by tempering chocolate and pouring into molds with musical note transfer sheets for decoration.   I poured out excess chocolate, then let the tempered chocolate set fully.  Then, I piped lukewarm (not hot) gingerbread ganache into each mold (cut the corner from a ziploc to do this easily).  Leave space at the top to cover with chocolate.  Let ganache rest to cool fully.  Cover ganache with a thin layer of chocolate to seal the top and bottom together, enrobing the ganache inside.  Let chocolates fully harden before banging on a counter to remove from mold.  

Friday 11 December 2015

White Chocolate Peppermint Popcorn

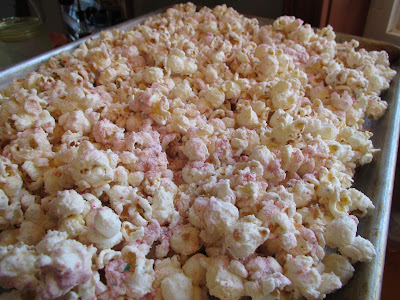
This was a serious hit with everyone! The kids loved helping make it - and it was easy and quick to whip together.  White chocolate with peppermint is a delicious combination, and adding that to the crunch of popcorn just makes it that much better!  A fun treat - one we plan to make again soon to pack into little treat baggies for Christmastime.  Enjoy!
Gluten Free White Chocolate Peppermint Popcorn
Gluten Free White Chocolate Peppermint Popcorn!!!
Tasty and easy - fresh homemade white chocolate peppermint popcorn!

White Chocolate Peppermint Popcorn
Based off the 'Candy Cane Popcorn' recipe from the book "Popcorn" by Carol Beckerman (Yum!)
Makes 1 large tray of popcorn

Line a cookie sheet with parchment paper.

Pop 1/2 cup popcorn kernels in an air popper in a large bowl.  Scoop popcorn by hand into a fresh large bowl. (This allows any kernels or smaller pieces to get left behind.)
Fresh popcorn, ready for white chocolate and peppermint!

Melt in a microwave safe bowl at 50% power in 30 second increments, stirring regularly. You don't want to burn the chocolate:
12 - 14 oz good quality white chocolate 

Mix in quickly:
1/4 - 1/3 cup crushed peppermint candy (candy canes, small peppermint candies)
Crushed peppermint candies - then mixed quickly with the melted white chocolate.

Fold melted white chocolate/peppermint mixture into popcorn quickly!  Mixing with your hands is effective, since it helps you do this part quickly.

Scoop popcorn onto prepared cookie sheet lined with parchment paper.
Sprinkle over top of popcorn:
1/4 - 1/3 cup crushed peppermint candy
Gluten Free White Chocolate Peppermint Popcorn
White chocolate peppermint popcorn, sprinkled quickly with additional crushed peppermint.

Place in the refrigerator ~5 minutes, until white chocolate has set.  Serve or store 3-4 days in a tightly sealed container.

Makes a fun, light dessert and a great holiday treat for kids!
Enjoy!

Sunday 6 December 2015

Shallot, Kale and Bacon Quiche with a Buttermilk Biscuit Crust

The buttermilk biscuit crust is a great favorite of mine when throwing together quiche.  It gives a lighter texture to the bottom of the quiche, and is a general favorite in my house, although they'll happily eat quiche made with a buttermilk pastry crust, too.  We sometimes find kale can be overpowering in recipes, but when sauteed with shallots and peppers, it's a wonderful addition to quiche, giving more of a spinach flavor.  My fabulous 4 year old cook assisted me in cooking this particular quiche all along the way.  Enjoy!
GF Kale and Bacon Quiche with Buttermilk Biscuit Crust
GF Shallot, Kale and Bacon Quiche with Buttermilk Biscuit Crust

Saute over medium heat until almost tender:
2 Tbsp olive oil
1-2 shallots, sliced
1/2 red bell pepper, diced
salt and pepper

Add and cook until kale is just tender/wilted:
2-3 cups diced kale, middle stem removed (washed, shaken dry is fine)
Sauteed Kale, Shallots and Red Pepper

Set vegetables aside to cool a bit while you prepare the buttermilk biscuit crust.
First, make your buttermilk (or just use ¼ cup buttermilk)

In a measuring cup place:
1 ½ tsp lemon juice OR white vinegar

Fill so you have total of:
¼ cup milk

Mix in a bowl:
¾ tsp sugar or squirt honey
1 tsp baking powder
¼ tsp salt
pinch of baking soda

Add and dice in with a pastry cutter:
2 ½ Tbsp butter

Add and mix with a spoon, just until combined:
¼ cup buttermilk (from above)

Press biscuit crust in pan using plastic wrap to keep from sticking.  It won't be perfect, and this is just fine!  It can be too sticky if it gets too warm, so you can always refrigerate a bit to chill and then it should press into the pan a bit easier.

Spread on the crust:
1. 1/2 - 1 cup crumbled cooked bacon or thinly sliced Canadian bacon
2. 1/2 - 1 cup sliced or shredded cheese (a stronger cheddar, or something similar is nice. I used a sheep's milk gouda, but sometimes I use a sharp cheddar or yogurt cheese).
3. Spread the cooked vegetables evenly over the top of the cheese.  You can use more or less of your vegetable mixture, depending on your preference.

Whisk and then pour over fillings:
4-6 eggs
1/3 - 1/2 cup milk (lactose-free works great)
salt and pepper

Bake at 425 F for 10 minutes.  Lower oven temperature to 350 F and bake another 20-25 minutes, until eggs are set in the middle (it varies depending on whether you use 4, 5 or 6 eggs).

Slice and serve hot or chill and enjoy cold.  Enjoy! 

Tuesday 1 December 2015

Chocolate Gluten-Free Wedding Cake!

Almost one year ago, I put together a delicious Gluten-Free Wedding Reception for my brother Mike and his wife Amanda.  The three-tiered wedding cake was made from a delicious, moist chocolate cake with different fillings in each tier (Raspberry, Mint, Triple-Chocolate). Each tier was topped with dark chocolate ganache, then semi-sweet ganache to create a smooth layer.  The cakes were then decorated with white chocolate ganache piping and a semi-sweet chocolate ganache scalloped edging.  Fresh flowers decorated the cake.  Happy Cake Making! Enjoy!
GF Chocolate Wedding Cake!
Homemade and Gluten-Free Chocolate Wedding Cake! 
GF Chocolate Wedding Cake!
#bromanda cutting the cake! They cut into the middle mint layer. Yum!
Above wedding cake pictures by Ali Sumsion Photography

Chocolate Gluten-Free Wedding Cake!
Makes 1 three-tiered cake (6", 8" and 10" layers)

Cake can be filled and arranged as described: (recipes for filling shown after cake recipe)
Bottom Tier (10") - three fillings
1. Raspberry Jam
2. Raspberry Dark Chocolate Ganache
3. Chocolate Marshmallow Frosting
Middle Tier (8") - three fillings (with mint-infused chocolate cake in this tier)
1. Dark Chocolate Mint Ganache
2. Crushed peppermint candy
3. Mint flavored Marshmallow Fluff Frosting
Top tier (6") - three fillings
1. Dark Chocolate Ganache
2. Milk Chocolate Ganache
3. Chocolate Marshmallow Frosting

One Batch Chocolate Cake Batter:
(makes two 10" cakes OR three 8" cakes OR two 8" + two 6" cakes OR two 6" cakes + 24 mini cupcakes)

Butter the cake pans.  Then line them with parchment paper.  Cut a circle for the bottom of the pan. Then cut long strips for the sides. This will give you the cleanest removal of your cakes.  

In a measuring cup, combine the following and set aside:
1 1/2 cup milk (lactose-free works great)
2 Tbsp white vinegar

In a large bowl, whisk together:
1/2 cup tapioca starch
1/2 cup sorghum flour
1/2 cup white rice flour
1 cup cocoa powder
1 1/2 tsp xanthan gum
1 tsp baking soda
2 tsp baking powder

In a mixer, beat until fluffy:
3/4 cup salted butter, softened

Add sugars to butter, and beat until fluffy:
1 cup brown sugar
1 cup white sugar

Add one at a time, scraping down the sides of the mixer, as needed:
3 eggs (room temperature)
2 egg yolks (room temperature)

Add in:
3 tsp vanilla extract or vanilla bean paste
(6-9 drops high quality peppermint essential oil, for peppermint layer only)

Turn the mixer to low.  Alternately add the flour/cocoa blend and milk/vinegar mixture.

One mix of cake batter makes two 10" rounds.   A second mix will allow you to make two 8" rounds + two 6" rounds.  (My top tier was a bit taller because I made three batches of batter here, in order to have extra for cupcakes.  Batch 1 made two 10" cakes. Batch 2 made three 8" cakes. Batch 3 made two 6" cakes + ~24 mini cupcakes (baked about 12-14 minutes).)

Bake cakes at 350 F.  Bake 6" rounds 20-25 minutes and 8" - 10" rounds 25-35 minutes.

Let rest a few minutes before removing carefully to cooling racks to completely cool.   Once cakes are cool, you have a few options: 
1. Make cake right away - fill layers as desired, chill in refrigerator to firm.  Cover in first layer of ganache, chill.  Cover in 2nd layer of ganache, chill.  Assemble cake (with dowels or on cake stand), decorate with white ganache, or as desired.  
2. Fill and stack each cake layer.  Wrap each filled cake layer securely with a few layers of plastic wrap.  Freeze until ready to use.  *This is my preference, since it allows you to make the cake a few days in advance, and you only need to assemble and do the final frosting of the cake. 
3.  Wrap each cake layer securely in a few layers of plastic wrap and freeze until ready to use.  


When you remove cakes from the freezer, let them rest wrapped on your counter for ~15-20 minutes, so any condensation is on the plastic wrap and not on your cake.  Then, you can unwrap and glaze/frost as desired.

Cake Fillings: 
Purchased fillings:
High quality raspberry jam
Peppermint candies/candy canes, crushed

Fillings to make: 
Raspberry Dark Chocolate Ganache
Dark Chocolate Mint Ganache
Dark Chocolate Ganache
Milk Chocolate Ganache
Chocolate Marshmallow Frosting
Mint Marshmallow Fluff Frosting

When assembling the cakes, I used ganache while it was still slightly warm when placed as a filling, as shown below.  Once chocolate ganache was spread on a cake layer, I then let it cool completely in order to set before adding on another layer of filling.
GF Cake with Ganache Filling

Cakes were assembled with the following fillings (same as shown earlier):
Bottom Tier (10") - three fillings
1. Raspberry Jam
2. Raspberry Dark Chocolate Ganache
3. Chocolate Marshmallow Frosting
Middle Tier (8") - three fillings (with mint-infused chocolate cake in this tier)
1. Dark Chocolate Mint Ganache
2. Crushed peppermint candy
3. Mint flavored Marshmallow Fluff Frosting
Top tier (6") - three fillings
1. Dark Chocolate Ganache
2. Milk Chocolate Ganache
3. Chocolate Marshmallow Frosting


Cake on left is assembled middle layer - with dark chocolate mint ganache, crushed peppermint and mint flavored marshmallow fluff frosting.  The cake on the right was an extra peppermint cake I made with the extra 8" round I had.  
GF Wedding Cake being prepped for assembly
Filled cakes after being removed from the freezer.  They are resting to allow any condensation to accumulate on the plastic NOT the cake.  

Semi-sweet and Dark Chocolate Ganache was used as a glaze on each layer.  I made a few batches of chocolate ganache, using the following recipe: 

Bring to a boil over medium heat: 
1/2 cup butter
1/2 cup heavy cream

Remove from heat and pour over
8 oz high-quality semi-sweet or dark chocolate

Cool slightly before pouring or spreading over cakes.  Cool fully if you would like to whip and use like a regular frosting.  I first spread a thin layer of dark chocolate as a crumb coat, and then used semi-sweet for the final layer.  
Gluten-Free Chocolate Wedding Cake
All cakes received an initial layer of chocolate ganache glaze.  This was allowed to set before a final coat of ganache was added.  

The cake was then assembled using dowels (each layer was on a foil-wrapped cardboard circle).  White Chocolate Ganache was used to pipe decorations on the cake.  

White Chocolate Ganache was prepared as follows: 
Heat to boil over med-high heat:
1/4 cup + 2 Tbsp cream
1 Tbsp butter
3/4 tsp vanilla bean paste (preferred) OR vanilla extract

Remove from heat and add:
6 1/2 oz. high quality white chocolate

Stir gently until smooth.   Let cool until the ganache is a temperature and consistency that can be piped.  You could cool fully and then whip the ganache, to pipe like you would regular frosting, too.

Gluten-Free Chocolate Wedding Cake!
The final product, with white ganache piping to decorate, and a final scalloped edge at the bottom of each layer done in semi-sweet chocolate ganache.  
Gluten-Free Chocolate Wedding Cake!
The GF chocolate wedding cake at the fully GF reception, with fresh flowers to decorate. 
Gluten Free Chocolate Wedding Cake
The top of the cake with smaller slices of the middle tier (mint) and bottom tier (raspberry) served, saving the top layer for the happy couple. 

Thanks to Ali Sumsion Photography for pictures of the completed cake!