Search for a Recipe

Friday 24 January 2020

Shrimp & Okra Gumbo

I grew up getting to eat gumbo fairly regularly - some of my favorite memories are times when we would go to fairs down in Georgia or South Carolina.  It wasn't until I was grown up that I realized you can actually make your own gumbo - you don't have to wait for summertime or a trip down south where okra is more readily available.  They sell okra sliced in the freezer! Yay!  I made this particularly recipe for book club, since we'd been reading a book based in the south.  It was a perfect excuse to whip up some gumbo.  And, because I wanted every Southern comfort food at the same time, I made some of my biscuits n' gravy with the naturally sweeter (coconut flour) biscuits and peach cobbler for dessert.  We had fun.  Enjoy!

Shrimp and Okra Gumbo
Fresh shrimp & okra gumbo - ready to serve with rice. Yum!

Shrimp & Okra Gumbo - Served over rice

Based off a recipe from Southern Living


Make Rice:
This is great to start making around the same time as your gumbo.  Then everything will be ready when you're wanting to dig in! 

Make 3 cups jasmine rice to serve the shrimp & okra gumbo over according to the package or make as described here:

In a pot, bring to a boil over high heat:
4 1/2 cups water (measure with a liquid measuring cup)
3 cups white jasmine rice
1/4 - 1/2 tsp salt

Once it's come to a good boil, place the cover on the pot.  Immediately lower heat to somewhere between low and medium-low and let the rice simmer for 20 minutes.  Remove from heat (keep the lid on) and let it rest 15 minutes before fluffing and serving.   You can make this at the same time as your gumbo.


Make Gumbo:

In a large pot over medium heat, melt:
6 Tbsp butter

Add and cook, stirring regularly for 10 minutes:
2 cups onions, finely diced
2 cups green peppers, diced in small to medium sized pieces
2 cups celery, finely diced

Add and cook, stirring regularly for another 5 minutes:
5-7 cloves garlic, minced

Add and cook, stirring well for 1-2 minutes:
1 1/2 tsp ground thyme
1 1/2 tsp salt
1 tsp ground pepper

Stir in the following:
~30 oz frozen sliced okra, partially thawed (I used three 10 oz bags and let them rest on the counter until I was ready to use)
4 cups chicken broth (GF chicken bouillon paste or Asian mushroom seasoning work)
2 cans diced tomatoes (14.5 oz cans)
1 can fire roasted diced tomatoes (14.5 oz can OR just an additional can of diced tomatoes, but you get an extra bite of flavor from fire roasted tomatoes)
3 bay leaves

Bring to a boil, then reduce heat to medium-low (or low).  Let vegetable mixture simmer for 30 minutes, stirring occasionally.

Optional, to thicken the gumbo just a little bit more after simmering 30 minutes: 
In a small bowl, mix together:
1 Tbsp cornstarch
3 Tbsp water

Stir this into your gumbo, then add the shrimp and hot sauce.

You'll want to add the following shortly before you're hoping to serve the food, since you don't want the shrimp simmering for long.  Add the following to your pot:
2 lbs cooked shrimp (peeled, deveined, tails on or off - if it was frozen, thaw and rinse well before adding to your pot)
1 - 3 tsp hot sauce (Tabasco works well - taste-test after adding 1 tsp and add more if desired)

Let gumbo come back to a simmer.
Salt & pepper, to taste. 
Remove the bay leaves and serve over rice!   This shrimp & okra gumbo is delicious!
Mmm... it smelled so delicious.  

Shrimp and Okra Gumbo Recipe by Successfully Gluten Free!

Thursday 23 January 2020

Ham, Gruyere, Shallot, and Potato Tart/Quiche

This is a rich, delicious quiche that I've made many times, modifying it along the way into this version that we love.  It works well in a regular pie dish, but also works nicely in a tart pan - and makes it a bit flatter and fancier looking.  I love the buttermilk biscuit crust.  I've written the recipe so you can following and prepare it in order - it's best to prepare the fillings first, then the crust, and finally assemble the quiche before baking.  Enjoy!
Gluten Free ham gruyere shallot and potato tart or quiche
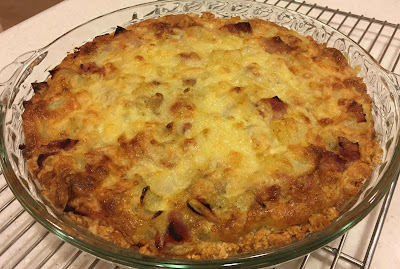
A yummy ham, Gruyere, shallot and potato quiche, ready to eat! 

Ham, Gruyere, Shallot, and Potato Tart/Quiche

Inspired and partially based on a recipe from "The Williams-Sonoma Cookbook - the essential recipe collection for today's home cook" 


FIRST - Prepare fillings:

Finely grate 1 cup Gruyere cheese.  (You can use more, if you want it extra cheesy). Set cheese aside to use later.

In a medium pot, boil 1 russet potato, peeled and cut into large chunks.  Once boiled, dice into small, 1/2" pieces and let cool 10-15 minutes.

In a saucepan, saute the following until shallots are softened:
1 Tbsp butter
2 shallots, diced
1/2 tsp fresh thyme OR 1/4 tsp dried ground thyme

Add and stir in, cooking 1 minute:
diced potato, from above

Remove from heat and stir in:
3/4 cup diced ham (I prefer using a black forest ham)

Set aside the vegetables and ham.

In a separate bowl, whisk together:
1/2 cup cream 
2 eggs
pinch nutmeg
1/4 tsp salt
1/4 tsp pepper

Set the eggs aside and prepare the base.


SECOND - Prepare buttermilk biscuit base:

In a measuring cup, combine to make buttermilk:
1 Tbsp vinegar
1/2 cup milk (just under, you want to have 1/2 cup buttermilk total)

In a large bowl, mix together:
1/2 cup brown rice flour
1/2 cup tapioca starch
1/4 cup cornstarch OR arrowroot starch
1/4 cup potato starch
1/4 tsp xanthan gum
1 1/2 tsp sugar
2 tsp baking powder
1/2 tsp salt
1/4 tsp baking soda

Add and chop in with a pastry cutter, until nice and crumbly (but make sure you can still see the chunks of butter):
5 Tbsp butter

Add and mix in with a spoon:
1/2 cup buttermilk, from above

Line a 10" tart pan or pie dish with the biscuit base, using plastic wrap to help press the dough in place if it's sticking to your fingers.


THIRD - Assemble your tart:

On top of your biscuit base, spread:
1/3 cup shredded gruyere cheese

Add the potatoes/ham mixture.    Pour the egg/cream mixture evenly over the potatoes/ham mixture.  Top with an additional 2/3 cup shredded gruyere cheese.
The assembled quiche, ready to bake.  This works nicely in a tart tin, too.  

Bake at 425 F for 10 minutes.  Without opening the oven, lower the temperature to 350 F and bake an additional 20-25 minutes.   Remove from the oven.  Let cool 5 minutes before serving.  If you made it in the tart pan, you can let cool a bit longer (~20 min.) before removing from the pan and placing on a serving platter.  Enjoy!
Fresh out of the oven! 

Ham, Gruyere, Shallot and Potato Tart/Quiche Recipe by Successfully Gluten Free!

Thursday 9 January 2020

Baked French Toast Style Bread Pudding

This is a perfect recipe for those cold winter days.  It's great for breakfast and as leftovers, too.  I based it off a Pioneer Woman recipe, but tweaked it a little bit - making it not as sweet overall, and a little richer in the pudding aspect.   You can assemble the evening before to bake in the morning, or even make it last minute and just let it soak an hour or so before baking, if you're short on time.  I've preferred this using homemade gluten-free brioche bread, which adds an extra element of richness to make it into a nice bread pudding, in my opinion.  Enjoy!
Fresh french toast style bread pudding - yum! 


Baked French Toast Style Bread Pudding

based on a recipe by the Ree Drummond (the Pioneer Woman), but I like to cut the sugar way back.

Begin this recipe the evening before you want to bake it.  Or assemble together in the morning if you plan to bake it in the evening.  You really do want it to rest in the refrigerator for a good 8 hours.  However, you can mix and let it rest just an hour or so before baking and it will still turn out quite well. 

In a buttered 9 x 13 baking dish, spread evenly:
1 - 1 1/2 loaves GF brioche bread OR GF bread of your choice, torn or cut into large chunks

In a large bowl, whisk together:
2 1/2 cups half & half (lactose-free works great - similar dairy-free creamers will work, too)
8-10 large eggs
scant 1/4 cup white sugar
scant 1/4 cup brown sugar
1 1/2 tsp vanilla extract OR vanilla bean paste (the little vanilla flecks will sink to the bottom, but I love the taste)

Pour the egg mixture evenly over the bread.  Cover tightly and refrigerate overnight.

In a large bowl, chop together with a pastry cover the following topping: *You can mix together the topping now and refrigerate in a ziploc bag until you're ready to bake, or prepare right before you place it in the oven. 
1/2 cup Kristin's Gluten-Free Flour Mix
1/3 - 1/2 cup brown sugar
1 tsp cinnamon
1/4 tsp salt
dash nutmeg
1/2 cup butter, chilled

Remove the baking dish from the refrigerator 30 - 45 minutes before you plan to bake and place on the stove-top or counter.  You don't want to put a cold glass or ceramic dish directly into the hot oven, since there's a chance it could crack. 
Brioche bread after soaking, ready to bake! 
Topped with the crumble topping just before baking.

Sprinkle the chill butter/sugar/flour topping mixture over the top of the bread.  Bake the entire tray at 350 F for 45 - 60 minutes.  Great served immediately.  Leftovers can be refrigerated and heat up nicely to eat later.  Delicious served with maple syrup (although I don't find it needs any) and fresh berries or jam.
Out of the oven let rest just a minute and then serve! 

Baked French Toast Style Bread Pudding by Successfully Gluten Free! 

Tuesday 7 January 2020

Basic Brioche - Gluten-Free Style

Brioche bread is a versatile dough that can be baked into smaller forms or larger loaves.  It's enriched with eggs, butter, and a little extra sugar than ordinary bread recipes.  It's best eaten fresh - but you can slice it, freeze it, and use later, too.  Make sure to reheat before eating.  It's SO good as baked french toast style bread pudding or in a bread pudding recipe.  This dough spreads.  I made the mistake one time of putting a double batch in 3 loaf tins instead of 4, and ended up with it rising up and over the sides of my pans while baking.  Whoops!  
Gluten free Brioche Bread
Brioche Bread - the dough below baked into two loaf tins
Gluten Free Brioche Danishes
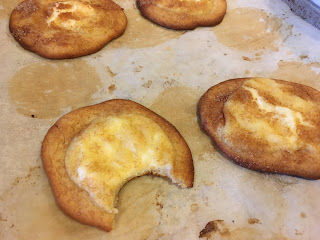
Brioche danishes filled with homemade vanilla pudding and sprinkled with cinnamon-sugar before baking.  (These spread when made on a flat sheet).
Gluten free Brioche Rolls
Brioche dough made into rolls.

Basic Brioche - Gluten Free Style


In a mixer, combine dry ingredients: 
1 cup brown rice flour
1/2 cup sorghum flour (or extra 1/2 cup brown rice flour)
1/2 cup white rice flour
1/4 cup tapioca starch
1/4 cup potato starch
1/4 cup white sugar
1 tsp xanthan gum
1 tsp salt
2 tsp rapid-rise yeast

Add and mix in 1 minute: 
1 1/4 cup milk, warmed (not hot)
4 egg whites + 2 eggs OR 4 eggs

Add, beating in 1 Tbsp at a time: 
6 Tbsp butter, softened (not melted)

Beat dough 5-6 minutes, until nice and smooth. 

Place dough in a buttered bowl (3-4 quart bowl works well).  Cover with plastic wrap and refrigerate until dough has doubled.  I find if I make this with cold milk, I can let it rise overnight.  If I use warm milk (as listed), it takes 2-4 hours to rise.  **NOTE: I've also completely skipped this step, and while I like the texture just a bit more when it has a double-rise, I've also risen and baked the bread immediately and it was still delicious.**

Remove dough from bowl and shape in desired pans - making sure your pans are well-buttered or lined with parchment paper.  For loaves, line two bread pans with parchment paper.  Fill halfway with batter.   After re-shaping, let dough rise in a warm location until doubled.   It's fine to leave uncovered during the rise, but you can also cover loosely with plastic wrap - but make sure the dough does NOT touch the surface of the dough.  
 I have made this dough both covered and uncovered during rising - do yourself a favor and don't bother covering the bread. It'll turn out great either way - and you won't have to worry about the plastic touching the top of the bread and pulling off the top when you remove it. 

Once dough has doubled in size, bake at 350 F for 1 hour for loaf pans.  The crust will be a dark brown, but not burnt.  The loaves tend to sink a bit in the center during baking or end up with a flat top.  
Brioche loaves fresh from the oven.  The tops of the loaves tend to be either slightly rounded, flat, or a bit sunken in the middle - it tends to vary depending on the day, but most loaves look flat on top.  And the taste is the same for all.

For smaller danishes, scoop into desired tins (whoopie pie tins or just parchment-lined cookie sheet).  The dough does spread during baking, so it's helpful to have something with some form.  You can fill it with custard (make homemade vanilla pudding, leave out 1/2 cup of the milk), jam, or leave them plain.   The smaller brioche bakes tend to bake more like 20-25 minutes at 350 F.   
Small rolls made in whoopie-pie tins (with a mini loaf made from some extra batter).  Baked ~20 minutes.
Batter in larger whoopie-pie tins, spread to make a hollow in the center for homemade vanilla pudding or jam.
Honestly, add more pudding than this and spread it around a bit more before you let it rise, then bake.
You can make the danishes on a flat cookie sheet lined with parchment paper, but they'll spread a bit during baking.  These were delicious topped with homemade vanilla pudding and cinnamon-sugar before baking.  It's also great with pudding and jam together, or just jam. 
We ate these warm and cold.  I really liked them with a bit of jam alongside the pudding, too.  

For brioche loaves, remove from tin and parchment paper and cool on wire racks.  I prefer this bread fresh - within the day it's made.  However, you can slice and freeze if you aren't going to be using it immediately, especially if you're wanting to use it in something like baked french toast.  It's absolutely amazing as a baked french toast - like a delicious bread pudding.  Yum! Enjoy!
Mmm... look at that flaky dough.

Basic Brioche Dough - Gluten Free Style by Successfully Gluten Free!