Search for a Recipe

Showing posts with label rice. Show all posts

Friday, 14 June 2024

Pan-grilled Tuna Onigiri (Stuffed Rice Balls)

 This has become an absolute favorite around here - usually coupled with homemade kimbap. My understanding is that the traditional way to have Yaki Onigiri (grilled rice balls) includes a brushing of soy sauce glaze, but we prefer without. My kids love helping to make these onigiri - and they love when we (hopefully) have leftovers so they can take one to school for lunch the next day.  Do you have to pan-fry these? No! You can leave them as-is, and wrap them in nori (seaweed paper), and they're delicious as well. Sometimes we add the nori to the cooked ones, too. Enjoy!
Grilling the tuna onigiri - yum!
A yummy pan-grilled tuna onigiri plus homemade kimbap meal with friends.


I find 1 cup sushi rice to 1 can of tuna is a good ratio. You can make more as desired!

To prepare rice: 

In a medium pot or rice cooker, combine and cook as directed: 
2 cups sushi rice (japonica or similar type), well rinsed
4 cups (1 liter) chicken stock/broth
1 Tbsp olive oil or butter
1/2 - 1 tsp salt (lower end with the salt if the broth includes salt)
1/2 - 1 tsp pepper
1/2 - 1 tsp garlic powder
1 - 2 tsp dried onion flakes
1/2 - 1 tsp dried cilantro flakes (optional)
1 - 2 tsp freeze-dried or fresh chives (optional)
1/4 - 1/2 tsp red chili flakes (optional)

For making the rice in a pot, I typically bring to a boil over high heat, stirring a few times. Cover with the lid and lower heat to low/medium-low and simmer 15 minutes. Turn off the heat and let rest/steam for an additional 10 minutes.  Stir to fluff/mix.  

To prepare tuna:

In a large bowl, mix together: 
2 cans tuna, drained
3-4 Tbsp mayonnaise (to desired consistency)
1-2 Tbsp dill pickle relish
1-2 tsp fresh or freeze-dried dill optional
salt & pepper, to taste (I tend to use very little additional salt)
Tuna salad, ready to go!

To prepare cheese: (Optional, but we enjoy it)

Slice and chop into ~1" squares:
cheddar or marble cheese, as desired

To assemble & pan-grill the rice balls: By all means make these in those cool triangular onigiri molds, if you have them. But this method works perfectly, is easy, and the kids love it.  You can make them as large or small as you prefer. It takes a little trial and error to figure out the size you enjoy. 

On a square of plastic wrap, flatten a spoonful of rice.  Place a spoonful of ~1 Tbsp or so of tuna on the flattened rice. Add a couple piece of cheese.  Using the plastic wrap, pull up all the sides and squeeze together to form a nice circle.  You can leave them round, or use your hands to shape them into the more traditional triangle shapes.  
I use a rice spatula to flatten, ready for fillings.
Rice flattened and toppings added. Ready to bring it all together into a ball.
Fillings added, my daughter is working on wrapping it up.
Rolling it and pressing to compact it a bit.
Shaping it into a triangle. Yes, there are these neat presses people can use, but this works easily when you don't have the tools. 

Heat a pan to medium to medium-high heat.  Brush the top side of your rice ball with avocado oil.  Place down on the pan, flatten slightly, and then brush the other side with additional avocado oil. 
Brushed with avocado oil and heating until crisped!
I actually like the look of round stuffed rice balls. We left some rounded for the ones we needed to make without cheese.  

Let cook until lightly browned on each side, so you have a nice crispy outside edge.  Remove from the pan and enjoy!  Leftovers heat nicely, too! We've even frozen them and my kids can pop them into their lunch boxes for a yummy lunch.  They just reheat them a bit once they've defrosted. Enjoy!

Pan-grilled until crispy and ready to eat!
Our friends joined us for yummy pan-fried/grilled tuna onigiri and some homemade kimbap. Yum!

Pan-grilled Tuna Onigiri (Stuffed Rice Balls) Recipe by Successfully Gluten Free!

Thursday, 6 April 2023

Meammar - Creamy Egyptian-Style Rice with Beef

      This rice is so creamy and rich and delicious.  It's basically a savory version of a rice pudding.  Yum!  My sweet friend, Haidy, served this for us when we went to their house for dinner, and we loved it.  She learned how to make it from her mother-in-law - meaning tried and true. Haidy was kind enough to have me over and teach me how to make it!  I took lots of notes, and then worked on figuring out measurements so it's easy to follow and bake when you don't have years of experience just eyeballing things.  Technically, Haidy makes even more at a time, using ~5 cups of rice and doing things by eye, but I've played around with it to get measurements (for myself and you all) since we can't all be lucky enough to have a friend over our shoulder telling us how it should look.   My family loves this new addition to our repertoire of dinner meals.  
     You can cover and freeze one of the pans to heat up later for another meal, which works great!  Just cover it loosely with foil and place it in the oven, then turn on the heat to 350 so the pan slowly heats up as your oven does.   In case you're wondering about the thin layer of yogurt spread on the top - this gives the beautiful rice brown color and crust to the top of the dish when baking.  Enjoy! 
A yummy serving of delicious Egyptian Rice! Yum! 

Meaamar (Maamar, M'ammar, M'armer) - Creamy Egyptian Style Rice with Beef

NOTE: This recipe has ~1.5 hour prep and ~45-55 minutes baking time.  
*You will start by soaking the rice (it soaks 1 hour).  After 30 minutes (or sooner) you want to start cooking your beef.  You'll finish soaking the rice and prepping it in the pans while your beef cooks.*    

Prepping the Rice (takes ~90 minutes - start cooking your beef after 30 minutes)

Soak fully immersed in cool water, giving a little stir occasionally:
3 cups Calrose rice (Egyptian-style or sushi-style)

***About half an hour after the rice starts soaking, begin cooking the beef.***

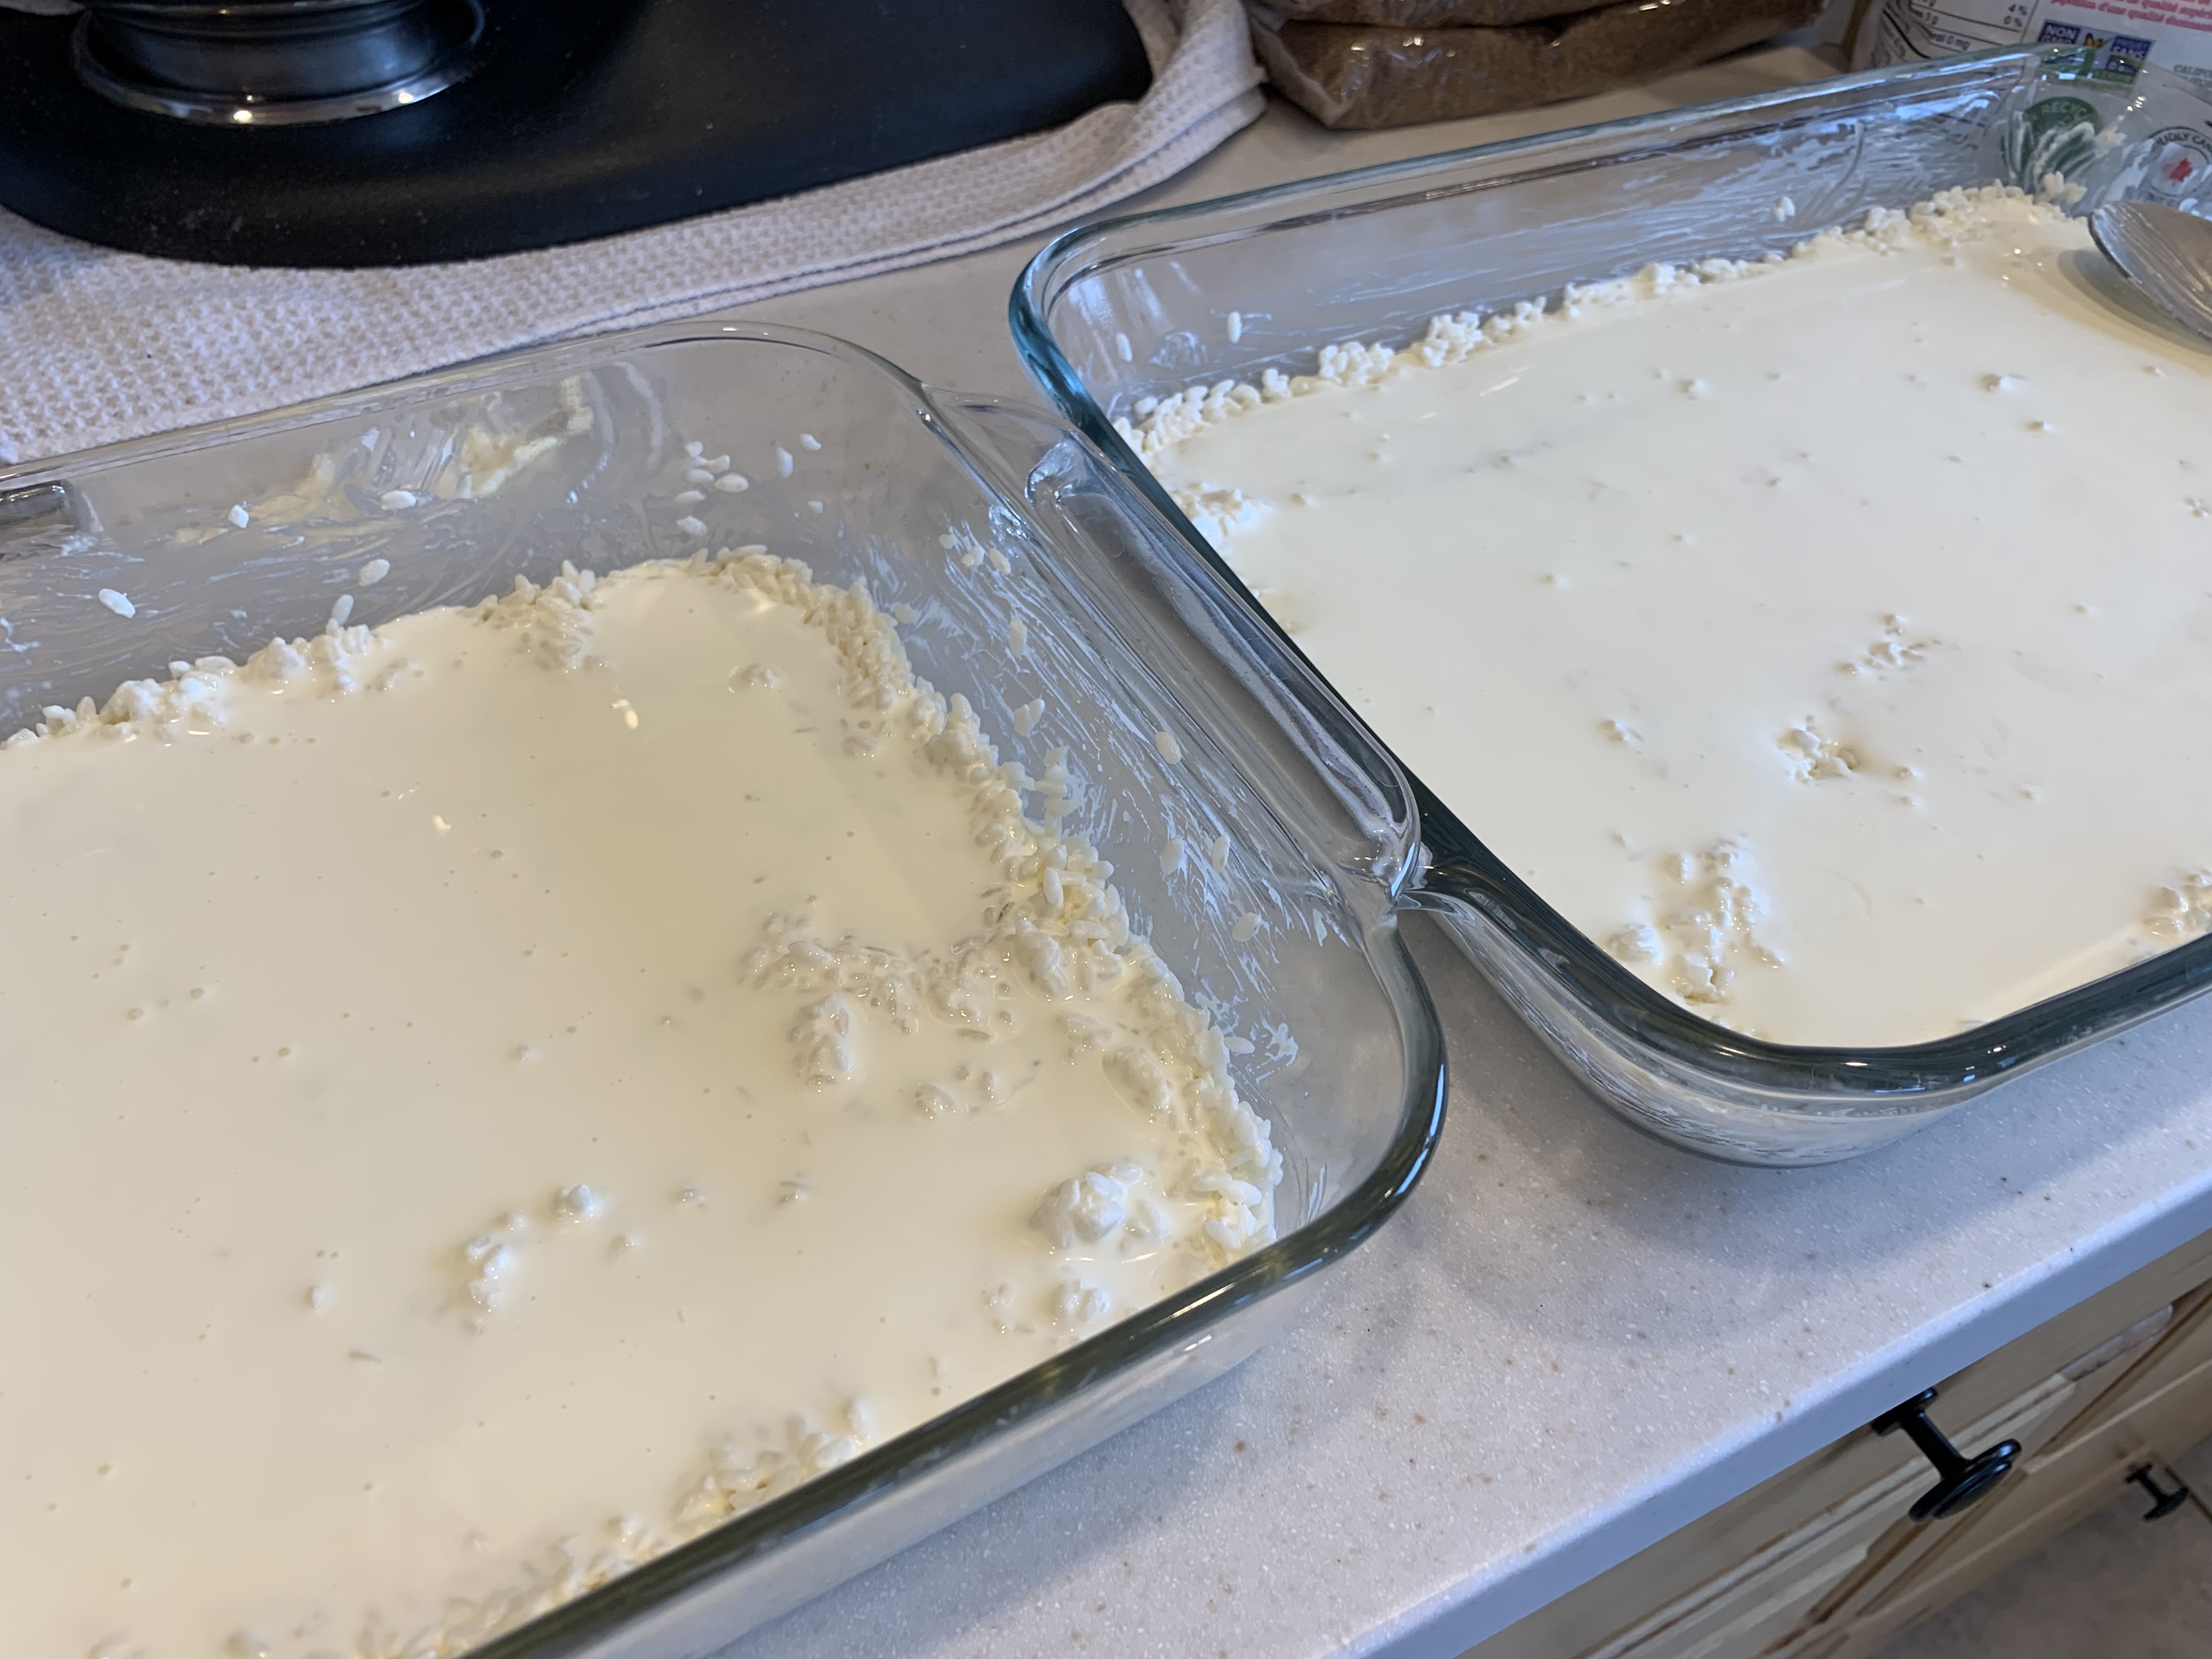
After soaking 1 hour, drain and rinse the rice.  Divide into a 9 x 13 pan and 8 x 8 pan so there are even layers of rice on the bottom.   I'll include amounts to add to both pans, to avoid confusion.  
After soaking & rinsing, divide between pans
It fills the pans about like this.

Add to the 8 x 8 pan, and mix in thoroughly: 
1/4 - 1/3 cup mascarpone cheese

Add to the 9 x 13 pan, and mix in thoroughly: 
1/2 - 2/3 cup mascarpone cheese   
This is a very forgiving recipe, so you can use more or a bit less as you prefer - but I find this amount works well. 
Mascarpone mixed in thoroughly.  This takes some patience.

To the 8 x 8 pan, add and mix gently: 
~ 160 ml / 5.5 oz heavy cream
~ 300 ml / 1 1/4 cup milk
1/4 tsp salt

To the 9 x 13 pan, add and mix gently: 
~ 320 ml / 11 oz heavy cream
~600 ml / 2 1/2 cup milk
1/2 tsp salt

Let sit and soak until beef is ready.  
This is just showing the thin layer of cream when added - it just covers the rice in a thin layer, then add the milk and salt.
This is how it looks with the milk added - it's about a half and half rice to liquid ratio.

Cooking the Beef - takes ~60 minutes

In a large pot with well-fitted lid, cook over medium-high to high heat, stirring occasionally: 
2-3 Tbsp avocado oil 
~1 kg/2 lbs stewing beef, diced into medium or large bite size pieces 
Do NOT add any salt/pepper at this point

Keep the lid ON, except while stirring.  Let the beef cook, stirring occasionally, until ALL the liquid has been absorbed.  Initially, the pot will have quite a bit of liquid that is released from the beef, then it will slowly cook off/be absorbed by the beef.  When all the liquid is almost absorbed, add:
3/4-1 cup water

 Lower the heat to medium-low to continue simmering until the meat softens and you can cut it with the cooking spoon.  Most of the liquid should be gone at this point.  If the meat still isn't tender enough, you can add a little extra water and continue simmering.   
Make sure to keep the lid on while cooking, just removing it to stir occasionally.  Once you add the extra water, be sure to lower the heat. 

Once your meat is soft and there is very little liquid left, add, and stir, cooking a few minutes: 
salt & pepper
Egyptian spice blend - this is a lovely mix of regular or smoked paprika, cardamom, cumin, black pepper, ground coriander, nutmeg, cinnamon, and cloves (it's sometimes called a Lebanese 7 spice blend, but this doesn't always contain cardamom, which is a flavor I love in this blend)

The amount of seasoning depends on your taste - it can be light and mild, or you can season generously.  Personally, I like to season generously, since it will be within a creamy rice.  
Seasoned and ready to add to the rice. 

Divide the meat between the pans.  Any liquid left can be added as well, to add extra flavor to your dish.  

Divided evenly between the pans
Larger pieces of meat work well in this recipe, but I like smaller pieces since it spreads more evenly throughout the dish.  Just divide any leftover liquid from the meat dish over the rice.

Final prep before baking - & baking (baking time takes about 45-55 minutes)

Spoon small scoops around and spread gently over the top of the 8 x 8 pan: 
~3 Tbsp plain yogurt

Spoon small scoops around and spread gently over the top of the 9 x 13 pan: 
~6 Tbsp plain yogurt

Bake at 425 F for about 15 minutes, until rice is bubbling nicely.  Lower heat to 350 F and cook an additional 30-40 minutes, until nicely browned on top and light browned on the bottom.  

This is the sort of deep golden brown on top that you're looking to see.
The best thing about a pyrex baking dish is being able to see the light golden brown on the bottom, which is how it should look when baked.


Meammar - Creamy Egyptian-Style Rice with Beef Recipe adapted by Successfully Gluten Free!


Thursday, 15 July 2021

Turkish Pilaf-Style Rice (minus the orzo)

 I really love Turkish foods and flavors, so I wanted to try to imitate the taste of the yummy rice that's served alongside kebabs and falafels at this great Turkish restaurant near Halifax.  I think it's the combination of cooking the onion, garlic and rice in a blend of butter and olive oil that gives the wonderful flavor and texture.  (I learned how magical the mix of butter and olive oil can be when sautéing from Julia Child - thank you, Julia!), and it's definitely perfect in making this rice nice and tasty! 
Rice pilaf-style rice with GF falafel and cucumber.  Delicious served with hummus and tzatziki sauce.  

Turkish Pilaf-Style Rice (minus the orzo)

Serves ~8-10, using 2 cups dried rice

In a medium pot with a lid, sauté over medium to medium-high heat 4-5 minutes, until onions are just browning:
3-4 Tbsp butter
1 Tbsp lemon olive oil (plain olive oil is fine)
1 Tbsp garlic-infused olive oil (plain olive oil is fine)
1 large onion, finely diced
1/2 tsp pepper
1/2 tsp salt

Once the onions are just browning, add and cook 2-3 minutes: 
2-3 cloves garlic, minced
2 cups white jasmine (or white basmati) rice, well rinsed under cold water, then drained

Add and stirring occasionally, until boiling: 
3 cups chicken broth (3 cups hot water + 3-4 tsp GF chicken bouillon paste or 3-4 tsp Mushroom seasoning)
1/2 - 1 tsp dried cilantro
another dash of salt & pepper

Once rice is boiling, stir once.  Cover and lower heat to low and let the rice cook for 20 minutes.  Turn off heat and let sit 10-15 minutes before fluffing and serving! Enjoy! 

Turkish Pilaf-style Rice by Successfully Gluten Free! 

Monday, 20 April 2020

Ginger Rice Pudding

The fresh ginger root added to this recipe makes a lighter, more refreshing dessert.  We've enjoyed it several times, and I love it because I can just make 2 cups of rice and use half the rice for this pudding and the rest for whatever dinner we happen to be having that evening.  I based it on a ginger & raisin pudding recipe on the side of a bag of jasmine rice, then modified it to my preferences. Yum! Enjoy!
Ginger Rice Pudding Gluten Free
Fresh Ginger Rice Pudding - yum!

Ginger Rice Pudding

In a medium pot, combine the following: 
1 cup white jasmine rice, well rinsed
1 1/2 cup water
pinch salt

Bring to a boil over high heat.  Stir once.  Immediately put on a lid and lower heat to between low and medium-low.  Simmer rice for 20 minutes.  Turn off heat and let rest 15 minutes. 

In the same pot, or in a new medium-sized pot, combine the following: 
cooked rice, from above (should be about 3 cups cooked)
2 1/4 cups coconut milk (for a richer pudding, you can use a mixture of 1 1/2 cups coconut milk, 1/2 cup milk, 1/4 cup cream OR use canned coconut milk, which is richer)
3 - 4 Tbsp white sugar
2 tsp fresh grated ginger (I have this frozen and it also works perfectly)
pinch salt

Cook over medium heat, stirring regularly, until your pudding bubbles and thickens.  This usually takes about 20 minutes.  

Remove from heat and stir in: 
1/2 tsp vanilla bean paste (OR vanilla extract)

Great served while hot, but this is also nice chilled.  Refrigerate leftovers in a bowl with plastic wrap tightly pressed to the surface. 


Ginger Rice Pudding Recipe by Successfully Gluten Free!

Tuesday, 13 October 2015

Chicken & Rice Soup

I came up with this yummy soup quite by accident.  We had family visiting and I needed something that could be eaten late at night when they arrived.  It turned out so flavorful and delicious, everyone loved it!  My kids both wanted seconds!  This is a great recipe if you have leftover roast chicken (or even turkey).  The only thing I realized is that it's next to impossible to take a nice picture of soup - but it's packed full of chicken, veggies and rice, and a nice, quick meal.  And, the only one I remembered to get a picture of is when I was being lazy and threw in a bag of grated carrots I had purchased on a whim instead of dicing the carrots.  They look a little funky, but the taste was still great.  Enjoy!
A picture at last!  Only it looks a little odd made with grated carrots. Sometimes it's just good to use what is available in the refrigerator. :) 

Chicken & Rice Soup

Serves 8-10

Put in a large pot:
3 ½ - 4 quarts chicken broth (or water + GF bouillon. Use ~ 1 tsp/cup water *see note below)
½ - 1 tsp ground turmeric
2 Tbsp chopped fresh parsley (OR 1 Tbsp freeze dried or dried)
1 Tbsp chopped fresh dill (OR 1/2 - 3/4 Tbsp freeze dried or dried)
Salt & pepper (use sparingly now - season more towards end)
2-3 cups mix medley of diced veggies (carrot, onion, celery, potato, turnip, celery root, fennel bulb & greens)
2-3 Tbsp olive oil 

Bring to boil over high heat. Once boiling, reduce heat to medium-low and cook 10 minutes, uncovered.  (* If you would like, you can saute the vegetables in olive oil for 5 minutes before adding chicken broth and spices, then bring to a boil and simmer an additional 5 minutes.  Either method of cooking will work well!!! *)

Add:
1 – 1 ½ cups basmati rice (rinse the rice & make sure it’s the cook in 15-20 minutes kind)
Simmer (uncovered) ~ 20 minutes, until rice is tender. 

Add:
2 cups cooked chicken, chopped or shredded
Season with additional salt/pepper, to taste.
Serve with chopped fresh parsley (optional).
Enjoy!

*Note: There is an Asian mushroom seasoning that is gluten-free, MSG-free, and absolutely delicious to use as a substitute for chicken bouillon. It’s my absolute favorite.  I find it adds a depth of flavor, but doesn’t add a ‘mushroom’ flavor.  It was recommended by our Vietnamese friend (and absolutely fabulous cook), Nam. I love it!

Another lovely picture of my strange looking soup made with grated carrots.  For a more normal looking soup, just slice or dice them. ;) 

Chicken and Rice Soup by Successfully Gluten Free!

Tuesday, 18 August 2015

Summer Veggie & Mushroom Fried Rice

I love whipping up fried rice in the summertime.  The addition of mushrooms cooked in butter and garlic gives some extra oomph to the dish.  In fact, it doesn't really need any hot sauce on the side, but I like a little kick.  This was an absolute hit with my little girls. They inhaled it!  Use any fresh summer greens, just dice them up.  You can toss in extra fresh herbs, too. It's versatile! Enjoy!
Gluten Free Vegetable and Mushroom Fried Rice
Fresh mushrooms and greens make for a quick, easy summer fried rice dish.

Summer Veggie & Mushroom Fried Rice
Serves 2

Use a large frying pan or wok over medium-high heat.
In 2-3 Tbsp butter, cook 2-3:
handful of fresh Chanterelle mushrooms, washed, dried and diced
1 tsp minced garlic
2-3 Tbsp fresh parsley, finely diced

Remove mushrooms from pan.

Add 2 Tbsp avocado oil (or another oil good for high-heat cooking) to the pan.

Add and cook 3-4 minutes:
2 cups cooked day-old rice (brown basmati worked well - you want your rice a little dried out, so if you make it fresh, cook it a bit extra to dry it out a little)
1 cup mixed baby greens (swiss chard, kale, spinach, fresh beet greens), diced
1/2 cup frozen peas OR handful sugar snap peas

Move rice/veggies to the outer edges of the pan.
Add, then stir to scramble the eggs:
1 Tbsp avocado oil
2 eggs, whisked

Add the mushrooms back into the pan.

Add and cook 1-2 minutes:
1-2 Tbsp GF soy sauce (Bragg's liquid soy seasoning works well) OR another flavorful sauce of your choice

Serve immediately with srarachi hot sauce (or a little ketchup if your eaters are 4 years old).  Enjoy!

Friday, 20 March 2015

Fried Rice with Vegetables and Chicken

This fried rice recipe has become a great favorite with everyone around here.  There's a few things I find that really have helped make this work for me -- 1. using white jasmine rice - not wet, or your stir-fried rice will stick together a bit; 2. Have all items prepared in bowls beforehand, since cooking time is quick; 3. Don't stir too much, since you want things to cook at the high heat before you rotate ingredients in the pan; 4. I really prefer using a can of green chilies instead of fresh red or green pepper in my stir-fry - I find the taste is less overwhelming and blends nicely with the other ingredients.  I started with a recipe from a kids cookbook, "Around the World" by Abigail Dodge, and found it worked really well if I used canned chilies instead of fresh ones.  However, the recipe didn't make quite enough for our family of 4 (counting little girls as 1 adult), so I tweaked it, also discovering that I needed to make sure the rice was properly cooked and then dried out a bit in order to get the right texture.  I also found that using the avocado oil for frying worked wonderfully.

Gluten Free Fried Rice
Gluten Free Fried Rice - Freshly cooked chicken and vegetable fried rice! 

Fried Rice with Vegetables and Chicken
Serves 4

Make 1 cup white jasmine rice (or rice of your choice) - this yields about 3 cups.  If you're making it fresh, let it cook a few minutes longer than normal and sit with the lid cracked after cooking so it dries out a bit.  Or, you can use day-old rice so it's a bit more dried out.

In a large frying pan or wok over medium-high to high heat, heat up:
3 Tbsp avocado oil (or another oil with a high smoke point, good for stir-frying)

Cook the following for 3 minutes:
1 onion, chopped
1 tsp minced garlic
1 can (4 oz/127 g) green chilies
GF Fried Rice - onions, garlic and chilies
Cook onions, garlic and chilies for 3 minutes.

Add and cook 4 minutes:
3 cups cooked white jasmine rice (or another cooked rice)
1/2 - 1 cup frozen peas
1 carrot, peeled and shredded
GF Fried Rice
Add rice, peas and shredded carrots and cook 4 minutes.

Push everything to the edge of the wok/pan.
Add, and then scramble:
1 Tbsp avocado oil
2-3 eggs, whisked
GF Fried Rice with Egg
Cooking quickly, I missed getting a picture of all the rice at the edge and egg in the middle - but here is after it's all scrambled and mixed together.

Mix everything together and add, cooking 1-2 minutes:
4 Tbsp GF soy sauce (I used Bragg's Liquid Soy Sauce)
1 cup finely diced cooked chicken (optional)

Serve hot!  Enjoy!
Gluten Free Fried Rice with Vegetables and Chicken
Add the GF soy sauce and chicken and let cook one more minute before serving.  Enjoy! 

Sunday, 10 August 2014

Chicken & Veggies over Rice

It's so easy to whip together a meal when you've got cooked chicken around. In this dish the zucchini softens to add to the lovely texture of the dish.  I've added fresh Swiss chard here, but you can easily substitute spinach or kale into this dish.  In this dish, the veggies are cooked first, until tender, and then the cooked chicken is added and it all comes together in a nice, light sauce which simmers and melds together wonderfully.  This dish is just wonderful over rice.  But, you could easily serve this with GF pasta, or scoop it up with GF crackers.  This meal started out as an experiment, but turned into something everyone wants again and again!  Enjoy!

Chicken & Veggies served over cooked sprouted wild rice & quinoa

Chicken & Veggies over Rice
Serves 4

Cook 1 cup brown basmati rice, or rice of your choice according to directions on package. (I used a sprouted rice/wild rice/quinoa blend in the pictures). 

To season your chicken:
Dice into small pieces, leaving it on the cutting board:
~2 cups cooked chicken

Season chicken generously with the following spices:
salt, pepper, ground coriander, tumeric, garlic powder, paprika

In a large, low-sided saucepan cook over medium heat 2-3 minutes:
3 Tbsp olive oil (you can use an infused olive oil, if desired, like mushroom-sage)
1 small onion, diced

Add an cook until Swiss chard has wilted, ~4-5 minutes:
1 small/medium zucchini, diced
1 1/2 cups Swiss chard, chopped (~3 large leaves + stems) *You can use spinach or kale instead of Swiss chard in this recipe
salt and pepper

Add, and bring to simmer/boil:
Seasoned chicken
1/2 cup water
1 tsp Asian mushroom seasoning OR GF chicken bouillon

Mix in a small bowl:
1/4 cup cold water
1 - 2 Tbsp cornstarch (more or less depending on thickness desired - you can adjust later)

Mix cornstarch/water mixture into chicken & veggies, stirring while it thickens, 1-2 minutes.  You can now adjust the consistency of your dish by adding either milk or water to thin.  Add slowly, stirring constantly to incorporate the additional liquid.

Cover pot, put heat to low and let chicken/veggies simmer 15-20 minutes.

Serve hot over rice. Enjoy!
Ready to eat!

Monday, 17 February 2014

Chicken à la King

This is one of those comfort food-type meals that's easy to whip up and great as leftovers.  I like that it's got a little bit of everything in it - grain, meat, veggie, dairy.  I've also found it's one of those surprising meals that has both mushrooms and bell peppers, and yet kids still seem to love it.  Win-win!  Enjoy!

Chicken a la King ready to serve over brown rice. Yum!

Chicken Ã  la King
Serves 4-6

Start cooking, according to directions:
1 1/2 - 2 cups brown basmati rice or brown rice
I recommend you start cooking the rice now because I find brown rice takes ~ 45 - 60 minutes to cook/rest.  Give yourself ~30 minutes for prep/cooking time for the chicken/veggie part of the recipe.

In a large, low saucepan with high sides melt over medium heat:
1/2 cup butter

Add and cook until peppers are just getting soft, but still a bit crisp:
1 cup sliced button mushrooms
1 large green bell pepper, chopped
1/2 - 1 small red bell pepper, diced
 
Veggies prepped, and cooked until peppers are just tender.

Add and cook until mixture comes to a boil:
1 1/4 cup chicken broth OR 1 1/4 cup water + 1 - 1/2 tsp Asian mushroom seasoning
1 1/4 cup milk (lactose-free works great)
1/2 tsp salt
1/2 tsp pepper
Mixture just before coming to a boil. 

While mixture is heating, stir in a small bowl:
1/4 cup milk
3-4 Tbsp cornstarch

Once mixture is at a boil, add cornstarch/milk mixture in, stirring constantly 1-2 minutes until mixture has thickened.

Add in, and cook until hot:
2 cups cooked, chopped chicken (I like to buy the ready-roasted chickens and find about 1/2 chicken is about the right amount of meat)

Serve hot over brown rice.  We find leftovers are great, too! It reheats nicely.  Enjoy! 

Thursday, 9 January 2014

Coconut Rice Pudding

This is a delicious and easy rice pudding to whip together.  Everyone loves it at my house - and it's great warm or cooled.  We find it's a nice snack to have in the refrigerator whenever someone wants a quick and filling snack.  Enjoy!
If you look closely, you can see tiny flakes of vanilla bean - I find using vanilla bean paste in place of vanilla extract in recipes like this really makes the flavor pop. 

Coconut Rice Pudding

Makes 6-8 servings (approximately - it kind of depends how much each person wants, since this is a rich pudding)

In a medium saucepan mix the following:
1/2 cup jasmine rice, rinsed thoroughly (or your pudding will thicken too quickly!)
1 cup 2% milk (lactose-free works well)
1 cup heavy/whipping cream (lactose-free works well)
1 can coconut milk

Bring to a boil over high heat, stirring occasionally.  Lower heat and simmer, uncovered for 30-40 minutes, stirring occasionally, until pudding thickens.

Once pudding is thickness you prefer, add and mix in the following:
1/4 - 1/3 cup sugar
1/2 tsp vanilla bean paste OR vanilla extract

Continue cooking for 5 minutes over low heat.  Remove from heat and put into bowls for serving or one larger bowl.  Great warm or cooled.  You can let this pudding cool uncovered.   Store in the refrigerator once it's cooled a bit.

To turn this into more of a Caribbean coconut pudding, add shredded or flaked coconut and raisins, if desired, when serving.

Enjoy!

Coconut Rice Pudding Recipe by Successfully Gluten Free!

Wednesday, 26 June 2013

Flavorful Shrimp Scampi w/ Wild Rice

This shrimp scampi is so easy to whip together and packed with flavor.  Plenty of herbs, lemon, garlic and shallots make a wonderful dish!  Served over a wild rice blend - which in this case has Japonica rice, making the end batch a rich purple hue, it's a fun alternative to the usual shrimp scampi over pasta.  The punch of lemon makes it a perfect dish to serve over rice.  Even the kids loved it! Enjoy!

Flavorful Shrimp Scampi w/ Wild Rice
Serves 4 (can easily be doubled)
 
To Cook Wild Rice:
Add together in a pot over high heat:
1 cup wild rice blend (I used Lundberg’s Countrywild blend of brown rice, Wehani and Japonica – which is why it ends up a darker color once cooked)
2 cups water
 
Once boiling, cover with lid and turn heat to low.  Let simmer 45-50 minutes.  Remove from heat and let sit 5 minutes. Fluff and serve.
 
To Cook Shrimp Scampi:
 
Heat in large saucepan over medium heat:
2 Tbsp olive oil
2 Tbsp butter
 
Add and cook until tender, 2-3 minutes:
3 tsp minced garlic
3-4 Tbsp finely diced shallot (~half a shallot)


Diced shallot and minced garlic (and some of the herbs used later) - the shallots and garlic cooking until tender.

Add and cook, turning shrimp regularly, until shrimp are pink through (this usually takes couple of minutes):
225g large shrimp (peeled, deveined and tail removed (if desired)
Juice of ½ lemon
¼ cup chicken broth
Pinch cayenne
Fresh ground pepper


Once shrimp are cooked, add the following and mix in well to thicken it up a bit:
~1 tsp arrowroot starch
(if you’re worried about the arrowroot starch not mixing in, or you want to use cornstarch, just mix the 1 tsp arrowroot starch or cornstarch with 1-2 tsp cold water before adding to pan).
 
Add and fold in the following, they will soften nicely:
1-2 Tbsp fresh basil leaves, chopped
1-2 Tbsp fresh parsley, chopped
1 Tbsp fresh chives, chopped fine
Remove from heat. If you need to wait a few minutes before serving, cover with a lid to keep shrimp hot.
 
Serve shrimp scampi over wild rice with a slice of lemon, if desired. 
Enjoy!