I thought a back to basics recipe might be nice for everyone stuck at home right now. And easy to share, if you know of someone in need of a meal. Rolls can be used for regular sandwiches, open-faced sandwiches, served alongside soups, chowders, pasta dishes, etc. The good news is that this recipe is easy, AND it makes a whole baking sheet of rolls (~20 rolls). They're soft, tasty, and they can be sliced, frozen, and reheated later. We've enjoyed these brushed with butter or egg before baking, but you can make them plain if you prefer. I like them best warm, but they're also good room temp. Enjoy!
Preheat oven to 375 F. Line a baking sheet with parchment paper. Have another baking sheet on hand to put upside down over top the rolls during rising.
In a glass measuring cup, combine:
1 1/2 cup warm, not hot water
6 Tbsp sugar
4 tsp Active Dry Yeast (or rapid-rise yeast)
In a mixer, combine:
2 cups brown rice flour
1 1/2 cups arrowroot starch (or cornstarch)
1 1/2 cups tapioca starch
1 Tbsp xanthan gum
1 tsp salt
4 tsp baking powder (I don't usually add baking powder into my rolls or bread, but in this recipe, it works nicely to aid the texture and rise)
Add and beat, scraping down the bowl occasionally, for 5-8 minutes:
yeast mixture, from above
6 Tbsp butter, softened
4 eggs
2 tsp apple cider vinegar
Using a large cookie scoop, scoop dough onto parchment-lined pan. I find if I aim for about 4 x 5 rolls on the pan, I'm just about right. Smooth and flatten the rolls with water - wet your hand and smooth the top of each roll (dip hand in water between each roll).
Place pan in a warm location. Put your extra baking sheet upside down over the top of the rolls. This keeps them nice and warm and helps them rise. Let rise 30-40 minutes, until rolls are doubled in size.
Brush rolls with 1-2 Tbsp melted butter OR 1 egg, beaten, if desired.
Bake at 375 F for 30 minutes. If you're worried about your rolls browning too much, you can loosely cover with foil for the last 5-10 minutes of baking.
Move rolls to a cooling rack (without pan or parchment paper) to cool. These are delicious warm. Leftovers can be sliced and frozen to use later for sandwiches, open-faced tuna melts, or with butter & jam. Enjoy!
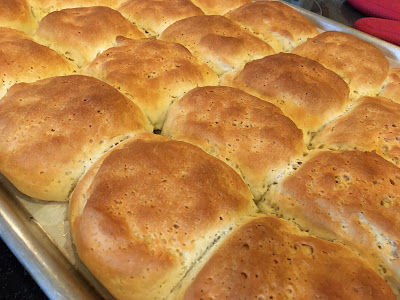
Buttery Gluten-Free Dinner Rolls. These have a nice, soft texture - they pull apart easily
A fresh pan of butter dinner rolls, ready to move to the cooling rack
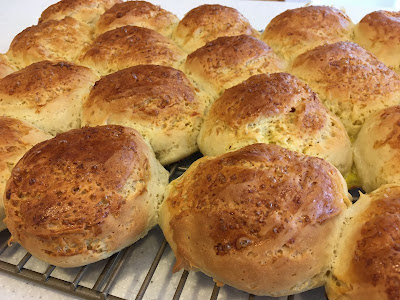
Brushed with egg, for a shiny look
Soft, Buttery Gluten Free Dinner Rolls
Makes ~20 rolls - inspired by a recipe from glutenfreehabit.comPreheat oven to 375 F. Line a baking sheet with parchment paper. Have another baking sheet on hand to put upside down over top the rolls during rising.
In a glass measuring cup, combine:
1 1/2 cup warm, not hot water
6 Tbsp sugar
4 tsp Active Dry Yeast (or rapid-rise yeast)
In a mixer, combine:
2 cups brown rice flour
1 1/2 cups arrowroot starch (or cornstarch)
1 1/2 cups tapioca starch
1 Tbsp xanthan gum
1 tsp salt
4 tsp baking powder (I don't usually add baking powder into my rolls or bread, but in this recipe, it works nicely to aid the texture and rise)
Add and beat, scraping down the bowl occasionally, for 5-8 minutes:
yeast mixture, from above
6 Tbsp butter, softened
4 eggs
2 tsp apple cider vinegar
Using a large cookie scoop, scoop dough onto parchment-lined pan. I find if I aim for about 4 x 5 rolls on the pan, I'm just about right. Smooth and flatten the rolls with water - wet your hand and smooth the top of each roll (dip hand in water between each roll).
Brushed with water to smooth and flatten a bit.
Place pan in a warm location. Put your extra baking sheet upside down over the top of the rolls. This keeps them nice and warm and helps them rise. Let rise 30-40 minutes, until rolls are doubled in size.
Covered with an upside-down pan, these rise up nicely.
Brush rolls with 1-2 Tbsp melted butter OR 1 egg, beaten, if desired.
Brushed with butter (they look similar, but a little more yellow when brushed with beaten egg)
Bake at 375 F for 30 minutes. If you're worried about your rolls browning too much, you can loosely cover with foil for the last 5-10 minutes of baking.
Butter brushed gluten-free dinner rolls, fresh from the oven.
Egg brushed gluten-free dinner rolls, fresh from the oven.
Move rolls to a cooling rack (without pan or parchment paper) to cool. These are delicious warm. Leftovers can be sliced and frozen to use later for sandwiches, open-faced tuna melts, or with butter & jam. Enjoy!


