Search for a Recipe

Showing posts with label peppermint. Show all posts

Saturday, 14 January 2023

Peppermint Chocolate Cake

Leftover candy canes?  No problem! This delicious Peppermint Chocolate Cake is just perfect for using them up!  A lovely 4 layer cake with peppermint-marshmallow filling and rich chocolate ganache in every layer.  Absolutely delicious! And perfect for one of our many winter birthdays. Enjoy!  Would you believe that I wrote out the instructions and my 8 year old and 11 year old made up the chocolate cake layers all by themselves while I went on a birthday walk?!  Extra special birthday treat! 
Beautiful and delicious slice of GF peppermint chocolate cake!
Yum! Freshly assembled with delicious flowing ganache filling and topping.

Peppermint Chocolate Cake!

Chocolate Sponge Cakes:

Preheat the oven to 350 F.  Butter the edges and line 2 quarter sheet baking pans with parchment paper (quarter sheet baking pans are approx 8x12 inner dimension or 9x13outer dimension metal cookie sheets - I LOVE this size.  Perfect for the toaster oven, and perfect when you have multiple things you want to roast separately in the regular oven, and of course, opera-style cakes!)

Melt together, then set aside:
1/4 cup butter
1/4 cup dark chocolate chips

In a small measuring cup, combine to make a "buttermilk": 
2 Tbsp white vinegar
milk to equal 1 cup (lactose-free or milk substitutes work)

In a large bowl, whisk together: 
1/2 cup coconut flour
1/4 cup cocoa powder
1/4 cup white rice flour
1 cup sugar
1/2 tsp baking soda
1/2 tsp salt

Add and whisk in until smooth: 
1 cup buttermilk, from above
melted butter & dark chocolate, from above
1/4 cup oil
6 large eggs
2 tsp vanilla bean paste or vanilla extract

Batter whisked and ready to put into the prepared pans.

Divide between the two parchment-lined pans.  Bake at 350 F for approximately 15-18 minutes.  These are nice and thin, so they cook quickly.  They should look nicely dried, but not burned or too dark on the edges. They should look no longer wet in the center.  Depending on your oven, they may need an extra minute or two.

Batter divided and ready for baking.
Out of the oven.  You can see how it's nicely dried out. Chocolate cake always smells so good. 

Remove from oven.  Let rest 5 minutes before flipping onto cooling racks to cool.  Once cool, carefully slice each cake in half so you'll have four even layers for your cake. 

Peppermint Marshmallow Frosting:

Once cakes have cooled, you can prepare your frosting, as it's time to assemble! 

Beat together in a mixer until light and fluffy - 2-3 minutes: 
1/2 cup butter, softened
1 1/2 cups powdered sugar
1 cup marshmallow fluff
1 tsp vanilla extract
1 tsp (or more if needed) cream or milk

When your frosting is nice and fluffy, gently mix in: 
~1/4 cup crushed candy cane (I find 2 large candy canes is about the right amount, but I like to crush 3 large candy canes so there is extra to sprinkle on top of the cake!)

Chocolate Ganache:

Once cakes are set to cool, prepare your chocolate ganache.  It will need a little time (5-10 minutes) to cool a bit on the counter before assembling the cakes, so timing-wise, I found this worked well.  

In a saucepan over medium heat combine and heat until bubbling gently: 
1/2 cup butter
1/2 cup whole cream/whipping cream
1/2 tsp vanilla bean paste or extract

Remove from heat and stir in until smooth (this takes a bit of patience, usually a few minutes): 
8 oz high quality semi-sweet or bittersweet chocolate

Once the ganache is nice and smooth, you can spoon it into a large freezer ziploc and set aside for assembling.  Just before assembling, snip a small corner of the bag for piping your ganache.  

Assembling your cake:

To assemble cakes: 
1. Layer of cake. 
2. Spread 1/4 of peppermint frosting on the layer. 
3. Drizzle a zigzag of chocolate ganache on top of the frosting.  
4. Repeat with 2nd cake layer, frosting, ganache drizzle.
5. Repeat with 3rd cake layer, frosting, ganache drizzle.
6. Top with 4th cake layer, and add frosting.  
7.  Gently spread the remaining ganache drizzle on top of the cake. 
8.  Top with fresh crushed candy cane. 
Chocolate cake with frosting and ganache drizzle
About to add the chocolate drizzle to this layer.
Complete! The smell is amazing.
Slice and serve!  If you want clean layers, let your cake chill for 2 or more hours in the refrigerator to firm up the frosting and ganache.  Using a large knife to cut will give you lovely, crisp slices.  Enjoy!!! 

Sliced fresh before it had a chance to cool - it'll look a little messy, but the taste is the best!  Chilled, you'll be able to get nice clean slices like the first picture.


Peppermint Chocolate Cake Recipe by Successfully Gluten Free! 

Wednesday, 7 February 2018

Scrumptious Mint Chocolate Chip Cookies

For my sister-in-law's Cape Cod wedding, I wanted to make something a little fancier than a plain chocolate chip cookie or a banana chocolate chip cookie (even though it's her favorite).   Due to allergies, I needed to make dessert foods that were gluten-free, nut-free, and soy-free.  These cookies were perfect, made with nut-free soy-free mini chocolate chips.  This recipe makes quite a lot of cookies, but they're small and spread out perfectly, making an attractive cookie for a special occasion. Plus, they taste delicious!  We even love pairing them with a homemade thin mint ice cream for an extra special treat! Enjoy!
Gluten Free Mint Chocolate Chip Cookies - fresh out of the oven! 

Scrumptious Mint Chocolate Chip Cookies
Makes ~72

Preheat oven to 350 F.  Line cookie sheets with parchment paper.

Mix together dry ingredients in a large bowl:
2 cups white rice flour
2/3 tsp xanthan gum
1 tsp baking soda
1 tsp salt

Cream together:
1 cup butter, softened
1/2 cup white sugar
1 cup brown sugar

Add,
1 tsp water
1 tsp vanilla extract or vanilla bean paste
2 eggs
8-10 drops peppermint essential oil (I love the Doterra oil for this)

Mix dry ingredients into wet until combined.

Add and mix in briefly:
1/2 bag mini chocolate chips (make sure gluten-free, soy-free, nut-free, if needed. I like the "enjoy life" brand)

Scoop small 1 Tbsp scoops ( I have a slightly smaller than 1 Tbsp scoop I like to use for this) onto parchment-lined pans.  Bake cookies for 6-7 minutes at 350 F.  Cool on a cooling rack.
Fresh out of the oven to cool! 
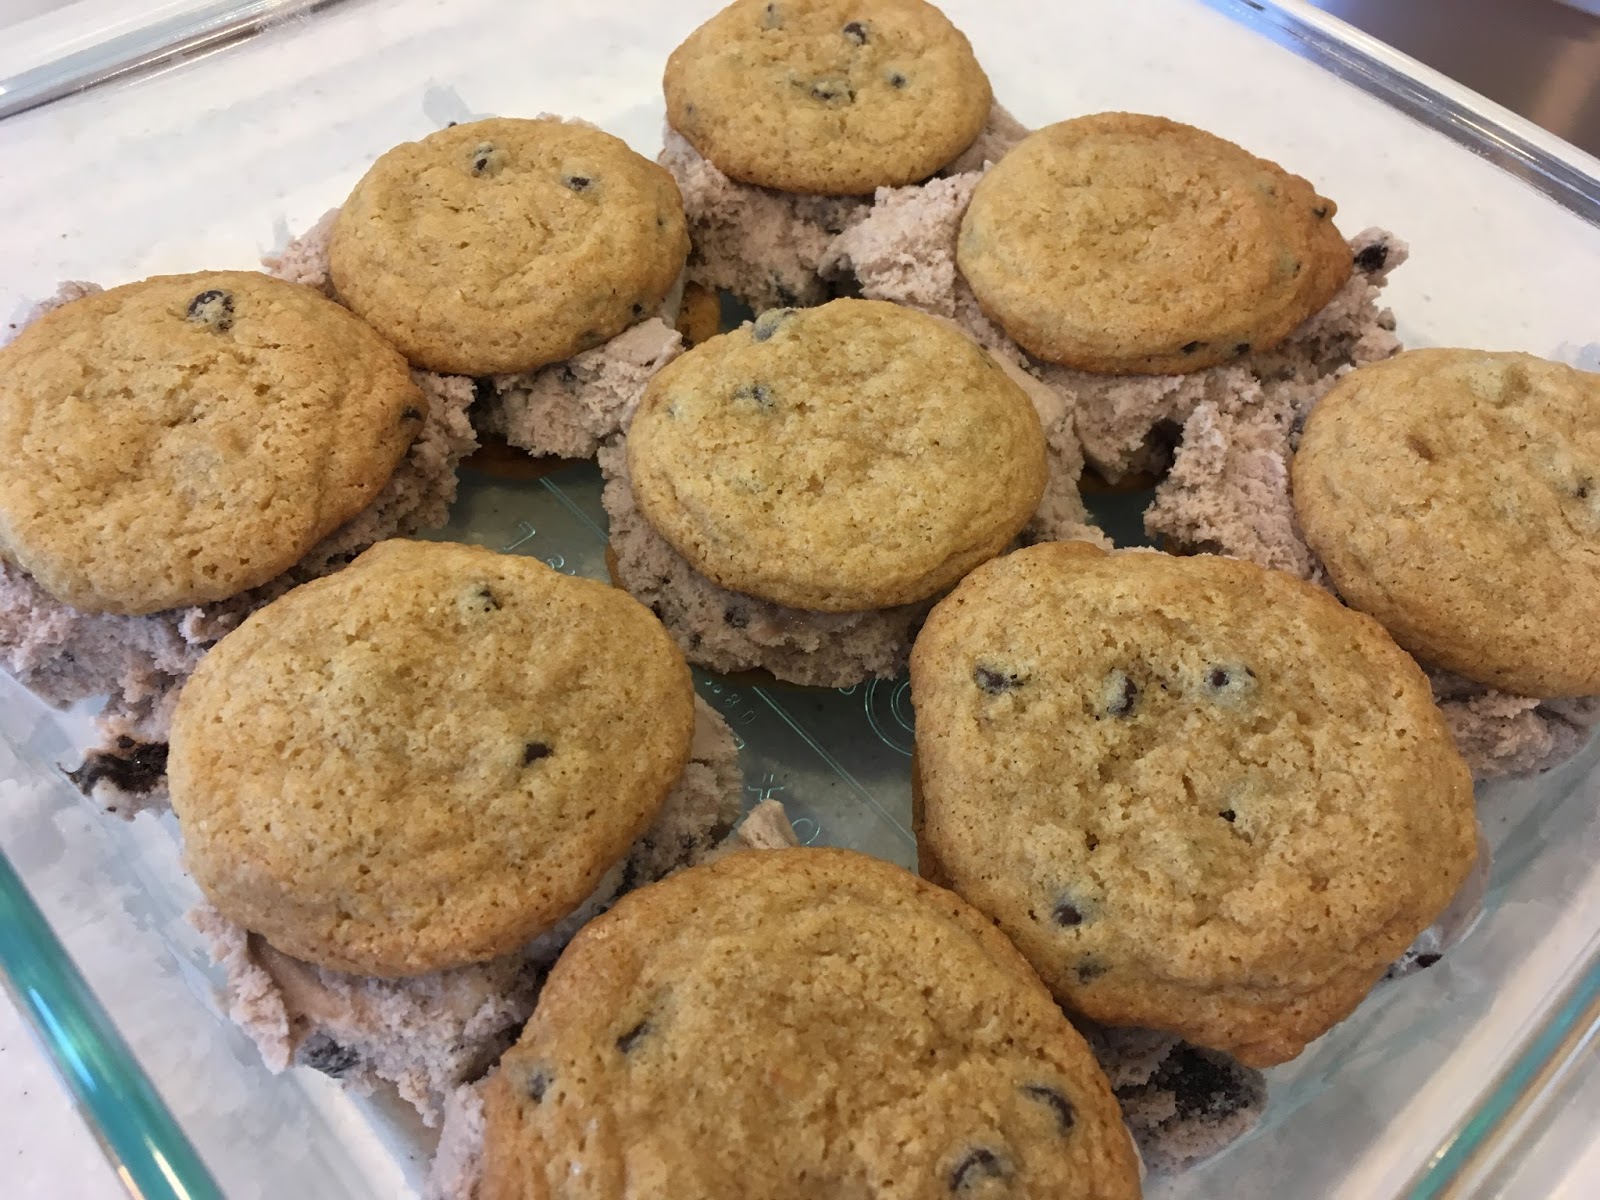
These mint chocolate chip cookies are wonderful fresh, but also freeze and thaw perfectly, too!  For an extra special treat, make mint ice cream sandwich cookies using homemade thin mint ice cream!  AMAZING! Enjoy!
A real winner - homemade ice cream sandwiches made from mint chocolate chip cookies and homemade thin mint ice cream. Yum! 

Thursday, 21 September 2017

Party sized mint brownies

My son (yes, my 11 year old) and I prepared these for my sister-in-law's wedding on Cape Cod this summer, and they were a perfect addition to our collection of gluten-free, soy-free, and nut-free desserts.  Once chilled, they can be neatly cut into whatever shape you desire.  For the wedding, we cut them into triangles that were arranged in a single layer on a couple platters.  They were able to be arranged and then stored in the refrigerator until it was time to serve.  These are similar to my previously posted mint brownie recipe, but a bit thinner and nice for an occasion where you want more, smaller servings to go around.  They were a hit with kids and adults at church, and also with my family, who was disappointed I'd share them at all. Those who have tried my original recipe and this version prefer these because they have a higher ratio of mint & chocolate to brownie. Yum! Enjoy!

GF mint chocolate brownies
Gluten-Free mint chocolate brownies, ready to serve!
GF mint chocolate brownies
I love cutting them into little triangles - both aesthetically pleasing and a nice small size for a brownie when feeding a crowd.

Mint Brownies - for a party!
You can cut them larger or smaller, so you can end up with between 50 - 120 pieces easily. 

Preheat oven to 350 F.  Line a large, flat (not warped), cookie sheet with parchment paper.

In a microwave-safe glass bowl, melt:
1 cup butter

Mix in until smooth:
1/2 cup high quality cocoa powder

Add and mix in:
4 eggs
1 cup white sugar
1 cup brown sugar

Then add and mix in, just until combined:
3/4 cup Kristin's Gluten-Free Flour Mix
1/2 tsp baking powder

Spread onto parchment-lined pan.  Bake for 20-22 minutes at 350 F.

Remove and place pan on a cooling rack.
Brownies just after removing them from the oven.

Mix together mint topping in a bowl:
2 cups powdered sugar
4 Tbsp melted butter
2-3 Tbsp milk
4 drops peppermint essential oil (I like the DoTerra Peppermint Oil for cooking)

Spread the mint topping evenly over the warm (but not piping hot) brownies.   I like to use a spoon to place dollops and then spread gently with the back of the spoon.
Mint layer - don't worry if some parts end up a little messy, just be gentle when spreading the mint layer.

In the microwave at 50% power in 30 second intervals, melt together:
1 cup semi-sweet chocolate
4 Tbsp butter

Spread chocolate evenly over the top of the mint layer.
Smooth the chocolate evenly over the brownies.  

Let brownies cool, then chill in the refrigerator until topping hardens.  You'll find they'll look nice and smooth once they've cooled.  You can slice these however you like - triangles, squares, rectangles, large, small.  You can even freeze them once you've cooled and sliced them.  Freeze in a ziploc bag on parchment paper in a single-layer.  Enjoy!!!
GF mint chocolate brownies
Mint-Chocolate Brownies! Yum!

Tuesday, 25 July 2017

Homemade Thin Mint Ice Cream!

Summertime is a the time of year when I most enjoy eating ice cream all by itself.  Generally, I prefer a tiny dollop on top of something like a warm fruit crisp.  One of my favorite flavors of ice cream is a mint chocolate chip and the other in pre-gluten-free days was a mint oreo flavor made by this wonderful ice cream shop in Boston.  This ice cream provides the best of both worlds!  A yummy cookie crumble, bits of chocolate, and mint all infused together in one delicious ice cream.  And, best of all you won't need all the cookies from your batch of GF thin mint cookies for this recipe, so you'll have extras to serve on the side.  Enjoy!
Gluten Free Thin Mint Ice Cream
A delicious fresh batch of homemade GF thin mint ice cream! 
Gluten Free Thin Mint Ice Cream
A rather crazy looking scoop of scrumptious ice cream with a GF thin mint cookie on the side! 

Homemade Thin Mint Ice Cream

Mix in a bowl:
3 cups 10% lactose-free cream (OR regular light cream OR 1 cup cream + 2 cups milk)
1 cup sugar
1/2 tsp vanilla bean paste or extract
2 drops peppermint essential oil (I love the Doterra peppermint oil in this recipe - and much prefer it to an extract)

Mix ~10-15 minutes in your ice cream maker (according to the directions on your ice cream maker).  While mixing, you can crush your homemade GF thin mint cookies, enough so you have about 1 cup of crushed cookie crumbs.  I like to leave some larger pieces and some smaller pieces.  It's easy to crush the cookies by placing in a freezer ziploc and rolling or hit with a rolling pin.

After the 10-15 minutes of churning, add to ice cream maker:
1 cup crushed homemade gluten-free thin mints.

Continue mixing until ice cream has thickened, as directed by your ice cream maker.  Scoop ice cream into a freezer-safe container and let chill ~2 hours before serving.  Feel free to serve alongside a few extra cookies! Enjoy!!!!


Tuesday, 27 September 2016

Homemade Gluten-Free Thin Mint Cookies!

Delicious homemade thin mint cookies that are also gluten-free!  Yes, you can!  These are so easy to whip together, very similar to my sugar cookie recipe.    We have loved making these cookies, then freezing and crushing to add into homemade ice cream to making thin-mint ice cream.  It's been a favorite.  My 5 year old helped make and decorate these cookies, and we were all thrilled with the end result.  Enjoy!
gluten free thin mint cookies
Homemade gluten-free thin mint cookies, ready for sampling! 
gluten free thin mint cookies
A happy little girl with her thin mint cookies! 

Homemade Gluten-Free Thin Mint Cookies!
Makes ~32 cookies

Preheat oven to 375 F.  Line cookie sheets with parchment paper or silicon baking mats.

In a bowl, mix: (it's important to mix dry ingredients first in GF baking to avoid clumping)
1/2 cup cocoa powder
1 cup Kristin's Gluten Free Flour Mix
1/2 tsp baking soda
1/2 tsp cream of tartar

In a mixer, beat until light and creamy: (a few minutes)
1/2 cup butter, softened
3/4 cup powdered sugar

Add and mix in:
1 egg yolk
1/2 tsp vanilla extract
3-4 drops peppermint essential oil*

Add and mix in flour/cocoa mixture.  Mix until dough holds together nicely, scraping sides of bowl regularly.

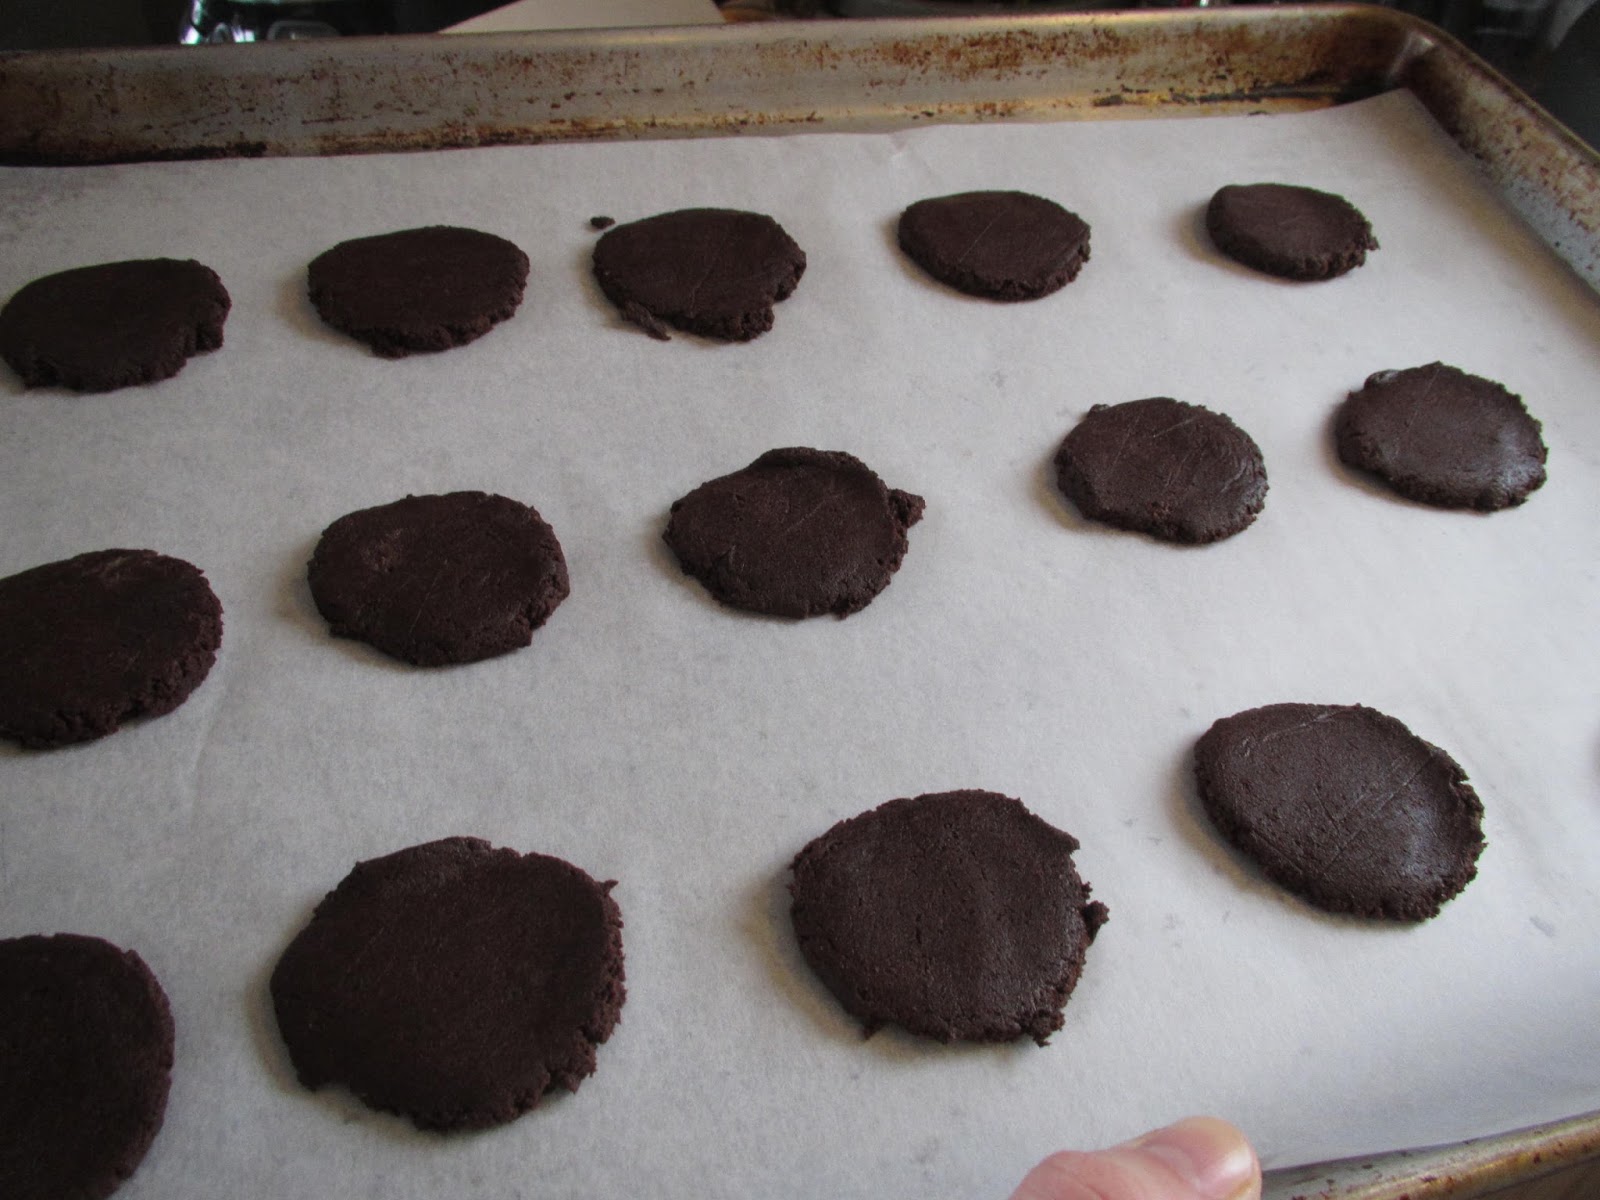
Place 1-2 teaspoon-sized scoops onto parchment paper-lined pan.  With plastic wrap or a plastic bag over your hand, flatten each scoop of dough.

Bake cookies at 375 F for 6-8 minutes. (6 for softer cookies, 8 for crispier cookies).  Let cookies cool completely on a cooling rack.  

In a bowl, melt at 50% power in your microwave: 
1 1/2 cups semi-sweet chocolate chips

Add to chocolate: 
A touch of peppermint oil (add by dipping a toothpick into the peppermint oil, so you add less than 1 drop)
1 tsp light olive oil, only if melted chocolate is too thick to dip (Often chocolate chips when melted are a bit too thick to dip in, so this can help without affecting flavor). 

Dip cookies in melted semi-sweet chocolate with just a touch of peppermint oil added OR you can use the back of a spoon to spread chocolate on the tops and bottoms of the cookie (we found this was a great way for little hands to dip the cookies in chocolate with ease).  

You can either decorate as described below, or chill in the refrigerator until chocolate has hardened for plain chocolate-covered thin mint cookies.  Enjoy!  

To decorate:
Sprinkle cookies with crushed peppermint OR add stripes or swirls of melted green mint chips (I find I need to add 1-2 tsp oil for 1/2 cup melted chips, again melted slowly at 50% power in the microwave). 

My 5 year old helped dip and decorate the cookies, she even piped on the green mint onto many of them, then swirled it with a toothpick.  
gluten free thin mint cookies
Dipping and swirling her first thin mint cookie. 
gluten free thin mint cookies gluten free thin mint cookies
Pipe on zigzags of melted green mint chips, then swirl with a toothpick for a fun design! 
decorating gluten free thin mint cookies
One happy chocolatier!  

Chill thin-mint cookies in the refrigerator until chocolate has set.  These store well at room temperature.  We love to freeze leftovers, then crush them to add to homemade ice cream!


* I really like the Doterra peppermint oil.  It has a lovely taste while cooking.  My friend Christine has an online shop where you can order food grade essential oils. 

Friday, 11 December 2015

White Chocolate Peppermint Popcorn

This was a serious hit with everyone! The kids loved helping make it - and it was easy and quick to whip together.  White chocolate with peppermint is a delicious combination, and adding that to the crunch of popcorn just makes it that much better!  A fun treat - one we plan to make again soon to pack into little treat baggies for Christmastime.  Enjoy!
Gluten Free White Chocolate Peppermint Popcorn
Gluten Free White Chocolate Peppermint Popcorn!!!
Tasty and easy - fresh homemade white chocolate peppermint popcorn!

White Chocolate Peppermint Popcorn
Based off the 'Candy Cane Popcorn' recipe from the book "Popcorn" by Carol Beckerman (Yum!)
Makes 1 large tray of popcorn

Line a cookie sheet with parchment paper.

Pop 1/2 cup popcorn kernels in an air popper in a large bowl.  Scoop popcorn by hand into a fresh large bowl. (This allows any kernels or smaller pieces to get left behind.)
Fresh popcorn, ready for white chocolate and peppermint!

Melt in a microwave safe bowl at 50% power in 30 second increments, stirring regularly. You don't want to burn the chocolate:
12 - 14 oz good quality white chocolate 

Mix in quickly:
1/4 - 1/3 cup crushed peppermint candy (candy canes, small peppermint candies)
Crushed peppermint candies - then mixed quickly with the melted white chocolate.

Fold melted white chocolate/peppermint mixture into popcorn quickly!  Mixing with your hands is effective, since it helps you do this part quickly.

Scoop popcorn onto prepared cookie sheet lined with parchment paper.
Sprinkle over top of popcorn:
1/4 - 1/3 cup crushed peppermint candy
Gluten Free White Chocolate Peppermint Popcorn
White chocolate peppermint popcorn, sprinkled quickly with additional crushed peppermint.

Place in the refrigerator ~5 minutes, until white chocolate has set.  Serve or store 3-4 days in a tightly sealed container.

Makes a fun, light dessert and a great holiday treat for kids!
Enjoy!

Wednesday, 25 November 2015

Mint Dark Chocolate Ganache

This is the last chocolate ganache recipe needed for the gluten-free wedding cake I made last December at the big gluten-free wedding reception I put together.  I'll be posting the wedding cake recipe in one week in honor of the 1 year anniversary of my brother and new sister's wedding!  But for now, you can think happy thoughts about mint chocolate ganache, which is, in my opinion, one of the tastiest kinds of ganache!  Enjoy!

Mint Dark Chocolate Ganache Truffles
Mint Dark Chocolate Ganache is perfect used in Molded Chocolate Truffles

Mint Dark Chocolate Ganache

Bring to boil over medium heat:
1/2 cup butter
1/2 cup heavy cream
5-6 fresh mint leaves (crushed in your hand before adding to pan to release oils) and/or 1-2 drops high quality peppermint essential oil (adjust to preference)

Once at a rolling boil, remove mint leaves.  Pour over:
8 oz high quality semi-sweet or dark chocolate

Mix thoroughly until smooth.
Optional: Add handful of crushed peppermint candy to ganache before using.

This recipe has 3 uses:
1. Truffle filling
2. Glaze on outside or middle filling layer in cake.
3. Cooled, then whipped and used as frosting (can be piped nicely once whipped).  

You can roll and dip truffles, too.  Then sprinkle with crushed peppermint for a nice finish.
Hand-dipped Mint Truffles in White Chocolate

Saturday, 23 May 2015

Peppermint Mint Milano Cookies!

I saw a variety of these (not gluten-free) in the store and thought they'd be perfect for a fancy gluten-free wedding cookie! They were delicious - and even froze well with ganache & peppermint in-tact, with just a tiny bit of sticking together (I was forced to eat a couple - not a hardship, I assure you).   Just one batch of my milano cookie recipe made 36 cookies, and you can easily double the recipe, if desired.  Enjoy!
Gluten Free Peppermint Mint Milano Cookies
Gluten Free Peppermint Mint Milano Cookies - ready to eat! 

Peppermint Mint Milano Cookies!
Makes 36 open-faced cookies

Preheat oven to 350F.  Line 3 baking sheets with parchment paper or silicon mat(s).

In a mixer, beat until creamed:
1/4 cup + 2 Tbsp butter, softened
1 1/4 cup powdered sugar

Mix in:
3 egg whites

Beat in:
1 Tbsp vanilla extract

Add and mix in, just until combined:
3/4 cup Kristin's Gluten-Free Flour Mix

Using the smallest size cookie scoop (1 Tbsp), scoop cookies onto prepared pans.  Place 12 cookies per pan, since these spread quite a lot during baking.

Bake 8-9 minutes at 350F, until golden around edges of cookies.  Cool 5-10 minutes before removing to a wire rack.

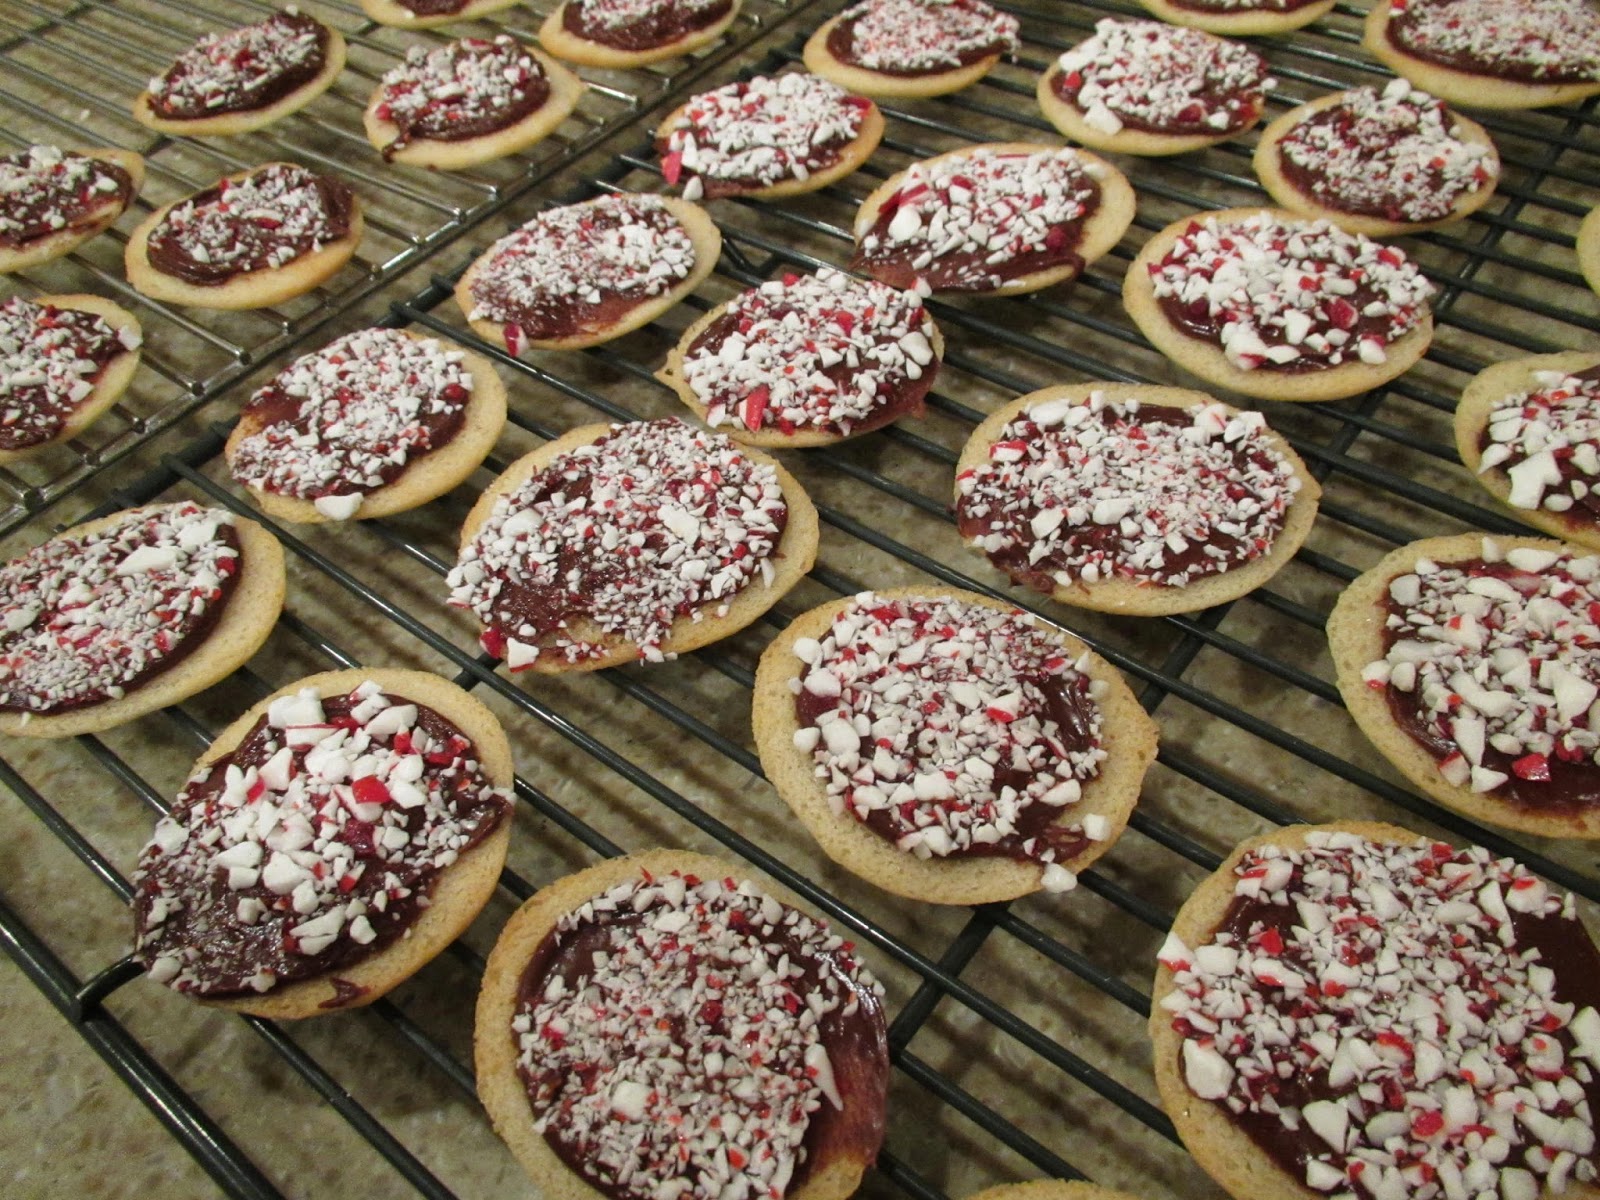
Once cookies are cool, spread the bottoms with mint chocolate ganache (recipe below) and dip in crushed candy cane.  Let ganache set before storing.
Chocolate on GF Milano Cookie
Ganache was spread on using the back of the spoon since we were dipping them in peppermint.
Gluten Free Peppermint Mint Milano Cookies
I returned them to the cooling racks after ganache/peppermint was added to allow them to set.  You can refrigerate them to speed up the process.

These can be eaten right away, stored in the refrigerator for 2-3 days, or frozen (I've never frozen more than a couple weeks.  They were still delicious - even straight out of the freezer).

Enjoy!

 Mint Chocolate Ganache:

In a small saucepan over medium heat, bring to a boil:
2 Tbsp butter
1/4 cup + 2 Tbsp cream

Once butter/cream are nicely bubbling, remove from heat and mix in:
3/4 cup semi-sweet chocolate chips
1 1/4 cup powdered sugar

If desired, add 2-3 drops peppermint essential oil*.  You can also use peppermint extract ~ 1/2 - 3/4 tsp should work.  Peppermint flavoring is strong, so use sparingly and make sure to taste-test along the way so you don't end up with too much minty flavor.  

*I prefer using the DoTerra Peppermint Essential Oil in this recipe. The taste is fabulous. You can buy the DoTerra Peppermint Essential Oil at mydoterra.com/cstolworthy, my friend Christine's online store.  The great thing I love about the DoTerra Essential oils is that they're a very high quality and taste, and are made to be ingested - they have all sorts of other flavors that can be used in cooking and baking! 

Tuesday, 17 March 2015

Mint Chocolate Brownies

These are a family favorite. My son even requested these this year instead of a birthday cake.  I prefer them at room temperature, but they're nice chilled or warmed a bit.  Just make sure to let them set before cutting them the first time.  With that nice minty green layer, they're a perfect St. Patrick's Day treat, too!

Gluten Free Mint Chocolate Brownies
Gluten Free Mint Chocolate Brownies - They're rich, so I tend to cut these tasty treats into small squares.  Delicious!

Mint Chocolate Brownies
Makes 8x8 tray of brownies (~16)

Preheat oven to 350F. Line 8x8 pan with parchment paper, then butter parchment paper and sprinkle with cocoa powder.  (I find if I don't then I end up needing to use a fork or spoon to scrap the bottom off, even after buttering the pan.)

In a large microwave-safe glass bowl, melt:
1/2 cup butter

Mix in until smooth:
1/4 cup cocoa powder

Add and mix in:
2 eggs
1/2 cup white sugar
1/2 cup brown sugar

Then add and mix in, just until combined:
1/4 cup + 2 Tbsp Kristin's Gluten-Free Flour Mix
1/4 tsp baking powder

Pour into prepared 8x8 pan and bake at 350F for 22-25 minutes.
Before and after baking
Let brownies cool completely.  Then top with the following:
1. Mint layer
Mix together and spread on top of brownies:
1 cup powdered sugar
2 Tbsp butter, melted
1 Tbsp milk
1-2 drops peppermint essential oil* (Add one drop at a time, then mix) (or use peppermint extract)
1-2 drops green food coloring

Taste the mint layer to make sure it's minty enough. 
Mint layer spreads easily over the brownies.
2. Chocolate Layer:
Melt together in a small microwave-safe bowl:
1/2 cup semi-sweet chocolate
2 Tbsp butter
Coated with chocolate
Spread thinly on top of brownies.  Let set in the refrigerator at least 15-30 minutes (to allow the chocolate layer to set).  Remove from refrigerator. Slice and serve!   I find these are best at room temperature, but I typically store them in the refrigerator and remove 20-30 minutes before serving.
Gluten Free Mint Chocolate Brownies
Mint brownies, ready to eat!  They can easily be lifted out of the pan using the parchment paper, to make for easier cutting.

* I love using the DoTerra Peppermint Essential Oil in my cooking.  You can find it at my friend Christine's online store:  mydoterra.com/cstolworthy

Thursday, 5 February 2015

Peppermint Chocolate Cupcakes

These are a wonderful cupcake, filled with just the right amount of mint, plus some crushed peppermint on top.  They'd be a cute Valentine's Day treat, too. You can, of course, pipe the frosting to make them look even nicer, but I tend to just swipe it on when we're making it to eat at home.   I even made mini versions for the big gluten-free wedding reception I put together for my brother and his wife. Enjoy!
*I prefer to use the DoTerra Peppermint Essential Oil in this recipe, which you can find at mydoterra.com/cstolworthy, my friend Christine's online store.

Mini versions in candy cane wrappers topped with my favorite marshmallow frosting with tops dipped in crushed candy cane

Peppermint Chocolate Cupcakes
Makes 12 to 36 cupcakes, depending on recipe used

Homemade recipe: 
Makes 36 cupcakes
Make up one batch of Julie's top-secret Amazing Chocolate Cupcakes.  Add 6-9 drops DoTerra Peppermint Essential Oil* into your batter.  Put in 36 muffin tins, lined with paper lining.  Bake as directed.

Box mix method:
Makes 12 cupcakes
Use either President's Choice or Betty Crocker GF chocolate cake mix.  Mix together as directed, using oil in place of butter.  Add 3 drops DoTerra Peppermint Essential Oil* into your batter.  Separate into 12 muffin tins. Bake as directed.

Frost with either half or whole batch of my favorite marshmallow frosting, depending on how many cupcakes you make.
You can either:
1. Mix **crushed candy cane (remove any large pieces) into the frosting
OR
2. Sprinkle or dip **crushed candy cane (remove any large pieces) on top of the frosting.

A special holiday treat! This was the quick slather on version - Yum!

These were a BIG hit!

*I prefer using the DoTerra Peppermint Essential Oil in this recipe. The taste is fabulous. You can buy the DoTerra Peppermint Essential Oil at mydoterra.com/cstolworthy, my friend Christine's online store.  The great thing I love about the DoTerra Essential oils is that they're a very high quality and taste, and are made to be ingested - they have all sorts of other flavors that can be used in cooking and baking! 
**To make crushed candy cane, place unwrapped candy canes (or hard peppermint candies) in a ziploc bag (then again in another ziploc bag to avoid excess mess) and crush with something hard - I tend to use the end of my rolling pin.

Saturday, 8 February 2014

(Mint) Milano Cookies - Gluten Free!

My sister emailed me a picture of some homemade (non-GF) milano cookies she made.  (Go Jenny!) I immediately wrote back saying how much I miss mint milano cookies.  Her reply, "I actually made these because I ran out of mint milano cookies."  It seemed the time had come to create a gluten-free recipe for those delicious milano cookies I enjoyed in my pre-gluten-free days.  I converted a recipe she forwarded me from Fitsugar.com. These were a hit!  They're light and delicate, and pair wonderfully with the ganache filling below.  The ganache filling can be made either plain chocolate or mint chocolate (my favorite is the mint). I like to use the DoTerra Peppermint Essential Oil in this recipe, which you can find at mydoterra.com/cstolworthy, my friend Christine's online store. Save your extra egg yolks and whip them into some yummy homemade vanilla pudding!  Enjoy!

Finished milano cookies, some with plain ganache and some with mint ganache filling. Yum!

(Mint) Milano Cookies - Gluten Free!
Makes 10 lg, 36 small, or ~25 lg

Preheat oven to 350F.  Line 2-3 baking sheets with silicon mat(s) or parchment paper.  (I used 3 pans for the amount of batter here).

In a mixer, beat until creamed:
1/4 cup + 2 Tbsp butter, softened
1 1/4 cup powdered sugar

Mix in:
3 egg whites

Beat in:
1 Tbsp vanilla extract

Add and mix in, just until combined:
3/4 cup Kristin's gluten-free flour mix

Place in a medium-sized freezer ziploc (use good quality, or the bag can rip).  Cut a corner 1/4" for small cookies and 1/2" for larger cookies.  Pipe 2" long stripes of dough onto prepared pan.  Leave 1" between smaller cookies and 2" between larger cookies to allow for spreading.
Small cookies - about 36 piped on this tray.  My daughter helped make the milano cookies - and eat them afterwards. 
Larger cookies - 21 piped on this tray

Bake at 350F ~7-8 minutes for smaller cookies and 8-10 minutes for larger cookies, until edges are browned.  Remove from oven and let cool 5-10 minutes on the baking sheet before removing to cooling racks to completely cool.
Small cookies after baking. Notice the light brown edges.
Larger cookies after baking.
After cooling a bit on the pan, remove to a wire rack.  I found I sometimes needed to peel the parchment or silicon mat away from the cookies, but I didn't have any break.

Once cool, fill with plain or mint ganache filling (below).  Eat right away, or allow to set before eating.  Best fresh or within 2-3 days of making.  Store in a closed container in the refridgerator.  Enjoy!
I just used a small spoon to put a bit of ganache onto the backside of one cookie before topping with another.  You could always put the ganache into a ziploc and pipe it on if you want your filling to look more even when complete.  
Delicious large cookies filled with the mint chocolate ganache. My favorite!

Chocolate or Chocolate-Mint Ganache:

In a small saucepan over medium heat, bring to a boil:
2 Tbsp butter
1/4 cup + 2 Tbsp cream

Once butter/cream are nicely bubbling, remove from heat and mix in:
3/4 cup semi-sweet chocolate chips
1 1/4 cup powdered sugar

If desired, add 1 drop peppermint essential oil* for 1/3 - 1/2 of the ganache recipe.  You can also use peppermint extract ~ 1/4 tsp should work.  Peppermint flavoring is strong, so use sparingly and make sure to taste-test along the way so you don't end up with too much minty flavor.  *I prefer using the DoTerra Peppermint Essential Oil in this recipe. The taste is fabulous. You can buy the DoTerra Peppermint Essential Oil at mydoterra.com/cstolworthy, my friend Christine's online store.  The great thing I love about the DoTerra Essential oils is that they're a very high quality and taste, and are made to be ingested - they have all sorts of other flavors that can be used in cooking and baking! 

Let the ganache cool a bit before sandwiching cookies.  You can place the cookies in the refrigerator to help the ganache fully set, if desired, but we enjoyed them fresh, too!
Yum!