Search for a Recipe

Sunday 14 November 2021

Plum Pudding Cake

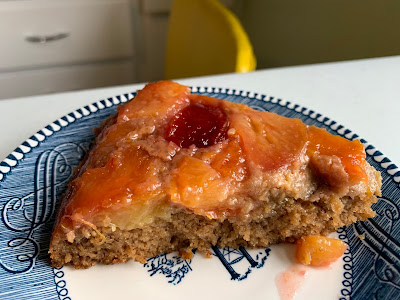
 We had an extremely low-key Canadian Thanksgiving this year - and it called for something a little more casual and easy to whip together than a pie or crisp or cobbler or other Thanksgiving dessert.  We liked it so much, we may add it to every Thanksgiving!  I've made this yummy plum pudding cake with various varieties of plums in addition to pluots.  All have turned out well and are delicious.  You can serve the slices upside-down for more of an upside-down cake look, or serve them right-side up. Enjoy! 

We love the look of the plum pudding cake flipped upside-down, too. It's so pretty. 
This was served with a tasty local blackberry ice cream, which complimented the plum cake nicely.

Plum Pudding Cake

Makes one 10-11" cake

Preheat oven to 350 F. 

In a 10" oven-proof skillet (*I have a nice oven-proof non-stick pan - a cast iron would work well, too), over medium heat melt completely:
3-4 Tbsp butter

Add and sauté until fruit is still firm, but more tender (usually 5-7 minutes): 
5-6 diced plums or pluots

Add and cook 1-2 minutes: 
1/4 cup sugar

Remove from heat and set aside while you prepare the cake batter.  
Fruit ready for the topping!
In a large bowl, whisk together: 
1/4 cup white rice flour
1/4 cup coconut flour
1/4 cup sugar
1/4 - 1/2 tsp baking soda
1/4 - 1/2 tsp salt
1/4 - 1/2 tsp cinnamon

Add and stir in until smooth: 
1/2 cup milk
1/4 cup oil
3 eggs
2-3 Tbsp date paste (100% date syrup) (This adds a natural sweetness without needing so much sugar in your bake, which I love)
1/2 tsp vanilla extract OR vanilla bean paste

Pour batter evenly over the top of your sautéed plums.  Bake in the oven at 350 F for about 30 minutes, until the cake is a nice, golden brown.  
Batter poured evenly on top of the sautéed fruit, ready for baking!
Nice and golden brown and ready to eat! Yum!

Remove and let cool slightly before slicing and serving.  I like to slice this with something gentle like a spatula to avoid scratching the pan.  You can also flip this cake upside down onto a serving platter like an upside-down cake, OR flip the pieces over onto each individual plate when serving.  Either way works great!   I love it as-is, but it's also yummy with ice cream or whipped cream.  Enjoy! 
So tasty and delicious!
So fun to mix and match the plums and pluots, too! 

Plum Pudding Cake Recipe by Successfully Gluten Free!

Sunday 7 November 2021

Easy Gluten-Free French Baguettes!!!

 These took a lot of experimenting with to get something that had the taste I wanted PLUS the shape I associate with a proper French baguette.  (Oh, and it cannot require some extra pan I don't have space for in the kitchen).  I have been making French bread in loaf pans for awhile (i.e. it has the flavor and exterior crunch/interior tenderness) and also a French bread-style sandwich bread, which we also really like.  However, I wanted something that could be easily used as a proper baguette for things like a brie & tomato sandwich, or thinly sliced and baked with olive oil for things like topping with bruschetta.   Or just pulling off pieces of hot bread to eat fresh!  Voila!  The parchment paper came to the rescue!  This recipe is easy to whip together, and you'll have fresh baguettes in no time!  Best fresh, in my opinion.  Enjoy!

They're just so pretty! Fresh Gluten-Free French Baguettes! 
So yummy. They get eaten quickly around here. 
They slice cleanly and work perfectly for appetizers, dipping, toasted with olive oil or butter. 

Easy Gluten-Free French Baguettes!!!

Makes six 12" baguettes or three 20" baguettes

Line pan(s) with parchment paper, creased with folds to make baguette-sized hollows for the bread to rise and bake in.  I love to use two 9x13 pans, but you could make all 6 half-sized loaves on a large cookie sheet or make 3 long baguettes on the large cookie sheet.  

In a mixer, combine thoroughly:
2 cups tapioca flour/starch
1 1/2 cups brown rice flour
6 Tbsp potato starch
3 tsp xanthan gum
1 Tbsp quick/rapid-rise yeast
1 1/2 tsp salt
1 Tbsp sugar
Optional: 1/2 cup quick-cook steel cut oats (if you use, add 1/2 cup water)

Add and mix in, beating 4 minutes:
1 1/4 cup lukewarm water
2 tsp apple cider vinegar
1/4 cup oil (avocado oil is my preferred choice)
1 cup egg whites (these can be purchased at the store near the eggs)

Scoop bread into a large freezer ziploc.  Snip the corner.  Pipe out your baguettes.  Aim for a size that is not too thick, as you want these to double in size while rising.  Let baguettes rise 45 - 60 minutes in a warm location, until bread has doubled and is getting cracks in the tops from rising.  Use kitchen scissors to snip little slashes on the top of each baguette before baking, if desired.  
Piped into prepared pans and ready to rise!
Doubled in size, ready to bake as-is or slash (below)
You don't have to add the diagonal slashes, but I think it looks really pretty once they're baked. 

Bake at 375 F for 40-45 minutes.  This length of time will allow the outside to get nice and crispy, but also allow the inside of the bread to fully cook.  If you cook it for less time, you'll find the inside is too sticky.   Let the bread cool a little before slicing (yes, we always taste-test it piping hot, but best to cool a little before slicing).  Sliced bread can be left in a sealed container on the counter and will still be delicious the next day! The crust will soften after being sealed, but a reheat in the oven will crisp it back up!   This has become the uncontested new family favorite bread recipe!  Enjoy!

Fresh from the oven.  I like to remove from the pan quickly to avoid soggy baguettes. 
Baguettes cooling.  One is about to lose a piece to eager taste-testers. 
I held them off long enough to take a photo of 6 half-sized baguettes. Yum!
The above slashed ones, fresh from the oven. 
Fresh from the oven, yummy French baguettes! Gluten-Free!
We had such a fun lunch with a French family we're friends with and brought a few loaves - they loved the GF Baguettes!

Easy Gluten-Free French Baguettes by Successfully Gluten Free!