Search for a Recipe

Showing posts with label biscuits. Show all posts

Monday, 29 March 2021

Chocolate Dipped Biscuits

 These nut-free cookies are thin shortbread-style biscuits that are dipped in chocolate once cooled.   I find them best on the day of baking, but they can be left in a tupperware at room temperature for several days and they do freeze well, too.  Cook them a bit longer if you want a crispier cookie.  Perfect for a small, fancy treat.  Enjoy! 
These turn out so pretty!
You can definitely cut them in different shapes, but the dough may need a bit more chilling time to avoid being too sticky. 

Chocolate Dipped Biscuits

Makes about 3 dozen cookies

In a mixer, cream together: 
1/3 cup butter
1/2 cup brown sugar

Add, mixing in, scraping occasionally: 
1/4 cup milk (lactose-free or milk substitute works)
1 egg
2 egg yolks
1 1/2 tsp vanilla bean paste OR vanilla extract
2 drops peppermint essential oil (I like the DoTerra oils)

Add and mix in until smooth: 
3/4 cup corn flour (white corn flour or yellow corn flour work - not corn meal, this is closer in consistency to cornstarch. You can use cornstarch if you cannot locate corn flour)
3/4 cup potato starch
1/4 cup coconut flour

Flatten the dough into an oval between two pieces of plastic wrap.  Fold so it's sealed and chill in the refrigerator for 30-60 minutes.  

Preheat oven to 375 F.  Line cookie sheet (or two) with parchment paper. 

Roll out between the plastic wrap to 1/4" thick.  Cut into small circles or shapes of your choosing.   Place on a parchment-paper lined cookie sheet.  They don't spread much, so you can have them relatively close together.  Bake at 375 for about 6-7 minutes for thin, small circles.  They should just be browning at the edges and be a nice light brown on the bottom.   If you want crispier cookies, you can cook them an extra minute or two.  Thicker cookies or larger cookies will need an extra couple minutes.  
Rolled and cut cookies, ready to bake.  
Baked and resting before moving to cooling rack.  For a crispier cookie, you can give them an extra minute or two.
I like them to be just light brown on the bottom and pale on the tops.

Let them rest on the pan for a few minutes before removing to a cooling rack to cool completely.  

You can temper your chocolate, if desired, for a wonderful snap that only tempered chocolate has.  However, they work perfectly well dipped in melted chocolate with a dash of oil added to help avoid streaks in the chocolate as it cools. 

To melt chocolate, melt the following at 50% power in 30 second increments, stirring between each 30 seconds until chocolate is nicely melted and smooth.  You may need to just do 15 seconds towards the end: 
1 cup high quality semi-sweet or dark chocolate
1/2 - 1 tsp lightly flavored oil (like olive oil or avocado oil)

Dip your biscuits as desired (bottoms only, halfway, etc.).  Place dipped biscuit on a parchment-paper lined cookie sheet.  Chill in the refrigerator until chocolate has set.  Remove and serve! Enjoy! 

The little ones LOVE to help dip the cookies.  We'd made some thicker ones here (thin is best)
After dripping some chocolate across the parchment she loudly declared "I didn't do anything!" to everyone in the house.  
Freshly dipped biscuits.
Chilled and hardened chocolate.  Ready to eat! 

Chocolate Dipped Biscuits Recipe by Successfully Gluten Free!

Sunday, 22 December 2019

GF Chocolate Oat Biscuits - perfect for s'mores!

These are a yummy oat biscuit-style cookie.  Crispy, crunchy, with a touch of cocoa powder in the cookie as well as mini chocolate chips make it perfect to eat alone or with a toasted marshmallow.   These have become a regular to have in our freezer for trips, lunches, or snacks.  They'd be great to take along for outings like skiing.  I took some on a plane trip recently, and it was a perfect little snack.  Yum! 
Gluten Free Chocolate Oat Biscuit
Freshly baked Chocolate Oat Biscuits - fresh from the oven! 

Gluten Free Chocolate Oat Biscuits

Makes about 45 cookies

Preheat oven to 325 F.  Line cookie sheets with parchment paper.

In a food processor, pulse or mix about 1-2 minutes, until nicely blended and oats are a little finer (but still have larger pieces throughout:
3 cups quick cook oats (Make sure these are gluten-free if Celiac or sensitive)
1/3 cup brown sugar
2 tsp cocoa powder
1/2 tsp cinnamon
1/2 tsp baking soda
1/2 tsp salt

Add and mix, just until blended:
1/3 cup oil
3 Tbsp maple syrup
3-4 Tbsp water

Add, mixing just until thoroughly combined:
1/2 cup mini chocolate chips
Mixed chocolate oat biscuit dough

Scoop 1 Tbsp scoops onto the parchment paper.  Cover the bottom of a flat glass with plastic wrap.  Dip briefly in water between pressing every 1-2 cookies (to help avoid sticking).   Press cookies until they're as flat as the mini chocolate chips will allow.  This will help them be thin and crispy!  I typically find I end up making 3-4 trays of cookies.
1 Tbsp scoops of cookies.
Flattened cookies - Yum!

Bake cookies at 325 F for ~20 minutes.   Let them rest for 5-10 minutes before removing cookies to a cooling rack to cool completely. 
Fresh cookies, ready to eat!

Once cooled, these last well in a closed container for several days, or you can freeze.  These are SO yummy with a hot marshmallow on top - like a s'more but with the chocolate and graham cracker combined.  These have also been the perfect cookie to bring along on trips.  Yum!  Enjoy!!!
Gluten Free Chocolate Oat Biscuit S'more
Ready to eat with a hot marshmallow! Yum! 

Gluten Free Chocolate Oat Biscuit Recipe by Successfully Gluten Free!

Thursday, 5 April 2018

Tasty Cheddar Biscuits

I'm always looking for delicious shortcuts.  Something I can whip together when I want a tasty meal without all the effort.  These cheddar biscuits are perfect in a pinch.  They work great with something like my easy homemade pulled pork.  You can fry up eggs and make bacon and egg sandwiches.  They're great alongside any dish you enjoy with biscuits, perhaps a Southern-style biscuits with gravy.   The taste and crunch of cheddar is my favorite.  Make sure you use a flavorful cheddar cheese.  I like using sharp cheddar in my cooking.  Enjoy!
Homemade Cheddar Biscuit with Pulled Pork.
Homemade Cheddar Biscuits, fresh out of the oven.  These are flattened, so they can be used for sandwiches. 

Tasty Cheddar Biscuits
Preheat oven to 400 F.

Make buttermilk mixture in a measuring cup.  In a measuring cup place:
1 Tbsp lemon juice

Fill so you have a total of:
1/2 cup milk

Mix in a large bowl: 
1/2 cup brown rice flour
1/2 cup tapioca starch
1/4 cup corn flour (or corn starch, if you don't have corn flour)
1/4 cup potato starch
1/4 tsp xanthan gum
2 tsp baking powder
2 tsp sugar
1/2 tsp salt
1/4 tsp baking soda

Dice in with a pastry cutter:
5 Tbsp butter

Add & mix in just until a dough is formed:
1/2 cup buttermilk, from above

Add:
1 cup grated cheese (a nice, sharp cheddar or similar cheese works well)

Scoop onto a tray lined with a silicon mat or parchment paper.  Flatten and gather into neater rounds with hands.  Bake at 400 F for ~15 minutes (more or less, depending on size of biscuits and desired browning level).  I aim for a very light brown.  Cool on the pan or cooling rack.
Cheddar biscuits, flattened and shaped quickly before baking.
Out of the oven and ready to eat! 

Wonderful warm with pulled pork.  Great as a side with breakfast.  Works nicely without cheese as a strawberry shortcake base.  Enjoy!  

Monday, 11 April 2016

Chicken Vegetable Pie and Biscuits

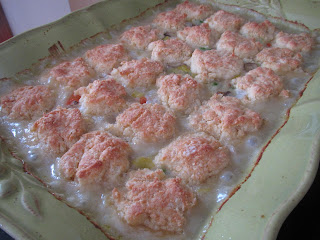
This dish is packed with veggies - leeks, mushrooms, onions, carrots, celery, peas topped with flaky biscuits.  I have listed this recipe in such a way that while things are cooking, you can stir occasionally and chop the remaining vegetables while things are simmering/cooking.  I, personally, find it helpful to have recipes listed in such a way that the ingredients and instructions are intertwined rather than having a large list of ingredients at the top followed by instructions at the bottom.  I hope you'll agree it's a helpful way to have a recipe, even if you have to skim through it all to find all the ingredients needed.  Ingredients are always in bold to help with this.  In this recipe, the addition of leeks adds wonderful flavor to the chicken vegetable pot pie taste.  The biscuits that cook right on top are wonderful! Light, soft, delicious.  A perfect accompaniment to this dish.  Enjoy!!!
A delicious biscuit topping a pile of tasty vegetables & chicken. Yum! 

Chicken Vegetable Pie & Biscuits


Preheat oven to 400 F.


Melt in large, heavy pan:
½ cup butter

Stir vegetables occasionally, so you can chop veggies & cook at the same time! 

Add & cook for 5 minutes:
1 onion, coarsely chopped
3 carrots, sliced thinly

Add & cook 2-3 minutes: 
1 leek, sliced and rinsed

Add & cook 5 minutes:
3 celery stalks, diced
1 cup sliced mushrooms

Add & cook until bubbling, lower heat to medium-low and let simmer 5 minutes:
2 1/2 cups hot chicken broth/stock
Season w/ salt & pepper

Mix together first and then mix into bubbling vegetables to thicken:
1/3 cup milk
2 Tbsp cornstarch

Stir in and let simmer over low to medium-low heat for 5-10 minutes:
1 cup cooked chicken, chopped
½ cup frozen peas

While chicken and vegetables are simmering, prepare the biscuits for the top:

Make buttermilk in a measuring cup.  In a measuring cup place:
1 Tbsp lemon juice

Fill so you have a total of:
1/2 cup milk

Mix in a large bowl: 
1/2 cup brown rice flour
1/2 cup tapioca starch
1/4 cup corn flour (or corn starch, if you don't have corn flour)
1/4 cup potato starch
1/4 tsp xanthan gum
2 tsp baking powder
2 tsp sugar
1/2 tsp salt
1/4 tsp baking soda

Dice in with a pastry cutter:
5 Tbsp butter

Add & mix in just until a dough is formed:
1/2 cup buttermilk, from above

Put vegetables/chicken in large dish (9x13 size).  Cover with small scoops of biscuit dough pressed into little flat circles using your hands.  Bake at 400 F for 15-17 minutes until golden brown.   Serve and enjoy! 
Chicken Pot Pie & Biscuits, ready to cook! 
This dish is absolutely beautiful coming out of the oven with those golden biscuits.  

Saturday, 14 February 2015

Easy Pulled Pork w/ Homemade BBQ Sauce

This is a great meal we all enjoy eating.  It's a delicious cold-weather meal, although we'll happily eat it anytime! My sister loves to serve her pulled pork Texas-style on tortillas with dill pickles. We love it!  Usually, unless I've made some tortillas, I just whip together some sort of roll or biscuit to serve with the pulled pork.  The cheddar biscuit-style recipe is *below* for the buns I whipped together here.  They're little biscuits - which the kids loved. The nice thing about this pulled pork recipe is that you make your own BBQ sauce, but you don't have to cook it in advance since it's cooked thoroughly in the crock pot at the same time as the pork.  A nice hearty meal that's also easy to whip together.  If you prefer, you can include the onion and add in a jar of your any BBQ sauce instead of mixing together your own sauce. That will work just as well. Enjoy!
Easy delicious pulled pork, served on homemade little cheddar biscuit-style rolls (recipe below)

Easy Pulled Pork w/ Homemade BBQ Sauce

Serves ~6-8

In a crock pot, mix together quickly (don't worry about mixing it well, it'll combine nicely as it cooks):
1/2 - 1 onion, diced
1 cup ketchup
1/2 cup apple cider vinegar
1/4 cup honey
1/3 cup sucanat sugar (or brown sugar)
1 Tbsp worchestershire sauce
1 Tbsp dark molasses
1 Tbsp GF soy sauce
1 Tbsp hot sauce (the spiciness level depends on what kind you use - I used a local habanero sauce which gave it a nice kick)
2 tsp dry mustard
1 tsp garlic powder
1/2 - 1 tsp ground pepper

Add in, mixing so the meat is coated:
2-3 lbs boneless pork loin roast, chopped into a few large pieces (best to remove any large pieces of fat)

If you feel like you need a little more liquid, you can always add a bit of apple cider/juice to the mixture. It'll cook right in nicely. 

Cook on 'high' in your crockpot for 5-6 hours. (You can also cook it on low 10-11 hours). Shred with two forks and let cook another 20-30 minutes on high in the crock pot.

Serve on rolls, biscuits, baked potato, or GF tortillas of your choice and enjoy!!!
(I served these on quick cheese biscuit-style rolls I threw together, recipe below).

Serving ideas/options:
Hamburger buns
Buttermilk biscuits
Homemade corn flour tortillas
Sourdough Rolls

*Easy Biscuit-type Rolls: 
Makes ~30-36 small biscuit rolls

Preheat oven to 375F.

Mix together (by hand or in a mixer):
1 1/2 cup tapioca starch
1 cup brown rice flour
1/2 cup potato starch
1/2 cup cornstarch
1 tsp salt
1/2 tsp xanthan gum
1 Tbsp baking powder
1 Tbsp sugar
1/2 tsp baking soda

Add and mix in just until combined:
3/4 cup milk
1/2 cup butter, melted
2 eggs
1 cup grated cheese

Scoop by large cookie scoops onto parchment lined cookie sheets.  Bake at 375F for ~20 minutes, until lightly browned on bottom and just starting to brown on top.  They should puff a bit from the cheese.

Let cool briefly on a cooling rack and enjoy! These are best warmed so the cheese is nice and soft.

Pulled Pork is particularly great on days that look like this:
PEI in winter - Trees coated in ice (thank you frozen fog), multiple feet of snow and a view of the frozen bay near our house. Brrrrrr... 

Easy Pulled Pork with Homemade BBQ Sauce and Gluten-Free Cheese Biscuits by Successfully Gluten Free! 


Sunday, 15 September 2013

Kristin's Biscuits n' Gravy

This is one of those recipes I tend to whip up when we're in the mood for something Southern.  I love that they have delicious gluten-free breakfast sausages available now, because it means we can once again enjoy this breakfast (or dinner) meal we all love!  You can make regular buttermilk biscuits, or my naturally sweeter, coconut flour biscuits (as I've done here).  Either way, it's a delicious and easy meal that hits the spot.  Enjoy!


Make a batch or two of my naturally sweeter coconut flour biscuits OR buttermilk biscuits.  The light, sweeter flavor is wonderful with the sausage and gravy topping.

Cook up 1 package gluten-free breakfast sausages in a medium-large frying pan over medium heat. To cook, chop into small pieces, or remove meat from casings, so you have lots of small bits of sausage cooked up. (natural selections maple syrup flavored sausages are lovely). 

NOTE:  If you use a package of breakfast pork sausage in patty form (they have some you slice yourself, and some in ready made, uncooked patties) - it's best to triple the recipe below in order to have enough gravy to accompany the sausage. 

Once sausage is cooked, add
1 cup milk (lactose-free works great)
pinch or two of chicken boullion flavoring (or asian mushroom flavoring, naturally gluten-free!)
salt and pepper

Bring to a rolling boil, mixing occasionally.

In a separate bowl, mix together:
1/3 cup milk
1 heaping Tbsp cornstarch

Mix the cornstarch/milk into the boiling sauce, stirring constantly.  The mixture will thicken quickly.
Salt and pepper to taste. 

Remove from heat and serve over warm gluten-free biscuits.
Enjoy!!!

Anyone not want biscuits n' gravy?  No problem!  Set aside some of the cooked sausage and fry up a couple eggs (topped with cheese, if you like, as I've done here), and serve with biscuits on the side.
I know my eggs look like triangles. I cooked them 4 to a pan, then cut them apart.  I like to fry them with a lid on top as they cook more evenly, and it helps the cheese melt nicely towards the end.

Gluten Free Biscuit Recipe - a naturally sweeter biscuit

I enjoy making biscuits occasionally to liven things up.  I really wanted a biscuit that was a bit lighter and sweeter in flavor than my regular buttermilk biscuits.  I discovered by using coconut flour in the recipe, I could end up with neatly shaped biscuits without rolling or cutting.  I really like these with my biscuits n' gravy recipe.  With some experimentation, I discovered I could get a bit softer, lighter biscuit by lowering the cooking temperature and modifying the ingredients a bit.  Both high and low temp options are here for you to try.  Enjoy!
Gluten Free Biscuits
Gluten Free Biscuits - ready to eat!  These were the higher heat variety.  

Gluten Free Biscuits – a naturally sweeter biscuit

Makes 6 large or 12 small biscuits (can easily be doubled or tripled or quadrupled, or used for bigger biscuits)
There are TWO ways to make this  with slight modifications in amounts of butter/liquid: 
1. higher temp = slightly more crumbly biscuit 
OR 
2. lower temp = A bit softer, less crumbly
Both taste great, but I think I prefer the lower temp recipe. 

LOWER TEMP RECIPE:  (Need to feed a crowd?  If you quadruple (x4) the recipe - the biscuits will fill ONE large cookie sheet (you can butter it or line with parchment paper).  Scoop dough using a large cookie scoop, leaving a little space between them and flattening slightly before baking - it may need a little extra baking time until they're a nice light golden brown on top.) 


Preheat oven to 350 F. Butter a skillet (that can be used in an oven). 

Mix together:
¼ cup coconut flour
¼ cup white rice flour
¼ cup tapioca starch
¼ cup brown rice flour
1 ½ tsp baking powder
½ tsp salt
1 tsp sugar

Chop in using a pastry cutter:
4 Tbsp butter

Mix in with a spoon until combined:
1 egg
1/2 cup milk

Scoop into prepared skillet using a medium cookie scoop OR just large scoops with your spoon. Flatten gently with hands.  These will spread quite a bit while cooking at the lower temperature. 

Bake at 350F for 15-20 minutes, until light golden brown. Remove from oven, cool on a cooling rack, if desired.
Best served warm. 

You can see how these will spread and run into each other as they bake.  They are so yummy!

These are great warm with jam. We love them with eggs and sausage or bacon. They’re also delicious with biscuits n’gravy. You can even use them as the foundations for strawberry shortcake!
Enjoy!


HIGHER TEMP RECIPE: (YES - the recipe is a bit different from the lower temperature recipe - oil used here instead of egg.)
Butter a skillet (that can be used in an oven).  Preheat oven to 425F.
Mix together:
¼ cup coconut flour
¼ cup white rice flour
¼ cup tapioca starch
¼ cup brown rice flour
1 ½ tsp baking powder
½ tsp salt
1 tsp sugar
Chop in using a pastry cutter:
2 Tbsp butter
Mix in with a spoon until combined:
2 Tbsp oil
1/2 cup milk
Scoop into prepared skillet using a medium cookie scoop.  Flatten gently with hands. 
Bake at 425F for 12 minutes, until light golden brown.  Remove from oven, cool on a cooling rack, if desired. 
Best served warm. 


These won't run into each other or spread as much as the lower-temperature version.  


These are great warm with jam.  We love them with eggs and sausage or bacon.  They’re also delicious with biscuits n’ gravy.  You can even use them as the foundations for strawberry shortcake!


Enjoy!


Gluten Free Biscuits – a naturally sweeter biscuit - by Successfully Gluten Free

Tuesday, 30 April 2013

Veggie Quiche w/ Hearty Buttermilk Biscuit Crust

This is a great all-in-one meal that packs a lot of veggies and gets fiber and protein into your diet as well!  Whenever I find myself making a delicious veggie pizza, I always end up with leftover peppers, mushrooms and onions.  What I find is if you chop up your veggies and layer them together in a tupperware, they'll stay fresh in the fridge for several days and you can whip up this recipe later in the week (or make this first and the pizza later).  It's a fun, easy recipe that tastes delicious warm or cold. Enjoy!  
Yes, I made two. There's a broccoli bacon quiche in the background. What can I say, we love them!
 
Veggie Quiche w/ Buttermilk Biscuit Crust

Makes 4-6 servings
 
Heat oven to 400F - 425F.  Get yourself out a pie pan.
 
I tend to make a full batch of buttermilk biscuits and use half for the crust and just cook the other half as biscuits.  But, if you just want to make the quiche, mix the crust as in the recipe below. In this case, it's nice to use the recipe below with the modifications, because it makes a heartier crust.
 
First, we’ll prepare the veggie filling:

Heat 1 Tbsp olive oil in large saucepan over medium heat.
 
Add and sauté 5-6 minutes:
¼ - ½ cup green bell pepper
¼ - ½ cup yellow bell pepper
¼ - ½ cup orange bell pepper
3-4 mushrooms, diced
1 small red onion, diced
½ tsp salt
¼ - ½ tsp pepper
½ tsp dried oregano
½ tsp ground coriander
Veggies ready to cook.

Set veggies aside and prepare the rest of the quiche.

To ready the crust:
 
First, make your buttermilk (or just use ¼ cup buttermilk)
In a measuring cup place:
1 ½ tsp lemon juice OR white vinegar
Fill so you have total of:
¼ cup milk
 
Mix in a bowl:
¼ cup brown rice flour
¼ cup tapioca starch
2 Tbsp cornstarch OR corn flour (not cornmeal) for a heartier crust
2 Tbsp potato starch
1 Tbsp flaxseed meal (optional, but a nice addition in a veggie quiche)
1/8 tsp xanthan gum
¾ tsp sugar
1 tsp baking powder
¼ tsp salt
pinch of baking soda
 
Add and dice in with a pastry cutter:
2 ½ Tbsp butter
 
Add and mix with a spoon, just until combined:
¼ cup buttermilk (from above)
 
Press biscuit dough gently into pie pan.  If the batter is sticky, put a tiny bit of water on your fingertips to help.


Spread on the bottom of the biscuit crust:
3-5 slices herb Havarti cheese (or similar)


On top of cheese put:
Cooked veggies
 
Mix together in a separate bowl:
4-6 eggs (4 cooks faster, but you’ll have a smaller quiche, I prefer 6 myself)
1/3 - ½ cup milk (lactose free works great)
Salt
Pepper (be generous)
 
Pour egg mixture carefully and evenly over the top of the bacon.   Pop in the oven!
This quiche had 4 eggs and 1/3 cup milk. It still puffs up and over the veggies once cooked.
 
Bake 10 min at 400-425F. Lower heat to 350F and cook 20-25 minutes more, until center is set (doesn’t jiggle when you gently shake the pan).
Remove from oven. Let cool 10-15 minutes before cutting.  Great warm or cold!   Enjoy!