We have a lot of winter birthdays around here, so lots of experimenting with cakes. My daughter wanted another opera cake, like her birthday last year, but I convinced her to let me tweak it a bit and turn it into a raspberry chocolate version for her 11th birthday. The addition of chocolate to the sponge makes the recipe a little less straight-forward, but it isn't too tricky and can be mixed up in a bowl with a whisk. Beautiful and delicious! My youngest helped me make this cake for her sister, and we especially love how the raspberry frosting turned out (based on a strawberry frosting that's a favorite). Enjoy!

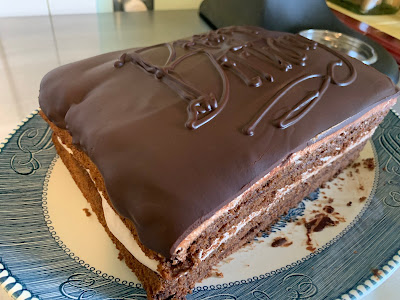
A pretty four layer chocolate opera-style cake! Hard to see some of the layers with the dark chocolate ganache & jam between the chocolate from this angle, but they're there! So yummy!

Slices of birthday cake for my now 11 year old served with a little ice cream on the side.
Dark Chocolate Raspberry Opera-Style Cake (nut-free!)
Chocolate Sponge Cakes:
Preheat the oven to 350 F. Butter the edges and line 2 quarter sheet baking pans with parchment paper (quarter sheet baking pans are approx 8x12 inner dimension or 9x13outer dimension metal cookie sheets - I LOVE this size. Perfect for the toaster oven, and perfect when you have multiple things you want to roast separately in the regular oven, and of course, opera-style cakes!)
Melt together, then set aside:
1/4 cup butter
1/4 cup dark chocolate chips
In a small measuring cup, combine to make a "buttermilk":
2 Tbsp white vinegar
milk to equal 1 cup (lactose-free or milk substitutes work)
In a large bowl, whisk together:
1/2 cup coconut flour
1/4 cup cocoa powder
1/4 cup white rice flour
1 cup sugar
1/2 tsp baking soda
1/2 tsp salt
Add and whisk in until smooth:
1 cup buttermilk, from above
melted butter & dark chocolate, from above
1/4 cup oil
6 large eggs
2 tsp vanilla bean paste or vanilla extract

Batter whisked and ready to put into the prepared pans.
Divide between the two parchment-lined pans. Bake at 350 F for approximately 15-18 minutes. These are nice and thin, so they cook quickly. They should look nicely dried, but not burned or too dark on the edges. They should look no longer wet in the center. Depending on your oven, they may need an extra minute or two.

Batter divided and ready for baking.

Out of the oven. You can see how it's nicely dried out. Chocolate cake always smells so good.
Remove from oven. Let rest 5 minutes before flipping onto cooling racks to cool. Once cool, carefully slice each cake in half so you'll have four even layers for your cake.
Chocolate Ganache:
Once cakes are set to cool, prepare your chocolate ganache. It will need some time to cool a bit on the counter before assembling the cakes, so timing-wise, I found this worked well.
In a saucepan over medium heat combine and heat until bubbling gently:
1/2 cup butter
1/2 cup whole cream/whipping cream
1/2 tsp vanilla bean paste or extract
Remove from heat and stir in until smooth (this takes a bit of patience, usually a few minutes):
8 oz high quality semi-sweet or bittersweet chocolate
Once the ganache is nice and smooth, you can divide it into a couple bowls so it will cool down a bit faster. If you use it right away, it'll just pour off and be too thin. I find if I just let it rest on the counter while I prepare the chocolate-sugar syrup and frosting, it's perfect.
Chocolate-Sugar Syrup:
(This is in place of the traditional coffee syrup - which is coffee mixed with sugar - the cocoa powder gave a perfect bitterness to the syrup so it worked wonderfully to brush on the cake layers!)
In a mug, combine:
1/2 cup boiling water
1 Tbsp cocoa powder
1/4 cup sugar
Stir until sugar is completely dissolved and you have a nice, smooth sugar syrup to use to brush on your cakes.
Raspberry Marshmallow Frosting:
Once cakes have cooled, you can prepare your frosting, as it's time to assemble!
Beat together in a mixer until light and fluffy - 2-3 minutes: 1/2 cup butter, softened2 cups powdered sugar1 cup marshmallow fluff3 Tbsp good quality raspberry jam1 tsp vanilla extract1 tsp (or more if needed) cream or milk (I typically don't find I need it bc the jam adds some liquid)
Assembling your cake:
To assemble cakes: 1. Brush each cake layer with your chocolate-sugar syrup
2. Spread one layer with 2/3 of the raspberry frosting. Spread the remaining frosting on one layer (this will be your top layer).
3. Gently spread some high quality raspberry jam on top of the two layers that have no frosting. Then, carefully spread chocolate ganache on top of the jam. Make sure you have at least 1/3 to 1/2 of the ganache remaining.
4. (Optional, but helps them stack a bit more neatly). Place the frosted/ganache covered layers in the refrigerator for 10 minutes to help set just briefly.
5. Carefully, assemble your cake as desired I like to assemble in the following order: Bottom - jam & ganache, Second to bottom - all frosting, Third layer - jam & ganache, and then the top layer with your frosting. I like to add the last layer of ganache and decoration after assembling for a neater look.  Starting to plate the cake. Bottom layer with jam & ganache here, to be followed by the frosted layer, than another jam layer, then the top layer!
6. Once assembled, spread the remaining chocolate ganache on top of the layer with 1/3 icing (your top layer). The ganache should be warm enough to spread and give a beautiful sheen to your layers. If the ganache isn't warm enough, you can gently heat for 10 seconds in the microwave to warm it up. Save some extra ganache for decorating the top!!! Let rest briefly, then pipe decoration of your choice on top using extra ganache. I like to place ganache in a ziploc bag with the corner snipped off. If you pipe warm (not hot) ganache onto slightly cooled, but not set ganache, you can end up with a beautiful look that defines the top of most proper opera cakes.  Layered and stacked with decoration piped on. Don't worry about drips or edges since those get trimmed off!
 It always looks so neat when you can get the timing right and the ganache piping flows nicely into the rest of the ganache layer.
7. Refrigerate 15-20 minutes. *I find if you refrigerate it too long, you'll lose the beautiful sheen because the ganache sets too hard. Although it does tend to warm up and still look nice once it's left at room temperature.*
8. Using a large knife (you can heat it if you like, but I found just wiping it well with a paper towel between slices worked for me), slice off the edges to create the clean, beautiful edges that define a proper opera cake.
 Trimming the edges off the cake.
Starting to plate the cake. Bottom layer with jam & ganache here, to be followed by the frosted layer, than another jam layer, then the top layer!
Trimming the edges off the cake.

We love how this ends up looking! So neat!
This cake is best served at room temperature and made on the day you're serving because of the beautiful shine on the ganache. However, leftover cake stores perfectly sliced in the refrigerator in tupperware - and it tastes just as delicious a day or two after assembling. You could even freeze slices, let them defrost in the bag and then serve at room temperature as well for leftovers! Enjoy !

One very happy 11 year old!


