Search for a Recipe

Saturday 29 August 2020

Hamburger Cake - Fun for Kids!

Nothing says Happy 89th Birthday like a hamburger cake.  But when my six year old read about it in a Food Network Kids Cookbook, she was convinced it would be the perfect cake for her great-nana.  So, we turned it into a gluten-free, chocolate party cake.  And it really was - lots of laughs, and packed with delicious chocolate in both batter and frosting, it was a hit!   
Happy 89th Birthday to this festive nana!  We'll have to see if we can top it for your 90th.  Maybe a hot dog cake?  By the time we served the cake, the hot kitchen had made the marshmallow fondant stretch and "melt" just like real cheese. Ha! 
My sister-in-law snapped this photo of the cake. 
Just after finishing our "burger" cake. 

Hamburger Cake

You can make the cake batter below, which is based off my chocolate chocolate chip muffin recipe.  It is rich and tasty - although I prefer it made fresh.  Other GF cake options that would work well in this recipe are my delicious chocolate cake recipe, my chocolate & toasted marshmallow chocolate cake, or a GF cake of your choice.  You could even use a vanilla cake, like the one in my blackberry vanilla cake recipe (double the recipe if you make it for a hamburger cake), if you prefer. 

Preheat oven to 350 F.  Butter three 6" cake pans and line the bottoms with a piece of parchment paper.  Have an extra muffin tray available to make chocolate chip muffins with any of the batter you don't use.  I made 6 muffins.   

In a small measuring cup, stir together and set aside: 
1/2 cup boiling water
1/2 cup cocoa powder

In a mixing bowl, mix together: (it's important to mix dry ingredients first in gluten-free baking to avoid clumps)
1 cup brown rice flour
3/4 cup white rice flour
1/3 cup arrowroot starch OR cornstarch
1/4 cup potato starch
1/4 cup tapioca starch
1 1/2 tsp xanthan gum
1 tsp salt
1 Tbsp baking powder
2 tsp baking soda

Add and mix in, letting it beat until it's nice and smooth: 
cocoa mixture, from above
1 cup butter, softened
2/3 cup milk
2/3 cup sour cream OR plain or vanilla greek yogurt
4 eggs
1 cup white sugar
1/2 cup brown sugar

Add and mix in: 
3 cups chocolate chips (variety - dark, semi, milk, white)

Divide the batter into the three prepared 6" cake pans.  I had just enough batter leftover for 6 chocolate chip muffins.  So, most of the batter will go into the cakes.  They will double in size while baking, so make sure your tins are nice and tall. 
Ready to bake!
Bake cakes at 350 F for 35 - 40 minutes.  Remove from oven and let rest 10 minutes before removing from pan (and removing parchment paper from the bottom) and placing them to cool on wire racks.  I highly recommend using a gentle fan to help these cool faster.  Anything with chocolate in it will take longer to cool.  
Fresh from the oven.
Cooling with the help of a small fan.  It made it cool MUCH faster.

Prepare the following about 30 minutes before you plan to assemble your cake:
1. Homemade marshmallow fondant (for the cheese)
2. Chocolate Frosting + Vanilla Frosting (which gets some of the chocolate added into make the color perfect for the bun)
3. Flattened watermelon gummies (for the lettuce/tomatoes)

Marshmallow Fondant
In a large glass bowl, heat in a microwave at 20 - 30 second increments until nice and puffy and melted, stirring occasionally:
5 oz large marshmallows

Stir in with hands, kneading well: 
3/4 cup sifted powdered sugar, keeping an extra 1/2 cup available in case extra is needed
1 - 2 tsp water

Knead and stretch the marshmallow fondant in the bowl to help avoid as much of a mess with the powdered sugar.  If you want to tint it with a bit of yellow/orange/red food coloring, you can do so, and knead and stretch it in.  

Keep the marshmallow fondant wrapped tight in plastic wrap until you're ready to roll out and assemble on your cake.  You will roll it out on a cutting board (or countertop) sprinkled well with powdered sugar.  Keeping the rolling pin, fondant, and board well sprinkled with powdered sugar will help avoid any stickiness.  You can slice it carefully with a sharp knife into a square shape to be placed on the cake "hamburger" once rolled out.  
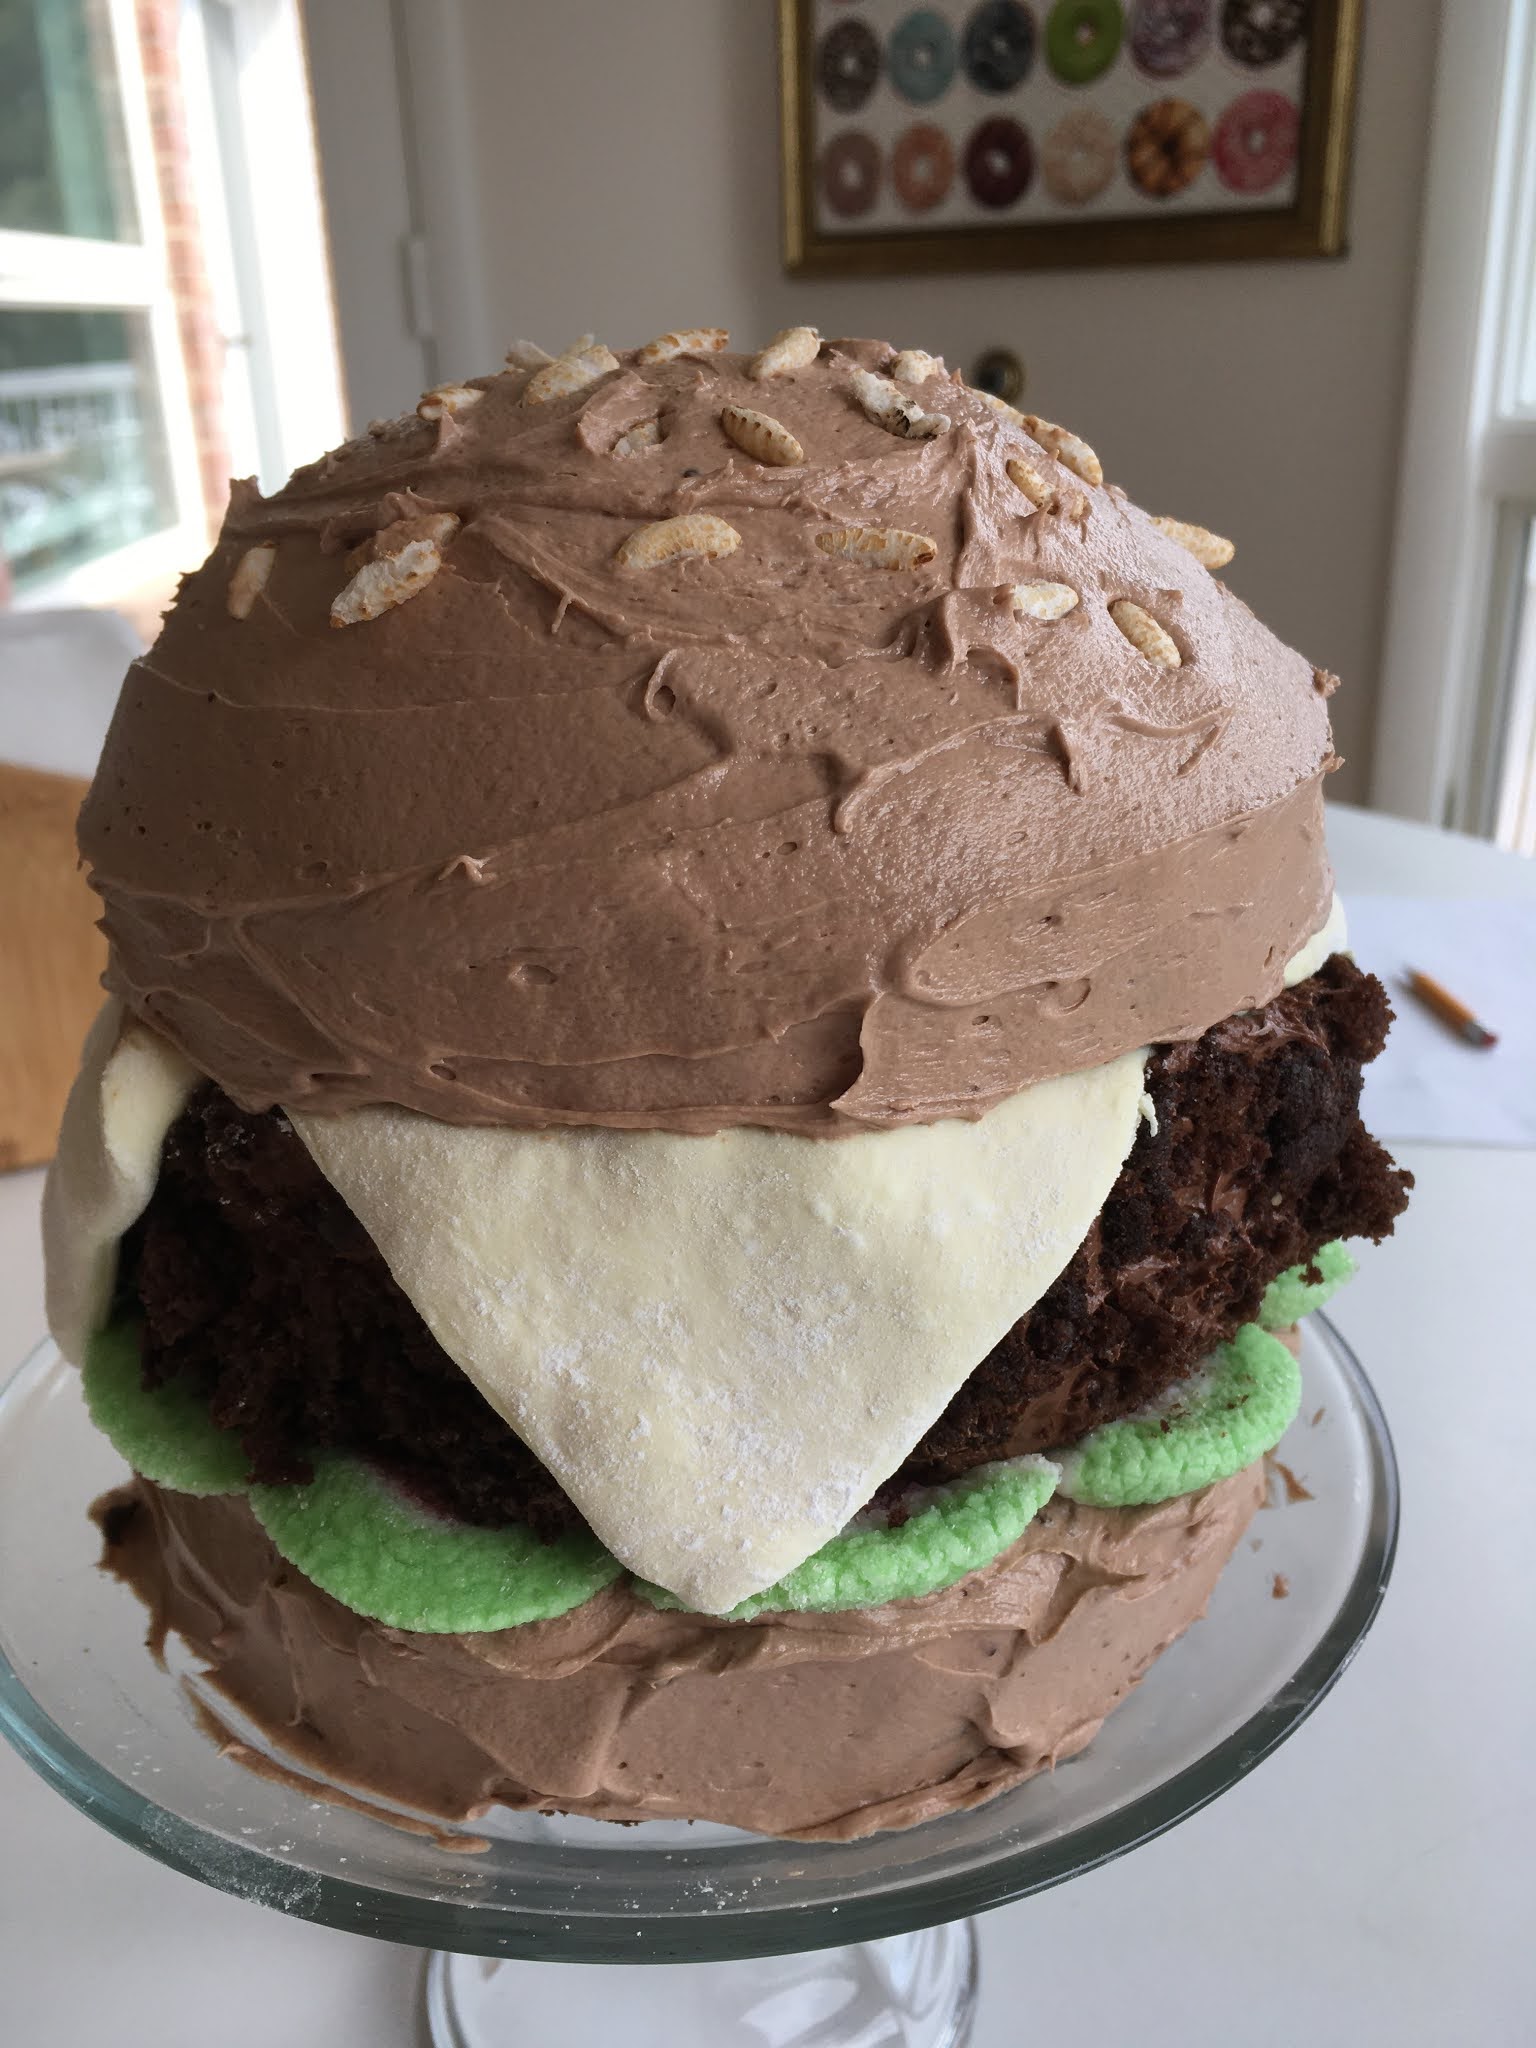
Make sure to cut your square so it's width matches the diameter of your cake or you'll end up with it a little large, like we ended up doing. Still fun - and looks like melted cheese. 
You can also see the darker chocolate frosting on the middle (hamburger) section and the lighter chocolate/vanilla mixed frosting making up the top and bottom sections.

Chocolate and Vanilla Frosting
In a mixer, beat until light and fluffy: 
1/2 cup butter, softened
3/4 cup powdered sugar
1/4 cup cocoa powder
1 tsp vanilla
1 cup marshmallow fluff

Remove from mixer into another bowl.  Add and beat in the same mixer until light and fluffy (it's OK to have any leftover chocolate frosting in there, since you'll be adding some of the chocolate frosting in later to make a light brown "bun" color)
1/2 cup butter, softened
1 cup powdered sugar
1 tsp vanilla
1 cup marshmallow fluff

Add some of the chocolate frosting to the vanilla frosting until you have the desired "bun" color lighter frosting.  

Lettuce Leaves
On a cutting board or counter sprinkled with regular sugar, roll gummy watermelons as flat and wide as you can.  Flipping over regularly to add extra sugar to it as it flattens so they don't end up sticky.  You will pinch together the red ends, and place them in a circle around the cake after you've frosted the bottom layer, so the "lettuce" part is sticking out the edges.  
All prepped and ready for the "burger" - my 6 year old loved this part.

To Assemble the Hamburger Cake:

Trim the cakes: 
1. Bottom layer - slice a cake in half until you have a 1 - 1 1/2 " flat slice of cake
2. Middle layer - slice off the top of the cake until you have an ~2 - 2 1/2" piece of cake
3. Top layer - with a sharp knife, carefully trim the top layer until you have a nice, domed piece of cake

Take some of the trimmed cake and crumble it up to decorate the sides of the middle layer. 

On the bottom layer spread the top and sides with the light chocolate frosting.  Decorate the edges with the flattened watermelon gummies.  

On a separate plate or holding in the air, spread the top and sides of the middle layer with the dark chocolate frosting.  Press the cake crumbs onto the sides of the layer.  Gently place it on top of your bottom layer/lettuce leaves. 

Roll out and trim your rolled out marshmallow fondant into a square that has a length the same diameter as your cake.  Place it on top of your hamburger layer. 

Gently place your top domed layer of cake on top of the fondant square.  Spread the top layer with the remaining light chocolate frosting.  

If desired, press puffed rice cereal into the top to look like sesame seeds.

To serve, I highly recommend slicing the cake in half, laying it flat and cutting wedges of "burger" out that way.  It makes it easier to work with/cut into the marshmallow layer.  Enjoy! 
A seriously happy baker putting puffed rice "sesame seeds" on top of the burger cake. 

Gluten Free Hamburger Cake - Fun for Kids! by Successfully Gluten Free!

Saturday 22 August 2020

Mexican Lasagna/Enchiladas (aka, easy enchiladas - with a quick, delicious homemade sauce!)

Enchiladas are one of those tasty dishes we like to have every so often.  However, I am always frustrated by the mess made between dipping the corn tortillas, filling, rolling, etc., especially when I have kids around trying to help.  I decided to just layer the enchiladas like a lasagna, alternating sauce, tortilla, filling.  It worked out perfectly!  And SO easy!  Between making homemade sauce & filling & prepping for baking, it was about 20 minutes! Another 20-40 baking - done! Yay!  I have a regular red chili enchiladas recipe posted, too, but I find this version tastes the same to us and is so much easier.  You can still make homemade corn tortillas for this recipe if you prefer!  I highly recommend eating these delicious enchiladas with some homemade strawberry-lemonade

A yummy feast - Enchilada Lasagna, Mexican Street Corn Salad, BBQ veggies, chips with dips

Easy Layered Mexican Enchiladas

Makes one 9x13 pan

Preheat oven to 350F. Use a 9x13 pan.

Corn Tortillas:
You can use store bought corn tortillas OR you can make your own homemade corn tortillas.  Any size will do since you'll be ripping them to size to make layers in your pan during assembly. 

Easy Homemade Red Chili Sauce:
In a med-large pot, cook the following over medium heat, until warmed/hot:
½ cup vegetable oil
 
Add the following, and mix in:
2 cloves crushed garlic OR 2 tsp crushed garlic (from a jar)
1 ½ Tbsp red chili powder
2 Tbsp sugar
½ tsp salt
½ - 1 Tbsp vinegar
1 tsp ground cayenne pepper
 
Stir in the following and heat until boiling:
2 cups tomato sauce
2 cups water (OR ½ cup (small can) tomato paste + 3 - 3 1/2 cups water)
 
Mix together (it's thick and difficult to mix at first, but keep stirring!) in a measure cup:
1/3 cup cornstarch
1/3 cup cold water
 
Add the cornstarch mixture to the boiling tomato sauce.  Stir constantly.  The sauce will thicken up quickly. Once sauce is thick and bubbling, do a taste test.  Add more sugar or chili powder or cayenne pepper or water to taste.  Once sauce is thickened and seasoned nicely, remove from heat.   
Tiny specks are just bits of garlic. It'll be lovely and smooth.

Chicken and Cheese Filling:

Mix together filling and set aside:
2 cups diced or shredded cooked chicken
1 cups grated cheese (a cheddar/Colby mix is nice - plus an extra 1-2 cups for the top of the enchiladas)
8 oz. cream cheese, softened
1 small can diced green chiles (optional, but highly recommended)
Enchilada Filling
The filling will be fairly thick, because you have cream cheese in it, but will be lovely when baked.

To assemble enchiladas - it's like a lasagna (sauce, tortilla, filling, repeat - ending with tortillas, the rest of the sauce, and cheese):

In a 9 x 13 pan, scoop a thin layer of sauce on the bottom of the pan.  Place a single layer of corn tortillas along the bottom of the pan on top of your sauce, ripping/cutting the corn tortillas to help fill any empty spaces.  Spread 1/3 of the chicken and cheese filling across the tortillas.  Spread a drizzle of red chili sauce across the top of the chicken and cheese filling.  

Add another single layer of corn tortillas, pressing down to help make everything flat and even across the pan.  Add another layer of 1/3 of the chicken and cheese filling.  Drizzle with the red chili sauce

Repeat with another single layer of corn tortillas, pressing down to help make everything flat and even across the pan.  Add another layer of 1/3 of the chicken and cheese filling.  Drizzle with the red chili sauce.

Add the final layer of corn tortillas, pressing down to help make everything flat and even across the pan.  Pour the remaining red chili sauce evenly over the top of the enchiladas.  Sprinkle the top generously with extra shredded cheddar cheese or Mexican cheese blend.  

Bake the enchiladas in the oven until nicely warmed through and bubbly at 350F for 20-40 minutes.  They'll be hot and ready to eat by 20 minutes, but I like them to get really bubbly and a little crispy around the edges.  Serve and enjoy!

This would be delicious followed by a homemade gluten-free tres leches cake


Easy Layered Gluten-Free Enchiladas by Successfully Gluten Free!

Thursday 13 August 2020

Banana Chocolate Chip Bars

We always seem to have some number of overripe bananas hanging around.  My banana chocolate chip cookies have been a favorite with my sister-in-law and her husband.  Inspired by that recipe, I wanted to make some banana chocolate chip cookie-style bars - tweaking them a little to use a bit less sugar, but still end up with a delicious, satisfying treat.  These have been a hit.  I've made them numerous times now - generally whenever I end up with only two overripe bananas on the counter.  I love how quick they are to throw together and bake. Yum! Enjoy! 
Gluten Free Banana Chocolate Chip Cookie Bars
Delicious Banana Chocolate Chip Cookie-Style Bars - packed with dark chocolate

Banana Chocolate Chip Bars

Preheat oven to 350 F. 
Butter or line with parchment paper an 8x12 pan (or 9x13). 

In a large bowl or mixer, blend well, making sure bananas are nicely mashed: 
2 overripe bananas
1/2 cup butter, softened (OR 1/4 cup butter + 1/4 cup oil)
1/4 cup sugar
1/4 cup brown sugar

Add and mix in: 
2 eggs
1/4 cup applesauce (no added sugar, cinnamon applesauce works well, too)
1 tsp vanilla extract

Add in, stirring well until combined: 
1 cup Kristin's Gluten-Free Flour Mix (OR 1 cup GF flour of your choice + 1/4 tsp xanthan gum)
1/2 cup whole oats (make sure they're gluten-free if Celiac or sensitive)
1 tsp baking soda
1 tsp salt

Add in, stirring to evenly distribute: 
1/2 - 1 cup dark and/or semi-sweet chocolate chips 

Spread in a thin layer in prepared pan.  
Ready to bake!

Bake at 350 F for 20-24 minutes, until nicely golden browned on top.  Let cool (at least a little bit), slice and enjoy!  
Fresh from the oven - they end up looking such a nice golden brown.

These never cool completely before we taste-test them.  They last well for a couple days on the counter in a closed container.  You can also slice and freeze extras.  

Mmm... 

Sliced and ready to eat!  Love them warm. 

Banana Chocolate Chip Bars Recipe by Successfully Gluten Free!

Friday 7 August 2020

Chocolate Crepes

These are a delicous chocolate dessert version of my favorite crepes.   If you're needing to serve a crowd, you can easily double or triple this recipe.   If you're looking for the opposite of a dessert crepe, try either my hearty buckwheat crepes or my regular favorite crepe recipe, great for savory or sweet fillings.  We love filling these yummy chocolate crepes with whipped cream and bananas or strawberries.  Or, you can us a bit of homemade vanilla pudding or homemade chocolate pudding with your fruit.  Add a drizzle of homemade chocolate fudge saucehomemade caramel sauce, or sauce of your choice for a special treat.  Enjoy!  
Gluten Free Chocolate Crepes
Fresh chocolate GF crepe served with banana, pudding and whipped cream (I'd say put it inside - we did for all the others) and drizzle with chocolate sauce. 
Chocolate Gluten Free Crepes
Freshly made Chocolate Crepes. Yum!

Chocolate Crepes

Makes ~6-7  10" crepes

In a large bowl, use a stick blender to combine the following: 
1 cup milk
1/3 cup cold water
2 eggs
1/4 cup cornstarch
1/4 cup arrowroot starch
1/4 cup brown rice flour
1/4 cup cocoa powder
2 Tbsp sugar
1/4 tsp baking soda
1/4 tsp salt
1/2 - 1 tsp cinnamon OR 2 tsp orange zest (Optional)

Add and blend again until smooth: 
2 Tbsp melted butter
Crepe batter, ready to cook!

Place crepe pan over medium-high heat.  Allow it to heat well before cooking your crepes. 

Spoon batter onto heated crepe pan, lifted the pan and swirling quickly to spread the crepes evenly and thinly.  You can quickly add a little extra if there are spots that didn't get filled well.  Cook thin crepes over medium-high heat until the visible batter is dry.  I find these need just an extra 20-30 seconds more than my favorite regular crepes recipe before flipping.  Run a spatula around the edge of the pan before quickly flipping over your crepe. Allow it to cook another minute before removing to a large plate.   

Repeat with batter until finished. 
Let swirl to spread evenly around the pan.  You want to allow the batter to dry out before flipping.  Here it's starting to dry out in the center and still wet toward the edges.
Just flipped - just needs a brief cooking on this latter side.  

These are wonderful served with homemade vanilla pudding or whipped cream, bananas and chocolate sauce drizzled on top.  You could also serve them with strawberries, or other fruit of your choice.  Cover leftovers in plastic wrap and refrigerate.  Warm briefly in a microwave or let rest at room temperature and they'll separate without problem.  Enjoy! 

Half a chocolate crepe filled with bananas, vanilla pudding, whipped cream, and topped with chocolate sauce. 

Chocolate Crepes Recipe by Successfully Gluten Free!