Search for a Recipe

Showing posts with label marshmallows. Show all posts

Wednesday, 20 December 2023

Homemade Gingerbread-flavored Marshmallows

These gingerbread flavored marshmallows got rave reviews from friends and family. They're so light and fluffy - as all yummy homemade marshmallows are - but the delicious gingerbread spices mixed in make it an extra special treat! Yum! Not in a gingerbread mood?  Try out Neapolitan flavored, s'more's marshmallows, chocolate covered marshmallows, or just plain-ol' vanilla marshmallows. Enjoy! 
Oops, snuck a bite! Yum!

Homemade Gingerbread-flavored Marshmallows

 
Butter 9x13 glass pan for larger square marshmallows OR butter cookie sheet for thinner marshmallows to cut into fancier shapes with buttered cookie cutters OR butter 9x13 pan and an 8x8 pan to make half thick, half thin marshmallows.
 
Combine in a mixer with whisk attachment:
½ cup cool water
3 pkg. (1/4 oz each) (This is about 2 1/2 Tbsp or 7 1/2 tsp) unflavored gelatin
 
In a small, deep saucepan, combine the following over medium heat. Cook, stirring, until syrup reaches 240F on a candy thermometer:
½ cup cool water
1 ½ cups sugar
1 cup light corn syrup
1/8 tsp. salt
 
I find heating to 240F takes ~20-30 minutes, and will go in phases of seeming not to increase in temperature to suddenly jump up 5-10 degrees.  So, make sure you’re paying attention, particularly at the end.
 
Showing the progression of sugar boiling.  It does bubble up a bit, but not too much.  Even so, I recommend using a pot that it the liquid will fill no more than halfway.
 
Remove from heat.  With mixer on low speed, slowly pour the sugar syrup into the softened gelatin.  Increase speed to high and whip until closer to room temperature, about 8-10 minutes. 
This is how the gelatin and boil-sugar mixture will look initially.
Keep whisking and it will fluff up and look like delicious marshmallow fluff.
 
While the marshmallow whips, mix together the following gingerbread spices to equal ~2 tsp total
1 tsp ground cinnamon
1/2 tsp ground ginger
1/4 tsp ground cloves
1/8 tsp nutmeg
1/8 tsp allspice
*make sure to mix together the spices first in a little bowl before adding to the pan, just to make sure you don't have lumps of any one spice.

Towards last 1-2 minutes of whipping, add in, scraping down occasionally: 
Gingerbread spices
1/2 - 1 tsp vanilla extract

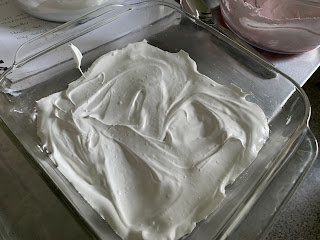
Use wet hands to smooth and flatten marshmallow into buttered pan(s).  
Gingerbread marshmallows - spread into a buttered pan

Optional decorating idea: As shown a couple photos in my regular marshmallow recipe, you can use food coloring (optional) on wet tops of marshmallows, swirling around for decoration.  If you want to add decorative sprinkles (optional), add them at this point.  

Sprinkle top of the pan with powdered sugar.  Let the marshmallows rest several hours at room temperature before cutting with a buttered knife or cookie cutter.  I find I need to re-butter the cookie cutters and knives every 3-4 cuts or they start to stick. 
Dusted with powdered sugar and resting.  This helps them dry out a bit before cutting. 

You’ll want to toss your marshmallows in powdered sugar to keep them from sticking together. You can either: 1. Place cut marshmallows aside on a piece of parchment paper sprinkled with powdered sugar, then toss in a large Ziploc with some powdered sugar; or 2. Place directly into a large Ziploc with powdered sugar once cut, and toss occasionally while you're cutting so marshmallows don’t stick together.  

Tossed with powdered sugar. 

Marshmallows are now ready to eat!  They can be stored in an air-tight container at room temperature for up to a couple weeks and will retain their freshness.  Enjoy!!! 
So light and fluffy and fun!   

Homemade Gingerbread-flavored Marshmallows Recipe by Successfully Gluten-Free! 


Monday, 12 June 2023

Rocky Road-style Brownies

 These yummy marshmallow chocolate chunk brownies are so delicious.  They always end up looking entertaining because of the marshmallows, so we sometimes call them "bumpy brownies".  This recipe is an update on the marshmallow brownies recipe I posted years ago.  This one lowers the sugar a bit, adds chunks of chocolate, and you have the option to add some chopped nuts, if you like, for a true rocky road brownie!  Unfortunately, worsening allergies to nuts means I don't get to do that anymore at our house, but it would be a delicious addition if you like nuts.  Enjoy! 
Yummy Bumpy Rocky Road-Style Gluten-Free Brownies! They're so funny looking, but the taste is amazing!
Make sure these are fully cooled before serving.  Patience is needed!

Rocky Road-style Brownies

Preheat oven to 350 F.  Line an 8" x 12" (quarter-sized) baking sheet or 9" x 13" baking dish with parchment paper.  Butter any edges that aren't covered by parchment.  

In a large, microwave-safe bowl, melt in 30 second increments at 50% power until melted, stirring every 30 seconds: 
100 g/3.5 oz dark chocolate (I've made this many times with many different types of dark chocolate - the type of dark chocolate will affect the final outcome - sometimes it'll be more gooey, sometimes more puffy - all delicious. Enjoy experimenting! I love using the Guittard dark chips.) 
1/2 cup butter

Once fully melted, add and mix in: 
1 cup sugar
1/3 cup cocoa powder

Add and stir in: 
2 eggs

Fold in evenly: 
75 g/2.5 oz mini marshmallows
1/2 cup milk, semi-sweet or dark chocolate chips
1/4 cup diced nuts, optional (I leave out bc of allergies, but it would make it into a proper rockyroad brownie - use your favorite nut - almond, cashew, walnut, pecan, peanut)

Mixed and ready to put in the pan.
Don't worry about perfectly spreading these into the pan - they'll spread as they bake.

Spread gently into prepared pan. Bake at 350 F for 20 minutes.  Remove from heat and let cool in pan on a wire rack.  While still warm, but not hot, carefully slice the brownies.  (This isn't necessary, but it is a bit easier to cut while they're still warm bc of the marshmallow).  Wait until fully COOL to serve.  Enjoy! 
Fresh from the oven! They never look the same way twice. So fun! 

Rocky Road-Style Brownies Recipe by Successfully Gluten Free!

Monday, 13 June 2022

Homemade Neapolitan Marshmallows!

 The fun medley of vanilla, chocolate and strawberry in ice cream was a childhood favorite.  Imagine my surprise when I discovered that using freeze-dried strawberries ground up and sifted in marshmallows adds the perfect strawberry flavor to make a strawberry layer in a Neapolitan marshmallow!  If you don't want to make SO many jut Neapolitan marshmallows, you can use half the marshmallow to make some homemade GF s'mores marshmallows and just use half the strawberry and cocoa powder for your Neapolitan layers.  
Some of the yummiest marshmallows I've ever tasted in my life!

Homemade Neapolitan Marshmallows!

Butter a 9x13 glass pan OR butter two 8x8 pans 

Combine in a mixer with whisk attachment:
½ cup cool water
3 pkg. (1/4 oz each) (This is about 2 1/2 Tbsp or 7 1/2 tsp) unflavored gelatin
 
In a small, deep saucepan, combine the following over medium heat.  Make sure the liquid fills no more than 1/2 of your pan because it will bubble up while heating. Cook, stirring regularly, until syrup reaches 240 F on a candy thermometer:
½ cup cool water
1 ½ cups sugar
1 cup light corn syrup
1/8 tsp. salt
 
I find heating to 240F takes ~20-30 minutes, and will go in phases of seeming not to increase in temperature to suddenly jump up 5-10 degrees.  So, make sure you’re paying attention, particularly at the end.

Remove your hot sugar from heat.  With the mixer on low speed, slowly pour the sugar syrup into the softened gelatin.  Increase speed to high and whip until closer to room temperature, about 8-10 minutes. After a few minutes, it will start looking like marshmallow!  
 
Towards the end add and beat in:
1 tsp vanilla bean paste OR vanilla extract

Remove 1/3 of the marshmallow and spread in your buttered pan, using lightly dampened hands to spread evenly.  
A layer of vanilla in an 8x8 pan

Remove 1/3 of the marshmallow into a separate bowl and mix in: 
1/4 - 1/3 cup sifted crushed freeze-dried strawberries (I like to prep this while the marshmallow is mixing/cooling)

Spread the strawberry layer on top of your vanilla layer, using lightly dampened hands to spread evenly.  
Adding the strawberry layer.  This definitely looked a bit more pink in person.  If you want it darker pink, you can always add a drop of food coloring with your freeze-dried strawberries. 

In your mixer, add and whisk in to make your chocolate layer: 
2 - 4 Tbsp cocoa powder

Spread your chocolate layer on top of the strawberry layer, using lightly dampened hands to spread evenly.  
The chocolate was last to be added.  

Sprinkle the top of your marshmallows generously with powdered sugar.   Let them sit 3-4 hours at room temperature to dry.  Use a buttered knife to slice the marshmallows (reapply butter, as needed).  Toss them gently in powdered sugar to coat evenly.   
Don't worry if the edges aren't perfect!  Here's a side-view of the three layers of marshmallows, topped with powdered sugar and left to dry for a few hours.  

Marshmallows are now ready to eat!  They can be stored in an air-tight container at room temperature for up to a couple weeks and will retain their freshness.  Enjoy!!! 
A bite out of a freshly made Neapolitan marshmallow! Yum!

Homemade Neapolitan Marshmallows Recipe by Successfully Gluten Free!

Wednesday, 30 March 2022

Homemade S'mores Marshmallows!

 I have been making homemade marshmallows for many, many years now, but I somehow never manage to post some of the more fun varieties.  This is SUCH a fun and easy one to make.  A huge hit with everyone who was lucky enough to eat one (or two, or three).  Enjoy! 
A bite taken out of a freshly made s'mores marshmallow. Yum!
Chocolate swirled marshmallows, ready to be topped with more crushed GF graham crackers.

Homemade S'mores Marshmallows!

Butter a 9x13 glass pan OR butter two 8x8 pans.  Sprinkle the bottom of the pan(s) with a layer of: 
GF graham crackers, crushed
Just one of the 8 x 8 pans buttered and lined with crushed GF graham crackers

Combine in a mixer with whisk attachment:
½ cup cool water
3 pkg. (1/4 oz each) (This is about 2 1/2 Tbsp or 7 1/2 tsp) unflavored gelatin
 
In a small, deep saucepan, combine the following over medium heat.  Make sure the liquid fills no more than 1/2 of your pan because it will bubble up while heating. Cook, stirring regularly, until syrup reaches 240 F on a candy thermometer:
½ cup cool water
1 ½ cups sugar
1 cup light corn syrup
1/8 tsp. salt
 
I find heating to 240F takes ~20-30 minutes, and will go in phases of seeming not to increase in temperature to suddenly jump up 5-10 degrees.  So, make sure you’re paying attention, particularly at the end.

Remove your hot sugar from heat.  With the mixer on low speed, slowly pour the sugar syrup into the softened gelatin.  Increase speed to high and whip until closer to room temperature, about 8-10 minutes. After a few minutes, it will start looking like marshmallow!  
 
Towards the end add and beat in:
1 tsp vanilla bean paste OR vanilla extract

Gently fold in - some will melt and swirl, but enough should remain un-melted so you have a nice blend in your marshmallows:
1/2 - 1 cup mini semi-sweet chocolate chips

Spread gently on top of your crushed graham cracker in your prepared pan.  Use slightly dampened hands (wet them again as needed) to spread your marshmallow evenly.   Sprinkle the top of the marshmallows with additional crushed GF graham crackers.  
Pressed in the pan, smoothed, and ready for topping. 
Topped with crushed graham cracker, and left to dry for a few hours.  Yum!

Let your marshmallows sit at room temperature for 3 - 4 hours to dry.  Slice, using a well buttered knife, buttering again as needed.  Roll your freshly sliced marshmallows in more crushed GF graham crackers.  Store extras in an air-tight container.  They will retain their freshness for 1 - 2 weeks (I couldn't tell you if they last longer because they've never made it past two weeks).  Enjoy! 

Homemade S'mores Marshmallow Recipe by Successfully Gluten Free!

Saturday, 30 November 2019

Chocolate Covered Homemade Marshmallows

Well, these may be bunny molds here, but you better believe these yummy chocolate covered homemade marshmallows will be getting made again for Christmas!  The homemade melt-in-your-mouth marshmallow is perfect coated in a crisp chocolate shell.  Special occasions only, in my opinion. ;) Perfect for gifts or a party!  Enjoy!
Gluten Free Chocolate Covered Homemade Marshmallows
A bite out of a delicious, fresh, homemade marshmallow-filled chocolate bunny.  Yum! 

Chocolate Covered Homemade Marshmallows


Temper your chocolate, as instructed here, and fill 2-3 silicon or plastic chocolate molds with tempered chocolate.  I used a 54% bittersweet chocolate for these chocolates here. 
Chocolate-filled molds

While chocolate sets, prepare your marshmallow (this is 1/2 a batch of my regular homemade marshmallow recipe):

Combine in a mixer with whisk attachment:
1/4 cup cool water
1 pkg. + 1/2 pkg. (1/4 oz each) unflavored gelatin

In a small, deep saucepan, combine the following over medium heat. Cook, stirring, until syrup reaches 238 F - 240 F on a candy thermometer:
1/4 cup cool water
3/4 cups sugar
1/2 cup light corn syrup
pinch salt
*Note: I find heating to 240 F takes ~20-30 minutes, and will go in phases of seeming not to increase in temperature to suddenly jump up 5-10 degrees.  So, make sure you’re paying attention, particularly towards the end.

Remove from heat.  With mixer on low speed, slowly pour the sugar syrup into the softened gelatin.  Increase speed to high and whip until closer to room temperature, about 8-10 minutes. 
This is how the gelatin and boil-sugar mixture will look initially.
Keep whisking and it will fluff up and look like delicious marshmallow fluff.
When there's about 2-3 minutes left for the mixing, add:
1/2 tsp vanilla

The mixing will have cooled the marshmallow down quite a bit.  You do not want this to be really hot while you are piping into your chocolate molds, or you'll melt the chocolate and ruin the temper.  However, I found that by the time it beat for 10 minutes and I placed it into a bag for piping, it had cooled down sufficiently.  

Using a couple small piping bags, fill with marshmallow and cut a small corner off the bag.  Pipe carefully into the molds, filling edges and corners first before filling the rest of the mold.  You can dip your finger in some water to flatten/fix the marshmallow before it cools too much to adjust.  However, you want to use VERY little water, because you are working with chocolate.  You want to avoid the water touching the chocolate.  
Marshmallow carefully piped into the chocolate molds.

Let the marshmallows rest at room temperature 30-60 minutes, to dry out a bit before melting and topping with chocolate.  (You can temper this chocolate, if desired, or just melt and pipe.  I usually do this and don't worry about the bottoms looking as nice as the tops or being as nice and crisp.)  

Once the chocolate has set (you can place it in the refrigerator to help it set), tap out or un-mold the marshmallow-filled chocolates.  These stay nice and fresh tasting for a couple weeks, if they can last that long. (I wouldn't know if they are fresh beyond that point since we've never managed to have any survive past two weeks).  Enjoy! 
Freshly tapped out marshmallow-filled bunnies. Yummmm... 
For a laugh - I tried to pipe homemade peeps, rolling them in colored sugar.  Unfortunately, I didn't actually look at a picture of a peep before piping these, so I ended up with mutant ghost peeps.
They actually tasted A-MAZING - despite looking absolutely horrible.  I don't normally like the sugar covered marshmallows.


Chocolate Covered Homemade Marshmallows Recipe by Successfully Gluten Free!


Friday, 22 November 2013

Homemade Marshmallows

Homemade marshmallows are wonderfully delicious.  The wonderful thing about this recipe is that it is so versatile. You can make big fat marshmallows, or smaller marshmallows, or cut marshmallows into festive shapes.  You can decorate the tops with colored swirls or sprinkles.  And, you can even flavor the marshmallows!  My favorite part is ending up with scraps of marshmallows, which are fun to eat, pop in hot chocolate, AND work perfectly in recipes calling for marshmallows, like my amazing marshmallow brownies.  Yum!  You will need a mixer with a whisk attachment and a candy thermometer for this recipe.  Enjoy!

Marshmallows cut in shapes in hot chocolate. You can just make square marshmallows, too.

Homemade Marshmallows

 
Butter 9x13 glass pan for larger square marshmallows OR butter cookie sheet for thinner marshmallows to cut into fancier shapes OR butter 9x13 pan and an 8x8 pan to make half thick, half thin marshmallows.
 
Combine in a mixer with whisk attachment:
½ cup cool water
3 pkg. (1/4 oz each) unflavored gelatin
 
In a small, deep saucepan, combine the following over medium heat. Cook, stirring, until syrup reaches 240F on a candy thermometer:
½ cup cool water
1 ½ cups sugar
1 cup light corn syrup
1/8 tsp. salt
 
I find heating to 240F takes ~20-30 minutes, and will go in phases of seeming not to increase in temperature to suddenly jump up 5-10 degrees.  So, make sure you’re paying attention, particularly at the end.
 
Showing the progression of sugar boiling.  It does bubble up a bit, but not too much.  Even so, I recommend using a pot that it the liquid will fill no more than halfway.
 
Remove from heat.  With mixer on low speed, slowly pour the sugar syrup into the softened gelatin.  Increase speed to high and whip until closer to room temperature, about 8-10 minutes. 
This is how the gelatin and boil-sugar mixture will look initially.
Keep whisking and it will fluff up and look like delicious marshmallow fluff.
 
Towards the end, add flavorings, such as:
Add:
1 tsp vanilla
Or (other options):
Peppermint candies, a few drops peppermint oil or peppermint extract, a few drops other flavoring, food coloring (if you want a different color), a few drops fruit-flavored oils (the kind used to flavor candy) or flavored extracts
 
Use wet hands to smooth and flatten marshmallow into greased pan or pans.  You can use food coloring (optional) on wet top, swirling around for decoration.  If you want to add decorative sprinkles (optional), add them at this point.  Sprinkle top with powdered sugar.  Let sit several hours before cutting with a greased knife or cookie cutter.  I find I need to re-butter the cookie cutters every 3-4 cuts or they start to stick. 

You’ll want to toss your marshmallows in powdered sugar to keep them from sticking together. You can either: 1. Place cut marshmallows aside on a piece of parchment paper sprinkled with powdered sugar, then toss in a large Ziploc with some powdered sugar; or 2. Place directly into a large Ziploc with powdered sugar once cut, and toss occasionally while you're cutting so marshmallows don’t stick together.    

In this batch, I made one 9x13 pan and one 8x8 pan, so I could cut thinner, shaped marshmallows (pictured below) and cut some larger square marshmallows (which I later dipped in chocolate).
Using a buttered cookie cutter, it's easy to cut marshmallows into fun shapes.
I cut stars, gingerbread men, and candy-cane shapes and packaged them up for the school's Christmas bake sale.  There is, of course, some extra marshmallow in the pan after cutting out the shapes.  I chopped it up into hap-hazardly shaped pieces and used it in one of our favorite recipes - my amazing marshmallow brownies!
 
These are some square-cut marshmallows I made at a different time.  I put on a bit of red food coloring after flattening the marshmallows with wet hands, and swirled it around.  I then put on colored sprinkles.  Finally, I sprinkled the top with powdered sugar and let sit a few hours before cutting, tossing in a bit more powdered sugar, and popping into bags.
 
Enjoy!!!
Another picture of our hot chocolate fun!

 Homemade Marshmallows Recipe by Successfully Gluten Free!