Search for a Recipe

Showing posts with label lemon. Show all posts

Monday, 23 September 2024

GF Light & Fluffy Lemon & Blueberry Muffins

 We seem to go through a lot of muffins around here. They're a favorite. Everyone loves muffins for breakfast, lunch, dinner, or snack-time. These lovely lemon and blueberry muffins are based off one of my favorite light and fluffy lemon or lemon-poppyseed muffins.  Quite a lot of the time, the types of muffins I end up making are directly influenced by what fruits and vegetables I happen to have in the refrigerator needing to be used. In this case - some lemons and blueberries. Enjoy! 

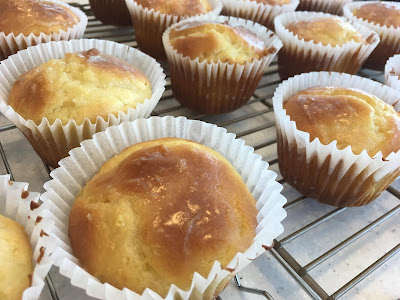
Lemon & Blueberry Muffins, fresh from the oven. Yum!

Light & Fluffy Lemon & Blueberry Muffins

Makes 24 muffins

Preheat oven to 350 F.  Line tins with paper liners.

In a mixing bowl, whisk together:
1 cup brown rice flour
3/4 cup white rice flour
1/4 c + 2 Tbsp arrowroot starch OR cornstarch
1/4 cup potato starch
1/4 cup tapioca starch
1 1/2 tsp xanthan gum
1 tsp salt
1 Tbsp baking powder
2 tsp baking soda

Add and beat 2-3 minutes until nice and smooth:
4 eggs
2/3 cup sour cream
2/3 cup milk
1 cup sugar 
1 cup butter, softened
1/4 cup lemon juice
2 Tbsp packed lemon zest (and/or 5 drops lemon essential oil)

Mix into batter:
1 - 1/2 cup fresh blueberries
Batter ready to put into muffin tins!
Divide batter into prepared muffin cups.
I like to use a really large size cookie scoop to divide up the batter.

Sprinkle the tops of the muffins with: 
~1 Tbsp granulated sugar
I fine this adds just a touch of caramelized sweetness 

Bake muffins at 350 F for 18-20 minutes until golden brown on top.  Let rest in tins a few minutes before removing to wire racks to cool.  These are wonderful hot or cooled on the day of baking. I like to put leave a handful of muffins in a tupperware on the counter for any that will be eaten within a day and reheat 15 second in the microwave before serving.  The remaining I put in a ziploc freezer bag and freeze for later. Enjoy! 
This recipe made 24 muffins. 

GF Light & Fluffy Lemon & Blueberry Muffins Recipe by Successfully Gluten Free!

Sunday, 7 July 2024

Crispy Lemon Cookies!

 These yummy crispy lemon cookies are a request from my dad - and what a perfect summertime request they are! They're lovely and light. And leftovers freeze perfectly, for little treats anytime! 
Enjoy! 
Delicious crispy lemon cookies - cook to a slightly darker brown for a crispier cookie. These had a slight softness to the center. 
I recommend at least this brown, but add an extra minute or two for a fully crispy cookie. 

Crispy Gluten-Free Lemon Cookies!

Makes ~36-45 (depends on size of your scoops)

Preheat oven to 375 F. 

In a large bowl, whisk together the dry ingredients (it's important to do this in GF baking to avoid clumping):
1 cup white rice flour
1/4 - 1/2 tsp xanthan gum
1/2 tsp baking powder
1/2 tsp salt

In a mixer, beat until light and fluffy:
1/2 cup butter, softened
3/4 cup white sugar

Add and mix in until thoroughly combined and still light and fluffy: 
2 egg whites
zest 2 lemons
1 tsp milk (you may need a little extra if you find your cookies don't spread as much as you like)
3-6 drops lemon essential oil
Light and fluffy wet ingredients, ready to mix in the dry ingredients.

Add and mix in dry ingredients, just until combined.  Scoop small Tbsp size scoops onto the pan. You can flatten a bit, if desired, for a slightly wider cookie.  
Small scoops - these do spread when baking - and you can flatten a bit before baking for thinner & wider cookies. 

Bake at 375 F for ~10 minutes, or until a nice light golden brown.  For less crispy cookies, they can be a bit pale on top and browned on the edges, and for a crispier cookie, cook an extra couple minutes until nicely light browned on top. 
Fresh from the oven - these are a lighter brown, so end up with a slight softness left in the center, but are wonderfully crispy around all the edges. Cook til fully light browned on top for a crispier overall lemon cookie. 
Cooling on the cooling rack - with one flipped over to show the light browned bottom. I recommend at least this brown, if not a bit darker for a crispier cookie. 

Let rest a minute or two before removing to cooling racks to fully cool.  Leftovers store perfectly in the freezer!  These lemon cookies are great on their own, or served with homemade lemon curd or ice cream. Enjoy!

Crispy Lemon Cookies Recipe by Successfully Gluten Free!

Monday, 29 April 2024

Light Lemon Sponge with Lemon Curd

When I sent my brother a photo of this dessert, he told me the fried egg looked delicious on top of the cake.  Okay, yes, with the runny, not quite chilled lemon curd it does look like this if you're too impatient to wait for it to chill - but it was delicious! A lovely light sponge topped with whipped cream and homemade lemon curd. And served with strawberries. Enjoy!
A yummy serving of Lemon Sponge cake!

Light Lemon Sponge with Lemon Curd

I recommend making the lemon curd filling first, since it seems to take the longest time to chill.  However, you can speed up the chilling of the curd.  I'll explain how after the recipe.  You also can serve the lemon curd warm, which is tasty, too! 

Lemon Curd:

In a medium saucepan, whisk together:
zest from 2 lemons
juice from 2 lemons (~1/2 cup, make sure to strain for seeds)
2/3 cup water
3/4 cup white sugar
3 Tbsp cornstarch

Heat over medium heat, stirring regularly with a whisk.  Once mixture comes to a boil and has thickened a bit, let boil 1 minute.  Then add and boil 1 additional minute:
2 egg yolks
1 1/2 Tbsp salted butter

Pour the curd into a large bowl.  Cover tightly with plastic wrap.  You can chill in the refrigerator OR, place your bowl into a bowl of ice.  You can fill a freezer ziploc with ice to place on top of the plastic wrap, too, to speed up the chilling.  I use this method when I'm short on time.

Lemon Sponge Cake

Preheat oven to 350 F. Line 2 quarter size baking pans (these are ~9" x 13" metal baking pans) with parchment paper.  If you don't have this size baking pan, you can use one large baking pan. I just find that if they aren't perfectly flat, they will result in uneven baking. 

Divide 6 eggs

Beat until stiff peaks: 
6 egg whites
3 Tbsp sugar
Egg whites & sugar, whisked until stiff peaks. 

In a large bowl, whisk together: 
3 egg yolks
1 cup milk
1/2 cup oil
1/2 tsp vanilla extract or bean paste
zest 2 lemons
10 drops lemon essential oil
1/2 cup coconut flour
1/2 cup white rice flour
3/4 cup sugar
1/2 tsp salt
1/2 tsp baking soda
Lemon batter mixture, ready to fold in the egg whites from above.

The next part needs to be done gently, so you don't lost the height from your egg whites. Fold 1/3 of your egg white mixture into the lemon batter.  Then fold the remaining egg white mixture, trying not to loose much height. 

Gently divide into your prepared pans.  Bake at 350 F for 15 - 18 minutes, until a light golden brown.  Rest a few minutes then flip onto cooling rack.  
Lemon sponges, ready for baking!
Fresh from the oven.
Since these get topped, I didn't worry about just flipping them facedown on the cooling rack. 

Whipping Cream

Whisk together until thick: 
1 cup heavy whipping cream
2 - 3 Tbsp powdered sugar

To serve, you can cut squares of cake and top with a dollop of whipped cream, a spoonful of lemon curd, and repeat - if you'd like a second layer.  Lovely served with sliced strawberries alongside. 

Enjoy! 
My youngest loves assembling and plating food. She was so excited to put these together. 
My girls loved serving these up. 
Yum!

Light Lemon Sponge with Lemon Curd Recipe by Successfully Gluten Free!


Thursday, 17 August 2023

Lemon Loaf (Mini or large size GF lemon bread loaves)

 My youngest loves planning baking experiments with me.  We saw GF lemon loaf in the freezer at the grocery store, and decided to grab ourselves two fresh lemons and whip up our own loaves!  Then we loved it so much, we made it again... then again.  You can make them as two large loaves or 6 mini loaves. Personally, I love the mini loaves, but both are great. Yum! Absolutely delicious! And we added a little lemon glaze to the top which is just lovely. Enjoy!
A tasty slice of GF lemon loaf
Large lemon loaves, glazed and ready to eat!
My mini-me -  mixing together the glaze on top.

Lemon Loaf (mini or large size GF lemon bread loaves)

Makes 2 large or 6 mini loaves

Preheat oven to 350 F.  Line bread pans with parchment paper. 

In a mixer, combine: 
1 cup brown rice flour
3/4 cup white rice flour
1/3 cup arrowroot starch (or cornstarch)
1/4 cup tapioca starch
1/4 cup potato starch
1 1/2 tsp xanthan gum
1 tsp salt
1 Tbsp baking powder
2 tsp baking soda

Add and beat slowly, then increase speed to medium/medium-fast for 3 minutes: 
1 cup butter, softened
3/4 cup sugar
2/3 cup milk
2/3 cup sour cream
4 eggs
1/4 cup fresh lemon juice
zest 1 lemon
3 drops lemon essential oil (or extra Tbsp of lemon zest)
Batter is ready to fill the pans!  She was so excited to help make this yummy bread.

Divide between 2 large bread loaf pans or 6 mini loaf pans lined with parchment paper.  Bake at 350 F for 30 minutes for mini loaves and 45 minutes for large loaves.   Remove from oven and mix together glaze while your loaves sit 3-5 minutes in pan. 
I usually fill the pans ~2/3 full.  Here are the large loaf pans before baking.
And the large loaves after baking! They smell delicious!
Mini loaves after baking.
Mix together glaze:
1/2 cup powdered sugar
2 Tbsp fresh lemon juice
zest 1 lemon 

Remove parchment paper and loaves from pan, *keeping parchment paper underneath each loaf to help catch excess glaze.  Spoon and spared glaze over each loaf.  Enjoy warm or cooled.  Cool loaves can be sliced and either refrigerated or sliced and frozen for later!

Large loaves, glazed and parchment paper under to catch any excess glaze.
Mini loaves, being glazed - I like to leave the parchment to help catch excess glaze.
A large loaf sliced.
We served the mini loaf slices with fresh strawberries. Yum!

Lemon Loaf (mini or large size GF lemon bread loaves) recipe by Successfully Gluten Free!


Tuesday, 18 February 2020

Lemon or Lemon Poppy seed Muffins

My talented friend Christina has created some absolutely delicious recipes, and this is one of them!  These gluten free lemon (or lemon poppy seed) muffins are SO light and fluffy.  I adjusted this recipe below when I made the light & fluffy orange muffins and chocolate chocolate chip muffins recipes.  Here's the original - perfect when you need a bite of citrus during those winter months. Enjoy!

Gluten Free Lemon and Lemon Poppyseed Muffin Recipe
Yummy Lemon Muffins - these are delicious with or without poppy seeds. 

Lemon or Lemon Poppy seed Muffins

Based on the recipe by my amazing friend, Christina Hansen! You're awesome!
Makes 24 muffins

Preheat oven to 350 F.  Line tins with paper liners OR spray with GF nonstick cooking spray.

In a mixing bowl, whisk together:
1 cup brown rice flour
3/4 cup white rice flour
1/4 c + 2 Tbsp arrowroot starch OR cornstarch
1/4 cup potato starch
1/4 cup tapioca starch
1 1/2 tsp xanthan gum
1 tsp salt
1 Tbsp baking powder
2 tsp baking soda
2 Tbsp poppy seeds (optional)

Add and beat 2-3 minutes until nice and smooth, using whisk attachments:
4 eggs
2/3 cup sour cream
2/3 cup milk
1 - 1 1/2 cup sugar (They're more of a dessert if you add the extra sugar, but I like it with less)
1 cup butter, softened
1/4 cup lemon juice
2 Tbsp packed lemon zest (OR 5 drops lemon essential oil)

Divide into prepared muffin cups.  If you have concerns about your muffins sinking in the middle, you can let the batter rest in the muffin tins for 20 minutes before baking.  I've tried it both ways and never had issues, but I do find they rise a little extra if you've let them rest before baking.   Bake muffins at 350 F for 15-20 minutes until golden brown on top.

Just out of the oven - I like them to be this nice golden brown.  Once on the cooling rack, you can glaze, if desired. 

While muffins are still warm/hot, whisk together and glaze over the top of the muffins:
1/2 cup powdered sugar
2 Tbsp fresh lemon juice
zest 1 lemon

Freshly glazed lemon muffins, ready to eat! Yum!

Lemon Or Lemon Poppy seed Muffins Recipe - Successfully Gluten Free!

Sunday, 11 August 2019

Lemon Cake with Homemade Lemon Curd Filling!

Yummy lemon cake - filled with delicious, homemade lemon curd!  I had a little bowl of leftover  lemon curd that kept having spoonfuls disappear from it each day after making this cake.  The cake is small, only 6" in diameter, but with three layers and packed with flavor, a little goes a long way.  We'll definitely be making this again!  Enjoy!
A slice of yummy lemon cake filled with lemon curd! 
Packed with flavor, this 6" cake is perfect for a summer birthday party!  I slapped the icing on as fast as humanly possible with the help of a five year old.  Still delicious! 

Lemon Cake with Homemade Lemon Curd Filling (Gluten Free)

Makes three 6" round layered cake.

I recommend making the lemon curd filling first, since it seems to take the longest time to chill.  However, you can speed up the chilling of the curd.  I'll explain how after the recipe. 

Lemon Curd:

In a medium saucepan, whisk together:
zest from 2 lemons
juice from 2 lemons (~1/2 cup, make sure to strain for seeds)
2/3 cup water
3/4 cup white sugar
3 Tbsp cornstarch

Heat over medium heat, stirring regularly with a whisk.  Once mixture comes to a boil and has thickened a bit, let boil 1 minute.  Then add and boil 1 additional minute:
2 egg yolks
1 1/2 Tbsp salted butter

Pour the curd into a large bowl.  Cover tightly with plastic wrap.  You can chill in the refrigerator OR, place your bowl into a bowl of ice.  You can fill a freezer ziploc with ice to place on top of the plastic wrap, too, to speed up the chilling.  I use this method when I'm short on time.

You can spread with a knife or place curd in a ziploc, snip the corner, and pipe onto your cake.  I prefer this method for even and easy spreading.
Homemade lemon curd after chilling, ready to place in a ziploc and pipe.

Lemon Cakes:

Preheat oven to 350 F.
Butter and line three 6" round pans with parchment paper.

Whisk together in a large bowl:
1/4 cup white rice flour
1/4 cup coconut flour
1/2 cup white sugar
1/4 tsp baking soda
1/4 tsp salt

Add and whisk until smooth:
1/2 cup milk (or milk substitute)
1/4 cup oil
1 tsp vanilla extract OR vanilla bean paste
3 eggs
5 drops lemon essential oil (I like the DoTerra lemon oil for cooking) (OR 2-3 drops oil + zest of 1 lemon)

Divide batter between the three 6" lined pans.  Bake 20 minutes, until lightly browned.  Let cakes rest 5 minutes before turning out onto a cooling rack to cool completely.

Quick & Easy Buttercream Icing:

In a mixer with whisk attachment, combine and whisk until light and fluffy:
1/2 cup butter, softened
2 cups powdered sugar
1/2 - 1 tsp vanilla extract OR vanilla bean paste
milk, add 1-2 tsp at a time until desired consistency.  
I usually find ~2-3 Tbsp of milk works great for a light and fluffy frosting. 

Layer your cakes as desired.  Ideally, pipe a circle of frosting around the edge of the bottom and middle circle of cake.  Pipe the lemon curd in the middle and gently layer the cakes.  It's best to chill now for an hour to help keep lemon curd from getting squished or leaking out at all.  Make a thin crumb coat of frosting on the sides and top of the cake.  Chill again for an hour or so.  Cover the cake with frosting.  I don't like to have too much frosting on a cake, so I try to keep the frosting to a minimum.
I tend to go for flavor over function sometimes.  I love the lemon curd, and so pipe a circle of frosting and fill with lemon curd on both layers.  To avoid curd squishing out from the bottom layer, you could flavor your frosting with a little lemon zest and lemon oil and then fill the bottom layer with a lemon frosting and the top layer with the curd.  

Keep the cake refrigerated until about an hour before serving.  Slice and serve!  We served it with homemade strawberry ice cream! Yum!
Lemon cake with Lemon Curd served with homemade strawberry ice cream.  We had a quadruple birthday party with extended family, so I used the sunshine muffin batter cooked as cakes, then filled with a cream cheese frosting for the second cake.  Everyone got slivers of each.  A delicious summer treat! Yum! 

Gluten Free Lemon Cake with Homemade Lemon Curd Filling Recipe by Successfully Gluten Free!

Sunday, 26 May 2019

Beautiful Mini Lemon-Strawberry Cake

A tiny cake, but with a big impact.  A nice, light lemon cake with a simple strawberry jam filling, topped with colorful marshmallow fluff frosting.  You could even go simpler, and leave off the frosting.  Just sprinkle with a little powdered sugar before serving.  This was lovely for Mother's Day!
It looks humongous in this picture, but this pretty cake is small and dainty - just 6" in diameter (a bit more with the frosting)
A lovely slice of strawberry-lemon cake, perfect for any celebration.

Beautiful Mini Lemon-Strawberry Cake - gluten free!

Makes one 6" cake with three layers

Jam: 
If you're making homemade jam, make it first so it can cool.  A high-quality store bought jam will work well, too.  For this cake, I made the following and used it to layer the cakes once it cooled.
In a small saucepan over medium heat, cook until starting to thicken (20-30 minutes):
~12 oz strawberries, washed, hulled, and finely diced
1/2 cup sugar
1/4 cup water

In a small bowl, mix together:
2-3 Tbsp cold water
2-3 Tbsp cornstarch

Slowly pour the cornstarch mixture into the strawberries, stirring constantly.  This will thicken up the jam nicely.  You can make this thinner or thicker, depending on your preference.  A thinner jam may run off the sides of your cake a bit.   
Pour thickened jam into a bowl and cover with plastic wrap to avoid a film forming on the top.  Let jam cool completely.   To speed this, you can place the bowl in a container of ice and put a baggie of ice on top of the plastic wrap.
Freshly made jam on the left, and speeding up the cooling process on the right.  Just make sure your bag of ice doesn't leak at all as the ice melts.

Lemon Cakes:
Preheat oven to 350 F.
Butter and line three 6" pans with parchment paper. I usually cut a circle for the bottom, then strips to line around the edges.

In a bowl, whisk together:
1/4 cup white rice flour
1/4 cup coconut flour
1/2 cup sugar
1/4 tsp baking soda
1/4 tsp salt
zest of 1 lemon

Add and whisk until smooth:
1/2 cup milk (lactose-free or dairy-free works great)
1/4 cup oil (I like avocado oil, but any light oil will work)
1 tsp vanilla
3 eggs
2 drops lemon essential oil (I like the DoTerra lemon oil for baking)

Divide batter between the three pans.  Bake at 350 F for about 14-16 minutes, until cakes are set in the middle.   Carefully remove from pans, removing parchment paper, too.  Let cool completely on a wire rack.
Lemon cakes, cooling.
Frosting: (this is the same as my favorite marshmallow frosting recipe)
In a mixer, beat together until light and fluffy (3-4 minutes):
1 cup butter, softened
2 1/2 cup powdered sugar
1 cup marshmallow fluff
1 tsp vanilla extract or vanilla bean paste


Assembling Cake: 
Once cooled, layer your cake with jam.  Then, spread a thin "crumb/jam" coating of frosting over the entire cake - this fills any holes and smooths out the sides.  Place the coated cake in the refrigerator to chill.
Layered with jam - you can see it was a bit runny, but it didn't make the cake soggy at all, so worked just fine! 
No problem if there are little bits of jam that end up sticking through, though it is best to try to get them covered up. After chilling and adding more frosting, this was completely hidden.

Divide the remaining frosting into four bowls.  Color the frosting, as desired.  I used a mixture of purple and pink coloring, adding amounts bit by bit using toothpicks, until I ended up with the colors I wanted.  (I left one as white, and the others shades of purple).  Place each color into a small, freezer ziploc (or icing bags).   Trim the corner off each to pipe.
Four bags of frosting in freezer Ziplocs - I find the freezer Ziplocs to be tough enough to squeeze without breaking while piping.  I've had issues with other styles.

Starting at the base of your cake, pipe 2-3 circles around the entire cake.  Use the back of a spoon to spread the frosting, flattening it a bit.  Pipe 2-3 circles of your next color.  Again, use the back of a spoon to spread the frosting.  Repeat with the final colors, until your cake is a beautiful gradient of color going up the cake to a pale top.  You'll end up with something that looks uniquely your own, but the gradual coloring changes make it so pretty.
You don't have to leave any frosting white -- you could make four colors, just make them complimentary, varying shades.  

I prefer this cake at room temperature, so the frosting stays soft, but you can always keep it in the refrigerator, removing it about 45 minutes - 1 hour before serving.   Enjoy!
Yummy, simple layers of lemon and strawberry! 

Gluten Free Mini Lemon Strawberry Cake Recipe by Successfully Gluten Free!