Search for a Recipe

Showing posts with label chocolates. Show all posts

Monday, 2 June 2025

Chocolate Hand-Dipped Banana Bites

These chocolate covered hand-dipped banana bites might be one of my favorite little frozen treats ever! I fell in love with chocolate covered frozen bananas as a kid - but I much prefer the chocolate-banana ratio of these yummy little slices.  Since I spend my life playing around with recipes and trying to simplify recipes that I make to make things faster, easier, and cleaner. These hand-dipped banana bites remove some of the mess from cleanup, since you can just dip them by hand.  (Yes, it's a bit cold on your fingers, sorry! Maybe grab someone to share the chocolate dipping with so your fingers don't freeze.) If you prefer to dip with forks, I still have my original banana bites recipe here. Enjoy!
Don't mind the missing slices - they were lost to quality control. These were dipped in milk and semi-sweet chocolate. Yum!
Dipped in a caramel and dark chocolate, these were popped out for a sweet treat.

Chocolate Hand-Dipped Banana Bites

You can make as much as you like, but I find 2-3 bananas per 10"x12" tray work well.

Use a small metal baking sheet for your banana bites. Line the baking sheet with parchment paper. 

Slice up in ½” slices and lay on parchment paper: 
2-3 nice, ripe yellow banana (not the overripe, spotted brown ones)

Pop that into the freezer, and allow to freeze completely (1-2 hrs at least, but you can leave it overnight).  I've forgotten I froze the banana slices and left them several days before - no problem!  

Use two types of chocolate for dipping. 
In two microwave safe bowls place: 
1/2 cup dark, semi-sweet, milk chocolate, caramel, OR white chocolate chips
1/2 - 3/4 tsp oil

Heat each bowl of chocolate at 50% power in the microwave for 60 seconds, stir, and then another 20-30 second increments until melted, stirring each time. 

Work quickly with the frozen banana.  If you feel like they're softening, return them to the freezer for 5 minutes to chill. 

Remove the frozen banana slices from the freezer.  You’ll want to use your fingers to pull them off the parchment paper, since they’ll stick a little. 

Dip each banana halfway in one type of chocolate, returning to the frozen parchment-lined pan immediately after dipping.  
Bananas dipped halfway in a delicious caramel chocolate. Ready to dip the other side! We think they look like little creatures dipped like this. hehe.

It's best to work quickly - or pop the bananas back in the freezer for 10 minutes before dipping the other side. Repeat, dipping each banana slice halfway in the second type of chocolate.  
Dipped in a dark chocolate on the second side.
A delicious combo of milk chocolate and semi-sweet chocolate for these banana slices. Yum!

The chocolate hardens quickly, so you can eat right away, or store in the freezer for later.  For storing, make sure you put the frozen dipped banana bites in a Tupperware or Ziploc in the freezer to retain the best taste.   Perfect for summer!!! 
A few bites for each person, ready to serve!
Extra chocolate?! No problem! Put those frozen cookies to good use and dip them in the extra melted chocolate. Dipped some triple chocolate cookies in a caramel chocolate. Scrumptious!

**I love using Callebaut chocolate chips for dipping.  They are a high quality chocolate and they give you the fluidity of the chocolate, which is helpful.  A 3/5 or 4/5 fluidity is the easier to work with for these. Their caramel chocolate is divine!** 

Chocolate Hand-Dipped Banana Bites Recipe by Successfully Gluten Free!

Saturday, 30 November 2019

Chocolate Covered Homemade Marshmallows

Well, these may be bunny molds here, but you better believe these yummy chocolate covered homemade marshmallows will be getting made again for Christmas!  The homemade melt-in-your-mouth marshmallow is perfect coated in a crisp chocolate shell.  Special occasions only, in my opinion. ;) Perfect for gifts or a party!  Enjoy!
Gluten Free Chocolate Covered Homemade Marshmallows
A bite out of a delicious, fresh, homemade marshmallow-filled chocolate bunny.  Yum! 

Chocolate Covered Homemade Marshmallows


Temper your chocolate, as instructed here, and fill 2-3 silicon or plastic chocolate molds with tempered chocolate.  I used a 54% bittersweet chocolate for these chocolates here. 
Chocolate-filled molds

While chocolate sets, prepare your marshmallow (this is 1/2 a batch of my regular homemade marshmallow recipe):

Combine in a mixer with whisk attachment:
1/4 cup cool water
1 pkg. + 1/2 pkg. (1/4 oz each) unflavored gelatin

In a small, deep saucepan, combine the following over medium heat. Cook, stirring, until syrup reaches 238 F - 240 F on a candy thermometer:
1/4 cup cool water
3/4 cups sugar
1/2 cup light corn syrup
pinch salt
*Note: I find heating to 240 F takes ~20-30 minutes, and will go in phases of seeming not to increase in temperature to suddenly jump up 5-10 degrees.  So, make sure you’re paying attention, particularly towards the end.

Remove from heat.  With mixer on low speed, slowly pour the sugar syrup into the softened gelatin.  Increase speed to high and whip until closer to room temperature, about 8-10 minutes. 
This is how the gelatin and boil-sugar mixture will look initially.
Keep whisking and it will fluff up and look like delicious marshmallow fluff.
When there's about 2-3 minutes left for the mixing, add:
1/2 tsp vanilla

The mixing will have cooled the marshmallow down quite a bit.  You do not want this to be really hot while you are piping into your chocolate molds, or you'll melt the chocolate and ruin the temper.  However, I found that by the time it beat for 10 minutes and I placed it into a bag for piping, it had cooled down sufficiently.  

Using a couple small piping bags, fill with marshmallow and cut a small corner off the bag.  Pipe carefully into the molds, filling edges and corners first before filling the rest of the mold.  You can dip your finger in some water to flatten/fix the marshmallow before it cools too much to adjust.  However, you want to use VERY little water, because you are working with chocolate.  You want to avoid the water touching the chocolate.  
Marshmallow carefully piped into the chocolate molds.

Let the marshmallows rest at room temperature 30-60 minutes, to dry out a bit before melting and topping with chocolate.  (You can temper this chocolate, if desired, or just melt and pipe.  I usually do this and don't worry about the bottoms looking as nice as the tops or being as nice and crisp.)  

Once the chocolate has set (you can place it in the refrigerator to help it set), tap out or un-mold the marshmallow-filled chocolates.  These stay nice and fresh tasting for a couple weeks, if they can last that long. (I wouldn't know if they are fresh beyond that point since we've never managed to have any survive past two weeks).  Enjoy! 
Freshly tapped out marshmallow-filled bunnies. Yummmm... 
For a laugh - I tried to pipe homemade peeps, rolling them in colored sugar.  Unfortunately, I didn't actually look at a picture of a peep before piping these, so I ended up with mutant ghost peeps.
They actually tasted A-MAZING - despite looking absolutely horrible.  I don't normally like the sugar covered marshmallows.


Chocolate Covered Homemade Marshmallows Recipe by Successfully Gluten Free!


Saturday, 8 December 2018

Coconut-Filled Chocolate Truffles!

These are some of my favorite winter chocolates to make. They're like a homemade mounds or bounty bar.  I love to temper my chocolate and make molded chocolates, but you can also roll and chill the filling to hand-dip it in chocolate, too!  These are a great given as gifts alone or combined with dark or milk chocolate truffles, chocolate covered homemade caramels, chocolate dipped orange or lemon peel (on of my all-time favorites!!!), gingerbread ganache truffles, raspberry dark chocolate ganache truffles, mint dark chocolate ganache truffles, or white chocolate ganache truffles.

Molds filled with coconut filling, with the bottoms being piped on.  Here there are milk chocolate (top and left) and semi-sweet chocolate (bottom right) being filled with coconut truffle filling! (I usually pipe chocolate around the edges and use a spoon to spread the chocolate evenly on the bottom of the truffles)
Delicious and beautiful molded truffles - coconut-filled are shown in hearts.

Coconut-Filled Chocolate Truffles - gluten free!

In a small blender or food processor, process until very fine:
1 1/3 cup sweetened flaked coconut

In a small frying pan, bring to a rolling boil over medium heat:
2 Tbsp heavy cream
2 tsp vanilla extract or vanilla bean paste

Remove from heat and add, stirring until chocolate is completely melted:
2 oz. white chocolate (chips or chopped finely)

Once chocolate has melted, stir in:
finely processed sweetened flaked coconut, from above

Let filling cool.
Fill molded chocolates, as you would with chocolate ganache or caramel filling.
OR
Make small balls or bars of filling and place on a parchment-paper lined pan.  Chill in the refrigerator or freezer until hard.  Hand-dip in chocolate, as desired.  

Tasty milk-chocolate molded truffles.

Gluten Free Coconut Filled Chocolate Truffles Recipe by Successfully Gluten Free!

Tuesday, 27 March 2018

White Chocolate Ganache

A beautiful, easy white chocolate ganache recipe, perfect for spring treats: beautiful cake topping, homemade chocolates, drizzled or smoothed for frosting over a cake or cupcakes, whipped and used as frosting.  I find, particularly for white chocolate, using a high quality chocolate is imperative if you want a good, clean texture for your ganache. I've previously posted how to properly temper chocolate for molded chocolates if you want to make molded chocolates, like the ones pictured here.  Enjoy!
Homemade white ganache truffles, decorated with edible glitter.

White Chocolate Ganache
This recipe has 3 uses:
1. Truffle filling
2. Poured while still warm (not hot) over cake to form smooth frosting
3. Cooled, then whipped and used as filling or frosting on cake.

Heat to boil over med-high heat:
1/4 cup + 2 Tbsp cream
1 Tbsp butter
3/4 tsp vanilla bean paste (preferred) OR vanilla extract

Remove from heat and add:
6 1/2 oz. high quality white chocolate

Stir gently until smooth.  For truffles, follow directions similar to dark or milk chocolate ganache.

Heart-shaped chocolate molds filled with white chocolate ganache.  Once the ganache has cooled, the final layer of chocolate can be spread over-top the ganache, cooled, and the chocolates can be knocked out.


Wednesday, 16 December 2015

Gingerbread Ganache Truffles

These were a very successful experiment I whipped up for my brother's gluten-free wedding reception.  They were so delicious, it's a miracle any made it out to be served.  These are a perfect truffle filling for winter.   The combination of flavors would also be great on top of a rich chocolate brownie.  I'll definitely be whipping these up again soon as part of my yearly assortment of chocolates for friends and teachers.  Enjoy!!!
Homemade Gingerbread Truffles
Gingerbread Truffles - inside molded dark chocolate with musical notes to decorate!

Gingerbread Ganache

In saucepan over medium heat combine:
1/4 cup heavy cream (whipping cream)
1/4 cup butter
1/2 tsp ground cinnamon
1/4 tsp ground ginger
1/8 tsp ground cloves
pinch nutmeg
pinch allspice optional
*mix together the spices first in a little bowl before adding to the pan, just to make sure you don't have lumps of any one spice.

Remove from heat and mix in until smooth:
4 oz semi-sweet chocolate OR 5 oz milk chocolate

You can use the ganache in a few ways:
1. Use warm over ice cream or brownies
2. Chill, then roll into balls, chill again, then dip in chocolate for truffles
3. Make molded chocolates - For the chocolates above, I made them by tempering chocolate and pouring into molds with musical note transfer sheets for decoration.   I poured out excess chocolate, then let the tempered chocolate set fully.  Then, I piped lukewarm (not hot) gingerbread ganache into each mold (cut the corner from a ziploc to do this easily).  Leave space at the top to cover with chocolate.  Let ganache rest to cool fully.  Cover ganache with a thin layer of chocolate to seal the top and bottom together, enrobing the ganache inside.  Let chocolates fully harden before banging on a counter to remove from mold.  

Wednesday, 25 November 2015

Mint Dark Chocolate Ganache

This is the last chocolate ganache recipe needed for the gluten-free wedding cake I made last December at the big gluten-free wedding reception I put together.  I'll be posting the wedding cake recipe in one week in honor of the 1 year anniversary of my brother and new sister's wedding!  But for now, you can think happy thoughts about mint chocolate ganache, which is, in my opinion, one of the tastiest kinds of ganache!  Enjoy!

Mint Dark Chocolate Ganache Truffles
Mint Dark Chocolate Ganache is perfect used in Molded Chocolate Truffles

Mint Dark Chocolate Ganache

Bring to boil over medium heat:
1/2 cup butter
1/2 cup heavy cream
5-6 fresh mint leaves (crushed in your hand before adding to pan to release oils) and/or 1-2 drops high quality peppermint essential oil (adjust to preference)

Once at a rolling boil, remove mint leaves.  Pour over:
8 oz high quality semi-sweet or dark chocolate

Mix thoroughly until smooth.
Optional: Add handful of crushed peppermint candy to ganache before using.

This recipe has 3 uses:
1. Truffle filling
2. Glaze on outside or middle filling layer in cake.
3. Cooled, then whipped and used as frosting (can be piped nicely once whipped).  

You can roll and dip truffles, too.  Then sprinkle with crushed peppermint for a nice finish.
Hand-dipped Mint Truffles in White Chocolate

Tuesday, 10 November 2015

Raspberry Dark Chocolate Ganache

A simple, and delicious raspberry chocolate ganache recipe.   This is delicious when used as a filling in cake, too!  The flowers on top aren't quite poppies, but close enough to seem appropriate to post close to Remembrance Day.  Enjoy!
GF Raspberry Dark Chocolate Ganache
A variety of truffles with ganache fillings.  The flower-topped chocolates have the raspberry dark chocolate ganache filling.  

Raspberry Dark Chocolate Ganache
For use in truffles or cake fillings

In a saucepan, bring to boil over medium heat:
1/2 cup butter
1/2 cup heavy cream
1/4 cup high quality raspberry jam (with or without seeds, depending on preference) (you can add a drop or two of raspberry flavoring, but I tend to prefer the taste of a high-quality jam). 

Remove from heat and pour over:
8 oz high quality semi-sweet or dark chocolate

Mix thoroughly until smooth.  You have two options:
1. Let cool slightly before using as fillings in molded chocolates OR as a rich filling in a cake.
OR
2. Let completely cool before rolling for round, dipped truffles OR whipping and using as filling for a cake.  

Tuesday, 6 January 2015

A Successfully Gluten-Free Wedding Reception!

This past December, I spent two weeks at my parents and nana's house whipping together a dessert-themed wedding reception for my brother Mike and his lovely bride Amanda.  They had a small ceremony and luncheon with family and bridesmaids/groomsmen, and then had a larger reception/party in the evening.  There were 150-200 guests that attended the reception!  In terms of food-prep time, I averaged about 5 hours of cooking each day to put together this event.  Everything was homemade and everything was gluten-free! Two days before the event, I had help frosting the sugar cookies from my aunt Jeanette.  The day before the wedding, I had help from a family friend (and superwoman!) Marcy Albrecht and my awesome aunt Jeanette to frost the (over 160 - I lost count) cupcakes, the two smaller cakes, and the three-tiered wedding cake.
Three-tiered Chocolate Gluten-Free Wedding Cake! Flowers were added shortly after this picture was taken, but this was just before the arrival of all the guests. 
Table #1 - full of delicious gluten-free treats! Chocolates, caramels, cupcakes, cookies, and fruit were served.
The wedding desserts were a big success!  We had three tables with a variety of desserts and one water/drink table.  The wedding cake was presented on its own table.  In addition to desserts, we served fresh fruit (strawberries, grapes, and clementines) on each of the three dessert tables.  And we had two large water servers with lemon and lime in one and cranberries and oranges in the other.  Very elegant and yet easy!
 Notice how the weather cooperated - providing a perfect dusting of fresh snow for a lovely winter wedding backdrop. Here, table #2 was topped with a variety of desserts and fresh fruit (though we put strawberries in the large bowl instead of clementines just before the start of the reception).
Dessert table #3, topped with cake, cupcakes, chocolates, cookies and fresh fruit!
The books ended up being covered in cream cloths, but I rather liked the look, which helped raise the water up higher to avoid spills.  Homemade candied orange peel and homemade peppermint bark were served between the waters. 

***For those recipes that I've not yet posted on my blog, I'll continue posting and linking here to all my recipe and ideas to make the perfect gluten-free wedding reception!***

THE DESSERT LIST:

Wedding Cake: 
The three-tiered wedding cake was made from a delicious, moist chocolate cake with different fillings in each tier.  Each tier was topped with dark chocolate ganache, then semi-sweet ganache to create a smooth layer.  The cakes were then decorated with white chocolate ganache piping and a semi-sweet chocolate ganache scalloped edging.  Fresh flowers decorated the cake.
Bottom Tier - three fillings
1. Raspberry Jam
2. Raspberry Dark Chocolate Ganache
3. Chocolate Marshmallow Frosting
Middle Tier - three fillings (with mint-infused chocolate cake in this tier)
1. Dark Chocolate Mint Ganache
2. Crushed peppermint candy
3. Mint flavored Marshmallow Fluff Frosting
Top tier: - three fillings
1. Dark Chocolate Ganache
2. Milk Chocolate Ganache
3. Chocolate Marshmallow Frosting
Wedding cake with fresh flowers to decorate, with a photobomb by my 10 month old daughter

Custard/pudding Dessert cups:
Pudding was made a day in advance, then strained (for eggnog pudding) and served just before the start of the reception.  Extra dessert cups were kept refrigerated until being served.  The typed served were:
Homemade Eggnog Pudding with Snowflake Gingerbread Cookies
Homemade Vanilla Pudding with Fresh Strawberry and Heart-shaped Sugar Cookie
Homemade Eggnog Pudding with Gingerbread Cookie Desserts

Cupcakes & Cakes:
A wide variety of cupcakes and cakes filled tiered platters on each of the three dessert tables.  Cupcakes and cakes were made in advance, cooled, then frozen in ziplocs (cakes were wrapped thoroughly in first plastic wrap, then foil). They were removed the day before, allowed to sit for 10 minutes before removing from bags and then frosted.  They were stored in a cold room after being frosted since some frosting included cream cheese or ganache.

The cupcake and cake varieties included:
Chocolate Homemade Caramel-Filled Cupcakes
Mini Chocolate Cupcakes w/ Chocolate Frosting and Candied Orange Peel
Peppermint Chocolate Cupcakes
Strawberry-Lemon Cupcakes with Strawberry Filling
Lemon Cupcakes with Lemon Frosting and Candied Lemon Peel
Vanilla Cupcakes with a variety of frostings
Pumpkin Spice Cupcakes with Cream Cheese Frosting
Peppermint Chocolate Cake with Marshmallow Frosting
Lemon Cake with White Chocolate Ganache Frosting and Candied Lemon Peel
Cupcakes on tiered stands spaced throughout the three dessert tables added elegance and interest.  Here you see lemon cupcakes with lemon frosting and a candied lemon peel topper.  Behind are chocolate cupcakes with caramel filling, and farther back are mini peppermint cupcakes and chocolate cupcakes.
Alternating on two side-by-side tiers were strawberry-lemon cupcakes and chocolate caramel-filled cupcakes.

Chocolates and Candies:
A wide variety of chocolates and candies were spaced artistically on platters throughout each of the three dessert tables and on the water table.

Chocolates and candy varieties included:
Candied Orange Peel
Candied Orange Peel dipped in Chocolate
White Chocolate dipped Homemade Caramels
Milk Chocolate dipped Homemade Caramels
Dark Chocolate dipped Homemade Caramels
Molded (Tempered) Chocolate - Dark Chocolate Truffles
Molded (Tempered) Chocolate - Gingerbread Chocolate Truffles
Snowflake Peppermint Bark
Peppermint Bark
Chocolate Angels with Silver Dusting
Dark Chocolate Truffles with Gingerbread Ganache Filling. Yum!

Cookies:
Cookies were made, filled (milanos), cooled, and then bagged in freezer ziplocs and frozen (no more than 2 weeks in advance to maximize freshness).  They were removed from the freezer just a couple hours before the reception and plated.  Gluten-free cookies freeze very well, and taste wonderfully fresh if served this way.
Mint Milano Cookies
Peppermint Mint Milano Cookies
Chocolate Chip Cookies with Chocolate Drizzle
Chocolate Chip Cookies
Triple Chocolate Cookies
Mint Triple Chocolate Cookies
Sugar Cookies with Marshmallow Frosting
Chewy Gingersnap Cookies
Heart-imprinted Chewy Gingersnap Cookies
Snowflake Gingerbread Cookies
A wide variety of fancy cookies added color and interest throughout the tables - not to mention they tasted delicious.
My three year old, ready to start taste-testing the desserts.


Tuesday, 25 November 2014

Tempering Dark, Milk or White Chocolate

There's a great deal of information out there regarding tempering chocolate.  Unless you want shiny dipped chocolates, chocolate decorations, or molded chocolates that can last days without looking funny (blooming to streaking) - don't bother with tempering.  Just following the instructions I've given here for dipping your chocolates, and enjoy.  Anything eaten within a day or two will look just fine made this way.  And if you store your chocolates in the refrigerator, they can look great for a couple weeks.  However, sometimes I want lovely crisp, shiny tempered chocolate.

Homemade molded truffles & caramels, decorated with edible shimmer, colored cocoa butter or chocolate transfer sheets. 

Why would you want to temper your chocolate?  The short story is: Tempered chocolate has a smooth sheen.  It hardens quickly - so you don't have to put things in the refrigerator to cool/harden the chocolate. It's crisp and not soft, so when you bite into it, it isn't mushy tasting - it snaps.  If you make molded chocolates, dip chocolates, or make chocolate decorations - it is nice to temper the chocolate or you might get what is called 'blooming' or 'streaking'.  There's nothing wrong with chocolate that has streaks or blooming in it, but it doesn't look as pretty and means your chocolate won't have that crisp snap to it since it's not "tempered".
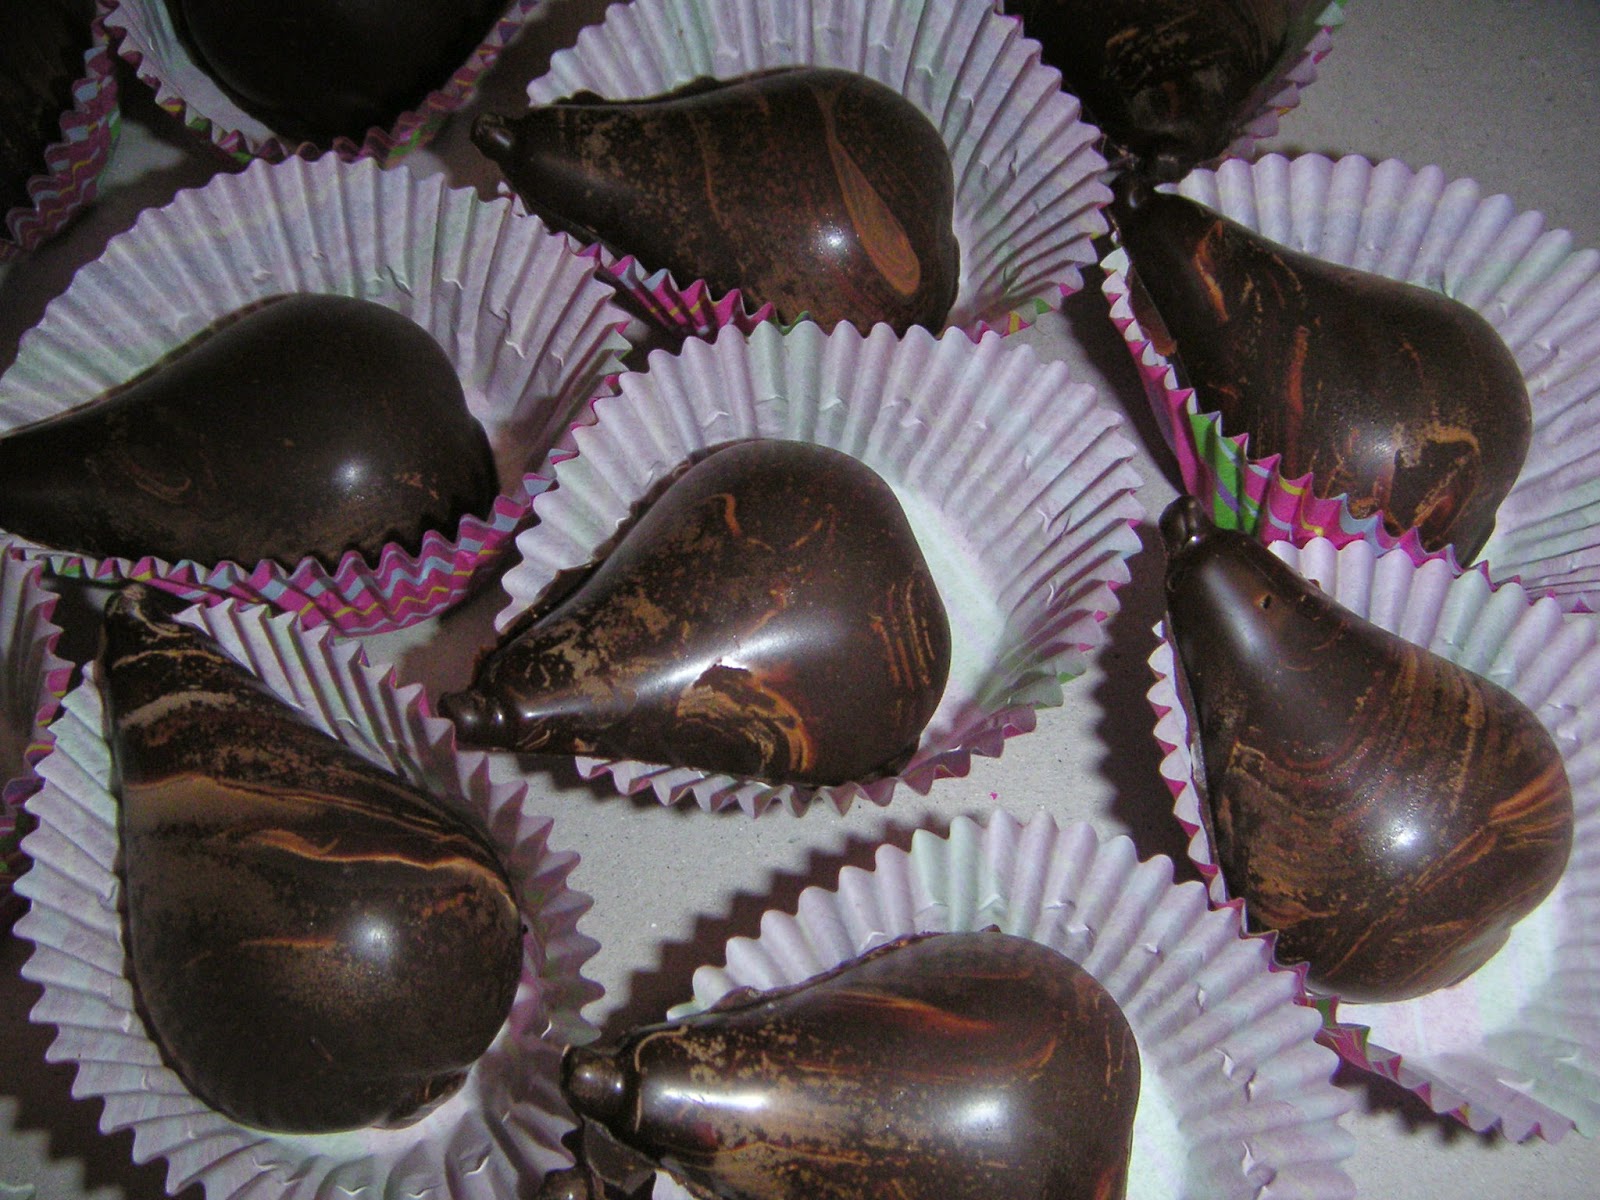
Molded pear-shaped truffles with chocolate just going out of temper - hence the swirls. No problem! Still tastes delicious - and looks rather neat, too. (Although I try not to do this)

I love making molded chocolates - although I keep it to about once or twice a year that I get out my molds and whip things together.  I'm all about simplifying my cooking while ending up with the best possible result, and this version of tempering chocolate is about as good as it gets. You still need patience during the cooling part of the process.  If you're nervous about using a microwave to make these. No problem!  Just set your toaster oven (or regular oven) to 175-200F and use that to slowly heat up your chocolate.  It takes a bit more time to bring things to temperature, and you still want to remove the bowl every couple minutes to stir the chocolate, but since it heats a bit slower, it will give you a bit more time to get used to how quickly chocolate heats up and how slowly it cools down.
A variety of molded chocolates - made with tempered chocolate. 

Tempering Dark, Milk or White Chocolate
Based on directions in the book 'Making Artisan Chocolates' by Andrew Garrison Shotts (a beautiful chocolate making book)

You can temper as much or as little chocolate as you like.  Just use the following percentage guideline:

Place 75% of your total amount of high-quality chocolate (chopped or as chips) in a microwave-safe bowl.  Save 25% chopped, chips or as a large hunk for later.  (For example, I typically use 3 bags ghirardelli or guittard chocolate chips and save 1 bag for later in the recipe. I find milk & white chocolates can be thick and a bit difficult to work with - but the guittard chips seem a bit less sticky than ghirardelli.  My favorite are Callebaut, with a proper consistency for molding, but I have to order these online.  However, the taste and texture is wonderful to work with!). 

* Purchased chocolate chips have varying amounts of cocoa butter in them. Some melt and are quite sticky and others are nice and smooth and flow easily.  Unfortunately, for most of us not ordering bulk from chocolate companies, it just takes a bit of experimentation to find the right kind.  Just don't get any chocolate that has 'extra' ingredients added into it, or it won't temper properly.  I find milk chocolate tends to be harder to work with and temper than dark chocolate - so best to keep that in mind!

Tempering process:
Usually takes me ~45 minutes - 1 hr.  A little longer if heating in toaster oven/regular oven (as mentioned above as a heating option, though the cooling time is the most time-intensive part of this process). 

Step 1: 
Heat 75% total chocolate in the microwave for 60 seconds at 50% power.  Stir well (even if it looks like nothing has happened).  Repeat heating and stirring process.

Heat until 115-120F.

Step 2:
Place bowl on the counter and let SIT for 10 minutes.

Step 3:
This next step takes time - be patient as you wait for your chocolate to cool.
Start adding ~ half of your 25% remaining chocolate by handfuls to your melted chocolate.  Stir in thoroughly.  Stirring every 20-30 seconds, allow the mixture to lower in temperature to:
86F for dark chocolate
81F for milk or white chocolate
When your initial chocolate you've added has melted in most of the way, add another handful or two of chocolate to your mixture to help it continue to cool.   Keep stirring every 20-30 seconds.  Be patient!  This can take 30-45 minutes or more depending on how much chocolate you have melted.

Step 4:
Once your chocolate has cooled.  Return it to the microwave and heat 1-5 seconds at 50% power.  Chocolate heats fast compared to how slowly it cools!  You don't want to go above 91F for the dark chocolate or ~89F for the milk chocolate, or the chocolate will go out of temper.
Heat chocolate to:
89F for dark chocolate
86F for milk or white chocolate

You can scoop out any chunks of chocolate that didn't melt all the way.  (Plop them on parchment paper and save them and reuse them next time you temper chocolate - or save for chocolate chip cookies, etc.)

Step 5:
Test your tempered chocolate on **parchment paper by drizzling a small bit with a fork. It should harden quickly.

Now, work quickly!  Use chocolate however you like for molds, dipping, piping decorations, etc.  Don't use too much chocolate from the bowl at a time, so the chocolate stays warm.  If you worry it's cooling, place it back in the microwave for 1-5 seconds at 50% power.  Make sure to give the chocolate a stir occasionally, so you can keep it in temper.

If you lose the temper, then you will have to reheat the chocolate back to 115F-120F and start the process again.

**Parchment paper is wonderful for chocolate making - I use it to line the counters & line cookie sheets.  I line containers with it before putting tempered chocolate items in them.   It helps a great deal with clean-up, too!
Molds filled w/ tempered chocolate, then shaken to remove excess, and excess scraped off with a knife.

Molds filled most of the way with white chocolate ganache filling. Extra white chocolate was put on top once filling set.  I find they're easier to get out if I pop them into the refrigerator for a few minutes before removing. (Plus, I sometimes don't bother tempering the chocolate going on the bottoms, so refrigerating it a bit helps it harden).

Finished chocolates - lightly dusted with edible shimmer.