Search for a Recipe

Wednesday 24 August 2016

Fabulous Versatile Pizza Crust

We really do love pizza, and prefer homemade crusts to any other.  I've posted thin crust, regular crust, individual-sized crustfocaccia crust, sourdough crust.  They're all terrific and delicious.  This recipe is nice since it's got more of the taste of sourdough even if you don't have a starter going.  You can let it rise for a puffier crust, (or cook right away for a thinner, crispier crust).  This recipe is also fabulous because you don't have to use the dough to make all pizza crusts.  You can use this dough for bread, rolls or pizza crusts!  Win-win!  If you make small-sized crusts, they freeze perfectly in ziploc bags and can easily be topped and baked later for a quick and easy meal!  Top with your favorite pizza toppings and enjoy!

A fresh, delicious gluten-free pizza - right out of the oven! 

Crispy, thin crust shown before and after baking.  Even if the crusts sink a little after the first partial-bake, I find they puff right on up again once toppings are added and they are cooked again. 
Before and after cooking with sauce, fresh spinach, ham, cheese & hot pepper flakes.

Fabulous Versatile Pizza Crust: 

Make one batch of my Speedy Version of my Sourdough Bread Dough can make 2 -3 large pizzas or 6 - 8 personal size pizzas (it all depends on how thin you spread the dough).   You can double the recipe, if desired. When I do, I usually end up with 12 small crusts which I freeze to use later. 

Spread scoopfuls of dough batter onto a parchment paper-lined baking sheet.  Spread thinly using a rubber spatula, holding edges of the parchment paper.  Let pizza crusts rest in a warm location for 15 minutes.

Bake at 400 F for 10-12 minutes OR Bake at 350 F for 20-25 minutes , until nicely browned.  A light or medium browned crust works nicely.

I often make a batch (or double batch) of this bread/roll/pizza dough and make some mixture of all three. I let rise and cook dough and breads all at 350 F.  If you're only making pizza crusts, I'd recommend cooking at 400 F. 

Pizza crusts before and after spreading on left and mini crusts and a loaf of speedy sourdough bread on the right. 

If you make bread alongside your pizza crusts, butter and fill the pan halfway. Let rise until it becomes even with the top of the pan and bake as directed in the Speedy Sourdough Bread Recipe

Once crusts are par-baked (partially baked), you can top with desired toppings and bake directly on the oven rack, for a nice crispy crust.  Topping suggestions described below, but add whatever you prefer. 

Bake pizzas at 400 F for 6-10 minutes, or until toppings look as you desire.  You can also cook these on the BBQ as described below.*

Crusts can also be frozen after the initial cooking, then removed from the freezer, placed on a cooling rack, have toppings added (it'll thaw while this happens) and be baked as described above.  Enjoy!

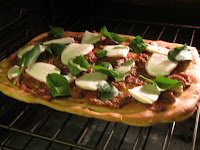
Pizzas before and after baking - topped with homemade meat sauce, fresh mozzarella, and fresh spinach.  Sprinkle fresh basil on top before serving. 
A delicious pizza topped with sauteed mushrooms, shallots, peppers and spinach. Sprinkled with fresh basil and Parmesan before baking. 
I like to slice the pizzas and return to a cooling rack to serve, keeping the crusts nice and crispy. 


*To cook in BBQ: (using a propane or gas grill is easiest, I find) Cook pizza directly on the grates at low to medium-low on the BBQ.  When the toppings are getting close to being done, turn up the heat to get the bottom crust where you like it.  It shouldn't take more than 5-6 minutes per pizza.  Remove from heat to a wire rack.  Slice on a cutting board and return to your wire rack (this ensures your pizza stays properly crispy on the bottom).  Enjoy!


Friday 19 August 2016

Homemade Fries!!!

These homemade fries are second only in tastiness to the lard-fried fries (frites) I've eaten in Belgium.  You'll all be happy to know that the Belgians are actually the ones who invented fries, and it was soldiers who thought they were still in France who named them the French Fries after falling in love with the deliciousness that is double-fried potato sticks.  Fried potatoes truly are a wonderful treat.  We more often than not roast our fries, but we do love the deep-fried ones, too!  My husband rarely requests I experiment with food (I do it readily enough on my own), but his one request was that I come up with some homemade poutine recipes (a Canadian specialty).  Frying up countless batches of excellent fries was our first step.  Poutine recipes to come!  Enjoy!
Homemade french fries, ready for ketchup or poutine toppings! 

Homemade Fries

Slice russet potatoes into small, medium or large size sticks.  I aim for 1 lb/person, but you can do more/less as you prefer.  I tend to err on the side of 'more' since they will reheat nicely in an oven if there are leftovers.  I'm providing a range of cooking times, which you can use according to how thin/fat your fries are sliced.  If you prefer crispier fries, slice them into smaller, thinner sticks.  

Rinse sliced potatoes very thoroughly in a colander under cold water.   You want to really get rid of the starch in the potatoes.  Place rinsed potatoes in a large bowl of cold water until ready to cook.

Preheat frying oil (like Canola or Avocado (my favorite, but it's pricier)) to either 300F or 350F depending on which cooking method (below) you are using.  (The purchase of a small deep fryer has made this a thousand times easier.)

Remove only the handfuls of sliced potatoes you are going to cook.  Lay rinsed fries out on towels or paper towels and thoroughly dry, patting well to remove all liquid before cooking.

There are TWO temperature methods you can try.  Both have worked well for me.  The 1st fry cooks the potato, so you have a soft center.  After cooling, the 2nd fry crisps up the outside of the fries. (There's all sorts of science behind why this works, but it all has to do with the starch properties of the potatoes).   Regardless of which temperature cooking method you employ: You will want to cook batches that do not fill your basket more than 1/2 full.  If you're cooking in a large pot on the stovetop, make sure to use small batches, one or two handfuls at a time to retain the oil temperature.  The fries will cause bubbling to occur when you first put them in the oil - more if there is extra water on them, so keep a careful eye on things.
Fries after the first round of cooking - they might just have a touch of browning happening, but will still be mostly white in color.  The potato is cooked, but it needs the second fry to get the crispy outer edges.

Method 1: 
Preheat oil to 350 F - 355 F.
1st fry: Cook potatoes 3-7 minutes (for ones pictured I used 4-5 minutes - for medium-sized fries).  Shake occasionally to keep potatoes from sticking to one another.  Drain on a paper towel-lined tray.   Let cool thoroughly, placing in a refrigerator if you want to speed the process.  You can cool and store in a tupperware to finish cooking up to a day later to prep early.
Keep oil at the same temperature, 350 F - 355 F
2nd fry: Cook pre-fried potatoes 2-6 minutes, or until nicely golden brown.  Shake occasionally to keep potatoes from sticking to one another.   Shake off excess oil and then pour onto a paper towel-lined cookie sheet.
Immediately sprinkle with fresh ground sea salt, tossing a little to coat.  Serve and enjoy!

Method 2: 
Preheat oil to 300 F.
1st fry: Cook potatoes 5-10 minutes.  Shake occasionally to keep potatoes from sticking to one another.  Drain on a paper towel-lined tray.   Let cool thoroughly, placing in a refrigerator if you want to speed the process.  You can cool and store in a tupperware to finish cooking up to a day later to prep early.
While fries cool, increase oil temperature to 380 F - 390 F.
2nd fry: Cook pre-fried potatoes 2-4 minutes, or until nicely golden brown.  Shake occasionally to keep potatoes from sticking to one another.   Shake off excess oil and then pour onto a paper towel-lined cookie sheet.
Immediately sprinkle with fresh ground sea salt, tossing a little to coat.  Serve and enjoy!


Skinny fries, fresh from the oil and ready to eat! 

Wednesday 10 August 2016

Key Lime Granola Bars!

Gluten Free Key Lime Granola Bars
Finally, the amazing key lime granola bars you never knew you always wanted!  They are SO delicious.  The best part is, they taste and look like proper granola bars.  They have an appropriately large amount of delicious key lime flavor, unlike many of the key lime bars I've tried over the years.   The oats are toasted first, and you then add key lime zest and shredded coconut (you could add some chopped or sliced nuts at this point, too, if you would like).   The key lime juice and sugars are heated together, just to dissolve the sugar before adding to the oats.  The bars cook for a short time at a low temperature, which helps everything blend together nicely.  If desired, you could dip the bottoms or sides of the cooled and sliced bars in white chocolate for more of a dessert bar.  Enjoy!

Key Lime Granola Bars
Delicious homemade Key Lime Granola Bars - Yum! 
Key Lime Granola Bars - wrapped and ready for breakfasts, lunches, or snacks

Key Lime Granola Bars!
Makes ~33 bars

Preheat the oven to 350 F.

Mix together in a large bowl:
6 cups whole oats (make sure to use gluten-free if Celiac or sensitive)
1/4 cup oil 
1/4 cup butter, melted
1/2 - 1 tsp salt

Spread in a cookie sheet and bake at 350 F for 15-20 minutes, stirring once or twice.   Remove from oven and pour back in the large bowl.   Lower oven temperature to 300 F.

Add to oats and mix to combine evenly:
1 Tbsp key lime zest (requires about 4-5 key limes)
1 cup shredded coconut
(1/2 cup chopped or sliced almonds, cashews or pecans could be added here, if desired)

While oats are cooking, you can prepare the following:
In a saucepan over medium-low heat, cook together, stirring regularly, just until sugar dissolves:
1 cup sugar
1/2 cup honey
1/4 cup maple syrup
1/2 cup fresh squeezed key lime juice (I used an entire bag of key limes)

Once sugar has completely dissolved, mix key lime/sugar mixture into the oats/zest mixture, making sure to evenly coat.

Spread onto a parchment paper-lined baking sheet.  Flatten with your spatula/spoon as best you can.

Bake granola bars at 300 F for 15-20 minutes, just until light brown on the edges.   Let fully cool in the pan on a wire rack.
Homemade Key Lime Granola Bars
Key Lime Granola Bars - fresh from the oven!

Remove parchment paper to a cutting board and slice with a large knife into desired granola bar size.  I sliced 3 x 11, ending up with 33 granola bars.  For a more dessert-type bar, you can dip the cooled and sliced bars in white chocolate, just on the bottom.

The key lime granola bars wrap nicely individually in plastic wrap - store in the refrigerator for a week or freeze.  Enjoy!!!
Key Lime Granola Bars
Key Lime Granola Bars sliced and ready to eat or wrap for later. 
Key Lime Granola Bars
Key Lime Granola Bars! 

Monday 1 August 2016

Banana Oatmeal Chocolate Chip Muffins

These are a tasty, hearty muffin - perfect for those times when you have overripe bananas lying around.  Peel and freeze your old bananas, so these can be made anytime!  For an extra bit of fun, you can put a spoonful of batter in the muffin tin, then add a teaspoon of either jam or chocolate sauce.  Top with the remaining batter.  This will turn your muffins into "banana surprise muffins"!  You can leave out the mini chocolate chips if you do this.  Thanks to my sister and sister-in-law for the inspiration behind these tasty muffins. Enjoy!
GF Banana Oatmeal Chocolate Chip Muffins
Fresh GF banana oatmeal chocolate chip muffins!  They taste better in these My Little Pony muffin liners, as my daughters informed me. 

Banana Oatmeal Muffins
Makes ~20-22 muffins

Preheat oven to 350 F.  Line muffin tins with paper liners.

In a large bowl, mix together:
3 overripe bananas, smashed
3 eggs
1/2 cup softened butter OR 1/2 cup oil (both work great, oil gives a fluffier muffin)
1 cup Kristin's Gluten-Free Flour Mix
1 cup GF oats (use GF if you're Celiac or sensitive)
1/3 cup hempseeds (or 1/3 - 1/2 cup flaxseeds)
1/4 cup sugar
1/2 cup brown sugar
1 tsp salt
1 tsp baking soda
1 tsp vanilla extract
1/2 cup mini chocolate chips

Fill muffin tins a little over 1/2 full.  Bake at 350 F for ~20 minutes.  (If you fill the muffin cups more like 3/4 full, they'll require ~25 minutes to cook).

Remove from pan and cool on a wire rack.  Enjoy!