Search for a Recipe

Showing posts with label cake. Show all posts

Friday, 30 October 2026

French Custard Cake

 This is a lovely and easy fruity custard cake recipe, based off a recipe from "Everyday Cake" by Polina Chernakova, then tweaked a bit to make it GF, and so it uses ingredients I readily have available. It is a rich flan-like cake.  So delicious. And SO easy to whip together. Enjoy!

A delicious custard cake with wild blueberries.
This custard cake combined wild blueberries and raspberries. It ended up looking a little like abstract art, but was delicious.

French Custard Cake

Preheat oven to 350 F. Line a pan that is just a little smaller than 9 x 13 with parchment paper or butter the pan.

Place in pan:
3 cups frozen wild blueberries (or a combination of wild blueberries with other berries to make 3 cups total of berries)
Fresh blueberries, ready for the batter!

In a blender, combine until smooth: 
2/3 cup sugar
1/2 tsp salt
5 eggs
1 cup heavy cream
1 cup whole milk
(or 2 cups half & half instead of the heavy cream and whole milk)
2 Tbsp vanilla extract

Pour into buttered baking dish overtop fruit.
Batter poured into the pan, ready for a little sugar sprinkling on top before baking.

Sprinkle overtop the batter/fruit:
3 Tbsp sugar
Sprinkled with sugar, and ready for baking!

Bake at 350 F for about 55 minutes, until it's puffed up nicely.  It is normal for it to deflate/sink while cooling. I find the fruit tends to be closer to the top a lot of the time, leaving a lovely layer of custard cake beneath. 

If desired, you can dust with powered sugar to serve. Slice and serve! Leftovers can be stored in the fridge and are nice to eat chilled or reheated. Enjoy!

French Custard Cake Recipe by Successfully Gluten Free!

Friday, 17 October 2025

Mini Cakes! (perfect for practicing piping skills)

 This easy cake and frosting recipe is absolutely perfect for cutting into rounds or shapes to make mini decorated cakes. Ideal when you or your kids want to practicing piping skills. ;) I hadn't made mini cakes in years, but my youngest was desperate to make a cake to practice decorating with frosting, and I remembered how I'd made these before. A perfect activity - and tasty, too!
My girls getting a bit fancier with the frosting and decor here.
Triple layer mini cakes!
Made this batch of mini cakes completely on her own. 

Mini Cakes! 

Sponge Cakes:

Preheat the oven to 350 F.  Butter the edges and line 2 quarter sheet baking pans with parchment paper (quarter sheet baking pans are approx 8x12 inner dimension or 9x13outer dimension metal cookie sheets - I LOVE this size.  Perfect for the toaster oven, and perfect when you have multiple things you want to roast separately in the regular oven, and of course, opera-style cakes!)

In a large bowl, whisk together: 
1/2 cup coconut flour
1/2 cup white rice flour
1 cup sugar
1/2 tsp baking soda
1/2 tsp salt

Add and whisk in until smooth: 
1 cup milk
1/2 cup oil
6 large eggs
2 tsp vanilla bean paste or vanilla extract

Divide between the two parchment-lined pans.  Bake at 350 F for approximately 15-18 minutes.  These are nice and thin, so they cook quickly.  They should look lightly browned and no longer wet in the center.  Depending on your oven, they may need an extra minute or two.  

Remove from oven.  Let cool in pan on wire racks.  Once cool, you can use circle cutters (or other shapes) to cut as desired. 
As you can see above, the girls used a round cutter to cut out the circles for making the mini cakes. They'd mix and match extra pieces to make little cakes after all the circle cakes were decorated. 

Vanilla-Marshmallow Frosting:

Once cakes have cooled, you can prepare your frosting, as it's time to assemble! 

Beat together in a mixer until light and fluffy - 2-3 minutes: 
1/2 cup butter, softened
1 1/2 cup powdered sugar
1/4 - 1/2 cup marshmallow fluff
1/2 - 1 tsp vanilla extract
1 - 2 tsp (or more if needed) cream or milk

Hard at work, focusing on making little decorative toppers for her mini cakes. 
How cute are these? 
She was not amused when her sister wanted to come and join.  So.... we had to make them again the following weekend. 
They stepped up their decorating goals and made a few colors of frosting.

I gave a few pointers, but they decorated these all by themselves. The middle layers were the "less successfully decorated cakes" - meaning the tops could be their favorites.  
Lots of  fun decorated cakes were made! 

Mini Cakes Recipe by Successfully Gluten Free!

Thursday, 21 August 2025

Angel Food Cake

Honestly, I feel like angel food cakes can be kind of a pain to cook. Not because they're difficult, but mostly because they use 12 fresh egg whites, which means I end up with 12 egg yolks (Do I then end up making 2-3 batches of homemade pudding? Yes, I do. Chocolate pudding and vanilla pudding are a must). And, everything needs to be clean and grease-free or the entire cake will collapse. If you're willing to do that, then you will absolutely love this delicious angel food cake.  Wish I could zip over and make this cake for you this week, nana! Happy 94th Birthday! 
Cooled and freshly sliced. Yum!
Fresh homemade angel food cake served with sliced strawberries and fresh whipped cream

Angel Food Cake

Preheat oven to 350 F. 
Have an angel food cake pan clean and ready. These have the removeable bottoms with the center column in them. 

Whisk together, and then sift 2-3 times. Then, set aside to fold in later:
3/4 cup powdered sugar
1/4 cup brown rice flour
1/4 cup white rice flour
1/4 cup cornstarch
2 Tbsp tapioca starch
2 Tbsp potato starch
1/2 tsp xanthan gum
1/4 tsp salt

In a very clean mixing bowl, with a wire whisk attachment, whisk to nice and foamy:
1 1/2 - 1 3/4 cup fresh egg whites, room temperature
plus water to equal 2 cups
2 tsp cream of tartar
1/2 tsp vanilla extract or bean paste

Add slowly, and beat about 5 minutes until stiff, glossy peaks form:
3/4 cup powdered sugar

Stiff peaks - tiny flecks are from vanilla bean paste, if you use vanilla bean paste.

Gently fold 1/4 of the egg whites into  the sifted flour mixture.  There may be some lumps, but you don't want to over-mix or you'll knock the air out of the egg whites.  Add another 1/4 of the egg whites and fold into the mixture.  Add the flour/egg white mixture into the remaining stiff egg whites and fold in carefully.  
After folding in 1/4 of the egg white into the sugar/flour mixture, then folding in another 1/4 of the egg white mixture into the sugar/flour mixture - that mixture is gently folded into the remaining egg white mixture.

Spoon into a clean, dry, unlined angel food cake pan. 
Batter scooped into clean, unlined angel food cake pan.

Bake at 350 F for 30-35 minutes, until browned on top.  Remove from the oven and turn the cake "upside-down" to fully cool.  It is VERY important to cool an angel food cake upside down, or you will end up with a cake that sinks in the center.  You can balance it on a bottle, or just on the counter (I usually go for that), or sometimes the pans have little feet it can sit on once turned upside down. 
Just out of the oven and ready to immediately place upside-down to FULLY cool. 
Balanced carefully upside down on the middle post. You can see how this is a pan where the bottom is removeable. This is important because you'll need to slice carefully along edges with a butter knife to remove. 

Once cool, carefully slice around the inside and outside edges. I like to slice carefully with a butter knife.  Pull the cake up, slice along the bottom of the pan, and then flip the angel food cake onto a plate to serve.
Sliced carefully and flipped onto a serving platter. 

My favorite way to eat angel food cake is with freshly sliced strawberries and cream.  (I whip up fresh whipped cream with just a spoonful of sugar. I prefer it not too sweet, since the cake light and sweet.) 

Orange glaze icing:  I grew up having angel food cake served with "orange sludge" frosting. I often just make a simple glaze from 2-3 Tbsp orange juice, orange zest, enough powdered sugar to make a thin, spreadable glaze.  But, to make the orange glaze/orange sludge icing like my sister does do the following: 
Mix together:  
1 Tbsp butter, melted 
zest of 1 orange
1/4 cup fresh squeezed orange juice

Stir in gradually until desired consistency: 
~2 cups powdered sugar  

This is then spread on the top and sides of the cake or drizzle over when serving. 

Enjoy!

Angel Food Cake Recipe by Successfully Gluten Free!

Monday, 29 April 2024

Light Lemon Sponge with Lemon Curd

When I sent my brother a photo of this dessert, he told me the fried egg looked delicious on top of the cake.  Okay, yes, with the runny, not quite chilled lemon curd it does look like this if you're too impatient to wait for it to chill - but it was delicious! A lovely light sponge topped with whipped cream and homemade lemon curd. And served with strawberries. Enjoy!
A yummy serving of Lemon Sponge cake!

Light Lemon Sponge with Lemon Curd

I recommend making the lemon curd filling first, since it seems to take the longest time to chill.  However, you can speed up the chilling of the curd.  I'll explain how after the recipe.  You also can serve the lemon curd warm, which is tasty, too! 

Lemon Curd:

In a medium saucepan, whisk together:
zest from 2 lemons
juice from 2 lemons (~1/2 cup, make sure to strain for seeds)
2/3 cup water
3/4 cup white sugar
3 Tbsp cornstarch

Heat over medium heat, stirring regularly with a whisk.  Once mixture comes to a boil and has thickened a bit, let boil 1 minute.  Then add and boil 1 additional minute:
2 egg yolks
1 1/2 Tbsp salted butter

Pour the curd into a large bowl.  Cover tightly with plastic wrap.  You can chill in the refrigerator OR, place your bowl into a bowl of ice.  You can fill a freezer ziploc with ice to place on top of the plastic wrap, too, to speed up the chilling.  I use this method when I'm short on time.

Lemon Sponge Cake

Preheat oven to 350 F. Line 2 quarter size baking pans (these are ~9" x 13" metal baking pans) with parchment paper.  If you don't have this size baking pan, you can use one large baking pan. I just find that if they aren't perfectly flat, they will result in uneven baking. 

Divide 6 eggs. 

Beat until stiff peaks: 
6 egg whites
3 Tbsp sugar
Egg whites & sugar, whisked until stiff peaks. 

In a large bowl, whisk together: 
3 egg yolks
1 cup milk
1/2 cup oil
1/2 tsp vanilla extract or bean paste
zest 2 lemons
10 drops lemon essential oil
1/2 cup coconut flour
1/2 cup white rice flour
3/4 cup sugar
1/2 tsp salt
1/2 tsp baking soda
Lemon batter mixture, ready to fold in the egg whites from above.

The next part needs to be done gently, so you don't lost the height from your egg whites. Fold 1/3 of your egg white mixture into the lemon batter.  Then fold the remaining egg white mixture, trying not to loose much height. 

Gently divide into your prepared pans.  Bake at 350 F for 15 - 18 minutes, until a light golden brown.  Rest a few minutes then flip onto cooling rack.  
Lemon sponges, ready for baking!
Fresh from the oven.
Since these get topped, I didn't worry about just flipping them facedown on the cooling rack. 

Whipping Cream

Whisk together until thick: 
1 cup heavy whipping cream
2 - 3 Tbsp powdered sugar

To serve, you can cut squares of cake and top with a dollop of whipped cream, a spoonful of lemon curd, and repeat - if you'd like a second layer.  Lovely served with sliced strawberries alongside. 

Enjoy! 
My youngest loves assembling and plating food. She was so excited to put these together. 
My girls loved serving these up. 
Yum!

Light Lemon Sponge with Lemon Curd Recipe by Successfully Gluten Free!


Tuesday, 6 April 2021

Individual-sized Carrot Cakes!

 My youngest wanted to help me make carrot cake, so we decided to change it up a bit and make little individual carrot cakes.  This was so fun to do, in addition to helping our cake last a bit longer since serving sizes were smaller than slicing the regular carrot cake.  They were so moist and delicious!  A new favorite way to make and serve carrot cake.  Enjoy!  
Gluten Free Mini Carrot Cakes
Cooled and frosted mini carrot cakes - ready to eat! 

Individual-sized Carrot Cakes!

Makes 24 mini carrot cakes

Carrot Cake Batter:

Preheat oven to 350 F.  Butter and flour (use GF flour mix OR brown or white rice flour) 24 muffin-sized square tins.  I have some square pans I found years ago that work perfectly for this recipe.  You can also make these in buttered and floured muffin tins for individual muffin-shaped cakes. 
The square tins we buttered and floured - you can easily make these in muffin tins.

In a food processor with a grater attachment, or with a grater, grate 4-5 washed, trimmed (and peeled, if desired) carrots so you have 3 cups grated carrot.  I like to pack down the cups of grated carrot to pack in a lot of carrot.

In a large bowl, mix together:
1/2 tsp xanthan gum
1 1/2 tsp baking powder
1 1/2 tsp baking soda
1/2 tsp salt
2 tsp ground cinnamon

Add and mix in until thoroughly combined: 
3 cups grated carrot
1 1/2 cups sugar
4 eggs
1 cup oil 
2 tsp vanilla extract

Divide batter into prepared pans.  They should fill each tin about halfway.   Bake at 350 F for about 15-18 minutes, until baked through, but not dried out.  These are a nice, moist cake but shouldn't be wet in the middle.  

Let rest 5 minutes in the pans, then remove to a cooling rack to fully cool. 
After resting and then removing onto cooling racks.  The buttering and GF flouring helped them pop right out of the pans.

Cream Cheese Frosting:

In a large bowl or measuring cup, mix together the following until nice and smooth: 
2-3 Tbsp butter, melted
4 oz cream cheese, softened
1 tsp vanilla bean paste or vanilla extract
3 cups powdered sugar

Once the frosting is nice and smooth, transfer into a medium-sized freezer ziploc.  Snip the corner and use to pipe zig-zags of frosting on top of your cooled carrot cakes.  *Note: If you want fluffier frosting, don't melt the butter, just soften.  Beat all ingredients in a mixer until light and fluffy.  Spread on or pipe on cooled cakes, as desired.

Easy Glaze:
Need something dairy-free?  Just mix together a bit of powdered sugar and water to desired consistency (aim for a thin, running glaze).  Spread over top the cooled carrot cakes.  Voila! An easy dairy-free option! 

These store wonderfully in the refrigerator for a few days.  They've never lasted longer than that around here.  Enjoy! 
Ready to eat!  We had lots of grated carrot, so we made a batch of a more healthy carrot muffins, too. 


Mini Carrot Cakes Recipe by Successfully Gluten Free!

Monday, 25 January 2021

Opera-style Cake (nut-free!)

 Oh my goodness, I can't even begin to describe how delicious this cake was for my little girl's 10th birthday.  A light vanilla sponge, chocolate ganache and marshmallow vanilla frosting - it was beautiful and scrumptious.  Nothing about this cake is difficult to make, but it does require a bit of time to allow things to cool before assembling.  My daughter wanted a chocolate and vanilla cake, but left the details up to me (I love when they do that).  The coconut flour in the batter gives the wonderful moistness to the sponge in lieu of the more traditional almond flour used in opera cakes.  The ganache is rich but lovely in thin layers throughout the cake.  And just a bit of marshmallow fluff in the frosting lightens up the buttercream parts.  A proper opera cake uses a coffee sugar syrup brushed onto each sponge layer, but I created a simple cocoa-sugar syrup which worked perfectly.  It was such a beautiful cake, too.  We were so excited cutting and serving the cake we almost forgot to sing!  Enjoy! 
Opera Cake Gluten Free
Side view of the beautiful opera-style cake for my daughter's birthday. 
Nut Free Gluten Free Opera Cake
My cursive G leaves much to be desired, but Gwen was very happy with her cake. 
A beautiful slice for the birthday girl! 

Opera-style Cake

Makes a cake approximately 6" x 8"

Sponge Cakes:

Preheat the oven to 350 F.  Butter the edges and line 2 quarter sheet baking pans with parchment paper (quarter sheet baking pans are approx 8x12 inner dimension or 9x13outer dimension metal cookie sheets - I LOVE this size.  Perfect for the toaster oven, and perfect when you have multiple things you want to roast separately in the regular oven, and of course, opera-style cakes!)

In a large bowl, whisk together: 
1/2 cup coconut flour
1/2 cup white rice flour
1 cup sugar
1/2 tsp baking soda
1/2 tsp salt

Add and whisk in until smooth: 
1 cup milk
1/2 cup oil
6 large eggs
2 tsp vanilla bean paste or vanilla extract

Divide between the two parchment-lined pans.  Bake at 350 F for approximately 15-18 minutes.  These are nice and thin, so they cook quickly.  They should look lightly browned on the edges and no longer wet in the center.  Depending on your oven, they may need an extra minute or two.  

Remove from oven.  Let rest 5 minutes before flipping onto cooling racks to cool.  Once cool, carefully slice each cake in half so you'll have four even layers for your cake.  
Cakes fresh from the oven - a lovely pale gold with light browned edges
Each of the cakes were sliced in half, so there are four even layers. 

Ganache:

Once cakes are set to cool, prepare your chocolate ganache.  It will need some time to cool a bit on the counter before assembling the cakes, so timing-wise, I found this worked well.  

In a saucepan over medium heat combine and heat until bubbling gently: 
1/2 cup butter
1/2 cup whole cream/whipping cream
1/2 tsp vanilla bean paste or extract

Remove from heat and stir in until smooth (this takes a bit of patience, usually a few minutes): 
8 oz high quality semi-sweet or bittersweet chocolate chips (or bars chopped well)

Once the ganache is nice and smooth, you can divide it into a couple bowls so it will cool down a bit faster.  If you use it right away, it'll just pour off and be too thin.  I prefer to let it cool down sitting out on the counter rather than in the refrigerator.  But if you're in a bind, you can help it chill faster by placing it in the refrigerator. 

Chocolate-Sugar Syrup: 

(This is in place of the traditional coffee syrup - which is coffee mixed with sugar - the cocoa powder gave a perfect bitterness to the syrup so it worked wonderfully to brush on the cake layers!)
In a mug, combine: 
1/2 cup boiling water
1 Tbsp cocoa powder
1/4 cup sugar

Stir until sugar is completely dissolved and you have a nice, smooth sugar syrup to use to brush on your cakes.

Vanilla-Marshmallow Frosting:

Once cakes have cooled, you can prepare your frosting, as it's time to assemble! 

Beat together in a mixer until light and fluffy - 2-3 minutes: 
1/2 cup butter, softened
1 1/2 cup powdered sugar
1/4 - 1/2 cup marshmallow fluff
1/2 - 1 tsp vanilla extract
1 - 2 tsp (or more if needed) cream or milk

Assembling your cake:

To assemble cakes: 
1. Brush each cake layer with your chocolate-sugar syrup

2. Spread one layer with 2/3 of the frosting.  Spread the remaining frosting on one layer (this will be your top layer). 

3. Gently spread some chocolate ganache on top of the two layers that have no frosting.  Then, spread the chocolate ganache on top of the layer with 1/3 icing (your top layer).  *You may have to add a second layer of ganache to some areas if it spreads too thin.  The ganache should be warm enough to spread and give a beautiful sheen to your layers. If the ganache isn't warm enough, you can gently heat for 10 seconds in the microwave to warm it up.   I didn't use all my ganache and had some leftover.  You do want some extra saved in order to pipe decoration on the top.  I also had a tiny bit of extra frosting left, so I spread that on top of one of the ganache layers - since extra frosting is always nice.   
The far cake has just been brushed with the chocolate sugar syrup.  The front was brushed with the chocolate sugar syrup, then had some frosting and ganache spread on top. 
Covered layers, ready for their brief refrigeration.  I did spread a little extra frosting I had on top of one of the ganache layers.

4.  Place the frosted/ganache covered layers in the refrigerator for 10-15 minutes.  

5.  Remove from the refrigerator and pipe decoration onto the top layer using ganache in a ziploc bag with the corner snipped off, if desired.  For a proper opera cake, they write the word "opera" in beautiful cursive.  I wrote "Gwen", since it was my daughter's birthday.  You want to pipe everything before it sets, although I did add an extra layer of ganache on top of the original "Gwen" so it would stand out a little extra for the birthday girl. 
If you pipe warm (not hot) ganache onto slightly cooled, but not set ganache, you can end up with a beautiful look that defines the top of most proper opera cakes.  I added an extra layers to make her name really stand out, but it looked very pretty before I added that layer. 

6.  Carefully, assemble your cake as desired (I prefer to assemble on a wire rack and then slide it onto the platter, but you can assemble it on a platter and slide strips of parchment paper under each side to remove after you're done assembling and cutting.  I like to assemble in the following order: Bottom - all ganache, Second to bottom - all frosting, Third layer - all ganache, and then the top layer with your decoration.  

7.  Refrigerate another 15 minutes.  *I find if you refrigerate it too long, you'll lose the beautiful sheen because the ganache sets too hard.  Although it does tend to warm up and still look nice once it's left at room temperature.*

8.  Using a large knife (you can heat it if you like, but I found just wiping it well with a paper towel between slices worked for me), slice off the edges to create the clean, beautiful edges that define a proper opera cake. 
Edges being sliced clean.  No one complained about having to taste-test the cut-off edges.
It looked so pretty! 

9.  Carefully slide the cake onto your prepared serving platter OR remove the parchment paper pieces.  Try to touch it as little as possible on the top to avoid messing up the beautiful sheen.   Leave at room temperature until serving.  Serve in thin slices or small squares to show off your pretty layers!  Yum! 

This cake is best served at room temperature and made on the day you're serving because of the beautiful shine on the ganache.  However, leftover cake stores perfectly sliced in the refrigerator in tupperware - and it tastes just as delicious a day or two after assembling.   You could even freeze slices, let them defrost in the bag and then serve at room temperature as well for leftovers! Enjoy !

A birthday cake to remember! 

Opera-Style Cake (nut-free) Recipe by Successfully Gluten Free!

Saturday, 29 August 2020

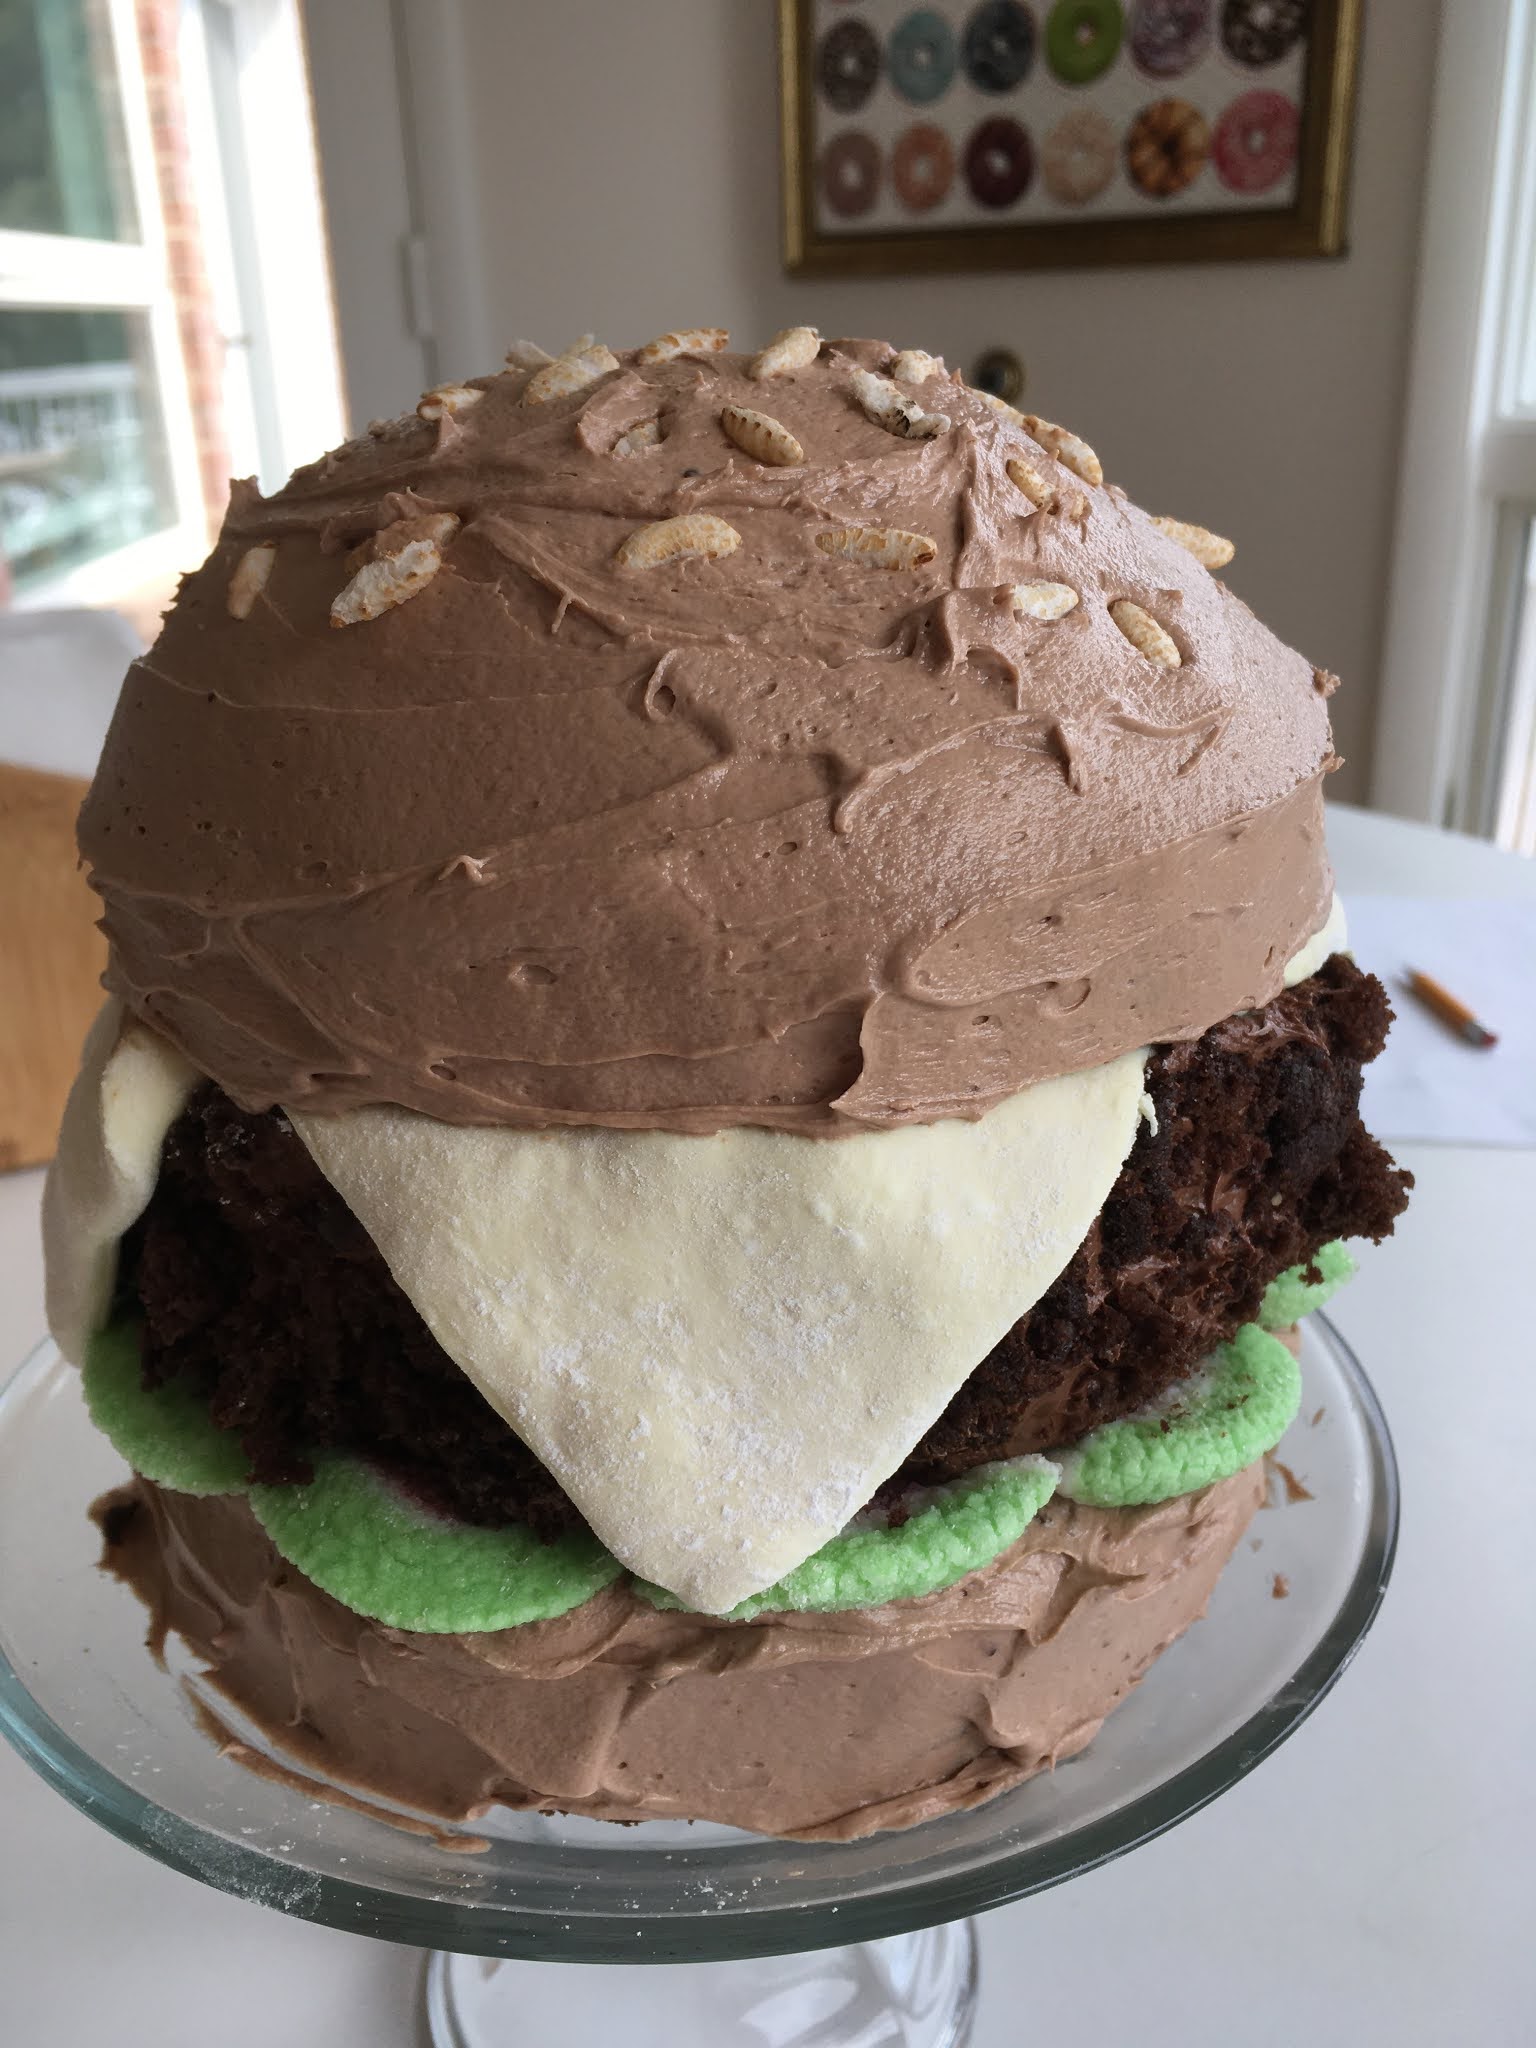
Hamburger Cake - Fun for Kids!

Nothing says Happy 89th Birthday like a hamburger cake.  But when my six year old read about it in a Food Network Kids Cookbook, she was convinced it would be the perfect cake for her great-nana.  So, we turned it into a gluten-free, chocolate party cake.  And it really was - lots of laughs, and packed with delicious chocolate in both batter and frosting, it was a hit!   
Happy 89th Birthday to this festive nana!  We'll have to see if we can top it for your 90th.  Maybe a hot dog cake?  By the time we served the cake, the hot kitchen had made the marshmallow fondant stretch and "melt" just like real cheese. Ha! 
My sister-in-law snapped this photo of the cake. 
Just after finishing our "burger" cake. 

Hamburger Cake

You can make the cake batter below, which is based off my chocolate chocolate chip muffin recipe.  It is rich and tasty - although I prefer it made fresh.  Other GF cake options that would work well in this recipe are my delicious chocolate cake recipe, my chocolate & toasted marshmallow chocolate cake, or a GF cake of your choice.  You could even use a vanilla cake, like the one in my blackberry vanilla cake recipe (double the recipe if you make it for a hamburger cake), if you prefer. 

Preheat oven to 350 F.  Butter three 6" cake pans and line the bottoms with a piece of parchment paper.  Have an extra muffin tray available to make chocolate chip muffins with any of the batter you don't use.  I made 6 muffins.   

In a small measuring cup, stir together and set aside: 
1/2 cup boiling water
1/2 cup cocoa powder

In a mixing bowl, mix together: (it's important to mix dry ingredients first in gluten-free baking to avoid clumps)
1 cup brown rice flour
3/4 cup white rice flour
1/3 cup arrowroot starch OR cornstarch
1/4 cup potato starch
1/4 cup tapioca starch
1 1/2 tsp xanthan gum
1 tsp salt
1 Tbsp baking powder
2 tsp baking soda

Add and mix in, letting it beat until it's nice and smooth: 
cocoa mixture, from above
1 cup butter, softened
2/3 cup milk
2/3 cup sour cream OR plain or vanilla greek yogurt
4 eggs
1 cup white sugar
1/2 cup brown sugar

Add and mix in: 
3 cups chocolate chips (variety - dark, semi, milk, white)

Divide the batter into the three prepared 6" cake pans.  I had just enough batter leftover for 6 chocolate chip muffins.  So, most of the batter will go into the cakes.  They will double in size while baking, so make sure your tins are nice and tall. 
Ready to bake!
Bake cakes at 350 F for 35 - 40 minutes.  Remove from oven and let rest 10 minutes before removing from pan (and removing parchment paper from the bottom) and placing them to cool on wire racks.  I highly recommend using a gentle fan to help these cool faster.  Anything with chocolate in it will take longer to cool.  
Fresh from the oven.
Cooling with the help of a small fan.  It made it cool MUCH faster.

Prepare the following about 30 minutes before you plan to assemble your cake:
1. Homemade marshmallow fondant (for the cheese)
2. Chocolate Frosting + Vanilla Frosting (which gets some of the chocolate added into make the color perfect for the bun)
3. Flattened watermelon gummies (for the lettuce/tomatoes)

Marshmallow Fondant
In a large glass bowl, heat in a microwave at 20 - 30 second increments until nice and puffy and melted, stirring occasionally:
5 oz large marshmallows

Stir in with hands, kneading well: 
3/4 cup sifted powdered sugar, keeping an extra 1/2 cup available in case extra is needed
1 - 2 tsp water

Knead and stretch the marshmallow fondant in the bowl to help avoid as much of a mess with the powdered sugar.  If you want to tint it with a bit of yellow/orange/red food coloring, you can do so, and knead and stretch it in.  

Keep the marshmallow fondant wrapped tight in plastic wrap until you're ready to roll out and assemble on your cake.  You will roll it out on a cutting board (or countertop) sprinkled well with powdered sugar.  Keeping the rolling pin, fondant, and board well sprinkled with powdered sugar will help avoid any stickiness.  You can slice it carefully with a sharp knife into a square shape to be placed on the cake "hamburger" once rolled out.  
Make sure to cut your square so it's width matches the diameter of your cake or you'll end up with it a little large, like we ended up doing. Still fun - and looks like melted cheese. 
You can also see the darker chocolate frosting on the middle (hamburger) section and the lighter chocolate/vanilla mixed frosting making up the top and bottom sections.

Chocolate and Vanilla Frosting
In a mixer, beat until light and fluffy: 
1/2 cup butter, softened
3/4 cup powdered sugar
1/4 cup cocoa powder
1 tsp vanilla
1 cup marshmallow fluff

Remove from mixer into another bowl.  Add and beat in the same mixer until light and fluffy (it's OK to have any leftover chocolate frosting in there, since you'll be adding some of the chocolate frosting in later to make a light brown "bun" color): 
1/2 cup butter, softened
1 cup powdered sugar
1 tsp vanilla
1 cup marshmallow fluff

Add some of the chocolate frosting to the vanilla frosting until you have the desired "bun" color lighter frosting.  

Lettuce Leaves
On a cutting board or counter sprinkled with regular sugar, roll gummy watermelons as flat and wide as you can.  Flipping over regularly to add extra sugar to it as it flattens so they don't end up sticky.  You will pinch together the red ends, and place them in a circle around the cake after you've frosted the bottom layer, so the "lettuce" part is sticking out the edges.  
All prepped and ready for the "burger" - my 6 year old loved this part.

To Assemble the Hamburger Cake:

Trim the cakes: 
1. Bottom layer - slice a cake in half until you have a 1 - 1 1/2 " flat slice of cake
2. Middle layer - slice off the top of the cake until you have an ~2 - 2 1/2" piece of cake
3. Top layer - with a sharp knife, carefully trim the top layer until you have a nice, domed piece of cake

Take some of the trimmed cake and crumble it up to decorate the sides of the middle layer. 

On the bottom layer spread the top and sides with the light chocolate frosting.  Decorate the edges with the flattened watermelon gummies.  

On a separate plate or holding in the air, spread the top and sides of the middle layer with the dark chocolate frosting.  Press the cake crumbs onto the sides of the layer.  Gently place it on top of your bottom layer/lettuce leaves. 

Roll out and trim your rolled out marshmallow fondant into a square that has a length the same diameter as your cake.  Place it on top of your hamburger layer. 

Gently place your top domed layer of cake on top of the fondant square.  Spread the top layer with the remaining light chocolate frosting.  

If desired, press puffed rice cereal into the top to look like sesame seeds.

To serve, I highly recommend slicing the cake in half, laying it flat and cutting wedges of "burger" out that way.  It makes it easier to work with/cut into the marshmallow layer.  Enjoy! 
A seriously happy baker putting puffed rice "sesame seeds" on top of the burger cake. 

Gluten Free Hamburger Cake - Fun for Kids! by Successfully Gluten Free!