Search for a Recipe

Showing posts with label marshmallow. Show all posts

Wednesday, 20 December 2023

Homemade Gingerbread-flavored Marshmallows

These gingerbread flavored marshmallows got rave reviews from friends and family. They're so light and fluffy - as all yummy homemade marshmallows are - but the delicious gingerbread spices mixed in make it an extra special treat! Yum! Not in a gingerbread mood?  Try out Neapolitan flavored, s'more's marshmallows, chocolate covered marshmallows, or just plain-ol' vanilla marshmallows. Enjoy! 
Oops, snuck a bite! Yum!

Homemade Gingerbread-flavored Marshmallows

 
Butter 9x13 glass pan for larger square marshmallows OR butter cookie sheet for thinner marshmallows to cut into fancier shapes with buttered cookie cutters OR butter 9x13 pan and an 8x8 pan to make half thick, half thin marshmallows.
 
Combine in a mixer with whisk attachment:
½ cup cool water
3 pkg. (1/4 oz each) (This is about 2 1/2 Tbsp or 7 1/2 tsp) unflavored gelatin
 
In a small, deep saucepan, combine the following over medium heat. Cook, stirring, until syrup reaches 240F on a candy thermometer:
½ cup cool water
1 ½ cups sugar
1 cup light corn syrup
1/8 tsp. salt
 
I find heating to 240F takes ~20-30 minutes, and will go in phases of seeming not to increase in temperature to suddenly jump up 5-10 degrees.  So, make sure you’re paying attention, particularly at the end.
 
Showing the progression of sugar boiling.  It does bubble up a bit, but not too much.  Even so, I recommend using a pot that it the liquid will fill no more than halfway.
 
Remove from heat.  With mixer on low speed, slowly pour the sugar syrup into the softened gelatin.  Increase speed to high and whip until closer to room temperature, about 8-10 minutes. 
This is how the gelatin and boil-sugar mixture will look initially.
Keep whisking and it will fluff up and look like delicious marshmallow fluff.
 
While the marshmallow whips, mix together the following gingerbread spices to equal ~2 tsp total
1 tsp ground cinnamon
1/2 tsp ground ginger
1/4 tsp ground cloves
1/8 tsp nutmeg
1/8 tsp allspice
*make sure to mix together the spices first in a little bowl before adding to the pan, just to make sure you don't have lumps of any one spice.

Towards last 1-2 minutes of whipping, add in, scraping down occasionally: 
Gingerbread spices
1/2 - 1 tsp vanilla extract

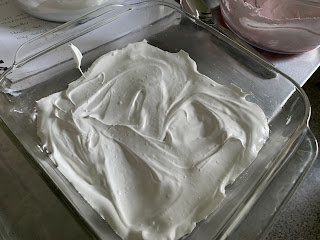
Use wet hands to smooth and flatten marshmallow into buttered pan(s).  
Gingerbread marshmallows - spread into a buttered pan

Optional decorating idea: As shown a couple photos in my regular marshmallow recipe, you can use food coloring (optional) on wet tops of marshmallows, swirling around for decoration.  If you want to add decorative sprinkles (optional), add them at this point.  

Sprinkle top of the pan with powdered sugar.  Let the marshmallows rest several hours at room temperature before cutting with a buttered knife or cookie cutter.  I find I need to re-butter the cookie cutters and knives every 3-4 cuts or they start to stick. 
Dusted with powdered sugar and resting.  This helps them dry out a bit before cutting. 

You’ll want to toss your marshmallows in powdered sugar to keep them from sticking together. You can either: 1. Place cut marshmallows aside on a piece of parchment paper sprinkled with powdered sugar, then toss in a large Ziploc with some powdered sugar; or 2. Place directly into a large Ziploc with powdered sugar once cut, and toss occasionally while you're cutting so marshmallows don’t stick together.  

Tossed with powdered sugar. 

Marshmallows are now ready to eat!  They can be stored in an air-tight container at room temperature for up to a couple weeks and will retain their freshness.  Enjoy!!! 
So light and fluffy and fun!   

Homemade Gingerbread-flavored Marshmallows Recipe by Successfully Gluten-Free! 


Monday, 13 June 2022

Homemade Neapolitan Marshmallows!

 The fun medley of vanilla, chocolate and strawberry in ice cream was a childhood favorite.  Imagine my surprise when I discovered that using freeze-dried strawberries ground up and sifted in marshmallows adds the perfect strawberry flavor to make a strawberry layer in a Neapolitan marshmallow!  If you don't want to make SO many jut Neapolitan marshmallows, you can use half the marshmallow to make some homemade GF s'mores marshmallows and just use half the strawberry and cocoa powder for your Neapolitan layers.  
Some of the yummiest marshmallows I've ever tasted in my life!

Homemade Neapolitan Marshmallows!

Butter a 9x13 glass pan OR butter two 8x8 pans 

Combine in a mixer with whisk attachment:
½ cup cool water
3 pkg. (1/4 oz each) (This is about 2 1/2 Tbsp or 7 1/2 tsp) unflavored gelatin
 
In a small, deep saucepan, combine the following over medium heat.  Make sure the liquid fills no more than 1/2 of your pan because it will bubble up while heating. Cook, stirring regularly, until syrup reaches 240 F on a candy thermometer:
½ cup cool water
1 ½ cups sugar
1 cup light corn syrup
1/8 tsp. salt
 
I find heating to 240F takes ~20-30 minutes, and will go in phases of seeming not to increase in temperature to suddenly jump up 5-10 degrees.  So, make sure you’re paying attention, particularly at the end.

Remove your hot sugar from heat.  With the mixer on low speed, slowly pour the sugar syrup into the softened gelatin.  Increase speed to high and whip until closer to room temperature, about 8-10 minutes. After a few minutes, it will start looking like marshmallow!  
 
Towards the end add and beat in:
1 tsp vanilla bean paste OR vanilla extract

Remove 1/3 of the marshmallow and spread in your buttered pan, using lightly dampened hands to spread evenly.  
A layer of vanilla in an 8x8 pan

Remove 1/3 of the marshmallow into a separate bowl and mix in: 
1/4 - 1/3 cup sifted crushed freeze-dried strawberries (I like to prep this while the marshmallow is mixing/cooling)

Spread the strawberry layer on top of your vanilla layer, using lightly dampened hands to spread evenly.  
Adding the strawberry layer.  This definitely looked a bit more pink in person.  If you want it darker pink, you can always add a drop of food coloring with your freeze-dried strawberries. 

In your mixer, add and whisk in to make your chocolate layer: 
2 - 4 Tbsp cocoa powder

Spread your chocolate layer on top of the strawberry layer, using lightly dampened hands to spread evenly.  
The chocolate was last to be added.  

Sprinkle the top of your marshmallows generously with powdered sugar.   Let them sit 3-4 hours at room temperature to dry.  Use a buttered knife to slice the marshmallows (reapply butter, as needed).  Toss them gently in powdered sugar to coat evenly.   
Don't worry if the edges aren't perfect!  Here's a side-view of the three layers of marshmallows, topped with powdered sugar and left to dry for a few hours.  

Marshmallows are now ready to eat!  They can be stored in an air-tight container at room temperature for up to a couple weeks and will retain their freshness.  Enjoy!!! 
A bite out of a freshly made Neapolitan marshmallow! Yum!

Homemade Neapolitan Marshmallows Recipe by Successfully Gluten Free!

Wednesday, 30 March 2022

Homemade S'mores Marshmallows!

 I have been making homemade marshmallows for many, many years now, but I somehow never manage to post some of the more fun varieties.  This is SUCH a fun and easy one to make.  A huge hit with everyone who was lucky enough to eat one (or two, or three).  Enjoy! 
A bite taken out of a freshly made s'mores marshmallow. Yum!
Chocolate swirled marshmallows, ready to be topped with more crushed GF graham crackers.

Homemade S'mores Marshmallows!

Butter a 9x13 glass pan OR butter two 8x8 pans.  Sprinkle the bottom of the pan(s) with a layer of: 
GF graham crackers, crushed
Just one of the 8 x 8 pans buttered and lined with crushed GF graham crackers

Combine in a mixer with whisk attachment:
½ cup cool water
3 pkg. (1/4 oz each) (This is about 2 1/2 Tbsp or 7 1/2 tsp) unflavored gelatin
 
In a small, deep saucepan, combine the following over medium heat.  Make sure the liquid fills no more than 1/2 of your pan because it will bubble up while heating. Cook, stirring regularly, until syrup reaches 240 F on a candy thermometer:
½ cup cool water
1 ½ cups sugar
1 cup light corn syrup
1/8 tsp. salt
 
I find heating to 240F takes ~20-30 minutes, and will go in phases of seeming not to increase in temperature to suddenly jump up 5-10 degrees.  So, make sure you’re paying attention, particularly at the end.

Remove your hot sugar from heat.  With the mixer on low speed, slowly pour the sugar syrup into the softened gelatin.  Increase speed to high and whip until closer to room temperature, about 8-10 minutes. After a few minutes, it will start looking like marshmallow!  
 
Towards the end add and beat in:
1 tsp vanilla bean paste OR vanilla extract

Gently fold in - some will melt and swirl, but enough should remain un-melted so you have a nice blend in your marshmallows:
1/2 - 1 cup mini semi-sweet chocolate chips

Spread gently on top of your crushed graham cracker in your prepared pan.  Use slightly dampened hands (wet them again as needed) to spread your marshmallow evenly.   Sprinkle the top of the marshmallows with additional crushed GF graham crackers.  
Pressed in the pan, smoothed, and ready for topping. 
Topped with crushed graham cracker, and left to dry for a few hours.  Yum!

Let your marshmallows sit at room temperature for 3 - 4 hours to dry.  Slice, using a well buttered knife, buttering again as needed.  Roll your freshly sliced marshmallows in more crushed GF graham crackers.  Store extras in an air-tight container.  They will retain their freshness for 1 - 2 weeks (I couldn't tell you if they last longer because they've never made it past two weeks).  Enjoy! 

Homemade S'mores Marshmallow Recipe by Successfully Gluten Free!

Saturday, 30 November 2019

Chocolate Covered Homemade Marshmallows

Well, these may be bunny molds here, but you better believe these yummy chocolate covered homemade marshmallows will be getting made again for Christmas!  The homemade melt-in-your-mouth marshmallow is perfect coated in a crisp chocolate shell.  Special occasions only, in my opinion. ;) Perfect for gifts or a party!  Enjoy!
Gluten Free Chocolate Covered Homemade Marshmallows
A bite out of a delicious, fresh, homemade marshmallow-filled chocolate bunny.  Yum! 

Chocolate Covered Homemade Marshmallows


Temper your chocolate, as instructed here, and fill 2-3 silicon or plastic chocolate molds with tempered chocolate.  I used a 54% bittersweet chocolate for these chocolates here. 
Chocolate-filled molds

While chocolate sets, prepare your marshmallow (this is 1/2 a batch of my regular homemade marshmallow recipe):

Combine in a mixer with whisk attachment:
1/4 cup cool water
1 pkg. + 1/2 pkg. (1/4 oz each) unflavored gelatin

In a small, deep saucepan, combine the following over medium heat. Cook, stirring, until syrup reaches 238 F - 240 F on a candy thermometer:
1/4 cup cool water
3/4 cups sugar
1/2 cup light corn syrup
pinch salt
*Note: I find heating to 240 F takes ~20-30 minutes, and will go in phases of seeming not to increase in temperature to suddenly jump up 5-10 degrees.  So, make sure you’re paying attention, particularly towards the end.

Remove from heat.  With mixer on low speed, slowly pour the sugar syrup into the softened gelatin.  Increase speed to high and whip until closer to room temperature, about 8-10 minutes. 
This is how the gelatin and boil-sugar mixture will look initially.
Keep whisking and it will fluff up and look like delicious marshmallow fluff.
When there's about 2-3 minutes left for the mixing, add:
1/2 tsp vanilla

The mixing will have cooled the marshmallow down quite a bit.  You do not want this to be really hot while you are piping into your chocolate molds, or you'll melt the chocolate and ruin the temper.  However, I found that by the time it beat for 10 minutes and I placed it into a bag for piping, it had cooled down sufficiently.  

Using a couple small piping bags, fill with marshmallow and cut a small corner off the bag.  Pipe carefully into the molds, filling edges and corners first before filling the rest of the mold.  You can dip your finger in some water to flatten/fix the marshmallow before it cools too much to adjust.  However, you want to use VERY little water, because you are working with chocolate.  You want to avoid the water touching the chocolate.  
Marshmallow carefully piped into the chocolate molds.

Let the marshmallows rest at room temperature 30-60 minutes, to dry out a bit before melting and topping with chocolate.  (You can temper this chocolate, if desired, or just melt and pipe.  I usually do this and don't worry about the bottoms looking as nice as the tops or being as nice and crisp.)  

Once the chocolate has set (you can place it in the refrigerator to help it set), tap out or un-mold the marshmallow-filled chocolates.  These stay nice and fresh tasting for a couple weeks, if they can last that long. (I wouldn't know if they are fresh beyond that point since we've never managed to have any survive past two weeks).  Enjoy! 
Freshly tapped out marshmallow-filled bunnies. Yummmm... 
For a laugh - I tried to pipe homemade peeps, rolling them in colored sugar.  Unfortunately, I didn't actually look at a picture of a peep before piping these, so I ended up with mutant ghost peeps.
They actually tasted A-MAZING - despite looking absolutely horrible.  I don't normally like the sugar covered marshmallows.


Chocolate Covered Homemade Marshmallows Recipe by Successfully Gluten Free!


Wednesday, 15 May 2019

Scandinavian Mallow Fluff Cakes

These Scandinavian Mallow cakes are my variation on the traditional "Flodeboller" that I was lucky enough to have eaten the couple of times I've visited Sweden.  They were so amazingly light and airy - a very different sort of marshmallow taste compared to what is typically found in North America.   However, since I didn't want to use a marzipan-type of base (commonly used for these type of mallow cakes), I needed to come up with something else that I was happy with for the bottoms.  After some experimentation, I came up with these super thin, yummy coconut-chocolate chip cookie bases.  (Technically, you can make these without any biscuit bottom at all.  Just pipe the mallow fluff onto a piece of buttered parchment paper).  These were a big hit around here - not lasting long at all.  Enjoy!!!
GF Scandinavian Mallow Fluff Cakes Flodeboller
Fresh Scandinavian Mallow Fluff Cakes, ready to eat!
GF Scandinavian Mallow Fluff Cakes Flodeboller
A mallow cake sliced open.  These were melt-in-the-mouth delicious!

Swedish Mallow Fluff Cakes - gluten free

Coconut Biscuit Cookie Dough (make in advance, since these need to chill/freeze before baking)
Makes ~ 60 small cookies - but you'll only need about 15-18 for the amount of marshmallow you'll make here - unless you want less marshmallow per cookie.  Feel free to double the marshmallow recipe if you are hoping to make more cakes.

In a separate bowl, mix together the dry ingredients:
3/4 cup brown rice flour
1/4 cup tapioca starch/flour
2 Tbsp potato starch
1/2 tsp xanthan gum
1/2 tsp baking soda
1/2 tsp salt

In a mixer, cream together:
1/2 cup butter, softened
3/4 cup brown sugar

Add and mix together:
1/2 tsp vanilla extract or vanilla bean paste
1 egg
1 egg yolk

Add to butter/egg mixture:
dry ingredients from above
1 cup sweetened coconut flakes
1/2 cup mini chocolate chips
This is just half the dough, but wanted to show the consistency.  

Divide dough into two portions and use two pieces of plastic wrap to make two 12" - 15" logs of dough.  Place wrapped dough into freezer 1-2 hours (or more - these will last several weeks before slicing and baking).
I wanted small cookies, and these will spread while baking, so I made each log of dough a good 12" - 15" long.  
When ready to bake, remove a log from the freezer and slice into thin slices.  Place on a parchment-lined pan and bake at 350 F for ~7-10 minutes, until nicely browned.   Let rest a few minutes on the pan before removing to a cooling rack to cool completely.
Thin slices of biscuit cookies, ready to bake.  Because mini chocolate chips are used, you can get really nice, thin slices.
Fresh from the oven - they tend to only spread a tiny bit, so you can bake them four across on the pan without any problems.
GF coconut chocolate chip wafer cookies
Fresh from the oven, cooling so you can put marshmallow on top. Yum!

Marshmallow Filling

In a mixer with a whisk attachment, whisk together until soft peaks form:
3 egg whites (fresh eggs are best)
1 Tbsp sugar
pinch salt

In a metal pot on the stove, combine, with very little or no stirring:
2 oz water
3/4 cup sugar
1/3 cup corn syrup
1 tsp fresh lemon juice
1 tsp vanilla extract

Heat over medium heat until sugar syrup reaches 238 F - 242 F.   Remove from heat immediately.  Turn mixture to low speed and slowly pour in the sugar syrup.  Increase the speed and beat on medium-high for 8-10 minutes.   The marshmallow will puff up nicely and get light and fluffy, while also cooling down.
Marshmallow fluffing up nicely.

Prepare a large piping bag with a large star-shaped tip (or just use a large round tip).  Place marshmallow into piping bag.  Pipe big swirls on top of each of the cookies, making a nice large mound on top of each.  You can make these as short or tall as you would like, depending on the mallow to cookie ratio you'd prefer.
Flodeboller
This pipes into gorgeous swirls.  You can use a plain tip or star tip.  I like this sort of look because then you end up seeing some of the definition once you dip it in chocolate.

Let the marshmallow-topped cookies sit at room temperature to dry for 1 - 2 hours.  These won't dry well if you're kitchen is humid, so best not to make on a rainy day.

Ideally, you would want to "temper" your chocolate for an authentic Flodeboller, however, this method of covering works very nicely, too:

In a 2 cup measuring cup, fill 1 1/2 cups full with high-quality dark chocolate (or milk chocolate) chips.  Melt at 50% power in 30 - 60 second increments in the microwave, stirring regularly.  Once the chocolate is mostly melted, add an extra handful of chocolate chips into your chocolate and stir until all the chocolate is melted.  This won't "temper" your chocolate, but will help you avoid any of the bloom or swirls that can appear on non-tempered melted chocolate.  Once your chocolate is fully melted, add 1 Tbsp light olive oil or 1 Tbsp coconut oil.  This will make it a bit runnier and easier to use for dipping your marshmallow cakes!

One at a time, dip your cakes into the chocolate, rotating them in the chocolate and shaking to remove excess chocolate.  You can use a spoon of your fingers to get as much or little as you like on the bottom of the cookie biscuit.  Place dipped cakes onto a parchment-lined baking tray.  Sprinkle desiccated coconut on top of cakes, if desired.   Refrigerate until chocolate has set, then serve!   You can place them in the refrigerator until the chocolate hardens.  Remove and keep at room temperature until ready to serve!  These didn't last more than a few days around here, but they were just as delicious a few days out as on day one.  Enjoy!
Flodeboller
Just dipped Mallow Cakes, sprinkled with desiccated coconut, and ready to chill/harden in the fridge.
Flodeboller Mallow Cakes
These are so tasty.  Yum!  

Gluten Free Scandinavian Mallow Fluff Cakes Recipe by Successfully Gluten Free!