Search for a Recipe

Wednesday 28 February 2018

Gluten Free Hamentashen!

Homemade Gluten Free Hamentashen cookies!  Easy and delicious! My dad's birthday falls on the Jewish holiday of Purim this year, so in lieu of a cake, he requested homemade hamentashen!   These triangular shaped cookies are filled with either jam or poppyseed filling.  I've seen them big and fat, small and crispy, with way too little filling, and overflowing with filling.  These are a nice middle-ground.  A good balance of flaky orange-flavored cookie crust with a perfect amount of jam in the middle.   The best part it, the dough can be shaped into cookies easily without refrigeration since it's rolled out between plastic wrap.  Happy eating!
Gluten free hamentashen
Alternating peach and raspberry-filled gluten-free hamentashen.  They kept disappearing as they cooled. 
Fresh hamentashen, ready to eat! 

Gluten Free Hamentashen
Makes ~30 filled cookies.

Preheat oven to 375 F. Line three pans with parchment paper.

Beat until light and fluffy:
1/2 cup butter, softened
3 oz cream cheese, softened
3 Tbsp sugar

Add and beat in until smooth:
1 egg
1 tsp vanilla extract
2 tsp orange zest
1 drop lemon essential oil (I like the DoTerra lemon essential oil for cooking)

Mix in a small bowl  before adding to wet ingredients:
1 1/2 cup Kristin's Gluten-Free Flour Mix
1/2 tsp xanthan gum
1/4 tsp salt

Mix dough together until smooth.   Most recipes recommend chilling, but I find because I am making these rolled between plastic wrap, I can just make them right away without any refrigeration. 

Scoop 1 Tbsp scoops onto plastic wrap.  Place another piece of plastic wrap on top and gently roll with rolling pin into a circle of about 3 - 4" diameter (I roll one way partly, then turn and roll the other way until it's a circle).
Rolled out between plastic wrap - no sticking, no mess!
Place 1 tsp jam of your choice in the center. (High quality jam is recommended - I used a homemade raspberry jam and a peach jam for these.  You can also fill with a poppyseed filling, which is more traditional.) 
Neatly folded hamentashen. Just use the plastic wrap to help fold and pinch edges/corners.  
Pick up carefully and place on the parchment-lined pan.
Use the plastic wrap to help you fold and pinch sides of the cookie inward, folding up three times to make a triangular cookie.  Carefully use your fingers to gently transfer the filled cookie to a parchment-paper lined baking pan.   Repeat until you have 12 cookies on a tray.
A tray ready to bake!
Bake cookies at 375 F for 16-18 minutes.   I like to make up another tray while the first are baking.
Some jam will bubble up and over the cookies, but this is fine.  After you move them to the tray the jam will just be left on the parchment paper. 
After removing from oven, let the cookies rest 3-4 minutes before removing to a cooling tray to cool completely.
Cooling cookies! Yum! 

If you're not serving on the same day, store cooled cookies in a tightly sealed container.  They'll be just as delicious day 2!  Enjoy! 
The cookie dough was wonderfully flaky, as you can see here. 

Saturday 24 February 2018

Sweet & Spicy Baked Tilapia with Lime

Sweet & Spicy Baked Tilapia with Lime combines a blend of Mexican flavors with the sweetness of maple syrup and the tartness of lime.   Served alongside rice, quesadillas, sauteed onions and peppers, it's an easy to whip together, but absolutely delicious feast of a meal.  I cooked 2 lbs of fish, so we'd have leftovers for another day.   The fish would be perfect used for fish tacos.  You can use all the same toppings, but serve it inside the corn tortillas. 
Mexican Style Tilapia
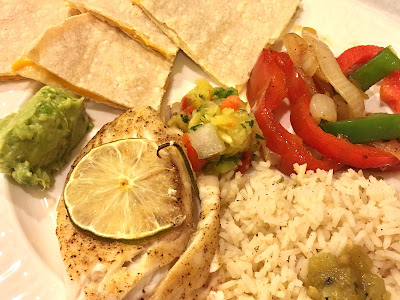
Mexican-style Tilapia with all the trimmings - would you believe this was the plate handed to my nana for dinner?  She was one happy eater.

Sweet & Spicy Baked Tilapia with Lime

Preheat oven to 400 F.

On a foil-lined cookie sheet, place 1-2 lbs fresh tilapia filets.

Mix together in a small bowl:
3-4 Tbsp lime-infused olive oil (or olive oil + 2-3 tsp fresh lime juice)
2 Tbsp maple syrup
1/2 tsp salt
1/2 tsp pepper
1/2 tsp cumin
1/2 tsp garlic powder
1 tsp chilli powder
pinch cayenne powder (for a spicier fish)

Spread spice mixture evenly over filets.   Top fish with thin slices of fresh lime
Mexican Style Tilapia
Topped with glaze and fresh lime and ready to bake.
Bake at 400 F for about 17-22 minutes, just until fully baked and fish flakes apart.

Serve alongside spicy rice (below), cheese quesadillas, fajita-style sauteed onion, green & red bell peppers (below), pineapple salsa (or salsa of your choice), guacamole, and canned green chilies for a Mexican-style feast!   The leftovers are just as delicious!  Yum! Enjoy!
Mexican Style Tilapia
Fish fresh out of the oven - yum!
Spicy Rice

For 1 cup rice, add to rice/water when beginning to cook, then cook as directed:
1/2 - 1 tsp salt
1/2 - 1 tsp pepper
1 tsp chilli powder
1/2 tsp cumin powder
1/2 - 1 tsp garlic powder

You can add more spices, to taste, once the cooking is complete.  I like to serve the rice alongside canned green chilies which add a nice flavor that compliments the fish nicely.

Fajita-style sauteed onion, green & red bell peppers

Cook over medium-high heat, stirring occasionally, until softened and roasted to desired amount:
3-4 Tbsp oil (appropriate for high-heat cooking)
1 onion, sliced
1-2 green bell peppers, sliced
1-2 red bell peppers, sliced
salt, pepper, garlic powder, to taste

Mexican Style Tilapia
This was my dinner plate - tilapia, rice, green chilies, pineapple salsa, guacamole, cheese quesadillas, sauteed peppers & onions. Mmm...  


Monday 19 February 2018

Homemade Thai Red Curry Paste

I have the hardest time finding curry pastes ready-made that have wholesome ingredients and the taste that I want.  This delicious homemade Thai red curry paste has exactly the flavors I want, plus I'm happy with all the ingredients that go into the paste.  I'm a fan of knowing what's in my food.  This red curry paste is wonderful mixed into rice & vegetables, mixed into an easy pumpkin soup to make a pumpkin curry soup (instructions at the bottom), or served alongside any dish that might benefit from a dollop of spice thrown in.  The best news is that if you don't want to use it right away, you can freeze it and use it anytime! Enjoy!
GF Thai Red Curry Paste
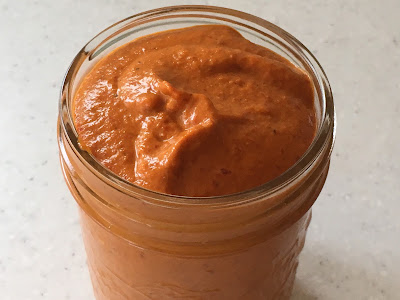
A delicious homemade Thai red curry paste.  

Homemade Thai Red Curry Paste
Makes ~12 oz of curry paste

Remove stems and place in a glass bowl:
3 large, dried New Mexico Chili Peppers
10 small, dried chiles de arbol

Cover chili peppers with boiling water and let rest 10 minutes, then drain. *(yes, you can use fresh hot peppers, just use three large and 10 small fresh ones, coarsely diced, instead of re-hydrating)*

In a frying pan, heat over medium heat, just until fragrant (usually 1-2 minutes):
1 Tbsp ground coriander
1 tsp ground cumin

In a blender or food processor, place the following:
1/2 cup shallots, coarsely chopped
1/4 cup minced garlic
1 Tbsp fresh ginger root, peeled and coarsely diced
1/4 cup fresh cilantro (optional)
1 tsp lobster bouillon base (I find lobster bouillon in a jar on the shelf near the chicken bouillon.)
1/2 tsp pepper
1/2 tsp salt 
coriander & cumin, from above
chili peppers, from above, drained
1/2 cup avocado oil (or other oil good for cooking)

Process the curry paste well, blending until nice and smooth.  You can store this in a glass jar in the refrigerator for a couple weeks, or freeze for up to a year.  I like to freeze it flattened in a ziploc bag, so then I can break off pieces when I want to use them.   This is great to use in rice & vegetables, to make a pumpkin-curry soup, to make a regular curry dish w/ meat & vegetables.  I've even served it alongside a pork carnitas spread, and it added a nice bit of spice to the meal.

My favorite thing to do with this red curry paste is to saute up fresh vegetables and add in cooked rice, salt, pepper, and a few Tbsp of thai red curry paste, to taste.   Each time I've made the vegetables and rice it's gotten rave reviews, and lots of people going back for seconds! 
GF Thai Red Curry Paste
I cover and store the curry paste in the refrigerator for a couple weeks, using in all sorts of dishes! 
Thai red curry pumpkin soup - homemade pumpkin soup with a healthy dollop of homemade red curry paste and 1 cup canned coconut milk mixed in, topped with scallions, cilantro and cooked chicken.  So easy, and so delicious, and was perfect for a bookclub luncheon.


Sunday 11 February 2018

King Cake - A Mardi Gras Tradition

My friend who hails from New Orleans asked me if I could come up with a gluten-free rendition of the traditional "King Cake" served for Mardi Gras.  This delicious cake is made with a bread-dough like consistency, filled with swirls of cinnamon and sugar and topped with a creamy, scrumptious glaze.  Colored sparkling sugar decorations in the traditional colors of purple, green and gold make for a fun, festive and delicious cake!  The best part is, while it looks fancy, it's easier to whip together than cinnamon rolls.  Enjoy!
Gluten free King Cake for Mardi Gras
Gluten-free King Cake!  Fun, Festive and Delicious!  
Gluten free King Cake for Mardi Gras
A slice of King Cake - I found everyone had a preferred color or color combination. 
King Cake
Makes one large King Cake

Preheat oven to 350 F.  Line a cookie sheet with parchment paper.

In a mixer, combine the dry ingredients:
2 cups brown rice flour
1 cup sorghum flour
3/4 cup cornstarch or arrowroot starch
1/4 cup potato starch
1/2 sugar
4 tsp rapid-rise yeast
3 1/2 tsp xanthan gum
1 1/2 tsp salt

Add in the following, mix slowly and then increase to medium/medium-high speed for 4 minutes:
1/2 cup butter, softened
1 cup milk, warmed
1/2 cup water, warmed (plus additional 2-3 Tbsp, if needed)
3 eggs

While beating, the dough will change consistency, but if it's too thick, you can add an additional 2 Tbsp of water.

Roll out the dough between pieces of plastic wrap.  I lay out two large pieces, slightly overlapped.  Scoop the dough onto the plastic wrap.  Then, using another two large pieces, slightly overlapped, roll the dough out into a large rectangle.  You want to aim for something approximately 20" x 36".

Spread on the dough:
1/4 cup butter, melted

Sprinkle over melted butter the following, mixed together:
1 cup brown sugar
1 Tbsp cinnamon

Using the plastic wrap to help, roll up the dough.  If the dough is a little sticky, you can always use a little bit of water on your hands. 
The rolled up dough, ready to carefully transfer to the parchment paper-lined pan
Getting the roll of dough into a ring on the parchment paper-lined pan is the trickiest part.  To do this, roll the dough toward the edge of the plastic wrap.  Carefully pick up the roll (using plastic wrap) and place as best you can into a circle/oval shape on your pan.  Don't worry if it's not perfect!

Use very wet hands to move and reshape the dough into the desired shape.   I keep dipping my hands in water to adjust the dough on the parchment paper and smooth the tops and edges.
Gluten free King Cake for Mardi Gras
King Cake dough, having been shaped into a neat, smooth ring.  You can make it into a larger oval, too! Both work perfectly.
Let dough rise ~40-60 minutes in a warm location, until puffed up (it won't be quite doubled in size, but should look nicely risen.    You have two options for rising:
1. Let it rise uncovered.  This will have a tighter edge to the outside of the dough, but will give a sleeker look.
2. Cover the cookie sheet with another cookie sheet that's flipped upside down.  This will give a puffier, more moist cake.  It tends to help it rise faster, and usually ends up with more cracks throughout the top, but the taste is basically the same.
Gluten free King Cake for Mardi Gras
King Cake dough after rising, ready for baking! 
Bake your cake at 350 F for ~40 minutes, until nicely browned.  Let rest on cookie sheet for 10-15 minutes before sliding off and letting cool directly on the cooling rack. 
Gluten free King Cake for Mardi Gras
Freshly baked, and finishing cooling on the cooling rack.  Colored sparkling sugar sprinkles can be seen next to the King Cake.
While the cake is cooling, prepare the colored sugars:
In three small bowls combine:
decorating sparkling sugar sprinkles
with liquid food coloring as follows:
2 red drops for every 1 blue drop for purple
green drops for green
yellow drops for gold

Set aside, mixing occasionally to help the coloring dry on the sugar crystals.

Once your cake is mostly cooled, you can glaze it with the following glaze, then immediately sprinkle with colored sugar sprinkles.

Creamy Glaze:
Whisk together:
3 cups powdered sugar
1/2 tsp vanilla extract
3 Tbsp butter, melted
2 Tbsp fresh squeezed lemon juice
2-4 Tbsp milk, to a thick glaze consistency

Spread the glaze overtop of the cake, spreading with the back of a spoon to spread evenly and get the dripping effect.  Sprinkle immediately with colored sprinkles.  It will set fairly quickly, and you can slice and serve!  Enjoy!
Gluten free King Cake for Mardi Gras
Immediately after spreading around the glaze. You want to put on the sprinkles immediately, while the glaze is still wet. 
Gluten free King Cake for Mardi Gras
A finished cake!  The glaze ends up looking polished once it cools/hardens slightly. 
Gluten free King Cake for Mardi Gras
Such a fun and festive cake! There were many happy little taste-testers around here! 

Wednesday 7 February 2018

Scrumptious Mint Chocolate Chip Cookies

For my sister-in-law's Cape Cod wedding, I wanted to make something a little fancier than a plain chocolate chip cookie or a banana chocolate chip cookie (even though it's her favorite).   Due to allergies, I needed to make dessert foods that were gluten-free, nut-free, and soy-free.  These cookies were perfect, made with nut-free soy-free mini chocolate chips.  This recipe makes quite a lot of cookies, but they're small and spread out perfectly, making an attractive cookie for a special occasion. Plus, they taste delicious!  We even love pairing them with a homemade thin mint ice cream for an extra special treat! Enjoy!
Gluten Free Mint Chocolate Chip Cookies - fresh out of the oven! 

Scrumptious Mint Chocolate Chip Cookies
Makes ~72

Preheat oven to 350 F.  Line cookie sheets with parchment paper.

Mix together dry ingredients in a large bowl:
2 cups white rice flour
2/3 tsp xanthan gum
1 tsp baking soda
1 tsp salt

Cream together:
1 cup butter, softened
1/2 cup white sugar
1 cup brown sugar

Add,
1 tsp water
1 tsp vanilla extract or vanilla bean paste
2 eggs
8-10 drops peppermint essential oil (I love the Doterra oil for this)

Mix dry ingredients into wet until combined.

Add and mix in briefly:
1/2 bag mini chocolate chips (make sure gluten-free, soy-free, nut-free, if needed. I like the "enjoy life" brand)

Scoop small 1 Tbsp scoops ( I have a slightly smaller than 1 Tbsp scoop I like to use for this) onto parchment-lined pans.  Bake cookies for 6-7 minutes at 350 F.  Cool on a cooling rack.
Fresh out of the oven to cool! 
These mint chocolate chip cookies are wonderful fresh, but also freeze and thaw perfectly, too!  For an extra special treat, make mint ice cream sandwich cookies using homemade thin mint ice cream!  AMAZING! Enjoy!
A real winner - homemade ice cream sandwiches made from mint chocolate chip cookies and homemade thin mint ice cream. Yum!