Search for a Recipe

Tuesday, 30 January 2018

Easy Herb & Garlic Chicken - perfect over pasta

A tasty, easy chicken recipe that my whole family has enjoyed.  The kids are happy I serve it with pasta, and the adults are happy because it's packed with basil, chives and garlic.   The drippings get tossed into the pasta, with or without the chicken, depending on your preference.  A nice, easy meal, that makes you feel like you're eating something fancy despite it's simplicity.  Enjoy!
Herb and Garlic Chicken - GF
Herb and garlic covered chicken, ready to pop into the oven! 

Herb & Garlic Chicken - perfect over pasta
Makes 5 chicken breasts

Preheat oven to 425 F.

In a bowl, mix together:
1/2 cup olive oil 
5-6 cloves garlic, minced
1/2 small onion, minced finely
3-4 Tbsp minced fresh chives
4-5 Tbsp fresh basil, sliced
1/2 - 1 tsp salt
1/2 tsp pepper

Drizzle a little of the mixture on the bottom of a 9 x 13 pan.   Place chicken breasts in pan, slicing thick areas, if needed, so all the chicken is at a similar height/thickness in the pan.  Spread the olive oil/garlic/herb mixture evenly over all the chicken breasts.

Bake at 425 F for ~25 minutes, until the chicken measures ~170 F at the thickest spot.
Herb and Garlic Chicken - GF
Fresh from the oven - ready to dice and toss with pasta - or collect drippings and toss and serve the chicken over-top! 

The chicken can be served directly over GF pasta*, using the olive oil and drippings to toss with your GF noodles.

OR

You can dice/slice up the chicken and toss the chicken and olive oil drippings with GF pasta to serve.

* My favorite GF noodles are the ones made from a mixture of brown rice, white rice, quinoa, and corn.   My ultimate favorite noodles are homemade gluten-free pasta, but these do take a bit more effort and mess, though not too much overall time because the boiling time for fresh noodles is so short. 

Thursday, 18 January 2018

Fabulous Gluten-Free French Bread!!!

We have a winner!  French-style bread with a crispy outside, light, chewy inside, and delicious flavor.  It's been requested many times now, and inhaled whenever I make it.  I've had people eating it for breakfast, lunch and dinner.   We had it at a large family dinner buttered and toasted alongside homemade seafood chowder, which was a hit.  We've had it alongside pasta & sauce, with jam for breakfast, alongside eggs & bacon, and just eaten with butter just for fun.   Every single time I make this recipe I am amazed by two things: 1. how amazing tasting this bread is with the crispy edges and chewy inside, 2. how easy it is to whip together. The rise and bake time are lengthier than most of my bread recipes, but it's so easy to whip together that it makes up for the wait time.  And, unlike most gluten-free breads, after cooling, you can leave it in a tupperware or ziploc on the counter top overnight and the texture and taste will still be amazingly delicious in the morning!  (Usually, GF breads do best if you freeze on the day of making).  The texture is equally amazing - retaining it's flexibility and not crumbling as one so often finds with gluten-free breads. Hurray! Enjoy!
Gluten Free French Bread
A fresh loaf of gluten-free French bread, sliced and ready to eat!  YUM! 

Fabulous Gluten Free French Bread!!! 
Makes 3 loaves

Line desired pans with parchment paper (3 loaf pans, large round glass bowls w/ flatter bottom, bagette pans, if you're lucky enough to have them). 

In a mixer, combine thoroughly:
2 cups tapioca flour/starch
1 1/2 cups brown rice flour
6 Tbsp potato starch
3 tsp xanthan gum
1 Tbsp quick/rapid-rise yeast
1 1/2 tsp salt
1 Tbsp sugar

Add and mix in, beating 4 minutes:
1 1/4 cup lukewarm water
2 tsp apple cider vinegar
1/4 cup oil (avocado oil is my preferred choice)
1 cup egg whites (these can be purchased at the store near the eggs)

Scoop bread into 3 pans lined with parchment paper.  Cover loosely with plastic wrap and let rise 45 - 60 minutes in a warm location, until bread has doubled and is getting cracks in the tops from rising.  Yes, you can make this in different shaped pans!  I've made it in normal bread loaf pans, but also in a med-large round glass Pyrex dish, lined with parchment, for a nice round-loaf look.  Same great taste! 
Gluten Free French Bread
Bread after rising and doubling in size.  Ready to bake! 

Bake at 375 F for 55-60 minutes.  This length of time will allow the outside to get nice and crispy, but also allow the inside of the bread to fully cook.  If you cook it for less time, you'll find the inside is too sticky.   Let the bread cool before slicing (although yes, we do eat it warm quite often, but it slices more cleanly if cooled).  Sliced bread can be left in a sealed container on the counter and will still be delicious the next day! The crust will soften after being sealed, but a reheat in the oven will crisp it back up!   This has become the uncontested new family favorite bread recipe!
Gluten Free French Bread
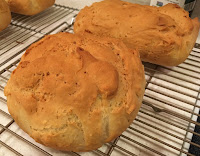
A fresh loaf, just out of the oven. Pop it out of the pan and cool on a cooling rack. 

Gluten Free French BreadGluten Free French Bread
I've made round loaves a couple times now, and they can be made larger or smaller (just add a little extra rising/baking time).  Same crispy outside and deliciously chewy inside! 

Thursday, 11 January 2018

Salted Caramel Frosting - made with homemade caramels

A wonderfully tasty salted caramel frosting - made with fresh, homemade caramels/sauce.  It's tasty with vanilla or chocolate cake.
Salted Caramel Frosting
Salted Caramel Frosting over cake made with my Vanilla Cupcake recipe

Salted Caramel Frosting: 

Make a small batch of homemade caramels:
Homemade Caramels: 

Butter one 8"x8" pan.

In a medium-sized saucepan over medium heat, combine:
2 Tbsp butter
3/4 cup whipping/heavy cream
1 cup brown sugar
1/4 cup light corn syrup
pinch salt, plus an extra pinch (or two good cranks with a salt grinder)

Cook until caramel reaches ~225-230 F on a candy thermometer.  Immediately remove from heat and mix in:
3/4 tsp vanilla bean paste OR vanilla extract

Pour caramels into buttered 8 x 8 pan and set on wire rack to cool.  You can make the frosting while these are still warm, but not hot.

Mix together, heating briefly briefly, if caramels have been allowed to cool. (You can heat 30 - 60 seconds in the microwave)
1/2 pan caramels (with an extra crank/pinch of fresh ground salt, heated to 225-230 F)
1/2 cup whipping/heavy cream

You'll want the caramel mixture to be a bit warm, but not hot, for it beat well into the other ingredients.

Beat in a mixer, starting slowly and building to medium to medium-high speed:
1 cup salted butter, softened
2 - 3 cups powdered sugar
2 tsp vanilla extract
caramels & whipping cream, from above

Let frosting beat for 2-3 minutes, then add extra powdered sugar to reach desired consistency.    You'll want it nice and fluffy, but not runny and not stiff.  It's okay if there are chunks of caramel that get stuck to your beaters - just leave them out when you're using the frosting (though you can eat them).  If you beat this A LOT, then you'll end up with a very fluffy frosting, thanks to the added whipping cream.
Very well whipped frosting.

This frosting tastes amazing on vanilla cupcakes.  It has a flavor reminiscent of penuche fudge (my favorite).  And, it is perfect in a chocolate layer cake, or on top of chocolate cupcakes, too! 

Wednesday, 3 January 2018

Herb and Lemon Baked Cod or Salmon

Happy New Year! I'll start the year off with a healthier dish - one we all love. The nice thing about making simple salmon or cod in this way is it's both aesthetically pleasing, and the lemon keeps the fish nice and moist during cooking.  I love the flavor of fresh dill, chives and lemon on the fish.  For a little extra flavor, you can add a sprinkling of thinly sliced red onion or minced garlic.  Great served with a salad or rice.  Enjoy!
Salmon and cod, ready for baking! 
Fresh out of the oven, and ready to eat! 

Herb and Lemon Baked Cod or Salmon


Preheat oven to 400 F.
Line baking pan with aluminum foil, turning up the sides to avoid drips spreading around the pan.

Place slices of salmon or cod on the foil-lined pan.  You can make as much or little of this recipe as you need.  The above pan is a 9x13 pan, and served 6.   

Sprinkle the top of the fish with the following:
fresh dill, diced
fresh chives, minced
salt & pepper

Drizzle the tops of the fish with:
lemon-infused olive oil (regular olive oil works, too, but the lemon-infused adds a richer flavor)

Top fish with thin slices of fresh lemon.

Bake at 400 F for ~16 - 20 minutes until thoroughly cooked.  This depends on the thickness/cuts of fish - check with a fork if it's flaking in the thickest part.  (Thicker/wider pieces may need a few extra minutes and thinner/narrow pieces will be more like the 16 minute time-frame).

Fresh baked fish is wonderful served alongside a fresh salad or with rice or potatoes.