I can't be the only one that finds gluten-free granola bars expensive. This recipe is great, because you can make your own big tray of granola bars, slice and store for eating through the week. If desired, you could also add some nuts to the mixture that goes in the oven, if you like. It was inspired by an easy kids recipe for homemade granola bars in my daughter's Highlight's magazine. Several alterations later, and we have the recipe below! The kids have been loving them. Some of our other favorite homemade granola bars are: key lime granola bars, delicious peanut butter granola bars, oatmeal berry jam bars, raspberry baked oatmeal, and several cookie-style varieties like granola bar bites, Aussie bites, and pumpkin granola cookies. And, if you want something more treat-like, you could make some yummy Monster cookies - a definite favorite! Enjoy~!
Preheat oven to 325 F. Line a cookie sheet with parchment paper. Line a 9 x 13 pan with parchment paper, set aside for later.
In a large bowl, mix together:
1/4 cup brown sugar
1/4 cup oil
1 tsp ground cinnamon
pinch salt
Add, and mix in, until thoroughly covered with oil/sugar:
3 cups whole oats (GF if celiac or sensitive)
1 cup unsweetened shredded coconut
1/2 cup pumpkin seeds (optional)
1/2 cup sunflower seeds (optional)
Spread the oat mixture onto the parchment-lined pan. Bake at 325 F for 15-20 minutes. While this is baking, you can prepare the syrup mixture.
In a medium-sized saucepan, mix over medium-low heat, 2-3 minutes, until the mixture is looking nice and smooth:
3/4 cup brown sugar
1/2 cup honey
1/2 cup agave
Add and mix in thoroughly:
6 Tbsp oil
1 tsp salt
1 tsp vanilla extract
Set to low heat, and mix in, stirring til smooth (chips have melted):
1/2 cup high-quality semi-sweet or dark chocolate chips
In a large bowl (can be the same as before), toss together:
4-5 cups puffed, crispy rice cereal (I like to use the kind made with brown rice)
Oat/coconut/seed mixture from oven (It's fine if it's piping hot, fresh from the oven)
Give your chocolate syrup a final good mix, and then pour on top of the oats and crispy puffed rice mix. Stir until evenly coated. Scoop granola mixture into the 9 x 13 pan lined with parchment paper. Press down with the back of your spoon or spatula.
Allow granola bars to fully cool. You can put them in the refrigerator for an hour or so to help them cool faster. Slice into desired sizes. You can wrap them in plastic wrap, wax paper, or parchment paper and store for snacks and school lunches. Enjoy!
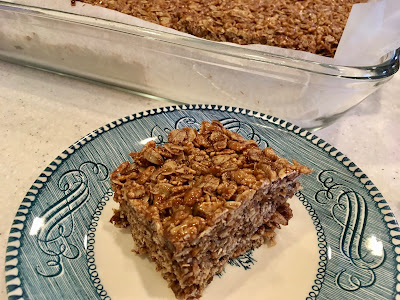
Freshly cut gluten-free granola bar. Yum!
Easy Homemade Granola Bars
Makes 9 x 13 pan, which you can slice any sizePreheat oven to 325 F. Line a cookie sheet with parchment paper. Line a 9 x 13 pan with parchment paper, set aside for later.
In a large bowl, mix together:
1/4 cup brown sugar
1/4 cup oil
1 tsp ground cinnamon
pinch salt
Add, and mix in, until thoroughly covered with oil/sugar:
3 cups whole oats (GF if celiac or sensitive)
1 cup unsweetened shredded coconut
1/2 cup pumpkin seeds (optional)
1/2 cup sunflower seeds (optional)
Spread the oat mixture onto the parchment-lined pan. Bake at 325 F for 15-20 minutes. While this is baking, you can prepare the syrup mixture.
Oats, coconut and seeds (if desired), ready to toast.
In a medium-sized saucepan, mix over medium-low heat, 2-3 minutes, until the mixture is looking nice and smooth:
3/4 cup brown sugar
1/2 cup honey
1/2 cup agave
Add and mix in thoroughly:
6 Tbsp oil
1 tsp salt
1 tsp vanilla extract
Set to low heat, and mix in, stirring til smooth (chips have melted):
1/2 cup high-quality semi-sweet or dark chocolate chips
Stirring in the chocolate chips - almost time to mix it all together.
In a large bowl (can be the same as before), toss together:
4-5 cups puffed, crispy rice cereal (I like to use the kind made with brown rice)
Oat/coconut/seed mixture from oven (It's fine if it's piping hot, fresh from the oven)
Give your chocolate syrup a final good mix, and then pour on top of the oats and crispy puffed rice mix. Stir until evenly coated. Scoop granola mixture into the 9 x 13 pan lined with parchment paper. Press down with the back of your spoon or spatula.
Just after being pressed into the pan. (We could resist taste-testing before cooling)
Allow granola bars to fully cool. You can put them in the refrigerator for an hour or so to help them cool faster. Slice into desired sizes. You can wrap them in plastic wrap, wax paper, or parchment paper and store for snacks and school lunches. Enjoy!
Sliced granola bars
Individually wrapped bars


