Search for a Recipe

Sunday, 26 December 2021

Monty's Specialty Muffins (aka Brownie Bites with Chocolate Truffles inside)

My son, Monty, and I came up with these yummy brownies!  This year, he asked if we could make his "specialty muffins" for Christmas.  I couldn't figure out what he was talking about until he explained it's the brownies with chocolate truffles baked inside made in muffin tins.  LOL.  These brownies are definitely not muffins, but they are made in muffin tins.  They're really delicious brownie bites.  Use your favorite gluten-free chocolate truffles OR make homemade truffles, dipped in chocolate. 
(If you are OK with gluten, you may enjoy using the Peppermint Cookie Lindor Truffles in the center.  However, Lindt (Lindor) truffles DO contain barley malt extract, which contains gluten, and therefore is NOT gluten-free.)  
The brownie batter is similar to the one used in Our Favorite Chocolate Brownie recipe.  Enjoy!

Truffle in the center of this yummy GF Brownie bite!
You can leave them wrapped or unwrapped. We only had oversized muffin liners that we could locate, so normally it doesn't look quite this small in the muffin liner. 
Cooled for an hour or so, the chocolate is still a bit melted in the middle. Yum! 

Monty's Specialty Muffins (aka Brownie Bites with Chocolate Truffles)

Makes 18 individual brownies

Preheat oven to 375 F.  Line 18 muffin tins with paper liners.  

Unwrap 18 GF Chocolate Truffles and set aside.  (You can make homemade truffles, dip in chocolate, and use for this recipe)

Melt in a microwave safe bowl: (I like to microwave chocolate at 50% power in the microwave in small, 30-45 second increments, stirring regularly to avoid any burning - yes, chocolate can burn and it's very sad when it does)
7 oz high-quality dark chocolate (70% is my favorite)
3/4 cup + 1 - 2 Tbsp salted butter

Add and stir in thoroughly: 
1 1/4 cups sugar

Mix in, incorporating one at a time: 
4 eggs

Add and stir, just until incorporated: 
1/3 cup Kristin's Gluten-Free Flour Mix (or GF mix of your choice)

Scoop 2 Tbsp. brownie batter into each prepared muffin tin.  Gently press a Chocolate Truffle into the center of each brownie.  Scoop an additional 1 Tbsp. brownie batter on top of the chocolates.  
Brownie batter divided between 18 muffin tins, each with a truffle inside. 

Bake your specialty muffins (aka, brownies) at 375 F for approximately 15 minutes, until just set in the middle.  Remove and place on a wire rack to fully cool.  Once they've cooled 10-15 minutes, you can remove the brownies from the pan to completely cool. 
Fresh from the oven! They smell SO good. 
 These are best served completely cooled (2-3 hours).  Any leftovers can be kept in a Tupperware on the counter for a couple days.  (They've never lasted longer than that at our house).  Enjoy!  
After cooling completely, these are a bit neater but still have a nice, soft inside. 
Another picture fresh from the oven. 

Monty's Specialty Muffins, aka Gluten-Free Brownie Bites with Chocolate Truffles Inside Recipe by Successfully Gluten Free! 

Tuesday, 21 December 2021

Apple Cinnamon Rolls

I have made these SO many times now.  Especially in the fall and winter when apples and plentiful.  These are a delicious alternative to regular cinnamon rolls. You can cook up fresh apple in a pan, or use freeze-dried apples if you're looking for a quicker option in these rolls.  They're great as a special treat for breakfast or a snack.  Easy to whip together in a mixer, roll out, rise, and bake.  I plan to make them for Christmas. Yum! Enjoy! 
Gluten Free Apple Cinnamon Rolls
Fresh GF apple cinnamon rolls topped with frosting.  
Without the cream cheese frosting - they have nice swirls and plenty of yummy filling. 

Apple Cinnamon Rolls

Makes about 20 rolls. 

Preheat oven to 350 F.  Line a large baking sheet with parchment paper.  

In this recipe, you can use fresh apples and sauté them, or you can use freeze-dried apples for a quicker prep.  Both options are included below. 

Fresh apple option:

Sauté over medium heat until apples have softened, but are not mushy: 
2-3 Tbsp butter
6 - 8 apples, peeled, cored and diced (use firm cooking apples that retain their shape when cooked)
1 Tbsp cinnamon

Add and cook 1 minute, then remove from heat: 
2 Tbsp maple syrup

Set apples aside to cool while you prepare the dough and filling. 

Dough:

In a large mixer, combine: (It's important to mix dry ingredients first in gluten-free baking to avoid clumps)
2 cups brown rice flour
1 cup sorghum flour (use extra brown or white rice flour or even oat flour if you do not have sorghum)
3/4 cup arrowroot flour (or cornstarch)
1/4 cup potato starch
1/4 cup tapioca starch
1/2 cup sugar
1 Tbsp xanthan gum
1 1/2 tsp salt
4 tsp rapid-rise/quick yeast
2 tsp baking powder

Add and mix in slowly, then increase speed to medium or medium-high and let beat 4 minutes: 
1/2 cup butter, softened
1 cup milk, warmed (not hot)
1/2 cup water, warmed (not hot)
3 eggs

Add into batter, mixing until evenly distributed: 
Sautéed apples, from above OR 1.2/34g freeze dried apple slices, broken into smaller pieces

While batter is beating, stir together: 
1/4 cup melted butter
1/2 cup brown sugar
1 - 2 Tbsp cinnamon
1 - 2 Tbsp maple syrup (Optional and ONLY if using freeze-dried apples, since the others get some added while cooking)

Lay out two large pieces of plastic wrap, overlapping slightly.   Place the dough along the center of the plastic wrap.  Cover with another two pieces of overlapping plastic wrap.  Roll out dough until you have a large, long rectangle approximately 15" x 30".   Remove the top layer of plastic wrap. 

Have a small bowl of warm water available to dip your hands/fingertips in case of any sticky dough. 

Spread the brown sugar/melted butter mixture on the dough using the back side of a spoon.  Use the plastic wrap to carefully roll up the dough into one long roll.   You can use wet hands to help with any sticky spots.  If you aren't sure how this should look, I have pictures included in several recipes, including my cinnamon roll recipe and pumpkin cinnamon rolls

Cut the dough (I just use a butter knife) into 1 1/2" or 2" slices.  Use wet hands/fingers to pick up and move the pieces.  Use wet hands to flatten each roll, so they're all even heights in the pan. 

Put the apple cinnamon rolls in a warm location and cover with an upside-down cookie sheet.  Let rise ~45 minutes.  Bake at 350 F for 25-30.  Top with cream cheese frosting (below) immediately, if you want the frosting to melt into the rolls.  Or, you can let the rolls cool and then pipe on the frosting.  I love these warm best.  Leftovers can be stored in the refrigerator or frozen and reheated.  Enjoy! 

Yummy fresh rolls drizzled with cream cheese frosting. 

Cream Cheese Frosting:

Mix together until smooth: 
1 - 2 Tbsp butter, softened
2 - 3 oz cream cheese, softened
1 1/2 cup powdered sugar
1 tsp vanilla
milk, to consistency (I find I sometimes need a little if it's a bit too thick, but sometimes I don't need any at all).  

Depending on your preference, you can make this a bit runnier and drizzle it on top.  You can have it a bit thicker and pipe it out/drizzle onto the rolls.  Or, what I often do for speed, just spread the frosting onto the rolls with the back of the same spoon used to mix together your cream cheese frosting. 
Just another batch - this one filled with a bit of extra apple. 
I left the frosting a little thicker and just quickly spread it on with the back of the spoon.  

Gluten Free Apple Cinnamon Rolls Recipe by Successfully Gluten Free!

Thursday, 9 December 2021

Crispy Gingersnaps Drizzled with Chocolate

 So, good news - If you don't want to make your gingersnaps free from dairy or eggs, you can make my chewy gingersnaps recipe and just flatten and bake them as directed below.  However, if you are serving anyone with rice, dairy or egg issues, this recipe is delicious!  Light and crispy.  Yum!   
Yummy Chocolate Drizzled Gingersnap cookies, ready to eat!

Crispy Gingersnaps Drizzled with Chocolate (GF, nut-free, dairy-free, egg-free)

Makes 24 cookies

Preheat oven to 375 F.  Line two cookie sheets with parchment paper.  

In a large bowl, whisk together the dry ingredients: 
1/4 cup white corn flour OR cornstarch
1/4 cup oat flour (make sure GF if Celiac or sensitive) OR brown rice flour OR sorghum flour
1/4 cup potato starch
2 Tbsp tapioca starch
2 Tbsp sorghum flour
scant 1/2 tsp xanthan gum
1 tsp baking soda
1/4 tsp salt
1/2 tsp ground cinnamon
1/4 tsp ground ginger
1/8 tsp ground cloves

In a mixer, beat until relatively smooth and a bit fluffy:
1/3 cup brown sugar
1/4 cup coconut oil (not melted)
3 Tbsp oil

Add and mix in thoroughly: 
2 Tbsp molasses
2 Tbsp applesauce

Add dry ingredients and mix until smooth.  Scrap and give another few stirs with your spatula.  Scoop 1 Tbsp scoops onto your prepared parchment-lined cookie sheets.  These spread quite thin, so 12 per pan should work well.  

Flatten cookies by dipping a flat bottomed glass lined with plastic wrap in granulated sugar and pressing down the tops of the cookies.  Usually once works, but you can dip and press the tops a second time if any doesn't have sugar evenly coating the surface.  
Cookies flattened with sugar coated glass cup

Bake cookies at 375 F for 6-8 minutes.  Shorter cook time will make for slightly less crisp cookies.  Let rest on the pan for a few minutes before removing to cooling rack to cool.  
Fresh from the oven. Let rest shortly before moving to cooling rack. 
Let them cool fully. These cool quickly because they're so thin. 

Place cooled cookies on a parchment-lined baking pan.  Melt the following together at 50% power in the microwave, stirring regularly: 
3/4 cup high-quality dark chocolate chips (dairy-free are readily available in dark chocolate chips)
1 tsp oil

Place melted chocolate in a small freezer ziploc.  Snip a small corner off and then drizzle over half of each cookie.  Place the cookies in the refrigerator 15 - 20 minutes until the chocolate has set.  Remove and serve!  These will store nicely in a closed container for a few days.  (They've never lasted longer than that around here).  
Gingersnaps drizzled with chocolate.

SO pretty!

Crispy Gingersnaps Drizzled with Chocolate Recipe by Successfully Gluten Free!

Wednesday, 1 December 2021

Gingerbread (chocolate chip) Bagels

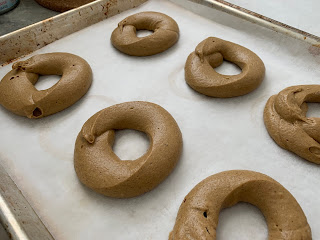
 Oh my goodness, these are SO delicious.  I've shared them with several friends now, and they all have raved over them.  The fresh ginger grated into the dough adds a wonderful extra bite to the bagels.  I even made a batch to trade for some fresh eggs with my pregnant friend since she found the fresh ginger helped her feel better.  You can make them with or without chocolate chips, as you prefer.  An absolutely delicious bagel! Enjoy!
Fresh Gingerbread Bagels - just out of the oven! 
Fresh Gingerbread Chocolate Chip Bagels - a new favorite!!!

Gingerbread (chocolate chip) Bagels

Makes ~18-24 depending on size

Line 2 baking pans with parchment paper or silicone liners.  Preheat oven to 350 F (you can wait and do this later, but I like to do it now because it helps the top of the oven become a nice, warm location for the bagels to rise).  

Combine in a 2 cup measuring cup and set aside to rest 5-10 minutes: 
1 1/4 cup warm water
1/4 cup molasses
2 Tbsp maple syrup
1 Tbsp rapid-rise/quick yeast

In a large mixer, combine the following (it's important to mix the dry ingredients first in gluten-free baking to avoid clumps)
2 cups tapioca starch
1 1/2 cup brown rice flour
6 Tbsp potato starch
1 Tbsp xanthan gum
1 1/2 tsp salt
2 tsp fresh grated ginger
1 tsp ground ginger
2 tsp ground cinnamon
1/2 tsp ground allspice
1/4 tsp cloves

Once your yeast mixture is ready, add to the dry ingredients: 
yeast mixture, from above
6 Tbsp oil
3 eggs

Beat on low, then medium speed 3-4 minutes, until batter is nice and smooth.   Add and mix in, if desired: 
1/4 - 1/2 cup mini chocolate chips (optional)

Scoop the batter into a large freezer ziploc bag.  Cut off 3/4" - 1" off of a corner of the bag and pipe bagels onto prepared parchment-lined baking sheets.  You can make them as small or large as you like.  I tend to have a few oval-shaped bagels, just to make them fit.  You can use 3 baking sheets, if preferred. 

Wipe/brush the top of the bagels with warm water.  Let rise ~30 minutes until nicely puffed, but not doubled in size.  
After piping, smooth the tops with water and let rise.
Chocolate chip bagels, piped and ready to have some water smoothed on top.
They puff, but don't fully double in size.  Make sure to wet them before rising or the tops can dry out too much and inhibit the rise.

Bake at 350 F for ~25-30 minutes, until you can tell they've gotten a bit browned on the top.  It's always tricky when there is molasses in the batter, but I find they're usually done in this period of time.   Let rest a minute before moving onto cooling racks to cool.  

These gingerbread chocolate chip bagels are delicious warm.  We love them plain, or toasted with a little cream cheese.  Slice and freeze leftovers.  They reheat perfectly in a toaster oven.  Enjoy!!!
Fresh from the oven!  I let them rest on the racks a minute or two before transferring to cooling racks. 
Slicing before freezing.  These are so yummy!

Gingerbread (Chocolate Chip) Bagels Recipe by Successfully Gluten Free!  

Sunday, 14 November 2021

Plum Pudding Cake

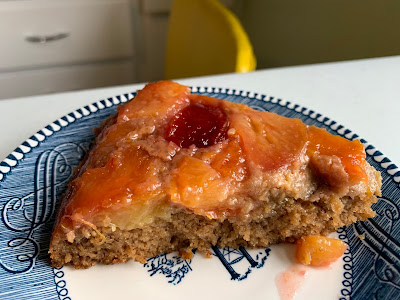
 We had an extremely low-key Canadian Thanksgiving this year - and it called for something a little more casual and easy to whip together than a pie or crisp or cobbler or other Thanksgiving dessert.  We liked it so much, we may add it to every Thanksgiving!  I've made this yummy plum pudding cake with various varieties of plums in addition to pluots.  All have turned out well and are delicious.  You can serve the slices upside-down for more of an upside-down cake look, or serve them right-side up. Enjoy! 

We love the look of the plum pudding cake flipped upside-down, too. It's so pretty. 
This was served with a tasty local blackberry ice cream, which complimented the plum cake nicely.

Plum Pudding Cake

Makes one 10-11" cake

Preheat oven to 350 F. 

In a 10" oven-proof skillet (*I have a nice oven-proof non-stick pan - a cast iron would work well, too), over medium heat melt completely:
3-4 Tbsp butter

Add and sauté until fruit is still firm, but more tender (usually 5-7 minutes): 
5-6 diced plums or pluots

Add and cook 1-2 minutes: 
1/4 cup sugar

Remove from heat and set aside while you prepare the cake batter.  
Fruit ready for the topping!
In a large bowl, whisk together: 
1/4 cup white rice flour
1/4 cup coconut flour
1/4 cup sugar
1/4 - 1/2 tsp baking soda
1/4 - 1/2 tsp salt
1/4 - 1/2 tsp cinnamon

Add and stir in until smooth: 
1/2 cup milk
1/4 cup oil
3 eggs
2-3 Tbsp date paste (100% date syrup) (This adds a natural sweetness without needing so much sugar in your bake, which I love)
1/2 tsp vanilla extract OR vanilla bean paste

Pour batter evenly over the top of your sautéed plums.  Bake in the oven at 350 F for about 30 minutes, until the cake is a nice, golden brown.  
Batter poured evenly on top of the sautéed fruit, ready for baking!
Nice and golden brown and ready to eat! Yum!

Remove and let cool slightly before slicing and serving.  I like to slice this with something gentle like a spatula to avoid scratching the pan.  You can also flip this cake upside down onto a serving platter like an upside-down cake, OR flip the pieces over onto each individual plate when serving.  Either way works great!   I love it as-is, but it's also yummy with ice cream or whipped cream.  Enjoy! 
So tasty and delicious!
So fun to mix and match the plums and pluots, too! 

Plum Pudding Cake Recipe by Successfully Gluten Free!

Sunday, 7 November 2021

Easy Gluten-Free French Baguettes!!!

 These took a lot of experimenting with to get something that had the taste I wanted PLUS the shape I associate with a proper French baguette.  (Oh, and it cannot require some extra pan I don't have space for in the kitchen).  I have been making French bread in loaf pans for awhile (i.e. it has the flavor and exterior crunch/interior tenderness) and also a French bread-style sandwich bread, which we also really like.  However, I wanted something that could be easily used as a proper baguette for things like a brie & tomato sandwich, or thinly sliced and baked with olive oil for things like topping with bruschetta.   Or just pulling off pieces of hot bread to eat fresh!  Voila!  The parchment paper came to the rescue!  This recipe is easy to whip together, and you'll have fresh baguettes in no time!  Best fresh, in my opinion.  Enjoy!

They're just so pretty! Fresh Gluten-Free French Baguettes! 
So yummy. They get eaten quickly around here. 
They slice cleanly and work perfectly for appetizers, dipping, toasted with olive oil or butter. 

Easy Gluten-Free French Baguettes!!!

Makes six 12" baguettes or three 20" baguettes

Line pan(s) with parchment paper, creased with folds to make baguette-sized hollows for the bread to rise and bake in.  I love to use two 9x13 pans, but you could make all 6 half-sized loaves on a large cookie sheet or make 3 long baguettes on the large cookie sheet.  

In a mixer, combine thoroughly:
2 cups tapioca flour/starch
1 1/2 cups brown rice flour
6 Tbsp potato starch
3 tsp xanthan gum
1 Tbsp quick/rapid-rise yeast
1 1/2 tsp salt
1 Tbsp sugar
Optional: 1/2 cup quick-cook steel cut oats (if you use, add 1/2 cup water)

Add and mix in, beating 4 minutes:
1 1/4 cup lukewarm water
2 tsp apple cider vinegar
1/4 cup oil (avocado oil is my preferred choice)
1 cup egg whites (these can be purchased at the store near the eggs)

Scoop bread into a large freezer ziploc.  Snip the corner.  Pipe out your baguettes.  Aim for a size that is not too thick, as you want these to double in size while rising.  Let baguettes rise 45 - 60 minutes in a warm location, until bread has doubled and is getting cracks in the tops from rising.  Use kitchen scissors to snip little slashes on the top of each baguette before baking, if desired.  
Piped into prepared pans and ready to rise!
Doubled in size, ready to bake as-is or slash (below)
You don't have to add the diagonal slashes, but I think it looks really pretty once they're baked. 

Bake at 375 F for 40-45 minutes.  This length of time will allow the outside to get nice and crispy, but also allow the inside of the bread to fully cook.  If you cook it for less time, you'll find the inside is too sticky.   Let the bread cool a little before slicing (yes, we always taste-test it piping hot, but best to cool a little before slicing).  Sliced bread can be left in a sealed container on the counter and will still be delicious the next day! The crust will soften after being sealed, but a reheat in the oven will crisp it back up!   This has become the uncontested new family favorite bread recipe!  Enjoy!

Fresh from the oven.  I like to remove from the pan quickly to avoid soggy baguettes. 
Baguettes cooling.  One is about to lose a piece to eager taste-testers. 
I held them off long enough to take a photo of 6 half-sized baguettes. Yum!
The above slashed ones, fresh from the oven. 
Fresh from the oven, yummy French baguettes! Gluten-Free!
We had such a fun lunch with a French family we're friends with and brought a few loaves - they loved the GF Baguettes!

Easy Gluten-Free French Baguettes by Successfully Gluten Free!

Wednesday, 27 October 2021

Frittata Recipe - make it your own!

 Frittatas are something I make on a regular basis, but I tweak and adjust them to include whatever vegetables I happen to have around at the time.  Or whatever I'm in the mood for eating.  My dad and sister pointed out that I've never actually managed to post my frittata recipe (probably because there are so many variations).  So, here you go!  I finally managed to type up a recipe that includes several options for you!  Feel free to make your frittata your own by being creative!  Enjoy!
This frittata was filled with leeks, asparagus and sharp cheddar.
This leek was filled with onions and mushrooms, with some green tomatoes on top.

Frittata Recipe - make it your own!


Preheat oven to 350 F - 375 F.
Lightly butter a baking dish (7x11) or pie dish.  You can also bake this in an oven-safe frying pan (same one used to cook the vegetables).  Both cooking options are included below.

Veggie Fillings:
 (I usually aim for about 1-2 cups of cooked vegetables - however, I've also made it without any vegetables at all for a plain bacon-cheddar frittata or ham & cheese frittata.  Like I said above, this is a versatile recipe.)

Sauté over medium heat until tender (not mushy) your choice of finely diced or sliced vegetables in 1-2 Tbsp oil finely.  Season your vegetables with salt, pepper and garlic (or mix all together and cook in pan with holes on barbecue for about 20 min.).  

A couple nice vegetable options: 
zucchini
yellow squash
onions
mushrooms (fresh or small can of organic mushrooms) 
OR
leeks, thinly sliced (cook first)
asparagus, diced
OR
onions
zucchini
bell pepper
OR
onions
mushrooms (fresh or small can of organic mushrooms) 
OR 
onions
mushrooms (fresh or small can of organic mushrooms)
bell pepper

You can also add a can of green chilis instead of, or in addition to your sautéed vegetables.  

Thinly slice a few cherry tomatoes OR one tomato (not too juicy). (Optional - You don't need the tomatoes, but I think they look pretty placed on top before baking).

Additional Toppings to prepare:
¼ cup diced green onions/scallions (optional)
1 cup cheddar cheese, grated or finely diced (I like a sharp or medium cheddar best, but you can use other types of cheese as well!)
6 cooked slices of bacon, diced OR  ½-1 cup of ham, diced OR  ½-1 cup cooked sausage, crumbled or diced (Optional - leave out the bacon/ham if you prefer a veggie & cheese frittata.)

Egg mixture:
Beat together in a bowl: 
6 eggs
1/2 - 1 cup milk

Add and mix in thoroughly: 
2 Tbsp butter, melted
½ tsp salt
¼ tsp pepper


There are two methods of assembly:

Prepared Dish (pie pan):
After beating eggs & milk and adding butter, salt, and pepper, pour into your prepared dish.  Sprinkle evenly over the top of your egg mixture the green onions, bacon/ham, cheese, and veggies.  No need to mix.  If you have any tomatoes, add them gently on top of the frittata and sprinkle the tomatoes with a little salt & pepper.  

OR

Oven-safe frying pan:
Sprinkle the cheese on top of your vegetables.  Pour the egg mixture over your sautéed veggies. Evenly spread your green onions, if using.  If you have any tomatoes, add them gently on top of the frittata and sprinkle the tomatoes with a little salt & pepper.  Depending how warm your vegetables are, you may need to lower the baking time by 5 or so minutes.  
Leeks & Asparagus with Cheddar cheese on top, ready for the eggs and tomatoes
Topped with eggs & some grape tomatoes, ready to sprinkle with a little salt & pepper, then bake.

Bake at 350 F - 375 F for ~30 minutes. (A knife should come out clean) until lightly browned and lightly firm.  Enjoy! 
Fresh from the oven! Yum!
Fresh from the oven - mushrooms & onion with ham, cheese and green tomatoes frittata


Frittata Recipe - Make it your Own by Successfully Gluten Free!