Search for a Recipe

Monday, 29 March 2021

Chocolate Dipped Biscuits

 These nut-free cookies are thin shortbread-style biscuits that are dipped in chocolate once cooled.   I find them best on the day of baking, but they can be left in a tupperware at room temperature for several days and they do freeze well, too.  Cook them a bit longer if you want a crispier cookie.  Perfect for a small, fancy treat.  Enjoy! 
These turn out so pretty!
You can definitely cut them in different shapes, but the dough may need a bit more chilling time to avoid being too sticky. 

Chocolate Dipped Biscuits

Makes about 3 dozen cookies

In a mixer, cream together: 
1/3 cup butter
1/2 cup brown sugar

Add, mixing in, scraping occasionally: 
1/4 cup milk (lactose-free or milk substitute works)
1 egg
2 egg yolks
1 1/2 tsp vanilla bean paste OR vanilla extract
2 drops peppermint essential oil (I like the DoTerra oils)

Add and mix in until smooth: 
3/4 cup corn flour (white corn flour or yellow corn flour work - not corn meal, this is closer in consistency to cornstarch. You can use cornstarch if you cannot locate corn flour)
3/4 cup potato starch
1/4 cup coconut flour

Flatten the dough into an oval between two pieces of plastic wrap.  Fold so it's sealed and chill in the refrigerator for 30-60 minutes.  

Preheat oven to 375 F.  Line cookie sheet (or two) with parchment paper. 

Roll out between the plastic wrap to 1/4" thick.  Cut into small circles or shapes of your choosing.   Place on a parchment-paper lined cookie sheet.  They don't spread much, so you can have them relatively close together.  Bake at 375 for about 6-7 minutes for thin, small circles.  They should just be browning at the edges and be a nice light brown on the bottom.   If you want crispier cookies, you can cook them an extra minute or two.  Thicker cookies or larger cookies will need an extra couple minutes.  
Rolled and cut cookies, ready to bake.  
Baked and resting before moving to cooling rack.  For a crispier cookie, you can give them an extra minute or two.
I like them to be just light brown on the bottom and pale on the tops.

Let them rest on the pan for a few minutes before removing to a cooling rack to cool completely.  

You can temper your chocolate, if desired, for a wonderful snap that only tempered chocolate has.  However, they work perfectly well dipped in melted chocolate with a dash of oil added to help avoid streaks in the chocolate as it cools. 

To melt chocolate, melt the following at 50% power in 30 second increments, stirring between each 30 seconds until chocolate is nicely melted and smooth.  You may need to just do 15 seconds towards the end: 
1 cup high quality semi-sweet or dark chocolate
1/2 - 1 tsp lightly flavored oil (like olive oil or avocado oil)

Dip your biscuits as desired (bottoms only, halfway, etc.).  Place dipped biscuit on a parchment-paper lined cookie sheet.  Chill in the refrigerator until chocolate has set.  Remove and serve! Enjoy! 

The little ones LOVE to help dip the cookies.  We'd made some thicker ones here (thin is best)
After dripping some chocolate across the parchment she loudly declared "I didn't do anything!" to everyone in the house.  
Freshly dipped biscuits.
Chilled and hardened chocolate.  Ready to eat! 

Chocolate Dipped Biscuits Recipe by Successfully Gluten Free!

Wednesday, 10 March 2021

Cream Puffs

Surprisingly, I don't make cream puffs terribly often, but every time I do I am reminded why they're such a fun dessert.  You can make these larger or smaller, depending on your preference, but you will have to adjust your baking time and make sure they're a nice golden brown.  Larger cream puffs definitely need longer in the oven to make sure they're firm and don't collapse on themselves during cooling.  An easy filling is just to use fresh whipped cream whipped with a spoonful of powdered sugar added to sweeten it a bit, but we especially love them with a vanilla or chocolate pastry cream.  Enjoy!
Make any size from this recipe!  Tiny cream puffs or larger ones.  Both work great!

Cream Puffs

Makes ~20 cream puffs, but it can make more/less depending on the size you pipe out

Make and cool filling of your choice.  I recommend a rich crème patissiere (vanilla pastry cream) (recipe below), or a rich chocolate pudding (chocolate pastry cream) (make it using 1/4 - 1/2 cup less milk for a bit thicker pudding). 

Crème Patissiere (Vanilla Pastry Cream): 

In a medium saucepan (avoid non-stick coated pans), heat over medium heat until just boiling: 
2 1/2 cup half & half OR whole milk
1/3 - 1/2 cup sugar
2 tsp vanilla bean paste OR vanilla extract
1/4 - 1/2 tsp salt

In a small bowl, mix together: 
1/4 cup cornstarch
4 egg yolks
1/4 cup half & half OR whole milk

Whisk the yolks/cornstarch mixture into the hot sugar/cream mixture.  Increase the heat to medium-high to speed up the process, but whisk constantly and rapidly.  Once the mixture thickens and starts to boil (I find it makes big, thick popping bubbles when done, and I quickly have to remove from heat to avoid getting burned), remove from heat and pour the pudding into a glass dish.  *If you find you have any lumps in your pudding, you can strain the pudding through a fine sieve to remove lumps as you put it into the glass dish. I find if I am trying to multi-task and forget to stir enough then this sometimes happens to me.*  

Cover the pudding with plastic wrap pressed directly on the surface of the pudding.  Let cool at room temperature until it's cool enough to place in the refrigerator to completely chill.  (I like to make this in the morning if I need it chilled by evening, or you can make it the day before.  If you're in a rush, you can place the bowl into a larger bowl of ice to speed the cooling process). 

Choux Pastry (Pate a Choux):

Preheat oven to 360 F.  (I find somewhere between 350 - 375 works perfectly).  Line a baking sheet with parchment paper.  

In a medium sized saucepan (I prefer to avoid non-stick coated pans), heat the following over medium heat just until starting to boil: 
1 1/4 cup water
1/2 cup salted butter
1 tsp sugar
1/4 - 1/2 tsp salt

Remove from heat and stir in quickly with a wooden spoon: 

Put the pot back on the heat and stir vigorously over the heat for 2 - 3 minutes.  It should smooth a bit during this time.  (I do find the bottom of the pot ends up coated with a thin layer of dough, but soaking the pot makes clean up easy)
Be prepared for an arm workout during this step.  The dough is thick and sticky. 

Remove from heat and place the dough into a mixer.  Turn on the mixer speed to low.  Let the dough mix for ~5-10 minutes, scraping occasionally.  Your dough should look nice and shiny and be quite thick.  This helps the dough cool before adding your eggs.  

Add to the dough (one at a time ideally, or just all together if you lack patience - the main thing is to let the dough beat until it's really nice and smooth): 
4 large eggs, room temperature

You want to let the dough mix on medium to medium-high speed until it's really nice and smooth, scraping occasionally.  Scoop the dough into two freezer ziplocs one inside the other (not absolutely necessary, but it's quite a thick dough and I find this helps avoid having a bag split while piping).  Snip ~1" from the corner of the bag.  
After scraping down the bowl.  It's hard to tell in a photo, but there's a glossy sheen to the dough.

Pipe small blobs onto a parchment-lined baking pan.  You can make these smaller or larger, depending on your preference.  They puff up during baking, so make sure they're spaced far enough apart from each other.  If desired, you can dip a finger in water to gently push down and smooth the tops of the choux pastry.  Use sparingly - you don't want them to be too wet on top. 

If desired, beat 1 egg and brush the tops of the choux pastry before baking.  If you don't brush the tops with beaten egg, they don't end up as dark golden browned during baking.  I've done it both ways - and it's really just a look thing.  I think the golden brown you get from the egg wash is lovely.  Bake at 360 F for 20 - 35 minutes, until the cream puffs are nicely browned.  I find smaller cream puffs need only 20 minutes, but the larger ones need significantly more time until they're puffed and golden brown.  *Yes, 360 F.  I find 350 too low and 375 too high.  If your oven runs cool then bake at 375 F.* 

These cream puffs were baked without being brushed with an egg wash, so they ended up paler, but are just as crispy on the outside and soft on the inside as the ones brushed with egg. 

Remove from oven and immediately poke a hole in the bottom with a sharp knife before placing on a cooling rack.  This helps steam escape, so the cream puffs won't collapse on themselves.  It also makes it easier to pipe in filling later, if you're wanting to pipe it in neatly.  

Once cool, fill cream puffs with filling of your choice - some people even prefer them filled whipped cream instead of a vanilla or chocolate pastry cream.  Whatever you prefer is great! To fill, it's neatest to pipe in the pastry cream from the bottom of each choux pastry using a long nosed metal piping tip.  However, I tend to aim for speed, so slicing the choux 1/2 or 3/4 through and piping the filling in from the side works well for me.  

These can be decorated with powdered sugar, or drizzled with a homemade chocolate ganache or homemade caramel sauce, like the one I used in my Paris-Brest Pastry recipe before serving.  Once the cream puffs are filled, store them in the refrigerator until serving.  Enjoy! 
Filled with chocolate pastry cream and topped with homemade caramel sauce. Yum! 


Cream Puffs Recipe by Successfully Gluten Free! 

Tuesday, 2 March 2021

Egg Rolls!

I was in the mood for some egg rolls - and figured it was about time I work on whipping up something tasty and easy to fry.  These are filled with a nice pork and veggie filling along with some rice noodles, to avoid having too much moisture inside the egg rolls.  I had some delicious egg rolls (pre-GF days) in Amiens, France at a market stall, and they had the fine rice noodles inside with the spicy pork filling.  I went back each day we were in that city to grab a lunch of an egg roll or two at the stall.  These are my version of that yummy meal.  We love them dipped in a spicy sweet chili sauce.  We had some friends over for a fun Chinese New Year meal, and had a great time eating these yummy egg rolls and homemade fried rice (but with finely diced ham instead of chicken).  I have also posted a tasty Vietnamese-style fried spring roll recipe, which is basically like an egg roll but made with a rice wrapper.  They are a little more finicky when frying than these egg rolls, but absolutely delicious.  Enjoy!  
Gluten Free Egg Rolls
Fresh egg roll filled with pork, veggies, and rice noodles.
Egg rolls ready to eat!

Gluten-Free Egg Rolls!

Makes 8-16ish, depending on size

Pork & Veggie Filling:

In a large frying pan over medium heat cook: 
1 lb ground pork
3 carrots, grated
1/4 - 1/2 tsp salt (omit or add just a dash if you're using a GF soy sauce that isn't Bragg's Soy Seasoning)
1/4 - 1/2 tsp pepper

Once the pork is about halfway cooked, add and continue cooking until pork is fully cooked: 
1 bell pepper, finely diced

When the pork is fully cooked, add and cook 1-2 minutes: 
2 Tbsp fresh ginger, grated
6-7 garlic cloves, minced OR 1 heaping Tbsp minced cloves (they sell jars in the vegetable areas at most large supermarkets)
2 Tbsp freeze dried red onion, optional

Add and cook 1-2 minutes: 
4 Tbsp Bragg's Liquid Soy Seasoning OR Gluten-Free Soy Sauce
1-2 tsp agave
Pork and vegetable filling, ready to cool a bit.
Remove from the heat and let cool while you prepare the noodles and dough. 

Rice Noodles:

Fill a large pot halfway full with water and 1 Tbsp salt.  Bring to a full, rolling boil.  Add to the pot:
Half or whole package of very thin rice noodles (I like the Maifun rice sticks for this recipe - the amount you cook depends on if you'd like any leftover noodles to eat with cooked pork filling if you get tired of making and wrapping egg rolls)  

Turn off the heat and leave noodles to rest in the pot for 10 minutes.  They are then ready to use!  You can just use them straight from the pot.  Drain and remove a portion of noodles into a small bowl for convenience while wrapping your egg rolls.  
Rice noodles - cooked, drained, and ready to fill egg rolls alongside the pork and vegetable filling! 

*Once these are just about done, I like to turn on the oil to heat.  I like to use a medium-sized saucepan over medium heat filled with 2" of avocado oil.  Use an oil that's good for frying.  You don't want the oil too hot, so I find the once it's nice and hot and ready to fry the egg rolls, the heat may need to be turned down just a bit.   You can drop a tiny piece of dough into the oil and see if it sinks and then rises up and starts bubbling nicely to determine if your oil is hot enough.  You can always use a deep-fryer.  I'd recommend setting it at about 360-370F.*  

Egg Roll Dough: 

***(I find that the amount of dough here works for about 1/2 of the prepared pork filling.  I usually reach a burnout from rolling and frying egg rolls by that point, and save the filling and noodles to make egg rolls another day or just serve the noodles with pork topping as it's own meal.  If you're wanting to make extra egg rolls - enough to use up all the pork filling above - please double this dough recipe)***

In a large bowl, whisk together: 
1 cup brown rice flour
scant 1/2 cup sorghum flour (or more brown rice flour)
scant 1/2 cup tapioca starch
1/4 cup potato starch
1 tsp xanthan gum
1/2 tsp baking powder (optional - this makes puffier egg rolls, for a thinner wrapper leave out)
1/2 tsp salt

Add in wet ingredients (there are two options) and mix in with the back of a spoon: 
3/4 cup water
1 egg
2 tsp oil

OR

1/2 cup water
2 eggs
2 tsp oil

Take a small portion of dough and roll it out thinly between two pieces of plastic wrap into a square-like shape.  On the dough square/circle, add a small portion of rice noodles and a small spoonful of pork filling - try to place the filling in a slightly rectangular orientation similar to what you want your final egg roll shape to be.  Use the plastic wrap to help you fold in and pinch the dough to seal it in an egg roll shape.  I like to fold the dough over one of the short rectangle sides of filling, then bring over a wide side over the top.  I then fold in the other short side and use the plastic wrap to help tuck the filling in a little to bring over the other wide side.  I use the plastic wrap to help reshape the egg roll before frying.  
I place the filling in as a rectangle.  Fold up the bottom, then side, then top and finally left side, using the plastic wrap to help with the wrapping. 
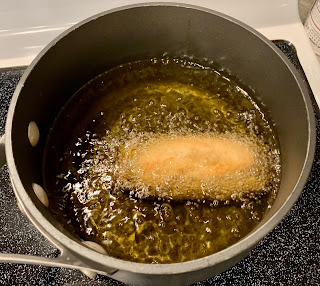
Set a little bowl to the side with some water in it.  Dip your fingers in the bowl and pick up your egg roll with wet fingers.  Carefully lower the egg roll into the heated oil.  Fry several minutes, turning occasionally, until nicely browned.  The best thing about these egg rolls is that your filling is completely cooked, so you're just needing to crisp up the outer shell.   I usually fry the egg rolls one at a time until I'm getting the hang of things and then sometimes fry them two at a time.   More than that and I worry they will stick together.  
Egg roll frying - I sometimes fry two at once, but make sure they don't stick together!

Place cooked egg rolls on a plate lined with paper towel to drain.  

These are delicious served alongside sweet chili sauce - I have only ever seen gluten-free versions of a sweet chili sauce, but please check the ingredients before purchasing.   My kids love them plain, too.  Enjoy!!! 
Fresh egg rolls.  Yum!
I had a little extra dough one day and filled them with dollops of jam.  They tend to ooze and spatter, but they were a fun thing to make with leftover dough.  

Gluten Free Egg Rolls filled with pork, vegetables and rice noodles by Successfully Gluten Free!