Search for a Recipe

Monday, 20 June 2022

Creamy Vegetable & Chicken Soup

This comforting creamy chicken & vegetable soup recipe is pretty versatile.   If you don't want to make your own rice, you can add a bag of pre-cooked microwaved rice (microwave it before adding it in).  You can use a drained can of cooked chicken instead of diced, roasted chicken.  You can use a bag of riced broccoli in place of the sliced/diced head of broccoli.  All sorts of variations to make life easier for those busy nights!  Enjoy! 
A yummy bowl of vegetable filled creamy soup with some salad on the side. 

Creamy Vegetable & Chicken Soup

In a large pot over medium-heat, sauté 3 - 5 minutes:
1 - 2 Tbsp butter
1 - 2 Tbsp oil 
1/2 - 1 onion, finely diced
1 - 2 carrots, finely diced
1 - 2 stalks celery, finely diced
1/2 tsp salt
1/2 tsp pepper
1/2 - 1 tsp freeze-dried or dried parsley
1/4 tsp dried sage or 1 - 2 tsp fresh sage, minced (optional)
1/4 tsp dried rosemary or 1 - 2 tsp fresh rosemary, minced (optional) 

*This recipe also works well with a holiday blend of vegetables (finely diced sweet potato, butternut squash, onion, celery, carrot with the sage and rosemary addition)*

Add and cook an additional 3-4 minutes: 
1 large head broccoli, sliced and diced

Add: 
1 can GF cream of chicken soup *see comment at end if you can't find this*
2 cups water
3/4 cup milk
2 tsp GF chicken bouillon paste

Bring to a boil, then lower heat and simmer for 10-15 minutes.  

Add the following, returning briefly to a boil before serving: 
1 - 2 cups cooked white Jasmine rice (make sure your rice is cooked!)
1 cup roast chicken, diced (Canned, drained chicken will work well in this recipe, too)

This is a nice all-in-one meal, but you can serve it with a side of GF crackers or GF garlic bread, whatever you're in the mood for!  Enjoy! 

A pot of soup, ready to eat!

*** If you cannot find a can of Gluten-Free cream of chicken soup, then this is my recommendation (and yes, I've done this)
Add an extra cup of chicken broth before you simmer your soup.  
After the 10-15 minutes of simmering, whisk the following together in a small bowl:
1/3 cup cold milk
1/4 - 1/3 cup cornstarch

Add to your soup and stir, bringing to a boil just to let it thicken a bit. 
And that'll be your work around! 

Creamy Vegetable & Chicken Soup Recipe by Successfully Gluten Free!

Monday, 13 June 2022

Homemade Neapolitan Marshmallows!

 The fun medley of vanilla, chocolate and strawberry in ice cream was a childhood favorite.  Imagine my surprise when I discovered that using freeze-dried strawberries ground up and sifted in marshmallows adds the perfect strawberry flavor to make a strawberry layer in a Neapolitan marshmallow!  If you don't want to make SO many jut Neapolitan marshmallows, you can use half the marshmallow to make some homemade GF s'mores marshmallows and just use half the strawberry and cocoa powder for your Neapolitan layers.  
Some of the yummiest marshmallows I've ever tasted in my life!

Homemade Neapolitan Marshmallows!

Butter a 9x13 glass pan OR butter two 8x8 pans 

Combine in a mixer with whisk attachment:
½ cup cool water
3 pkg. (1/4 oz each) (This is about 2 1/2 Tbsp or 7 1/2 tsp) unflavored gelatin
 
In a small, deep saucepan, combine the following over medium heat.  Make sure the liquid fills no more than 1/2 of your pan because it will bubble up while heating. Cook, stirring regularly, until syrup reaches 240 F on a candy thermometer:
½ cup cool water
1 ½ cups sugar
1 cup light corn syrup
1/8 tsp. salt
 
I find heating to 240F takes ~20-30 minutes, and will go in phases of seeming not to increase in temperature to suddenly jump up 5-10 degrees.  So, make sure you’re paying attention, particularly at the end.

Remove your hot sugar from heat.  With the mixer on low speed, slowly pour the sugar syrup into the softened gelatin.  Increase speed to high and whip until closer to room temperature, about 8-10 minutes. After a few minutes, it will start looking like marshmallow!  
 
Towards the end add and beat in:
1 tsp vanilla bean paste OR vanilla extract

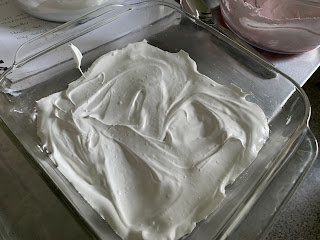
Remove 1/3 of the marshmallow and spread in your buttered pan, using lightly dampened hands to spread evenly.  
A layer of vanilla in an 8x8 pan

Remove 1/3 of the marshmallow into a separate bowl and mix in: 
1/4 - 1/3 cup sifted crushed freeze-dried strawberries (I like to prep this while the marshmallow is mixing/cooling)

Spread the strawberry layer on top of your vanilla layer, using lightly dampened hands to spread evenly.  
Adding the strawberry layer.  This definitely looked a bit more pink in person.  If you want it darker pink, you can always add a drop of food coloring with your freeze-dried strawberries. 

In your mixer, add and whisk in to make your chocolate layer: 
2 - 4 Tbsp cocoa powder

Spread your chocolate layer on top of the strawberry layer, using lightly dampened hands to spread evenly.  
The chocolate was last to be added.  

Sprinkle the top of your marshmallows generously with powdered sugar.   Let them sit 3-4 hours at room temperature to dry.  Use a buttered knife to slice the marshmallows (reapply butter, as needed).  Toss them gently in powdered sugar to coat evenly.   
Don't worry if the edges aren't perfect!  Here's a side-view of the three layers of marshmallows, topped with powdered sugar and left to dry for a few hours.  

Marshmallows are now ready to eat!  They can be stored in an air-tight container at room temperature for up to a couple weeks and will retain their freshness.  Enjoy!!! 
A bite out of a freshly made Neapolitan marshmallow! Yum!

Homemade Neapolitan Marshmallows Recipe by Successfully Gluten Free!