Search for a Recipe

Wednesday, 20 December 2023

Homemade Gingerbread-flavored Marshmallows

These gingerbread flavored marshmallows got rave reviews from friends and family. They're so light and fluffy - as all yummy homemade marshmallows are - but the delicious gingerbread spices mixed in make it an extra special treat! Yum! Not in a gingerbread mood?  Try out Neapolitan flavored, s'more's marshmallows, chocolate covered marshmallows, or just plain-ol' vanilla marshmallows. Enjoy! 
Oops, snuck a bite! Yum!

Homemade Gingerbread-flavored Marshmallows

 
Butter 9x13 glass pan for larger square marshmallows OR butter cookie sheet for thinner marshmallows to cut into fancier shapes with buttered cookie cutters OR butter 9x13 pan and an 8x8 pan to make half thick, half thin marshmallows.
 
Combine in a mixer with whisk attachment:
½ cup cool water
3 pkg. (1/4 oz each) (This is about 2 1/2 Tbsp or 7 1/2 tsp) unflavored gelatin
 
In a small, deep saucepan, combine the following over medium heat. Cook, stirring, until syrup reaches 240F on a candy thermometer:
½ cup cool water
1 ½ cups sugar
1 cup light corn syrup
1/8 tsp. salt
 
I find heating to 240F takes ~20-30 minutes, and will go in phases of seeming not to increase in temperature to suddenly jump up 5-10 degrees.  So, make sure you’re paying attention, particularly at the end.
 
Showing the progression of sugar boiling.  It does bubble up a bit, but not too much.  Even so, I recommend using a pot that it the liquid will fill no more than halfway.
 
Remove from heat.  With mixer on low speed, slowly pour the sugar syrup into the softened gelatin.  Increase speed to high and whip until closer to room temperature, about 8-10 minutes. 
This is how the gelatin and boil-sugar mixture will look initially.
Keep whisking and it will fluff up and look like delicious marshmallow fluff.
 
While the marshmallow whips, mix together the following gingerbread spices to equal ~2 tsp total
1 tsp ground cinnamon
1/2 tsp ground ginger
1/4 tsp ground cloves
1/8 tsp nutmeg
1/8 tsp allspice
*make sure to mix together the spices first in a little bowl before adding to the pan, just to make sure you don't have lumps of any one spice.

Towards last 1-2 minutes of whipping, add in, scraping down occasionally: 
Gingerbread spices
1/2 - 1 tsp vanilla extract

Use wet hands to smooth and flatten marshmallow into buttered pan(s).  
Gingerbread marshmallows - spread into a buttered pan

Optional decorating idea: As shown a couple photos in my regular marshmallow recipe, you can use food coloring (optional) on wet tops of marshmallows, swirling around for decoration.  If you want to add decorative sprinkles (optional), add them at this point.  

Sprinkle top of the pan with powdered sugar.  Let the marshmallows rest several hours at room temperature before cutting with a buttered knife or cookie cutter.  I find I need to re-butter the cookie cutters and knives every 3-4 cuts or they start to stick. 
Dusted with powdered sugar and resting.  This helps them dry out a bit before cutting. 

You’ll want to toss your marshmallows in powdered sugar to keep them from sticking together. You can either: 1. Place cut marshmallows aside on a piece of parchment paper sprinkled with powdered sugar, then toss in a large Ziploc with some powdered sugar; or 2. Place directly into a large Ziploc with powdered sugar once cut, and toss occasionally while you're cutting so marshmallows don’t stick together.  

Tossed with powdered sugar. 

Marshmallows are now ready to eat!  They can be stored in an air-tight container at room temperature for up to a couple weeks and will retain their freshness.  Enjoy!!! 
So light and fluffy and fun!   

Homemade Gingerbread-flavored Marshmallows Recipe by Successfully Gluten-Free! 


Thursday, 14 December 2023

Leek & Fennel Mac & Cheese

 It's an unusual combination in mac & cheese, I agree, but the flavors are delicious together.  Leeks have a unique flavor that blends so nicely with a sharp cheddar and bit of Parmesan. The fennel adds some extra oomph of flavor that I love.  All in all, it was a hit around this house. And it's the perfect cold weather type comfort food.  Enjoy! 
Had some baked sweet potato fries on the side. Yum!

Leek & Fennel Mac & Cheese


While you're preparing your sauce, you can boil your pasta as follows: 

Pasta:
Boil large pot of water + 1 Tbsp salt over high heat. 
Add and cook until desired tenderness: 
1 340g package GF macaroni (or noodle of your choice)

Drain, rinse and set aside until ready to mix into prepared sauce.  

Sauce:
In a large saucepan over medium heat, heat and cook the leeks are softened, but not mushy (~5-7 minutes): 
2 Tbsp olive oil
2 Tbsp butter
small leek, sliced (washed well)
1/4 - 1/2 fennel bulb & shoots
2 shallots, sliced
1 tsp garlic salt (or 1/2 tsp garlic powder, 1/2 tsp salt)
1/2 tsp pepper
Cooking up the veggies.
Add and bring to a boil, stirring occasionally: 
2 cups milk
1 cup water + 1 tsp GF chicken bouillon paste 
Getting ready to thicken the sauce!

In a small bowl, whisk together: 
1/4 cup water
2 Tbsp cornstarch

Mix the cornstarch mixture into the bubbling sauce, stirring until thickens and returns to boil for one minute.  Remove from heat and add: 
2 cups shredded sharp cheddar
1/2 cup grated Parmesan cheese
Nice and cheesy, and ready for the noodles. 
Add in the cooked, drained and rinsed pasta to the cheesy sauce.  Stir together well and serve!  Enjoy!
A tasty, rich mac and cheese. Yum!

Leek & Fennel Mac & Cheese Recipe by Successfully Gluten Free!

Monday, 4 December 2023

Mint Version of my Favorite Chocolate Brownes Ever Recipe!

 My dad laughed when I told him I made these because I needed them.  But, at the time, I really did.  Chocolate, mint, a slice of rich, warm brownie.  Yep, I needed these brownies. Now you, too, can make them anytime you feel the "need"!  They're based off my family favorite best chocolate brownies EVER recipe - but tweaked a bit to allow for the addition of a bunch of extra chocolate thrown in at the end!  Enjoy! 
A yummy slice of mint chocolate brownie!!!

Mint Version of my Favorite Chocolate Brownies Ever! 

Line a 9” x 13" glass pan w/ parchment paper.  It doesn’t have to be well done, just fold sides so it works and it’s covered.  If you don’t use parchment paper, expect to spoon your final brownies out – buttering just doesn’t cut it this time, folks.

Heat oven to 375 F.

Melt in bowl in microwave: (I like to microwave chocolate at 50% power in the microwave in small, 30-45 second increments, stirring regularly to avoid any burning - yes, chocolate can burn and it's very sad when it does). 
7 oz. high-quality dark chocolate (60-70% works best)
¾ cup + 2 Tbsp butter

Add and mix in:
1 cups sugar

Mix, incorporating one at a time:
5 eggs

Add and stir until incorporated:
1/4 cup brown or white rice flour

Add and stir in: 
1/2 cup milk chocolate chips
1/2 cup white chocolate chips
1/2 cup semi-sweet chocolate chips (optional, since you already have dark chocolate in the batter)

Pour into parchment paper lined 9 x 13 baking pan. 

Sprinkle on top: 
1/2 - 1 cup various mint chocolate chips and bars broken into chunks. 
Ready to bake in a 9" x 13" pan lined with parchment paper

Bake at 375 F for 22 - 24 minutes.
Fresh from the oven. These smell amazing!!!

Remove from oven, leave to cool and rest on a metal cooling rack.   Yes, you can eat warm, but it’s best to let it cool a bit - 30 minutes works well to be able to cut into pieces. These are great served warm or cooled.  We love them warm with ice cream on top.  Once fully cool, these can be cut in small pieces and frozen to eat later.  Tastes great, and a nice way to have treats on-hand for special occasions.

Gluten Free Mint Version of my Favorite Chocolate Brownies Recipe by Successfully Gluten Free!

Monday, 27 November 2023

Easy Swirl Chocolate Chip Cookies

I'm always playing around with favorite recipes - and this one came from just such an experiment.  I wanted something along the line of a favorite cookie, my amazing brownie chocolate chip swirl cookie, but easier.  This is perfect!  Easy as can be, but looks fancy - and has such a fun taste with the dark chocolate swirls and lighter swirls.  Yum! 
Yummy easy swirled chocolate chip cookies! 

Easy Swirl Chocolate Chip Cookies

Makes ~36 cookies

Preheat oven to 350 F.  Line 3 pans with parchment paper. 

Mix in a large cereal bowl/small mixing bowl: 
1/2 cup white rice flour
1/8 tsp xanthan gum
1/4 tsp baking soda
1/4 tsp salt

Mix in a second large cereal bowl/small mixing bowl: 
1/4 cup white rice flour
1/4 cup dark cocoa powder
1/8 tsp xanthan gum
1/4 tsp baking soda
1/4 tsp salt
1/2 cup mini chocolate chips

Cream together until light and fluffy: 
1/2 cup butter, softened/half melted works great
1/3 cup + 1 Tbsp sugar
1/3 cup + 1 Tbsp brown sugar 
.
Add and mix in: 
1 tsp vanilla extract
1 egg
Light and fluffy butter mixture

Mix half the butter/egg mixture into each flour bowl.   

Scoop the batters side by side on a piece of plastic wrap.  Roll into a log.  Cut open one end.  Put the log into a freezer ziploc and cut the corner ~ 1/2".  
Scooped side by side, then rolled into a log to put into a ziploc.  
Pipe swirls of dough onto the parchment-lined pans.  Aim for the size cookies you'd make with 1 - 2 Tbsp size scoops.
Swirled cookies, ready to bake.
They flatten as they bake, so I didn't bother trying to flatten any ends poking up.  This photo gives you an idea of how much to pipe so they don't end up running into each other as they spread. 

Bake cookies at 350 F for 8-10 minutes until light to medium browned.  Cool on pan for a few minutes before removing to a cooling rack to fully cool.  Leftovers freeze perfectly. Enjoy! 
Fresh from the oven, the same pan as from the above photo! 
Some of the first try of cookies stuck together - which my kids think means they can eat those clusters each as "one cookie". Ha! 

Easy Swirl Chocolate Chip Cookies Recipe by Successfully Gluten Free!

Sunday, 19 November 2023

Spinach-Feta Stuffed Bread

 Oh my gosh, this is SO delicious.  Unless you're my youngest who dislikes spinach and/or feta cheese in which case it tastes "strong" and may not be your favorite. The BEST thing about this spinach-feta stuffed bread is that once cooled and sliced, this freezes perfectly.  This has been a great addition to our school and work lunch repertoire!  It'll thaw to room temperature by lunchtime. Works great! *As an extra side note: you can fill these with sauce and cheese, like you would a pizza, too to make a sort of calzone-style bread!* Enjoy! 
Slice of freshly made Spinach-Feta Stuffed Bread. Yum!
Some made with the spinach and feta filling, and some filled with sauce and cheese, like a pizza. 
Sliced and ready to serve!  Was a perfect dish to bring along for a group get-together. 

Spinach-Feta Stuffed Bread

Preheat oven to 425 - 450 F.  Line a baking sheet with parchment paper. 

*Note: you can fill these with sauce and cheese, like you would a pizza, too!* Works great!

Mix together, and set aside: 
500 g bag frozen diced spinach, thawed and drained (I squeeze to remove as much water as possible)
1 cup crumbled feta cheese
1 cup grated mozzarella cheese
2 - 4 Tbsp grated parmesan
1 tsp ground pepper
1 tsp garlic powder
1 egg

Note: In order to make 2 trays, each with 2 loaves instead of 1 tray with 3 loaves, I increased the dough amount by 50% (i.e. 4.5 cups flour, 3 tsp xanthan, 1.5 Tbsp rapid yeast, etc.) and made a couple of them more pizza-like in filling. Worked great! 

In a large mixer, combine: (It's important to mix dry ingredients first in GF baking to avoid clumps)
2 tsp xanthan gum (yes, extra is needed)
1 Tbsp rapid-rise yeast
1 Tbsp minced dried onion (optional)
1 tsp garlic powder
1/2 tsp salt

Add, and beat 2-3 minutes, until nice and smooth: 
2 1/3 cup milk, room temperature
2 eggs

While the bread is mixing, in a small bowl melt: 
1/4 cup salted butter

Put bread dough into a large freezer ziploc.  Cut 1/2" - 3/4" corner of the ziploc. Pipe 3 long ovals, each with 3 strips of batter onto a parchment-lined pan. You'll want to aim to use no more than 2/3 of the total dough, so you have enough to pipe on top. 
Dough piped onto the pan, ready to smooth and spread with wet ands

Use wet hands over each loaf to flatten/smooth each bottom. I like to leave a bit of a lip to the edges to help the filling inside. 
Spread the piped dough out with wet hands (or you can use extra butter and the back of a spoon, but I find it isn't needed - so just use wet hands. 

Evenly divide the spinach-cheese filling between the loaves.  (Optional: you can fill with spaghetti sauce and mozzarella cheese, add a little of the spinach-feta filling (if desired), and add a bit extra parmesan.)
All spinach-feta on the left, and half spinach-feta and some pizza-style on the right (also increased the dough by 50% so a bit larger final bake overall).
Sprinkled a bit of extra parmesan overtop before piping on the zigzags for these ones. 

Pipe zigzags or stripes across the top of each loaf. You want to make sure the filling isn't fully covered, so the filling and dough can breathe while baking.  
you can get creative with your piping. Just make sure to have gaps so the filling and dough breathes while baking. 
Piped zigzags onto these ones - then some extra zigs and zags on one pan since I'm not the best at guessing how much to pipe.  No worries! They all turn out great!


Again, use the back of a spoon to spread the remaining melted butter over the top of the dough. You can use the butter and spoon to help smooth and flatten the loaf tops - and help smooth together edges of bottom and top crust!  Drizzle any extra melted butter overtop before baking! Yum!  The more you smooth the edges from the top into the bottom, the less it will separate while baking. But it's a very forgiving recipe! 

Optional - on top of butter brushed loaves sprinkle: 
grated parmesan
crushed red pepper

Sprinkled with a big of extra parmesan and crushed red pepper after brushing with butter.  

Bake your loaves at 425 - 450 F for 27 - 30 minutes until a nice brown. Remove from pan (and parchment) and cool on a wire cooling rack.  We've eaten this fresh from the oven and let cool to slice for later. Enjoy! 
On the pan, fresh from the oven!
GF Spinach and Feta Bread transferred to a cooling rack. 
The more pizza-styled ones, fresh from the oven. 
Transferred to a pan to cool! Yum! 

Once sliced, these freeze perfectly and work SO great to take for lunches!  I slice and put them in tupperware or ziplocs.  Enjoy! 
Ready to freeze! My daughter loves these for her school lunches.

Spinach-Feta Stuffed Bread Recipe by Successfully Gluten Free! 

Wednesday, 8 November 2023

Chocolate Raised Donuts!

 These GF chocolate donuts are a-maz-ing!  I am so grateful leftovers freeze perfectly so we aren't tempted to eat the whole batch at once.  If yeast makes you nervous, no worries!  I have lots of donut hole recipes that don't use yeast - like these glazed chocolate donut holes or these chocolate coconut donut holes.  However, if you're up for it, these raised chocolate donuts are absolutely delicious. Enjoy! 

A delicious gluten-free chocolate donut.
Freshly glazed GF Chocolate Raised Donuts!

Chocolate Raised Donuts!

Makes 24 donuts
Line two cookie sheets with parchment paper cut into 12 pieces (for piping donuts).

Mix together in a mixer: 
1/2 cup cocoa powder (light vs dark will affect the overall flavor, so use what you like!)
1/2 cup white rice flour
1/2 cup brown rice flour
1/2 cup tapioca starch
1/4 cup potato starch
1/4 cup arrowroot starch or cornstarch
1 tsp xanthan gum
2 tsp rapid-rise/quick yeast
1/2 tsp salt
3 Tbsp sugar
1/2 tsp baking soda

Add, then beat until nice and smooth, 2-3 minutes: 
3 eggs
3/4 cup milk, warmed
1/4 cup butter, softened
1 tsp vanilla bean paste OR vanilla extract
1 tsp apple cider vinegar

Put batter into a large freezer ziploc.  Snip 1/2" off one corner.  Pipe donut rounds onto each of the pre-cut pieces of parchment paper.  Lightly smooth the piped donuts with water, as needed.  Let rise in a warm location for 20-30 minutes.  
Piping each donut onto a separate piece of parchment paper makes it easy to lift and lower into the oil. The parchment will pop off the oil in the fryer, and you can just lift it out! 

While donuts are rising, you can heat your oil.  I like to use avocado oil for frying, but you can use canola or whatever kind you prefer for frying.  Heat to ~165C - 170C / 325 F - 338 F.   Using the pieces of parchment paper, gently lower the donuts into the oil in small batches (this depends on the size of your fryer or pot used for frying - I can usually fry 6-8 at a time).  Cook 2-3 minutes per side, until nicely cooked. 
Frying the donuts. Once they've puffed up and the bottoms are darkened, you can flip them. 
After being flipped - I find 2-3 minutes per side works perfectly. These aren't large donuts. 

Remove donuts from fryer and place on a paper towel-lined pan.  
Freshly out of the fryer, and ready to glaze.

Whisk together the following, and dip the top of warm/hot donuts into the glaze: 
1 1/2 cup powdered sugar
1 tsp vanilla 
cold water, to a thin dipping consistency

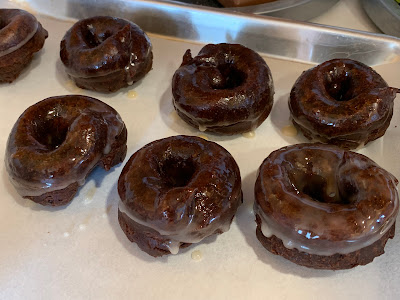
Put dipped donuts on a fresh parchment-lined pan.  They're ready to eat!  You can eat them hot or let them cool.  
Dipped donuts on a parchment-lined pan to cool (or taste-test)

Cooled donuts can be frozen in a freezer Ziploc and thawed/heated to eat anytime.  Enjoy!

Chocolate Raised Donuts Recipe by Successfully Gluten Free!