Search for a Recipe

Friday, 20 May 2022

Blueberry-Lemon Coffee Cake

 We do love blueberry snacks and treats.  Sometimes it's nice to have recipes that can just go in one big pan rather than making blueberry muffins.  This was a yummy treat that doubled as a tasty breakfast for us all.  Enjoy! 
Blueberry-Lemon Coffee Cake. 

Blueberry-Lemon Coffee Cake

Line a quarter cookie sheet pan or 9 x 13 glass pan with parchment paper. 

Preheat oven to 400F.

In a large bowl, mix together:
1/2 cup GF oat flour (OR 1/2 cup sorghum OR 1/2 cup brown rice flour)
1/2 cup brown rice flour
1/2 cup tapioca starch
1/2 tsp xanthan gum
1/2 cup sugar (OR 1/4 cup sugar plus 2 Tbsp 100% date paste. added with liquid ingredients)
2 tsp. baking powder
1/2 tsp. salt

Add and mix in just until combined (don't overmix, it's okay if there are a few lumps):
3/4 cup milk (lactose-free or other milk substitutes work as well)
1/4 cup lemon-infused olive oil OR oil plus zest of 1 lemon
1 egg

Add & fold in:
1 cup fresh or frozen blueberries

Spread into the prepared pan.  Prepare topping. 

In a large bowl, chop together: 
1/4 cup brown rice flour
1/4 cup brown sugar
1/4 cup butter, chilled
1/2 tsp vanilla bean paste or extract
3 drops lemon essential oil OR zest of 1 lemon
pinch salt

Sprinkle topping over your blueberry batter.  
Sprinkled with topping and ready to bake!
Bake at 400 F for 20-25 minutes.  Check, and continue baking until nicely browned.  I find it needs an extra 5 minutes or so if I've used frozen blueberries.

Remove and place pan on a cooling rack to cool.  Slice and serve!  Enjoy! 

Fresh from the oven. Yum!

Blueberry-Lemon Coffee Cake Recipe by Successfully Gluten Free!

Wednesday, 4 May 2022

Blueberry-Lemon Cream Cheese Danish!

For a fancy dessert (or breakfast), these blueberry-lemon cream cheese danish rings are so yummy!  Lately the grocery stores have stocked some delicious blueberries, and since these are best made with fresh berries, it's a perfect treat!  They're similarly made to my raspberry-lemon cream cheese danish that I posted years ago.  This recipe makes TWO large danish rings, but you can use half the dough to make something else, filling and baking cinnamon rolls or orange rolls.  Enjoy!
A fresh slice of blueberry-lemon cream cheese danish, gluten free! SO yummy!

Blueberry-Lemon Cream Cheese Danish!

Makes 2 Danish rings

The dough in this recipe is the same used for my cinnamon rolls. If you like, you can make one Danish and one 8x8 pan of cinnamon rolls, which is what I like to do!  Just use a half recipe for filling/frosting as in the cinnamon roll recipe for your cinnamon rolls, and use half the filling called for here.

Prepare filling:

Mix thoroughly in a bowl, then set aside:
8 oz cream cheese, softened
2 Tbsp ricotta
Zest of 2 lemons OR 4-6 drops lemon essential oil (I like DoTerra oils best)
2 tsp vanilla extract
1 cup powdered sugar

Rinse and set aside to dry:
3 cups fresh blueberries


Prepare dough:

Preheat oven to 350F.  (I do this so I can sit things on to top of a warm oven to rise)
Line 2 cookie sheets with parchment paper (Or line 1 cookie sheet and grease an 8x8 pan if you're making cinnamon rolls)

Place in a cereal bowl:
3 eggs (still in shells)
Pour warm/hot water over eggs.  This will bring them to room temperature.

In a 2 cup measuring cup, heat until just scalding (90 seconds in the microwave should do it):
¾ cup milk

Immediately add to hot milk (and stir occasionally to help butter melt):
½ cup butter, chopped into smaller pieces
½ cup sugar
1 ½ tsp salt

In a small measuring cup or bowl combine:
1/3 cup warm water (110-115F)
4 tsp rapid rise yeast or active dry yeast
1 Tbsp sugar

Let yeast rest 5 minutes to foam and allow milk mixture to cool a bit. 

Meanwhile, mix in a large bowl:
4 ½ cups Kristin’s Gluten-Free Flour Mix * (see note at bottom of recipe for measurement amounts for just this recipe)
2 tsp xanthan gum (this is in addition to the xanthan gum in the flour mix)

Add to the flour mixture:
3 warmed eggs (you can add these to the milk)
Milk mixture
Yeast mixture

Mix well with a spoon, using the back of the spoon to help make the mixture nice and smooth.  Let this sit just a moment while you prepare the filling.

It should look like this once mixed.

Line two large sheets of plastic wrap side by side on the counter, overlapping a bit.   2-3 foot long pieces work well. 

Spoon out half of the dough and place along the middle of the plastic wrap.

Pull out another two large sheets of slightly overlapping plastic wrap to cover the dough.  You’ll then flatten out the dough between the sheets until you have – more or less – a 10”x20” piece of dough. 
Flattened dough between plastic wrap.

Try to make it nice and even.  (You can try to make the middle a bit thicker than the top and bottom since you’ll be folding it over, so then you’ll effectively double the amount of dough where it joins together. But don’t worry too much!)
You have to slightly adjust the plastic wrap as you’re flattening the dough, since it sometimes gets caught underneath the dough.  But, you’ll find the dough doesn’t stick to the cling wrap, which is fantastic!  Carefully remove the top layer of plastic wrap.

The plastic wrap pulls off cleanly and easily. 

Spread half of the cream cheese mixture over the dough, leaving a good 1-2 inches at the top and bottom.  
Sprinkle with half the fresh blueberries.

Carefully fold the dough in half, using the plastic wrap to help you lift it up and over itself.   Pull the plastic wrap back and use the other side of the plastic wrap to help lift and fold the bottom back onto itself, as shown in the picture. 


Fold the dough in half long-wise, using the plastic wrap to help
Fold back the edge onto the top of the dough, to form a log


You’ll have to carefully lift the plastic-wrapped log over to your cookie sheet.  You’ll want to roll the middle of your log onto the cookie sheet and wrap the others around to form a circle.  This is a little tricky the first time you try it, but you can use the plastic wrap to help you adjust the circle and stick the ends together.  Don’t touch the dough with your hands, use plastic wrap.  You can use the plastic wrap to help you widen the center of your circle once it’s on the pan.  (you can also use wet hands to smooth the dough and adjust slightly.  Remember, it will rise, bake AND have powdered sugar on top to hide any lumps and bumps).

I used the plastic wrap to help widen the center hole, and make a nice circular shape

If desired, you can use a serrated knife, gently cut slices around the Danish, widening the sliced areas a tiny bit using the knife to help you.  It is optional to make slices in the Danish.

You can smooth your dough with wet hands to help you shape and adjust your Danish ring!

Cover your cookie sheet with an upside-down cookie sheet and set in a warm location to rise 30-45 minutes.  (alternatively, you can butter some plastic wrap and set that over the dough).  I have also left it uncovered to rise, and it works out very well, too.  The dough won’t double in size, but should look like it’s puffed up a bit.  

Repeat with other ½ of dough, OR flatten dough and fill like cinnamon rolls.


Bake each Danish at 350F for ~30 minutes, until nicely browned on top.   Set cookie sheet on wire rack to cool.
No worries if there's any drips.  They peel right off the parchment and you can hide any mishaps with powdered sugar. 
Slice and sprinkle with powdered sugar to serve!
It's so pretty and yummy!
Slices freeze really well and heat up quickly in the microwave!  We slice and pop them into tupperwares once cooled and pull out and reheat on a plate for snacks/breakfast/treats.  Enjoy!


If you don’t want to make up the flour mix since you’d have to make it twice for this recipe, just use the following: 
2 cups brown rice flour
1 cup sorghum flour
¾ cup + 1 Tbsp cornstarch OR 2/3 cup arrowroot starch
¼ cup + 1 Tbsp potato starch
¼ cup + 1 Tbsp tapioca starch
1 ½ tsp xanthan gum (ideally measure 1 1/3 tsp)

Blueberry-Lemon Cream Cheese Danish Recipe by Successfully Gluten Free!

Sunday, 24 April 2022

Orange, Cranberry & Vanilla Cookies!

 This yummy soft gluten-free orange, cranberry and vanilla cookie recipe has a perfect combination of sweet and tart.  We love the flavor of the cookies.  If you can find orange-flavored dried cranberries, I find they're even nicer than plain dried cranberries in these cookies.  While you can use vanilla extract in these cookies, I highly recommend vanilla bean paste for a stronger vanilla flavor. These are a yummy, easy to whip together gluten-free cookie recipe.  Enjoy! 

Orange Cranberry Vanilla Cookies
Yummy GF Orange Vanilla Cranberry Cookies
My little sous chef who helped make these cookies.   

Orange, Cranberry & Vanilla Cookies

Based on a non-GF recipe by King Arthur Flour Company.
Makes ~48 cookies

Preheat oven to 425 F.  Line two pans with parchment paper.  

In a mixer, beat together: 
1/2 cup butter, softened
3/4 cup sugar
zest/grated orange peel from 1 large orange (or two small oranges)
1 tsp vanilla bean paste
1/4 tsp baking powder
1/4 tsp salt

Mix in, scraping a couple times: 
1 egg

Stir in, just until combined: 
1 1/2 cups Kristin's Gluten-Free Flour Mix * (for measurements for this amount see below) *
2 cups dried cranberries (orange-flavored dried cranberries are the best if you can find them)

Drop small scoops (heaping teaspoon) of cookies onto parchment-lined pans.  You can make 4 x 6 rows on the cookie sheets.  

Using a flat bottomed glass, dip your cup in sugar, then flatten each cookie until they're 1/4" - 1/2" thick.  You may need to dip and flatten a couple times until you reach the desired thickness.  These cookies don't spread much during baking. 
Dipping & flattening the cookies before baking.
This is her favorite part.

Bake cookies at 425 F for 6 - 7 minutes until barely browned at edges.  If you use a larger scoop, which would give you cookies about 3 x 5 on each pan, you'll want to increase the baking time to 8-9 minutes.  

Let the cookies rest on the pan until mostly cooled, then carefully move to cooling racks to fully cool.  These are delicious fresh, but store well for several days at room temperature in an air-tight container.  Enjoy! 
Fresh from the oven - cooling before being moved to wire racks.  I prefer them a little less browned on the bottom than in this photo.
*** GF Flour Mix measurements for this recipe *** 
Kristin's Gluten-Free Flour Mix (1 1/2 cup flour mix):
3/4 cup brown rice flour
1/4 cup sorghum flour (or extra brown rice flour, white rice flour, or GF oat flour)
1/4 cup cornstarch OR arrowroot starch/flour
2 Tbsp potato starch
2 Tbsp tapioca starch/flour
1/2 tsp xanthan gum

Orange, Cranberry & Vanilla Cookies Recipe by Successfully Gluten Free!

Monday, 11 April 2022

GF Matzo Brei

 My grandma introduced me to matzo brei when I was little.  My dad would make it with me at least once each year growing up.  Yet it was only recently that I realized it isn't Matzo Brie, it's Matzo Brei.  My sister saved me from incorrectly suggesting this was some sort of cheese-laden dish.  Not at all!  It's a yummy pancake-like breakfast dish!  Gluten-Free Matzo-Style Squares aren't perfectly OK for Passover, but they're as close as I get, so we use them.  Matzo Brei is a quirky, but delicious breakfast meal that has been one of my favorites over the years, so my sister suggested I actually post the recipe.  I'll include her updated microwavable variety, too!  She likes to add some shredded cheese to hers (I include that variation).  Enjoy! 
Matzo Brei!  Yum! 

GF Matzo Brei

The recipes below each make one matzo brei, but you can repeat the simple instructions as many times as necessary to serve the family.  I prefer to make them one at a time, or you'll end up with your matzo getting too soggy.

Matzo Brei - Griddle/Frying Pan Version

Set a medium-large bowl next to the sink.  Rinse gently under cool water, front and back: 
1 large GF matzo-style square

Place your wet matzo in your bowl, breaking it up with a fork or your hands.  Add and mix in: 
1 egg
pinch of salt (optional)
pinch of cinnamon (optional)
It should look like this before frying.

Heat your frying pan over medium-low heat, adding: 
1/2 - 1 Tbsp butter

Spread your matzo/egg mixture into the pan, flattening it into a large pancake.  Let cook until lightly or medium browned on one side.  Flip, and cook on the other side.  Serve on a plate and drizzle with maple syrup, like a large pancake.  
Spread out and cooking on the frying pan.
Flipped over and cooking on the other side.  Like a big egg-y pancake.

Matzo Brei  - Microwave Version

Set a larger-sized cereal bowl/soup bowl next to the sink.  Rinse gently under cool water, front and back: 
1 large GF matzo-style square

Place your wet matzo in your bowl, breaking it up with a fork or your hands.  Add and mix in: 
1 egg
pinch of salt (optional)

Microwave 1 minute.  Remove from microwave and, if desired, immediately sprinkle top with: 
1 - 2 Tbsp shredded Mexican blend or cheddar cheese (optional)

Drizzled the top with maple syrup. Enjoy! 
My sister's matzo brei - definitely a bit speedier in the microwave, but I do love the crispness of frying.  Both are yummy and a fun breakfast!


GF Matzo Brei Recipe by Successfully Gluten Free!

Tuesday, 5 April 2022

Free-From Dinner Rolls! (no eggs, dairy, gluten, rice, seeds, nuts)

Similar to my Free-From bread recipe, these rolls are free from many of the common flours, eggs, dairy, nuts, and seeds commonly found in many gluten-free breads.  I do love many of my other roll varieties, but these are a delicious roll all on their own.  A nice recipe to add to your GF roll repertoire! 
Fresh from the oven!
My daughter enjoying a fresh "free-from" roll.

Free-from Dinner Rolls!

Makes ~30-35 rolls
In a large measuring cup combine and let rest: 
2 cups warm water
6 Tbsp sugar or honey
4 tsp active dry or rapid-rise yeast


In a mixer, combine: (In gluten-free cooking, it's important to mix the dry ingredients separately to avoid lumps)
2 cups tapioca starch
1 1/2 cup oat flour
1 cup potato starch
1/2 cup arrowroot starch OR cornstarch
1/2 cup GF quick-cook steel cut oats
1 Tbsp xanthan gum
4 tsp baking powder
1 tsp salt

Mix in, then let beat on medium speed 3-4 minutes: 
yeast/water mixture, from above
1/2 cup butter, softened (if OK with butter) or dairy-free butter substitute
4 eggs (if OK with eggs) OR 1/2 cup unsweetened applesauce + 1/4 cup oil 
2 tsp apple cider vinegar

Scoop rolls onto a parchment-lined cookie sheet using a large cookie scoop (approximately 4 x 5 rolls).  Flatten and smooth the rolls, as desired, with wet hands.  Cover with an upside-down cookie sheet, and let rise in a warm location until doubled, approximately 30-40 minutes.  

If desired, brush with 2 Tbsp melted butter or butter substitute before baking. 
Rolls after rising, ready to bake!
Out of the oven! Nice and browned. They smell delicious!

Bake at 375 F for 30 minutes.  You can cover them lightly with foil the last 5-10 minutes if you're concerned about them browning a bit too much.  

Enjoy! 
Fresh from the oven, ready to transfer to a cooling rack. 

Free-From Dinner Rolls! (No eggs, dairy, gluten, rice, seeds or nuts) Recipe by Successfully Gluten Free!

Wednesday, 30 March 2022

Homemade S'mores Marshmallows!

 I have been making homemade marshmallows for many, many years now, but I somehow never manage to post some of the more fun varieties.  This is SUCH a fun and easy one to make.  A huge hit with everyone who was lucky enough to eat one (or two, or three).  Enjoy! 
A bite taken out of a freshly made s'mores marshmallow. Yum!
Chocolate swirled marshmallows, ready to be topped with more crushed GF graham crackers.

Homemade S'mores Marshmallows!

Butter a 9x13 glass pan OR butter two 8x8 pans.  Sprinkle the bottom of the pan(s) with a layer of: 
GF graham crackers, crushed
Just one of the 8 x 8 pans buttered and lined with crushed GF graham crackers

Combine in a mixer with whisk attachment:
½ cup cool water
3 pkg. (1/4 oz each) (This is about 2 1/2 Tbsp or 7 1/2 tsp) unflavored gelatin
 
In a small, deep saucepan, combine the following over medium heat.  Make sure the liquid fills no more than 1/2 of your pan because it will bubble up while heating. Cook, stirring regularly, until syrup reaches 240 F on a candy thermometer:
½ cup cool water
1 ½ cups sugar
1 cup light corn syrup
1/8 tsp. salt
 
I find heating to 240F takes ~20-30 minutes, and will go in phases of seeming not to increase in temperature to suddenly jump up 5-10 degrees.  So, make sure you’re paying attention, particularly at the end.

Remove your hot sugar from heat.  With the mixer on low speed, slowly pour the sugar syrup into the softened gelatin.  Increase speed to high and whip until closer to room temperature, about 8-10 minutes. After a few minutes, it will start looking like marshmallow!  
 
Towards the end add and beat in:
1 tsp vanilla bean paste OR vanilla extract

Gently fold in - some will melt and swirl, but enough should remain un-melted so you have a nice blend in your marshmallows:
1/2 - 1 cup mini semi-sweet chocolate chips

Spread gently on top of your crushed graham cracker in your prepared pan.  Use slightly dampened hands (wet them again as needed) to spread your marshmallow evenly.   Sprinkle the top of the marshmallows with additional crushed GF graham crackers.  
Pressed in the pan, smoothed, and ready for topping. 
Topped with crushed graham cracker, and left to dry for a few hours.  Yum!

Let your marshmallows sit at room temperature for 3 - 4 hours to dry.  Slice, using a well buttered knife, buttering again as needed.  Roll your freshly sliced marshmallows in more crushed GF graham crackers.  Store extras in an air-tight container.  They will retain their freshness for 1 - 2 weeks (I couldn't tell you if they last longer because they've never made it past two weeks).  Enjoy! 

Homemade S'mores Marshmallow Recipe by Successfully Gluten Free!

Wednesday, 23 March 2022

Jam Rugelach

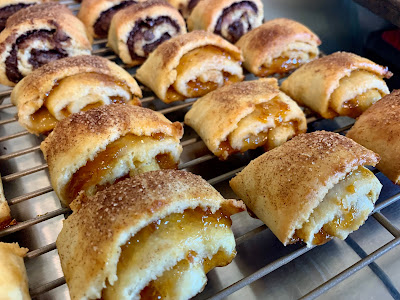
Rugelach are a delicious flaky rolled up baked treat.  Sometimes you'll find them looking more like mini croissant in style, but I grew up having them in the style here, rolled, sliced, and baked on their side.  This way you get to see the pretty swirl of filling.  A nice tart jam is perfect in rugelach.  I love plum jam, but something like a cherry or raspberry will work nicely, too.  Enjoy! 

gluten free jam rugelach
Yummy homemade gluten-free jam rugelach, with some chocolate rugelach in the background. 

Jam Rugelach

Preheat oven to 375 F (or wait and do this later if you're going to chill your dough - I usually skip the chilling and don't mind if they're not as neatly sliced).  Line 1-2 baking pans with parchment paper.

Have a jar of high quality thicker (not runny) jam available.  Good flavors are plum jam, raspberry jam, or cherry jam

Prepare your dough:

Beat until light and fluffy:
1/2 cup butter, softened
3 oz cream cheese, softened
3 Tbsp sugar

Add and beat in until smooth:
1 egg
1 tsp vanilla extract
zest of 1 lemon

Mix in a small bowl  before adding to wet ingredients:
1 1/2 cup Kristin's Gluten-Free Flour Mix
1/2 tsp xanthan gum
1/4 tsp salt

Mix dough together until smooth.   Most recipes recommend chilling, but I find because I am making these rolled between plastic wrap, I can just make them right away without any refrigeration.   Roll out the dough between plastic wrap to make a rectangle about 8" x 30".  

Spread your choice of high quality jam above evenly over the dough using the back of a spoon to avoid tearing the dough.  Have a small bowl of water available to use to help with any stickiness while you're rolling and slicing your dough.  Use the plastic wrap and wet fingers, as needed, to tightly roll up the dough so you have a long, 30" log. 

My studious little daughter spreading homemade yellow plum jam on our rugelach.  

You have THREE options at this point.  You can chill the log of dough for 60-90 minutes before slicing (this does make for neater cuts), or you can slice the dough right away and then chill them for 20-30 minutes on the baking pan before baking.   If you're short on time, you can just bake them right away, but you'll end up with neater rugelach cookies if you can chill them for at least the 20-30 minutes before baking. 

Use a sharp knife that you clean between each slice, slice the rugalach into 1" pieces and place them on the parchment-lined pan.  These don't spread much, so you can fit quite a lot on one pan.  

I like to keep the bowl of water nearby in case I need to dip my fingers so they don't stick.  Here are the jam rugelach, ready for the topping before baking!

Just before baking, brush the tops of the rugelach with: 
1 egg, beaten

And sprinkle with: 
Cinnamon-Sugar Mixture (1/2 cup white sugar + 1-2 Tbsp cinnamon mixed together is a nice ratio)

Bake trays of rugelach at 375 F for about 20-23 minutes, until a nice golden brown.  Let cool on the pans ~5 minutes before removing to wire racks to fully cool.  Enjoy!!! 

Brushed with egg and sprinkled with cinnamon-sugar. Ready to bake! 
Fresh from the oven.  The dribbles of jam don't matter so much once they're moved to the cooling racks. 
Jam rugelach cooling on the rack.  We made a batch of chocolate rugelach as well as the jam rugelach.  Yum! 


Jam Rugelach Recipe by Successfully Gluten Free!