Search for a Recipe

Thursday, 30 July 2015

Chocolate-covered Strawberries

Fresh summer strawberries are delicious all on their own, but when you want a fun summer treat there's nothing so easy, and at the same time fancy, as chocolate-covered strawberries!  We love to make them using the wonderful fresh summer PEI strawberries when we have family visit. I prefer making them with a high-quality semi-sweet or dark chocolate, but you can use a high-quality milk chocolate (though it tends to be a little more difficult to dip unless you add a little light oil).  These are a hit anytime we make them. Delicious!  Enjoy!

Gluten Free Chocolate Covered Strawberries
Delicious Chocolate Covered Strawberries - ready for eating! 

Chocolate-covered Strawberries

Wash and thoroughly dry fresh strawberries.  Make sure they are very, very well dried.

You can either leave the green ends on or cut them off if you'd rather your berries stand up (as in the picture below).

Melt a small bowl of high quality semi-sweet or dark chocolate at 50% power in the microwave.  It's best to melt the chocolate for 30 seconds at a time and then stir.  You don't want to overheat the chocolate, since it can burn easily.   It's best to have chocolate partially melted and then continue mixing until the chocolate is completely melted, this keeps the chocolate from being too hot.  

Cover a plate or small tray with parchment paper.

Hand-dip each strawberry in chocolate, carefully placing on the tray.  It can be placed however you like, depending on whether you left the stem on the strawberries or trimmed them.

If desired, melt a little white or milk chocolate.  Put in a ziploc bag, trim the edge and drizzle the top of the dipped strawberries.

Place completed strawberries in the refrigerator for at least 20 minutes to chill and fully set.  These are best served within a day of making them, though if you use very fresh strawberries and they are thoroughly dried, they will often last two or three days.  Enjoy!
Gluten Free Chocolate Covered Strawberries\
Washed and well-dried strawberries with stems trimmed.  Dipped strawberries on parchment paper.  Chocolate-covered strawberries drizzled with white chocolate. 
Gluten Free Chocolate Covered Strawberries
A beautiful collection of local PEI strawberries hand-dipped in dark chocolate. Yum! 

Monday, 27 July 2015

Gluten-Free Leek Quiche

This was one of those recipes I initially whipped together using wonderful local produce while we were visiting Bruges, Belgium.  While travelling, it can be difficult locating usual gluten-free flours that you typically use, but the great thing about quiche is that you can throw together a mix of whatever flours are available to you (I was able to easily locate cornstarch and buckwheat flour, also called sarrasin flour, which I used here), chop in some butter and salt using two knives and press it into the pan.   Leeks are a wonderfully flavorful vegetable, and add a great depth of taste whenever used.  We love them in the tasty potato, zucchini and leek side dish - and you can use leftovers from that side dish in this recipe, as described below.  Enjoy!
Gluten Free Leek Quiche
Fresh gluten-free leek quiche - great hot, warm or cooled! 
Gluten-Free Leek Quiche
Serves 8

Preheat oven to 400 F.

Chop together using two knives or pastry cutter in a mixing bowl:
1 cup Kristin's Gluten-Free Flour Mix OR 1 cup blend of Gluten-Free flours available (the lack of xanthan gum will make the crust a little more crumbly than normal - it will still taste great)
1/2 tsp salt
1/3 cup + 2 Tbsp butter
1 tsp olive oil 

Press the pie crust pastry into a pie pan or similar sized baking dish.
Pie crust pressed into an oval ceramic baking dish - an attractive alternative to an ordinary pie pan.

Saute in a frying pan over medium-high heat:
3 Tbsp olive oil  
1-2 shallots, diced
3 cups leeks, sliced and well-rinsed/dried

Let cook 4-5 minutes, until the shallots and leeks are looking wilted, but not soft.
If you have any leftover potato, zucchini and leek side dish, you can toss that in and let it heat up 1 minute.

Beautiful sauteed leeks, with a little leftover potato, zucchini & leek side dish tossed in.

Spread leek mixture over your crust.

Whisk together the following and then pour over leeks:
6 eggs
1/2 cup whole milk (or cream for a richer quiche)
salt & pepper

Bake at 400F for 25-30 minutes, until quiche is set in the middle.  Depending on your oven, it may need a few extra minutes to set in the middle, but I find mine is usually done between 25-30 minutes.  Remove from oven to a cooling rack.  Let the quiche rest 5 minutes before serving.

Great served hot, warm or cooled.  Enjoy! 

Tuesday, 21 July 2015

Rustic Open-Faced Sandwiches

It's that time of year when delicious spicy peppers abound!  Whip up a batch or two of hearty jalapeno cheddar bread and you'll have the starting place for lots of delicious lunches.  Even my little girls enjoy the jalapeno cheddar bread when used to make open-faced sandwiches.  Enjoy!

Gluten-Free Rustic Open-Faced Sandwiches on Jalapeno Cheddar Bread
Gluten-free Rustic Open-Faced Sandwiches made on Jalapeno-Cheddar Bread. Yum!

Rustic Open-Faced Sandwiches

Make 3 mini loaves of the Hearty Jalapeno Cheddar Bread.  Once cool, thinly slice. (This bread freezes really well after slicing, so you can make it in advance to pull together a quick dinner later!)

Preheat oven to 375F.  Or you can heat/toast these on the BBQ if you have a mesh pan so the slices don't fall through.

Arrange thinly sliced hearty jalapeno bread on a foil-lined baking sheet.

Atop each piece of bread add:
1-2 thin pieces of ham, turkey or chicken
1 thin piece high quality cheese (thin slices, since you already have cheddar in the bread)
3-4 pieces thinly sliced cherry tomatoes (in different colors, if possible)

Heat in oven ~8 minutes, until cheese is nicely melted and bread is just crisping around edges.

Serve hot.  Great with fresh arugula or other greens alongside.  Enjoy!

Monday, 13 July 2015

Banana & Chocolate Swirl Bars

Every time I end up with a large amount of overripe bananas, I freeze them.  Usually I end up with only 2 or 3 that weren't eaten, but sometimes I've ended up with entire bunches that somehow ended up overlooked.  This recipe is perfect for those times, since it requires 5 over-ripe bananas!  Peel your bananas prior to freezing, and then you can just place them in a bowl to defrost.  If you've frozen your bananas, use all the liquid in the bowl once it's defrosted.  It will work perfectly well whether or not you've frozen your bananas for this recipe.  This is a favorite every time we've made it.  And it's fun for the kids to help with, too!  Enjoy!

Gluten-Free Banana Chocolate Swirl Bars
Fresh gluten-free banana chocolate swirl bars! 

Banana & Chocolate Swirl Bars


Preheat oven to 350 F. Line a 9x13 pan with parchment paper OR line 2 quarter sheet pans with parchment paper (equivalent to using two 9x13 pans).

In a mixer, beat until creamy:
1/2 cup butter
1 cup sugar

Add and mix thoroughly:
5 very ripe bananas, mashed
1 egg
1 tsp vanilla paste or extract

Mix in a separate bowl: (it's important to mix dry ingredients separately in gluten-free cooking to avoid clumping)
1 1/2 cup Kristin's Gluten-Free Flour Mix
1 tsp baking powder
1 tsp baking soda
1/2 tsp salt

Add flours to banana mix and mix until just combined, scraping sides of bowls a couple times.

Remove half the batter and set aside (I reuse the flour mixing bowl).

In remaining batter, stir in:
1/4 cup cocoa powder
1/2 cup mini or regular semi-sweet chocolate chips

Spread 2/3 of chocolate batter in your parchment-lined 9x13 pan.
My four year old happily helped me spread the chocolate batter over the base of the pan. 
Spread the yellow batter on top of the chocolate batter.  Scoop remaining chocolate batter in a few spots on top of the yellow batter.
I try to place extra chocolate batter like this on top, since I find it makes prettier swirls in the final product.
Use a knife to gently swirl the batter.
Gluten-Free Banana Chocolate Swirl Bars
Swirled batter, ready to bake.
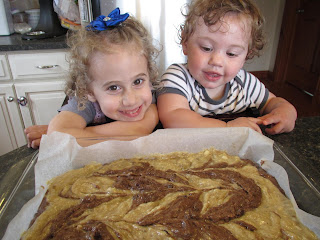
My girls with Gluten-Free Banana Chocolate Swirl Bars
My girls were SO excited with our results.  They happily inhaled the cooked bars, too!
How they'll look if you're making it in 2 pans for thinner bars. 

Bake at 350 F for 30-35 minutes, until nicely browned on top.  If you're making it in 2 pans, then bake at 350 F for 20-22 minutes, until nicely browned on top.  Let cool on a cooling rack. Slice into bars and enjoy! 
Yummy thinner banana & chocolate swirl bars - so pretty! 

Banana & Chocolate Swirl Bars Recipe by Successfully Gluten Free!

Sunday, 5 July 2015

Tasty Early Summer Salad

Summertime brings with it lots of fresh local vegetables. We're lucky to be able to get local organic veggies each week from Heartbeet Organics (they have the most amazing salad green mixes).  If you check out their site, you can see all the great information they've put together about how to best store and serve the wide variety of vegetables they grow.  This salad was a delicious start to the summer - packed with fresh local veggies and an easy, tasty sauce.  We served it alongside baked salmon fillets with a dijon glaze (my herb-crusted salmon recipe here which is a similar type dish). Enjoy!
GF Tasty Early Summer Salad
Fresh organic veggies with a homemade dressing

Tasty Early Summer Salad
Serves 4

Toss in a medium bowl:
2-3 cups purple kale, rip or cut into bite-size pieces
2-3 cups mixed fresh salad greens
handful sugar snap peas, diced
handful cherry tomatoes, sliced 
2-3 radishes, finely diced
1/3 avocado, diced

In a small bowl, combine:
1 Tbsp coriander (cilantro) puree
2 Tbsp GF ranch dressing
2-3 Tbsp diced roasted bell pepper
Easy and quick homemade dressing - adds a little extra to the ordinary ranch dressing
Pour dressing on salad mix and toss gently.
Serve and enjoy! 

Friday, 3 July 2015

Easy Homemade Pasta!!!

You can make delicious homemade gluten-free pasta at home with just a few simple kitchen items - a bowl, a rolling pin, a pizza cutter (or knife).   I used the recipe in the 'Artisanal Gluten-Free cook book' by Bronski & Bronski as inspiration, but made some alterations along the way in terms of measurements, mixing and cooking.  However, it was a great starting point, and led me to this delicious recipe.  I have (and will continue) to play around with the pasta maker I received as a gift, but at present I find the best noodles are still the ones made by rolling out the dough as thinly as possible and then slicing with a pizza cutter.   The egg in the recipe gives the pasta a rich flavor which is tasty to eat on it's own, or with a light topping like butter and Parmesan cheese.  It was a big hit with the whole family. Enjoy!
Gluten Free Homemade Pasta!!!
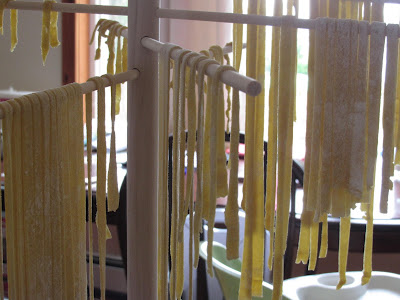
Homemade gluten-free pasta noodles, ready to boil
GF Homemade Pasta and Pesto
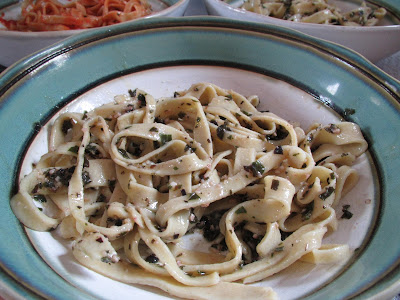
Homemade gluten-free pasta with homemade spinach (nut-free) pesto! Delicious!

Homemade Pasta!
Serves 4

Have an extra 1/2 Kristin's Gluten-Free Flour Mix set aside for kneading and rolling out your dough.

Combine in a bowl:
2 1/2 cups Kristin's Gluten-Free Flour Mix
1 tsp xanthan gum
1 tsp salt
4 eggs, whisked
It's best to incorporate the flour slowly to avoid lumps.  You can use your fingers or a spoon or fork (I tend to just use the fork I whisked the eggs with - less to clean!)

Remove the dough from the bowl and knead on a floured surface 1-2 minutes, adding a bit more flour if it gets sticky.

Roll 1/3 - 1/2 batch of dough at a time on a flour surface until the dough is as thin as you can make it (I tend to use a back and forth rolling motion to get the dough extra thin).  You'll need to add a little extra flour to the top and bottom of the dough occasionally to avoid sticking since you'll be rolling the dough very thin (~1/16").

Once you have the dough rolled as thinly as possible, slice strips of dough using your pizza cutter (or knife).  You can use a ruler if you're picky about how evenly sized your noodles are, but I tend to just ballpark it.   Set noodles aside either on a pasta hanger or just neatly in small piles until you're ready to boil your pasta.
Gluten-free pasta dough rolled really really thin and then sliced fairly evenly with a pizza cutter. It's so quick! 
Gluten Free Homemade Pasta!!!
While waiting to boil, I hung the pasta on a pasta rack, but because it's floured if you put it in small piles, it will be perfectly fine before boiling.

Bring water to boil in a large pot over high heat (I fill halfway).  Add 1 Tbsp salt to the water.   Once water is at a rolling boil, you can add the pasta.  Stir occasionally to avoid sticking to the pot.   Once the water is back to a boil (~30-45 seconds), set a timer for 2-4 minutes.  You may need to lower the heat slightly so it doesn't boil over. Watch closely! The pasta cooks rapidly, so start taste-testing after 2 minutes to make sure you get the texture you want.  Fresh pasta has a chewier taste than the dried stuff, but don't let it cook more than 5 minutes or it can get sticky.

Drain pasta and rinse in cold water to remove extra starch.  Serve with your favorite sauce, pesto, or butter & Parmesan.

Some suggestions are below:
Kale & Basil Pesto (nut free)
Spinach Pesto (nut free)
Light Bolognaise Sauce
Red & Green Sauce with Meatballs
Meaty Sauce with Spinach, Garlic & Basil
Spaghetti Sauce with Veggies
Alfredo Cream Sauce