Search for a Recipe

Thursday, 27 August 2015

Healthy and Delicious Chocolate & Banana Milkshake

This milkshake requires a little planning ahead, which is why I'm posting it on a rainy day.  Peel and freeze fresh, not-overripe bananas, breaking into bite-size chunks.  My friend Rebekah from Jersey (yes, the proper Isle of Jersey - a truly gorgeous island between the coast of England and France) introduced me to these chocolate shakes.  They have quickly become a family favorite - and I love that they're a healthy dessert option!  I now keep a ziploc bag with fresh, frozen bananas in my freezer so I can whip this shake up anytime.  I love the fact that it doesn't have any ice cream or added sugar in it - just three simple ingredients.  You could easily make it with dairy-free milk, too. Enjoy!
Healthy and Delicious Chocolate Banana Milkshake
A summer view of a PEI bay, enjoyed while sipping on a fresh chocolate milkshake.  This summer vista has been a welcome change from our 18 feet of snow this past winter, when I was forced to make chocolate donut holes. (The swing-set in this picture was completely buried by snow).

Healthy and Delicious Chocolate & Banana Milkshake
Makes ~3 cups

Measurements are approximate, as it's hard to measure frozen banana chunks.  These general guidelines will give you a fabulous milkshake, but you can tweak things a bit, to taste, and it'll still turn out wonderfully.  The frozen banana is the key!  It'll give you the proper 'milkshake' consistency.

Blend together until thoroughly mixed, frothy and creamy:
1 cup frozen banana pieces (don't use overripe bananas unless you want a sweeter milkshake)
2 Tbsp cocoa powder (more or less, to taste - I tend to lean towards the 'more' side)
~1 cup milk, enough to cover the bananas (lactose-free works great!)

The ingredients will measure to about 2 cups prior to blending and about 3 cups when blended.  You can add a little extra milk if your milkshake is too thick.

It's delicious!  Enjoy! 

Saturday, 22 August 2015

Delicious Gluten-Free Oatmeal Chocolate Chip Cookies!

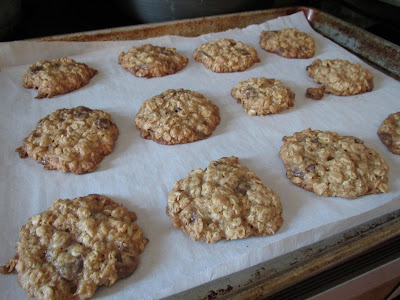
These tasty oatmeal chocolate chip cookies can be mixed by hand!  While I do love my kitchen-aid mixer, sometimes it's nice to just throw things together in a bowl and mix them by hand.  These have been a great hit, and even made twice in one week (shhh).  They were a perfect treat to whip up with my 4 year old helper.  They received rave reviews this evening from the friends who tried them.  I love making them with a mixture of semi-sweet and dark chocolate chips. Yum! Enjoy!
Gluten Free Oatmeal Chocolate Chip Cookies
Gluten-Free Oatmeal Chocolate Chip Cookies - fresh from the oven! 

Delicious Gluten-Free Oatmeal Chocolate Chip Cookies!
Makes ~36 cookies

Preheat oven to 350F.  Line cookie sheets with parchment paper or silicon mat.

In a large bowl, mix until smooth (use the back of the spoon to get all butter and sugar lumps out):
3/4 cup butter, softened (I used salted butter)
3/4 cup sugar
1/2 cup brown sugar
1 egg
2 Tbsp water
2 tsp vanilla extract or vanilla bean paste

Mix in a small bowl:
3/4 cup Kristin's Gluten-Free Flour Mix
1 tsp cinnamon
1/2 tsp baking soda
1/2 tsp baking powder

Mix the flour into the butter/sugar mixture, just until thoroughly combined.

Fold in:
3 cups whole oats (make sure they're gluten-free if you're Celiac or sensitive)
1 1/2 cups semi-sweet chocolate chips (OR you can use a combination of semi-sweet and dark chips)

Use a 2 Tbsp cookie scoop to scoop cookies onto parchment-lined baking sheets. You can leave or flatten slightly (I find the cookies end up a little more evenly-sized if I do this).
Leave scooped, or flatten slightly before baking.  

Bake at 350F for 11-13 minutes. (less time = chewier cookie, more time = crispier cookie).
Let rest 1-2 minutes before removing to wire rack to cool.   Delicious fresh.  Leftovers freeze well.  Enjoy! 

Tuesday, 18 August 2015

Summer Veggie & Mushroom Fried Rice

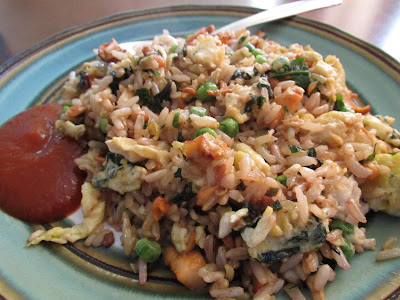
I love whipping up fried rice in the summertime.  The addition of mushrooms cooked in butter and garlic gives some extra oomph to the dish.  In fact, it doesn't really need any hot sauce on the side, but I like a little kick.  This was an absolute hit with my little girls. They inhaled it!  Use any fresh summer greens, just dice them up.  You can toss in extra fresh herbs, too. It's versatile! Enjoy!
Gluten Free Vegetable and Mushroom Fried Rice
Fresh mushrooms and greens make for a quick, easy summer fried rice dish.

Summer Veggie & Mushroom Fried Rice
Serves 2

Use a large frying pan or wok over medium-high heat.
In 2-3 Tbsp butter, cook 2-3:
handful of fresh Chanterelle mushrooms, washed, dried and diced
1 tsp minced garlic
2-3 Tbsp fresh parsley, finely diced

Remove mushrooms from pan.

Add 2 Tbsp avocado oil (or another oil good for high-heat cooking) to the pan.

Add and cook 3-4 minutes:
2 cups cooked day-old rice (brown basmati worked well - you want your rice a little dried out, so if you make it fresh, cook it a bit extra to dry it out a little)
1 cup mixed baby greens (swiss chard, kale, spinach, fresh beet greens), diced
1/2 cup frozen peas OR handful sugar snap peas

Move rice/veggies to the outer edges of the pan.
Add, then stir to scramble the eggs:
1 Tbsp avocado oil
2 eggs, whisked

Add the mushrooms back into the pan.

Add and cook 1-2 minutes:
1-2 Tbsp GF soy sauce (Bragg's liquid soy seasoning works well) OR another flavorful sauce of your choice

Serve immediately with srarachi hot sauce (or a little ketchup if your eaters are 4 years old).  Enjoy!

Friday, 14 August 2015

Stuffed Zucchini on the Grill!

It's that time of year - zucchini are fresh and plentiful!  The round shaped zucchini are just perfect for stuffing and grilling (or baking).   These stuffed zucchini were delicious and gorgeous. Serve them alongside the roasted cherry tomatoes and onions for a delicious meal.  The filling mix can be cooked on it's own and is wonderful as a side-dish or on top of rice or potatoes.  Enjoy!
Gluten Free Stuffed Zucchini on the BBQ
Delicious grilled stuffed round zucchini! 

Stuffed Zucchini or round summer squash on the Grill

Line a grill-proof pan with 2-3 layers of aluminum foil.  Drizzle the foil with olive oil.
Spread in the pan:
1-2 cups cherry tomatoes
1/2 small onion, thinly sliced or chopped

Chop the tops off of 5-6 small, round zucchini, saving the tops.  Scoop out the insides with a melon scoop, saving the insides for the filling.  Place emptied rounds spaced evenly in the pan with the tomatoes and onions.
I used a melon scoop to easily get out the insides of the zucchinis.

Chop and mix the following filling together:
zucchini insides, diced
1/2 small eggplant, diced
1/2 small onion, finely diced
1/3 cup GF breadcrumbs (I used rice breadcrumbs)
3/4 tsp salt
3/4 tsp pepper
3/4 tsp dried basil
1-2 Tbsp chipotle-infused olive oil (or olive oil plus pinch cayenne or chipotle spice)

Stuff each zucchini tight with filling and then place tops back on.   Extra filling can be wrapped in a foil packet and grilled 15-20 minutes and served as a side or over baked potatoes.

Grill over low heat (~350F) or in an oven at 350F for 45 minutes, until the zucchinis are tender.   Serve hot as a main dish or as a side.  Enjoy! 

Thursday, 13 August 2015

Kohlrabi - the odd looking deliciously crunchy vegetable

Kohlrabi are one of my new favorite vegetables.  They look crazy, with leaves sticking out of stems located all around the bulb of the vegetable.  You can pull off the leaves, peel the skin off the main part of the kohlrabi and slice, chop, or grate the kohlrabi.  It can be eaten raw - it has a crunch like an apple but isn't sweet - or cooked. It's great in a stir-fry.  There is some great information about kohlrabi linked from the Heartbeet Organics webpage.  (They grow the best vegetables!)
Gluten Free Kohlrabi - Hot Pepper Jelly - Hummus on Rice Cracker
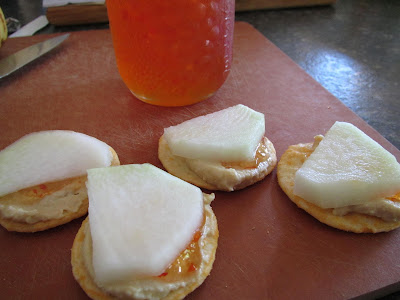
Delicious snack made with fresh kohlrabi, homemade hot pepper jelly and hummus on a rice cracker. Yum! 
Snack-time Kohlrabi Bites:

Peel and thinly slice the kohlrabi.
Kohlrabi before cutting
Unpeeled kohlrabi - the leaves have been chopped off, but this is what it looks like before peeling (I usually just use a knife to peel away the outer edges).  Tasty snack-time kohlrabi bites are seen behind the kohlrabi. 

Layer rice crackers with the following:
hummus 
homemade hot pepper jelly*
1 slice of kohlrabi

Enjoy!
Kohlrabi snacks
Fresh snack-bites with homemade hot pepper jelly.

* For homemade hot pepper jelly, my friend Julie and I use fresh hot peppers and red bell peppers to get the naturally "red" jelly.  We just use the simple recipe from food.com. We never strain it and it has specks of seeds and pepper throughout.  It's delicious! 

Thursday, 6 August 2015

Lemon Meringue Pie - Gluten-Free!

It seems to have turned into a summer tradition of whipping up a delicious lemon meringue pie when my sister-in-law, Lily, visits.  I, personally, think it's an excellent tradition.  The recipe below is written out in order of how best to prepare this pie.  The meringue below requires boiling a sugar syrup and then letting it cool.  I find if you do that first then it's ready to use by the time you've made up your crust and lemon curd filling.  I find that by doing this, the meringue has more structure and holds together perfectly when slicing your pie.   It was definitely a hit! 'Til next summer... or perhaps sooner... Enjoy!
Gluten Free Lemon Meringue Pie
A fresh slice of delicious gluten-free lemon meringue pie! 

Lemon Meringue Pie - Gluten-Free!
Serves 8

Make a batch of Kristin's buttermilk pastry crust recipe.  You'll need half recipe for this pie, so you can make a half recipe, if desired.  Or, you can use the other half of the pie crust dough as the bottom for a quiche or another pie like the raspberry cream cheese pie or blueberry cream cheese pie Let the dough chill while you prepare the following sugar syrup.

Prepare a sugar syrup for the meringue topping first to allow the sugar mixture to fully cool while you make and bake your pie crust and make the lemon filling:

Mix together in a medium sized saucepan:
1/2 cup sugar
4 tsp cornstarch
1/2 cup water

Cook over medium heat until it comes to a boil, whisking constantly.  When it's at a rolling boil, let it boil for 1 minute.  Then set aside the sugar mixture to cool.

Roll and bake one pie crust at 425F for 15-17 minutes until light golden brown.   To get the prettiest crust, roll out the dough between plastic wrap.  Use plastic wrap to help shape the edges of the dough.

While crust is baking, prepare lemon curd filling:

In a medium-sized saucepan over medium heat, whisk and bring to rolling boil for 1 minute:
1 1/2 cups sugar
1/3 cup cornstarch
1 1/2 cup water
3/4 cup fresh lemon juice (about 4 lemons)
zest of 1 or 2 lemons

Add, whisking constantly:
4 egg yolks, whisked
3 Tbsp butter

Let the lemon mixture boil for 1 minute.  Remove from heat and pour over hot pie crust.  Cover immediately with plastic wrap while you finish making the meringue topping.  
Lemon curd filling in baked pie crusts.  You can see one with a crimped edge vs. one hastily pressed into the pie plate.  The difference in color was primary due to the egg yolks used, although the one on the left I accidentally added too much sugar (it was actually really delicious, though I try not to do that normally).  Bright yellow yolks will give a vibrant hue to the filling.  The taste will be great either way. 

Set oven temperature to 350F.

Finish meringue topping:
Whisk (easiest in a mixer or with a good hand-held mixer) until soft peaks form:
4 egg whites
pinch salt

Slowly add the cooled sugar syrup to the egg whites.  Beat on high until stiff peaks form.

Remove the plastic wrap from the top of your lemon curd.
Spread meringue gently over pie, making sure to have the meringue touch the edges of the crust to create a nice seal over the entire pie.  You can smooth the top or use a spoon to make little spikes across the tops depending on your preference.
Meringue topping spread on top of pie. 
Bake at 350 F for 12-15 minutes.  Meringue should look a nice light brown on top.  Let pie cool on a wire rack.  Great warm, but best cooled, then chilled in the refrigerator.  Keep in the refrigerator until ready to serve.  Enjoy!
Cooked pies, now set aside to cool. 
Gluten Free Lemon Meringue Pie
Great while still warm or cooled completely. This meringue slices so nicely and tastes great!