Search for a Recipe

Friday, 28 June 2019

Herb-Cheddar Scones

I don't make scones very often, but every now and then it's nice to have a scone for dinner or dessert.  These herb and cheddar scones are perfect for a savory meal.  They would go nicely with eggs, or a BBQ style meal.  Make them into small wedges or circles if they're a side rather than main part of your meal! Enjoy!
I made big wedges for these scones, but you can make smaller scones, too.  Just reduce cooking time by a few minutes. 

Herb-Cheddar Scones (Gluten Free)

Preheat oven to 425 F.  Line a cookie sheet with parchment paper.

In a large bowl, mix together:
2 cups Kristin's Gluten-Free Flour Mix *see below for measurements just for this recipe*
1/4 cup white sugar
2 tsp baking powder
1 tsp salt
1/4 tsp fresh ground pepper

Chop in with a pastry cutter:
1/2 cup butter, chilled

Whisk together in a small cup or bowl:
1/2 cup heavy cream/whipping cream
2 eggs

Stir into flour mixture with a fork, just until dough forms - don't overwork!
cream/egg mixture, from above
1 Tbsp freeze-dried dill (or 2 Tbsp fresh dill)
1 Tbsp freeze-dried chives (or 1/4 cup fresh chives or scallions)
1 cup grated sharp cheddar cheese
Ingredients prepped, with butter chopped into the flour mixture.  Everything mixed together just until the dough forms, then kneaded just a few times.

Knead just a few times with your hands to help it all hold together (don't overwork - you don't want to heat up the dough/butter or over-mix).   Working quickly, press into a 1/2" thick circle on the parchment paper lined pan.  You can use a butter knife or large flat-edged dough scraper to gently cut/separate into wedges.  Slide them just apart from each other.  You can also roll and cut out circles, or squares to make smaller scones.  Just lower the baking temperature by 4-5 minutes.
You can make scones large or small.  Here, I pat them into one large circle and cut it apart into wedges.  These were for larger dinner-sized scones.

Brush the tops of the scones with additional heavy creamIf desired, you can sprinkle more dill and scallions on the top.  
Brushed with cream before baking.
Bake immediately at 425 F for about 20 - 22 minutes, until nicely browned.  (For smaller sized scones, cook a few minutes less).  Scones are best fresh and warm.  You can freeze and reheat any leftovers in the oven.
Fresh from the oven! Yum!  

*Kristin's Gluten-Free Flour Mix for this recipe - makes 2 cups flour mix*
3/4 cup brown rice flour
1/2 cup sorghum flour
1/4 cup arrowroot starch
1/4 cup potato starch
1/4 cup tapioca starch
3/4 tsp xanthan gum

Gluten free Herb Cheddar Scones Recipe by Successfully Gluten Free

Friday, 14 June 2019

Ginger Pear Upside Down Cake

I was inspired to make several varieties of upside down cakes after watching the British Baking show with my kids.   Since discovering it years ago, I have always loved the rich flavor combination of fresh pears baked with tangy ginger.   In this case, I wanted to try to create a ginger-pear cake that really packed a lot of ginger flavor.  It was such a success, I've since made it several more times, not including the other experiments I've tried with other fruits.  A new family favorite around here! Enjoy!
A fresh Ginger Pear Upside Down Cake, ready to eat! Yum! 
A pretty slice of Ginger Pear Upside Down Cake. 

Another picture, just because it's just so visually appealing. 
Still whipping this up 5 years later... It's just as delicious!


Ginger Pear Upside Down Cake (Gluten Free)

Makes 10" - 11" diameter cake

In a 10" oven-proof skillet (*I have a nice oven-proof non-stick pan - a cast iron would work well, too), over medium-low to medium heat melt completely:
1/4 cup butter

Remove butter from heat, then add:
1/2 cup brown sugar
2 tsp ground ginger
1 tsp cinnamon
pinch cloves
2 Tbsp corn syrup (optional, but will help keep the syrup from crystallizing when cooled)

You do NOT want to let this cook or heat much at all, or you'll end up with it seizing up and turning into a lump of hard sugar you need to throw away.  Just stir off the heat to help it become nice and smoothed.
Melted butter with sugar and spices mixed in, ready to add the fresh fruit on top.

Arrange on top of syrup:
2 - 3 Bosc pears, just ripe, so they're still firm and aren't mushy, peeled and sliced ~1/4" thick (fanning them out ends up looking pretty)  *If you don't have Bosc pears - apples will work well, too.  Make sure you use a variety that is good for cooking, so it keeps its shape as it cooks.
You don't have to add the random little extra pieces, but I just love the fruit.  I've made this all pear and a mixture of pear and apple.  It's worked great both ways! 

In a large bowl, mix together with a whisk:
1 1/2 cup Kristin's Gluten-Free Flour Mix
1/2 cup brown sugar
1 tsp baking powder
1/4 tsp baking soda
1/4 tsp salt
1 tsp ground ginger
2 tsp fresh, crushed ginger (they sell this in the freezer in 1 tsp frozen cubes, which makes it easy to have on hand if you don't have any fresh ginger root)
1/2 tsp cinnamon
pinch allspice
pinch cloves

Add and whisk until smooth:
3/4 cup milk
6 Tbsp butter, melted
2 eggs
1 Tbsp molasses
1 tsp vanilla bean paste or vanilla extract

Pour/spread carefully over the pears.  Bake at 350 F 33-37 minutes, until cooked through and nicely browned on top.   Let the cake rest on a cooling rack for only 5 minutes.
Skillet in the oven, about to bake.
Fresh out of the oven. 

Working carefully and quickly, place your serving platter on the top of the pan, holding it tight against your skillet.  Flip the cake upside down onto the serving platter. 
After resting 5 minutes, it was flipped onto the serving platter. 
It smells SO good. Mmmmm... 

You can eat this right away, or let it cool and then eat.  The first time I made it, this cake did not last a day at my house, it was melt-in-the-mouth delicious.  Store any leftovers in the refrigerator.  I recommend reheating any leftovers before serving, although my son likes it best chilled. :)   Enjoy!
The cake ends up moist, with a lovely texture.  

Gluten Free Ginger Pear Upside Down Cake Recipe by Successfully Gluten Free

Sunday, 2 June 2019

Kristin's Sunshine Muffins

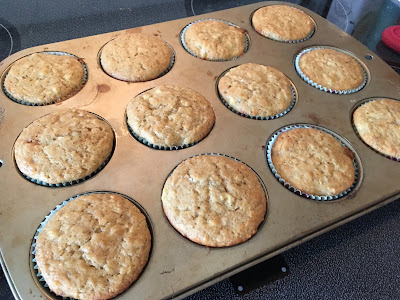
Bananas, pineapple, coconut wrapped up into one muffin.  These muffins taste like "sunshine" to me, so I'm calling them sunshine muffins.  My son told me they were "heavenly", which I think is quite the compliment.  They were such a fun, light flavor.  Even my dad, who tends to not like things with coconut, really enjoyed them.  Yay!  They whip up quick and easy in a bowl with a fork, too.  I love those sorts of recipes - easy, but absolutely delicious.  Enjoy!

Gluten Free Banana Pineapple Coconut Muffins
Fresh from the oven - Sunshine Muffins

Kristin's Sunshine Muffins (Gluten Free)

Makes 12-18

Preheat oven to 350 F.  Line 12 - 18 muffin tins with paper liners.

In a bowl, mash together with a fork:
2 large, overripe bananas, mashed (I like to leave it a bit chunky, so you end up with bits of banana throughout)
3 oz crushed pineapple & juice (use crushed pineapple in juice OR a mix of cubed pineapple & juice from a can, break up the pineapple cubes to "crush" the pineapple -- do not use the canned crushed pineapple in syrup or you'll end up with too much sugar/sweetness)
1 egg
1/4 cup oil (I like avocado oil)
1/4 cup plain yogurt
1 tsp vanilla extract or vanilla bean paste

Add and mix in, just until blended (I mixed everything together with a fork, and used a spatula at the end to get all the edges of the bowl and spoon them into the muffin tins):
1 cup Kristin's Gluten-Free Flour Mix
1/4 cup white sugar
1/4 cup brown sugar OR 2 Tbsp 100% date paste
1/4 cup sweetened OR unsweetened shredded coconut
1/4 tsp cinnamon
1/4 tsp baking soda
1/4 tsp salt

Divide the batter evenly between muffin tins, 1/2 - 3/4 full.
Muffins, ready to bake!  These are filled 3/4 full and required closer to 25 minutes to bake.  I have made them other times, filling only 1/2 full and they bake in ~20 minutes.  

Bake at 350 F for ~18-22 minutes for 18 muffins or 23-26 minutes for 12 muffins.   They should end up a nice, light golden brown on top.

Remove to cooling rack.  Enjoy!!!

Gluten Free Kristin's Sunshine Muffins Recipe by Successfully Gluten Free!