Search for a Recipe

Tuesday, 27 April 2021

Gluten-Free Vanilla Wafer Cookies!

 I've actually been meaning to figure out a recipe that tastes right to me for gluten-free vanilla wafer cookies, and after a push by my friend Liz, I actually did the experimentation to figure it out!  (Thanks Liz!)  These are nice and vanilla-filled.   If you let these rest a day after baking and cooling, then they really taste so similar to the store-bought ones from my childhood.  And they're easy, too!  Enjoy! 
Gluten-Free Vanilla Wafer Cookies Cooling

Gluten-Free Vanilla Wafer Cookies!

Makes ~24 (1 Tbsp sized cookies)

Preheat oven to 325 F.  Line one or two baking sheets with parchment paper. 

In a bowl, mix together: (It's important to mix the dry ingredients separately in GF baking)
1/4 cup white rice flour
1/4 cup cornstarch or fine-ground corn flour (or arrowroot starch)
1/4 cup potato starch
1/4 cup tapioca starch
1/4 tsp xanthan gum
1/4 tsp baking powder
1/4 tsp baking soda
1/4 tsp salt

In a mixer, beat until fluffy: 
6 Tbsp butter
1/4 cup white sugar
1/4 cup brown sugar

Add and mix until nice and smooth: 
flour mixture, from above
1 egg white
1 Tbsp vanilla extract (OR 2 tsp vanilla extract + 1 tsp vanilla bean paste)
1 1/2 Tbsp milk (add an extra 1/2 - 1 Tbsp if you think your batter is too thick, but I find this amount works well)

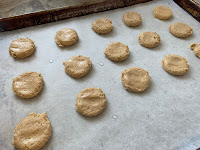
Scoop small spoonfuls or use a small, 1 Tbsp sized cookie scoop to scoop batter onto parchment-lined pan.  I prefer to dip a couple fingers in water and gently flatten the top of each scoop.  This helps with even baking. 

Ready to bake!
Fresh from the oven!

Bake your cookies at 325 F for ~15-18 minutes, until nicely golden.  Too pale and they won't be nice and crispy.   Let them rest on the pan for 5-10 minutes before removing to a cooling rack.  Let them fully cool.  Store fully cooled cookies in a tupperware container on the counter.  These are good the day you make them, but we prefer to let them sit a day before eating for a real "vanilla wafer cookie" taste.  Enjoy!  

A couple more pictures:
I found if I was careful, I could fit the entire batch on one pan since they don't spread too much.  Here, you can see half flattened and half left un-flattened.
I prefer the more even baking of the flattened cookies, but the un-flattened work perfectly well, too. 

Gluten Free Vanilla Wafer Cookies by Successfully Gluten Free!

Thursday, 22 April 2021

Onion Bagels

 These onion bagels are a fun savory bagel.  They'd be delicious topped as a smoked salmon bagel or just with cream cheese.  These are made and risen the same way as many of my savory bagel recipes, so you can look at those for extra pictures of the piped bagels and rising bagels.  Some of our favorite savory bagels are the everything bagel, the poppy seed bagel, the garlic & poppy seed bagel, the flavorful hearty bagel, and the jalapeno cheddar bagel.  I've posted plenty of sweet flavors, too!  Enjoy! 
Fresh from the oven - tasty onion bagels.

Onion Bagels

Makes ~18-24 bagels depending on size of bagel piped

Line two baking sheets with parchment paper.  

In a measure cup, combine the following and let rest 5-10 minutes: 
1 1/4 cup warm water
6 Tbsp honey
1 Tbsp rapid rise/quick yeast

In a mixer combine: 
2 cup tapioca starch
1 1/2 cup brown rice flour
6 Tbsp potato starch
1 Tbsp xanthan gum
1 1/2 tsp salt
2 Tbsp dried onion flakes (dried minced onion)
1-2 tsp onion powder (adjust depending on how strong you like your onion flavor)
For an even stronger onion flavor, finely mince or grate 1-2 Tbsp fresh shallots

Add and beat thoroughly for 3-4 minutes: 
yeast mixture, from above
6 Tbsp oil
3 eggs

Scoop into a large ziploc bag.  Cut 3/4" - 1" off the corner.  Pipe bagels onto prepared, parchment-lined baking pans.  I sometimes have to make ovals just to fit in all the bagels on two pans. Use 3 pans, if preferred.  

Brush/wipe the tops of the bagels with warm water.  Mix together and sprinkle on top of the bagels: 
1 tsp dried minced onion
1/2 tsp onion powder
1/2 tsp garlic powder
1/2 tsp dried chives
1/4 tsp salt
OR 
Use the Trader Joe's "onion salt" blend to top.

Let rise in a warm location for ~30 minutes until they've puffed up, but not doubled in size.  

Bake at 350 F for ~20-25 minutes, until bagels are nicely golden brown.  Too pale in color, and they'll sink/collapse a bit after you remove them from the oven.  Let rest a minute and then remove to cooling racks to cool.  

These are delicious with cream cheese & salmon, cream cheese, or used as a sandwich roll.  Once cooled, you can slice and then freeze leftovers.  They reheat perfectly in a toaster oven.  Enjoy! 


Onion Bagels Recipe by Successfully Gluten Free!

Monday, 12 April 2021

Asparagus, Shallot and Ham Tart/Quiche

Asparagus always seems like such a delicious springtime vegetable.  I usually just toss it in a bit of oil and roast it in the oven, but it's SO good in a quiche.  I have a wider, lower tart pan that I hadn't used in awhile, and so breaking it out to make a springtime asparagus quiche seemed ideal.  I added some ham underneath the shallots and asparagus, but you could just as easily leave it out.  Next time, I may just need to make two at once so we have more leftovers! Enjoy!  
Asparagus Tart/Quiche, fresh from the oven. Yum! 

Asparagus, Shallot & Ham Tart or Quiche

Line a 10" - 11" tart pan with 1/2 recipe of Kristin's buttermilk pie pastry crust.  You can roll it out as directed, or sprinkle and then press into pan with a piece of plastic wrap over your hand to avoid sticking.  If you don't have a tart pan, you can make this in a pie dish. 

Preheat oven to 425 F.

Sauté the following over medium heat 5-7 minutes: 
1 Tbsp butter
1 Tbsp olive oil
2-3 shallots, thinly sliced
1 bunch asparagus, washed, ends trimmed, and cut into ~3-4" pieces

Remove from heat and let cool while you prepare the rest of your filling. 

Dice into bite-sized pieces: 
~1/2 - 3/4 cup diced of thickly sliced baked ham (Optional - you can leave out the ham if preferred, but I recommend replacing it with something flavorful, like Boursin cheese)

In a bowl, whisk together:
~6-7 eggs (you may find you need more/less depending on how large your tart pan is)
1/4 cup milk (lactose-free works well)
salt & pepper

On top of your prepared crust, spread the diced ham.  Spread in the sautéed shallots and asparagus.

Ham topped with sautéed shallots and asparagus.
 Pour the egg mixture evenly overtop of everything.  
Evenly pour over the egg mixture, and it's ready to bake!

Bake at 425 F for 15 minutes.  Lower the oven temperature to 350 F and cook for an additional 15-20 minutes, until eggs are nicely set and crust is a nice golden brown.  Let rest 10 minutes before serving.

Wonderful served warm.  Refrigerate any leftover pieces.  You can serve chilled or warmed, but we do love leftovers of this asparagus tart warmed in a toaster oven.  Enjoy! 

Asparagus, Shallot and Ham Tart or Quiche by Successfully Gluten Free! 

Tuesday, 6 April 2021

Individual-sized Carrot Cakes!

 My youngest wanted to help me make carrot cake, so we decided to change it up a bit and make little individual carrot cakes.  This was so fun to do, in addition to helping our cake last a bit longer since serving sizes were smaller than slicing the regular carrot cake.  They were so moist and delicious!  A new favorite way to make and serve carrot cake.  Enjoy!  
Gluten Free Mini Carrot Cakes
Cooled and frosted mini carrot cakes - ready to eat! 

Individual-sized Carrot Cakes!

Makes 24 mini carrot cakes

Carrot Cake Batter:

Preheat oven to 350 F.  Butter and flour (use GF flour mix OR brown or white rice flour) 24 muffin-sized square tins.  I have some square pans I found years ago that work perfectly for this recipe.  You can also make these in buttered and floured muffin tins for individual muffin-shaped cakes. 
The square tins we buttered and floured - you can easily make these in muffin tins.

In a food processor with a grater attachment, or with a grater, grate 4-5 washed, trimmed (and peeled, if desired) carrots so you have 3 cups grated carrot.  I like to pack down the cups of grated carrot to pack in a lot of carrot.

In a large bowl, mix together:
1/2 tsp xanthan gum
1 1/2 tsp baking powder
1 1/2 tsp baking soda
1/2 tsp salt
2 tsp ground cinnamon

Add and mix in until thoroughly combined: 
3 cups grated carrot
1 1/2 cups sugar
4 eggs
1 cup oil 
2 tsp vanilla extract

Divide batter into prepared pans.  They should fill each tin about halfway.   Bake at 350 F for about 15-18 minutes, until baked through, but not dried out.  These are a nice, moist cake but shouldn't be wet in the middle.  

Let rest 5 minutes in the pans, then remove to a cooling rack to fully cool. 
After resting and then removing onto cooling racks.  The buttering and GF flouring helped them pop right out of the pans.

Cream Cheese Frosting:

In a large bowl or measuring cup, mix together the following until nice and smooth: 
2-3 Tbsp butter, melted
4 oz cream cheese, softened
1 tsp vanilla bean paste or vanilla extract
3 cups powdered sugar

Once the frosting is nice and smooth, transfer into a medium-sized freezer ziploc.  Snip the corner and use to pipe zig-zags of frosting on top of your cooled carrot cakes.  *Note: If you want fluffier frosting, don't melt the butter, just soften.  Beat all ingredients in a mixer until light and fluffy.  Spread on or pipe on cooled cakes, as desired.

Easy Glaze:
Need something dairy-free?  Just mix together a bit of powdered sugar and water to desired consistency (aim for a thin, running glaze).  Spread over top the cooled carrot cakes.  Voila! An easy dairy-free option! 

These store wonderfully in the refrigerator for a few days.  They've never lasted longer than that around here.  Enjoy! 
Ready to eat!  We had lots of grated carrot, so we made a batch of a more healthy carrot muffins, too. 


Mini Carrot Cakes Recipe by Successfully Gluten Free!