Search for a Recipe

Saturday, 22 June 2024

Blueberry Cobbler!

 A perfect summer recipe! This delicious cobbler is so easy to whip together. It's a nice addition to that many blueberry recipes I've shared.  This recipe can be combined with my peach cobbler or tart cherry cobbler recipes, if desired.  I find if you'd like a thicker topping, you can just make the single 8 x 8 pan of blueberry cobbler, or if you like less topping overall, you can divide the topping between two 8 x 8 pans of fruit. Either way, it disappears within a day around here. Enjoy! 
A pan of blueberry cobbler and peach cobbler, with the lighter topping option. 

Blueberry Cobbler!

In an 8" x 8" glass pan, fill halfway with:
frozen wild blueberries  (I'd estimate 4-6 cups blueberries are needed, but it's always tricky to gauge measuring, so I just go by filling the 8 x 8 pan halfway. You can also make this recipe with fresh blueberries.)

If you want to make a pan of peach (or tart cherry) at the same time you can put the sliced peaches in an 8 x 8 pan, and add the following to the peaches, same as the blueberries.

Add and mix in: 
2 - 4 Tbsp sugar
2 - 4 Tbsp Kristin's Gluten-free Flour Mix
1 tsp cinnamon

Mix together in a large bowl (if you want a lighter topping, make half the amount listed here - it'll work perfectly well, too!  Or, make the full amount and split it between the blueberry pan and make the peach cobbler, too! That's usually what I do since there's more to go around.):
1 cup Kristin's Gluten-free Flour Mix
3/4 - 1 cup sugar
1 tsp baking powder
1/2 tsp salt

Add, chopping in with a pastry cutter until you have a crumbly topping:
3 Tbsp butter, chilled
1 egg
1 tsp vanilla extract or vanilla bean paste

Sprinkle the crumb topping over the prepared blueberries.  Bake at 350 F for ~50 minutes, until topping is nicely browned.  Great served hot or warm.  The cobbler can be served alone - but we love it with a tiny dollop of vanilla ice cream or whipped cream needed! We enjoy leftovers chilled or reheated. Enjoy!
A pan of peach and blueberry cobbler with the lighter cobbler topping option. Gone within a day!

Blueberry Cobbler Recipe by Successfully Gluten Free!

Friday, 14 June 2024

Pan-grilled Tuna Onigiri (Stuffed Rice Balls)

 This has become an absolute favorite around here - usually coupled with homemade kimbap. My understanding is that the traditional way to have Yaki Onigiri (grilled rice balls) includes a brushing of soy sauce glaze, but we prefer without. My kids love helping to make these onigiri - and they love when we (hopefully) have leftovers so they can take one to school for lunch the next day.  Do you have to pan-fry these? No! You can leave them as-is, and wrap them in nori (seaweed paper), and they're delicious as well. Sometimes we add the nori to the cooked ones, too. Enjoy!
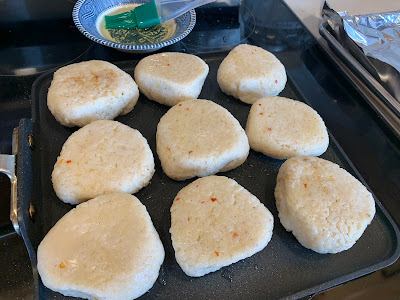
Grilling the tuna onigiri - yum!
A yummy pan-grilled tuna onigiri plus homemade kimbap meal with friends.


I find 1 cup sushi rice to 1 can of tuna is a good ratio. You can make more as desired!

To prepare rice: 

In a medium pot or rice cooker, combine and cook as directed: 
2 cups sushi rice (japonica or similar type), well rinsed
4 cups (1 liter) chicken stock/broth
1 Tbsp olive oil or butter
1/2 - 1 tsp salt (lower end with the salt if the broth includes salt)
1/2 - 1 tsp pepper
1/2 - 1 tsp garlic powder
1 - 2 tsp dried onion flakes
1/2 - 1 tsp dried cilantro flakes (optional)
1 - 2 tsp freeze-dried or fresh chives (optional)
1/4 - 1/2 tsp red chili flakes (optional)

For making the rice in a pot, I typically bring to a boil over high heat, stirring a few times. Cover with the lid and lower heat to low/medium-low and simmer 15 minutes. Turn off the heat and let rest/steam for an additional 10 minutes.  Stir to fluff/mix.  

To prepare tuna:

In a large bowl, mix together: 
2 cans tuna, drained
3-4 Tbsp mayonnaise (to desired consistency)
1-2 Tbsp dill pickle relish
1-2 tsp fresh or freeze-dried dill optional
salt & pepper, to taste (I tend to use very little additional salt)
Tuna salad, ready to go!

To prepare cheese: (Optional, but we enjoy it)

Slice and chop into ~1" squares:
cheddar or marble cheese, as desired

To assemble & pan-grill the rice balls: By all means make these in those cool triangular onigiri molds, if you have them. But this method works perfectly, is easy, and the kids love it.  You can make them as large or small as you prefer. It takes a little trial and error to figure out the size you enjoy. 

On a square of plastic wrap, flatten a spoonful of rice.  Place a spoonful of ~1 Tbsp or so of tuna on the flattened rice. Add a couple piece of cheese.  Using the plastic wrap, pull up all the sides and squeeze together to form a nice circle.  You can leave them round, or use your hands to shape them into the more traditional triangle shapes.  
I use a rice spatula to flatten, ready for fillings.
Rice flattened and toppings added. Ready to bring it all together into a ball.
Fillings added, my daughter is working on wrapping it up.
Rolling it and pressing to compact it a bit.
Shaping it into a triangle. Yes, there are these neat presses people can use, but this works easily when you don't have the tools. 

Heat a pan to medium to medium-high heat.  Brush the top side of your rice ball with avocado oil.  Place down on the pan, flatten slightly, and then brush the other side with additional avocado oil
Brushed with avocado oil and heating until crisped!
I actually like the look of round stuffed rice balls. We left some rounded for the ones we needed to make without cheese.  

Let cook until lightly browned on each side, so you have a nice crispy outside edge.  Remove from the pan and enjoy!  Leftovers heat nicely, too! We've even frozen them and my kids can pop them into their lunch boxes for a yummy lunch.  They just reheat them a bit once they've defrosted. Enjoy!

Pan-grilled until crispy and ready to eat!
Our friends joined us for yummy pan-fried/grilled tuna onigiri and some homemade kimbap. Yum!

Pan-grilled Tuna Onigiri (Stuffed Rice Balls) Recipe by Successfully Gluten Free!

Monday, 3 June 2024

Easy Veggie-filled Risotto

 I love to whip together risotto quite regularly. The great thing is it's so versatile - you can adjust the vegetables and spices to your preference of the day! Here's a nice light risotto recipe that works well as an accompaniment - or can work as an all-in-one meal! A variety of options are provided below. You can adjust the risotto ingredients depending on what vegetables you have on-hand. Enjoy!
Delicious risotto served with a side of roasted asparagus and salmon. 

Easy Veggie-filled Risotto

Over medium heat in a large wide saucepan, cook 5 - 7 minutes: 
2 - 3 Tbsp olive oil (you can add a bit of additional oil as needed throughout cooking)
1/2 - 1 onion OR 3-4 shallots, diced or sliced
1 leek, sliced & well rinsed optional
1/2 fennel, diced optional
1 - 3 carrots, diced or sliced
1 - 2 cups mushrooms, sliced optional
1 - 2 zucchini, diced and/or sliced optional - I will sometimes add the zucchini earlier, or will wait and add it a bit later if I'm using things like bell pepper, so it doesn't soften too much during cooking.

Add and cook 1-2 minutes: 
1 Tbsp minced garlic (Yes, you can use more garlic than this - I often do!)


Pan roasted the vegetables until crisp-tender, then added in the minced garlic.

Add and cook an additional 3-4 minutes (optional)
1 - 2 zucchini, diced and/or sliced (if you didn't add it above)
1 - 3 stalks celery, diced optional
1 bell pepper, diced optional

Move vegetables to the side and add and cook ~2 minutes: 
1 Tbsp olive oil 
2 cups Arborio risotto rice, rinsed

Add and cook with the risotto for ~2 minutes. 
After the 2 minutes, it'll look like this and be ready to add the broth/liquid

Add, and let come to a boil over the same medium heat (feel free to play around with the spices used in this recipe - I tend to adjust them depending on my mood and what else we're having for dinner)
6 cups chicken broth
1 tsp salt
1 tsp pepper
1 tsp garlic powder
1 - 2 tsp oregano
1 - 2 tsp basil 
1 tsp parsley optional
1 - 2 tsp fresh thyme optional
1 - 2 tsp fresh oregano optional 

Once simmering, stir every few minutes. You can keep it over medium heat, and after ~10 minutes, add to the simmering pot: 
~2 cups water
I usually add this as the liquid cooks off. I like to leave it simmering over medium heat vs lowering the heat to low/medium-low, so I add more water to compensate. 

Let simmer a total of ~20 minutes, stirring regularly.  Taste-test toward the end until you have the desired softness of your risotto.  I sometimes end up letting it simmer closer to 25 - 30 minutes, depending on how the risotto rice is tasting.  

Optional: For more of an all-in-one meal, during the last 2 - 3 minutes of cooking, you can add the following: 
1 cup baby tomatoes, sliced in half
1 cup cooked, diced chicken
While many cook risotto by cooking and slowly adding liquid over time, I prefer to keep it simmering and stir regularly, but not constantly, so I can multi-task in the kitchen. This means, it tends to look like this initially. 
It will look like this as the risotto absorbs the liquid.  I find I play around with the amount of water added depending on how soft/hard the risotto rice is, and what I'm in the mood for on that particular day. 
The final risotto, I like where there's still a bit of wetness to it, since I find once you add cheese, it thickens. 

The risotto is great as a side-dish, or if you added the chicken and tomatoes, like in the photo below, it's lovely served with some grated parmesan cheese on top! We enjoyed it for dinner with some friends recently alongside some yummy homemade rosemary focaccia bread. Enjoy! 
Veggie-packed risotto served with some Parmesan on top alongside fresh focaccia bread! Yum!

Easy Veggie-filled Risotto Recipe by Successfully Gluten Free!