Search for a Recipe

Friday, 11 December 2015

White Chocolate Peppermint Popcorn

This was a serious hit with everyone! The kids loved helping make it - and it was easy and quick to whip together.  White chocolate with peppermint is a delicious combination, and adding that to the crunch of popcorn just makes it that much better!  A fun treat - one we plan to make again soon to pack into little treat baggies for Christmastime.  Enjoy!
Gluten Free White Chocolate Peppermint Popcorn
Gluten Free White Chocolate Peppermint Popcorn!!!
Tasty and easy - fresh homemade white chocolate peppermint popcorn!

White Chocolate Peppermint Popcorn
Based off the 'Candy Cane Popcorn' recipe from the book "Popcorn" by Carol Beckerman (Yum!)
Makes 1 large tray of popcorn

Line a cookie sheet with parchment paper.

Pop 1/2 cup popcorn kernels in an air popper in a large bowl.  Scoop popcorn by hand into a fresh large bowl. (This allows any kernels or smaller pieces to get left behind.)
Fresh popcorn, ready for white chocolate and peppermint!

Melt in a microwave safe bowl at 50% power in 30 second increments, stirring regularly. You don't want to burn the chocolate:
12 - 14 oz good quality white chocolate 

Mix in quickly:
1/4 - 1/3 cup crushed peppermint candy (candy canes, small peppermint candies)
Crushed peppermint candies - then mixed quickly with the melted white chocolate.

Fold melted white chocolate/peppermint mixture into popcorn quickly!  Mixing with your hands is effective, since it helps you do this part quickly.

Scoop popcorn onto prepared cookie sheet lined with parchment paper.
Sprinkle over top of popcorn:
1/4 - 1/3 cup crushed peppermint candy
Gluten Free White Chocolate Peppermint Popcorn
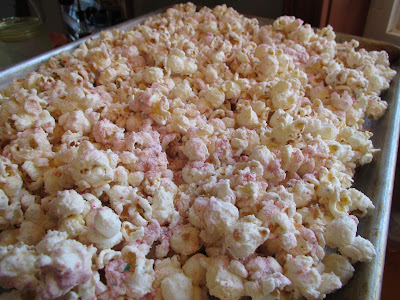
White chocolate peppermint popcorn, sprinkled quickly with additional crushed peppermint.

Place in the refrigerator ~5 minutes, until white chocolate has set.  Serve or store 3-4 days in a tightly sealed container.

Makes a fun, light dessert and a great holiday treat for kids!
Enjoy!

Sunday, 6 December 2015

Shallot, Kale and Bacon Quiche with a Buttermilk Biscuit Crust

The buttermilk biscuit crust is a great favorite of mine when throwing together quiche.  It gives a lighter texture to the bottom of the quiche, and is a general favorite in my house, although they'll happily eat quiche made with a buttermilk pastry crust, too.  We sometimes find kale can be overpowering in recipes, but when sauteed with shallots and peppers, it's a wonderful addition to quiche, giving more of a spinach flavor.  My fabulous 4 year old cook assisted me in cooking this particular quiche all along the way.  Enjoy!
GF Kale and Bacon Quiche with Buttermilk Biscuit Crust
GF Shallot, Kale and Bacon Quiche with Buttermilk Biscuit Crust

Saute over medium heat until almost tender:
2 Tbsp olive oil
1-2 shallots, sliced
1/2 red bell pepper, diced
salt and pepper

Add and cook until kale is just tender/wilted:
2-3 cups diced kale, middle stem removed (washed, shaken dry is fine)
Sauteed Kale, Shallots and Red Pepper

Set vegetables aside to cool a bit while you prepare the buttermilk biscuit crust.
First, make your buttermilk (or just use ¼ cup buttermilk)

In a measuring cup place:
1 ½ tsp lemon juice OR white vinegar

Fill so you have total of:
¼ cup milk

Mix in a bowl:
¾ tsp sugar or squirt honey
1 tsp baking powder
¼ tsp salt
pinch of baking soda

Add and dice in with a pastry cutter:
2 ½ Tbsp butter

Add and mix with a spoon, just until combined:
¼ cup buttermilk (from above)

Press biscuit crust in pan using plastic wrap to keep from sticking.  It won't be perfect, and this is just fine!  It can be too sticky if it gets too warm, so you can always refrigerate a bit to chill and then it should press into the pan a bit easier.

Spread on the crust:
1. 1/2 - 1 cup crumbled cooked bacon or thinly sliced Canadian bacon
2. 1/2 - 1 cup sliced or shredded cheese (a stronger cheddar, or something similar is nice. I used a sheep's milk gouda, but sometimes I use a sharp cheddar or yogurt cheese).
3. Spread the cooked vegetables evenly over the top of the cheese.  You can use more or less of your vegetable mixture, depending on your preference.

Whisk and then pour over fillings:
4-6 eggs
1/3 - 1/2 cup milk (lactose-free works great)
salt and pepper

Bake at 425 F for 10 minutes.  Lower oven temperature to 350 F and bake another 20-25 minutes, until eggs are set in the middle (it varies depending on whether you use 4, 5 or 6 eggs).

Slice and serve hot or chill and enjoy cold.  Enjoy! 

Tuesday, 1 December 2015

Chocolate Gluten-Free Wedding Cake!

Almost one year ago, I put together a delicious Gluten-Free Wedding Reception for my brother Mike and his wife Amanda.  The three-tiered wedding cake was made from a delicious, moist chocolate cake with different fillings in each tier (Raspberry, Mint, Triple-Chocolate). Each tier was topped with dark chocolate ganache, then semi-sweet ganache to create a smooth layer.  The cakes were then decorated with white chocolate ganache piping and a semi-sweet chocolate ganache scalloped edging.  Fresh flowers decorated the cake.  Happy Cake Making! Enjoy!
GF Chocolate Wedding Cake!
Homemade and Gluten-Free Chocolate Wedding Cake! 
GF Chocolate Wedding Cake!
#bromanda cutting the cake! They cut into the middle mint layer. Yum!
Above wedding cake pictures by Ali Sumsion Photography

Chocolate Gluten-Free Wedding Cake!
Makes 1 three-tiered cake (6", 8" and 10" layers)

Cake can be filled and arranged as described: (recipes for filling shown after cake recipe)
Bottom Tier (10") - three fillings
1. Raspberry Jam
2. Raspberry Dark Chocolate Ganache
3. Chocolate Marshmallow Frosting
Middle Tier (8") - three fillings (with mint-infused chocolate cake in this tier)
1. Dark Chocolate Mint Ganache
2. Crushed peppermint candy
3. Mint flavored Marshmallow Fluff Frosting
Top tier (6") - three fillings
1. Dark Chocolate Ganache
2. Milk Chocolate Ganache
3. Chocolate Marshmallow Frosting

One Batch Chocolate Cake Batter:
(makes two 10" cakes OR three 8" cakes OR two 8" + two 6" cakes OR two 6" cakes + 24 mini cupcakes)

Butter the cake pans.  Then line them with parchment paper.  Cut a circle for the bottom of the pan. Then cut long strips for the sides. This will give you the cleanest removal of your cakes.  

In a measuring cup, combine the following and set aside:
1 1/2 cup milk (lactose-free works great)
2 Tbsp white vinegar

In a large bowl, whisk together:
1/2 cup tapioca starch
1/2 cup sorghum flour
1/2 cup white rice flour
1 cup cocoa powder
1 1/2 tsp xanthan gum
1 tsp baking soda
2 tsp baking powder

In a mixer, beat until fluffy:
3/4 cup salted butter, softened

Add sugars to butter, and beat until fluffy:
1 cup brown sugar
1 cup white sugar

Add one at a time, scraping down the sides of the mixer, as needed:
3 eggs (room temperature)
2 egg yolks (room temperature)

Add in:
3 tsp vanilla extract or vanilla bean paste
(6-9 drops high quality peppermint essential oil, for peppermint layer only)

Turn the mixer to low.  Alternately add the flour/cocoa blend and milk/vinegar mixture.

One mix of cake batter makes two 10" rounds.   A second mix will allow you to make two 8" rounds + two 6" rounds.  (My top tier was a bit taller because I made three batches of batter here, in order to have extra for cupcakes.  Batch 1 made two 10" cakes. Batch 2 made three 8" cakes. Batch 3 made two 6" cakes + ~24 mini cupcakes (baked about 12-14 minutes).)

Bake cakes at 350 F.  Bake 6" rounds 20-25 minutes and 8" - 10" rounds 25-35 minutes.

Let rest a few minutes before removing carefully to cooling racks to completely cool.   Once cakes are cool, you have a few options: 
1. Make cake right away - fill layers as desired, chill in refrigerator to firm.  Cover in first layer of ganache, chill.  Cover in 2nd layer of ganache, chill.  Assemble cake (with dowels or on cake stand), decorate with white ganache, or as desired.  
2. Fill and stack each cake layer.  Wrap each filled cake layer securely with a few layers of plastic wrap.  Freeze until ready to use.  *This is my preference, since it allows you to make the cake a few days in advance, and you only need to assemble and do the final frosting of the cake. 
3.  Wrap each cake layer securely in a few layers of plastic wrap and freeze until ready to use.  


When you remove cakes from the freezer, let them rest wrapped on your counter for ~15-20 minutes, so any condensation is on the plastic wrap and not on your cake.  Then, you can unwrap and glaze/frost as desired.

Cake Fillings: 
Purchased fillings:
High quality raspberry jam
Peppermint candies/candy canes, crushed

Fillings to make: 
Raspberry Dark Chocolate Ganache
Dark Chocolate Mint Ganache
Dark Chocolate Ganache
Milk Chocolate Ganache
Chocolate Marshmallow Frosting
Mint Marshmallow Fluff Frosting

When assembling the cakes, I used ganache while it was still slightly warm when placed as a filling, as shown below.  Once chocolate ganache was spread on a cake layer, I then let it cool completely in order to set before adding on another layer of filling.
GF Cake with Ganache Filling

Cakes were assembled with the following fillings (same as shown earlier):
Bottom Tier (10") - three fillings
1. Raspberry Jam
2. Raspberry Dark Chocolate Ganache
3. Chocolate Marshmallow Frosting
Middle Tier (8") - three fillings (with mint-infused chocolate cake in this tier)
1. Dark Chocolate Mint Ganache
2. Crushed peppermint candy
3. Mint flavored Marshmallow Fluff Frosting
Top tier (6") - three fillings
1. Dark Chocolate Ganache
2. Milk Chocolate Ganache
3. Chocolate Marshmallow Frosting


Cake on left is assembled middle layer - with dark chocolate mint ganache, crushed peppermint and mint flavored marshmallow fluff frosting.  The cake on the right was an extra peppermint cake I made with the extra 8" round I had.  
GF Wedding Cake being prepped for assembly
Filled cakes after being removed from the freezer.  They are resting to allow any condensation to accumulate on the plastic NOT the cake.  

Semi-sweet and Dark Chocolate Ganache was used as a glaze on each layer.  I made a few batches of chocolate ganache, using the following recipe: 

Bring to a boil over medium heat: 
1/2 cup butter
1/2 cup heavy cream

Remove from heat and pour over
8 oz high-quality semi-sweet or dark chocolate

Cool slightly before pouring or spreading over cakes.  Cool fully if you would like to whip and use like a regular frosting.  I first spread a thin layer of dark chocolate as a crumb coat, and then used semi-sweet for the final layer.  
Gluten-Free Chocolate Wedding Cake
All cakes received an initial layer of chocolate ganache glaze.  This was allowed to set before a final coat of ganache was added.  

The cake was then assembled using dowels (each layer was on a foil-wrapped cardboard circle).  White Chocolate Ganache was used to pipe decorations on the cake.  

White Chocolate Ganache was prepared as follows: 
Heat to boil over med-high heat:
1/4 cup + 2 Tbsp cream
1 Tbsp butter
3/4 tsp vanilla bean paste (preferred) OR vanilla extract

Remove from heat and add:
6 1/2 oz. high quality white chocolate

Stir gently until smooth.   Let cool until the ganache is a temperature and consistency that can be piped.  You could cool fully and then whip the ganache, to pipe like you would regular frosting, too.

Gluten-Free Chocolate Wedding Cake!
The final product, with white ganache piping to decorate, and a final scalloped edge at the bottom of each layer done in semi-sweet chocolate ganache.  
Gluten-Free Chocolate Wedding Cake!
The GF chocolate wedding cake at the fully GF reception, with fresh flowers to decorate. 
Gluten Free Chocolate Wedding Cake
The top of the cake with smaller slices of the middle tier (mint) and bottom tier (raspberry) served, saving the top layer for the happy couple. 

Thanks to Ali Sumsion Photography for pictures of the completed cake! 

Wednesday, 25 November 2015

Mint Dark Chocolate Ganache

This is the last chocolate ganache recipe needed for the gluten-free wedding cake I made last December at the big gluten-free wedding reception I put together.  I'll be posting the wedding cake recipe in one week in honor of the 1 year anniversary of my brother and new sister's wedding!  But for now, you can think happy thoughts about mint chocolate ganache, which is, in my opinion, one of the tastiest kinds of ganache!  Enjoy!

Mint Dark Chocolate Ganache Truffles
Mint Dark Chocolate Ganache is perfect used in Molded Chocolate Truffles

Mint Dark Chocolate Ganache

Bring to boil over medium heat:
1/2 cup butter
1/2 cup heavy cream
5-6 fresh mint leaves (crushed in your hand before adding to pan to release oils) and/or 1-2 drops high quality peppermint essential oil (adjust to preference)

Once at a rolling boil, remove mint leaves.  Pour over:
8 oz high quality semi-sweet or dark chocolate

Mix thoroughly until smooth.
Optional: Add handful of crushed peppermint candy to ganache before using.

This recipe has 3 uses:
1. Truffle filling
2. Glaze on outside or middle filling layer in cake.
3. Cooled, then whipped and used as frosting (can be piped nicely once whipped).  

You can roll and dip truffles, too.  Then sprinkle with crushed peppermint for a nice finish.
Hand-dipped Mint Truffles in White Chocolate

Tuesday, 17 November 2015

Cinnamon Roll Pancakes

We made these as a youth activity at my church and it was such a huge hit with the girls.  I've since made it a handful of times at home and when we've had visitors and it's been an equally big hit.  My sister, Jenny, introduced me to the magic that is cinnamon roll pancakes.  They're a great treat when you don't have time to make homemade gluten-free cinnamon rolls.  The cinnamon mixture sinks into the batter and then caramelizes perfectly once flipped. Enjoy!

Fresh, piping hot gluten-free cinnamon roll pancakes!

Cinnamon Roll Pancakes
Makes ~24 pancakes

Mix in a large bowl:
1 1/2 cups Kristin's Gluten-Free Flour Mix
2 Tbsp brown sugar
2 Tbsp baking powder
1/2 tsp salt

Add and mix in:
2 eggs
1 1/2 - 1 3/4 cup milk (lactose-free works great!)
4 Tbsp oil
1/2 - 1 tsp vanilla bean paste (or extract)

Pre-heat your pan over medium-low heat while you mix together the cinnamon mixture.

Mix together and put in a squeeze bottle (or thick ziploc bag):
1/2 cup butter, melted
3/4 cup brown sugar
1 Tbsp cinnamon
*The butter will separate out a bit from the cinnamon swirl mix, but just keep shaking or mixing - I sometimes just squeeze out any extra liquid into a spare bowl before piping the cinnamon mixture onto the pancakes.

If you have a non-stick, then you don't need to butter the pan (although you'll want to give it a quick wipe between batches of pancakes).  If in doubt, butter your pan between rounds of pancakes.

Pour a spoonful of batter on the pan.  Add a big swirl of cinnamon mixture on top of the pancake.  Repeat.

You'll want the pancakes to look fairly well-cooked, so you can see bubbles coming through the entire pancake before you flip.  It should look similar to the one below.

You can serve the pancakes plain (honestly, they're delicious like this and I don't think need anything else added) or you can make a bit of cream cheese glaze (below) to turn them into proper mini cinnamon rolls.  

Cream Cheese Glaze:
2 oz cream cheese
1 cup powdered sugar
pinch salt
1/2 tsp vanilla bean paste (or extract)
milk, to desired consistency

Tuesday, 10 November 2015

Raspberry Dark Chocolate Ganache

A simple, and delicious raspberry chocolate ganache recipe.   This is delicious when used as a filling in cake, too!  The flowers on top aren't quite poppies, but close enough to seem appropriate to post close to Remembrance Day.  Enjoy!
GF Raspberry Dark Chocolate Ganache
A variety of truffles with ganache fillings.  The flower-topped chocolates have the raspberry dark chocolate ganache filling.  

Raspberry Dark Chocolate Ganache
For use in truffles or cake fillings

In a saucepan, bring to boil over medium heat:
1/2 cup butter
1/2 cup heavy cream
1/4 cup high quality raspberry jam (with or without seeds, depending on preference) (you can add a drop or two of raspberry flavoring, but I tend to prefer the taste of a high-quality jam). 

Remove from heat and pour over:
8 oz high quality semi-sweet or dark chocolate

Mix thoroughly until smooth.  You have two options:
1. Let cool slightly before using as fillings in molded chocolates OR as a rich filling in a cake.
OR
2. Let completely cool before rolling for round, dipped truffles OR whipping and using as filling for a cake.  

Monday, 9 November 2015

Delicious Root Vegetable Side

This isn't as colorful a dish as I normally prefer, but the taste is fabulous.  It would be a lovely addition to a Thanksgiving style meal.  It's filled with wholesome fall vegetables: celeriac root, parsnips, onion, garlic & potatoes.   Once the vegetables are cooked, you can throw in a bit of milk, chicken and peas to quick turn it into a hearty all-in-one meal (instructions below).   The vegetables are wonderful served alongside fresh multi-grain bread & butter.   I used fresh vegetables from our organic vegetable CSA (community supported agriculture, Heartbeet Organics).  If you're out of parsnips, you can just leave it out and make the dish with only potatoes and celery root.  The blend of flavors is really what makes this dish pop.

Delicious Root Vegetable Side
Serves 4-6

Grate coarsely (a large grater on a mandolin works well or you can chop into thin strips) the following:
4 small/med. potatoes (thin-skinned)
1 celeriac root (also called celery root) (peeled)
2 parsnips

Prepare the following:
1 onion, thinly sliced
3 cloves garlic, minced or crushed

In a large low-sided frying pan, warm over medium heat:
2-3 Tbsp butter
2-3 Tbsp olive oil

Once butter & olive oil are hot, add all vegetables (onions/garlic & potato/celeriac/parsnips) and the following seasonings.  Saute all veggies until nicely softened, stirring regularly.
pinch ground allspice
pinch dried rosemary, crushed
1/2 tsp ground coriander
1/2 tsp garlic powder
1/4 - 1/2 tsp dried oregano
salt & pepper, to taste

Serve as a delicious, rich side dish. Would be a wonderful addition to a Thanksgiving-type meal.

OR

To make into a quick & hearty meal, you can add the following:
1-2 cups cooked chicken
1 cup frozen peas
1 cup milk (lactose-free options work well)
Cook a few minutes, until mixture thickens. The potatoes contain starch that will help naturally thicken this mixture.  Salt & pepper, to taste.
Enjoy!