Search for a Recipe

Monday, 11 March 2019

Rainbow Birthday Cake!

A yummy rainbow cake, filled with homemade vanilla pudding and topped with a vanilla marshmallow frosting on the outside! You can make this cake as a traditional rainbow, or vary things up and do shades of blue, pink, purple, etc.  I've made these differently depending on kids preferences.  The thing we love the most is that because the cake is filled with pudding rather than frosting, the overall cake isn't as sweet as most cakes.  The cake is only 6" in diameter, so you won't feel like you're overwhelmed with cake.  Enjoy!
Gluten Free Rainbow Cake
A slice of rainbow cake, about to be served and quickly inhaled! 
Gluten Free Rainbow Cake
It was perfect for my now 5 year old!  She was one happy little girl.
Gluten Free Rainbow Cake
If you've let the cake chill nicely, it will slice wonderfully!

Rainbow Cake - gluten free!

Makes a 6" diameter cake, but it's 6 layers tall!

Vanilla Pudding Filling  


Make pudding first, since it will need to cool in the refrigerator.  

In a medium saucepan, whisk together:
2 1/4 cup milk (whole milk is best, similar lactose-free options work well, too)
1/2 cup white sugar
1/2 tsp salt

Bring to a low boil over medium heat, stirring regularly.
Mix together in a separate bowl, then add quickly, whisking into bubbling milk/sugar mixture:
1/4 cup milk
4 egg yolks
1/4 cup cornstarch

Once pudding has thickened, and started bubbling again, remove from heat.  Immediately add:
2-3 tsp vanilla bean paste OR vanilla extract

Place pudding in a bowl.  Cover with plastic wrap (pressed firmly on the surface of the pudding).  Let cool on the counter a bit before placing in the refrigerator to cool completely.


6 Colorful Cakes


Preheat oven to 350 F.  Line 6" pans with parchment paper.  Use a parchment paper circle just wider than the pan.  Press down and smooth edges as best you can.

In a large bowl, whisk together:
1/2 cup white rice flour
1/2 cup coconut flour
1 cup white sugar
1/2 tsp baking soda
1/2 tsp salt

Add and mix until smooth:
1 cup milk
1/2 cup oil
2 tsp vanilla bean paste OR vanilla extract
6 eggs

Divide batter into six bowls.  Add food coloring, as desired.   Pour batter into prepared pans.  (This works to do in stages if you don't have 6 pans - I only have 2 - the batter will be fine resting at room temperature before baking).
Batter divided into six cereal bowls.
You can use as much or little coloring as desired.  I usually don't go quite this bright.

Bake colorful cakes at 350 F for 14 - 16 minutes.  Loosen the edges, if needed, then flip and put on a wire rack to cool (removing parchment paper).
Make sure you don't forget to use parchment to line your pan, or you'll end up with cakes stuck to the pan!  Just use a knife to loosen the sides of the cake and it will pop right out. 
Some very colorful cakes cooling. 

Once all your cakes have cooled, you can assemble your cake!  Layer cakes with chilled vanilla pudding in desired color order.  Place the cake in the refrigerator to chill while you prepare your frosting.
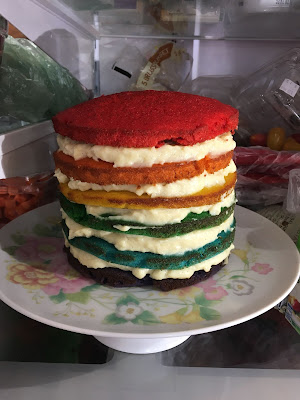
Gluten Free Rainbow Cake
I've served this cake just like this, without frosting, and it's still a big hit.  Perfect if you want to avoid frosting, although I find most people love frosting. 

Marshmallow Fluff Frosting

In a mixer, beat together 2-3 minutes, until nice and fluffy:
1 cup butter, softened
2 cups powdered sugar
2 tsp vanilla extract
2 cups marshmallow fluff

Remove cake from refrigerator and put a thin layer of frosting all over the cake as your "crumb coat".   Let the cake chill a bit more to set that layer before adding the rest of the frosting and any decorations you like.  We loved how it looked with an excessive number of rainbow sprinkles added.  Keep in the refrigerator until ready to serve.  It's best if you can let it rest about 30 - 60 minutes at room temperature before serving.   Make sure you wipe off your cake cutting knife between each slice so you have clean slices!  Enjoy!!!
Gluten Free Rainbow Cake
Freshly frosted and covered in sprinkles! 
Gluten Free Rainbow Cake
It ends up looking SO great the entire time you're cutting it.  

Gluten Free Rainbow Birthday Cake Recipe by Successfully Gluten Free!

Wednesday, 6 March 2019

Favorite Orange Rolls made in a mixer!

I'm always looking for ways to cut corners, simplify my baking, but retain the taste and flavors.  This method of making orange rolls does just that!  Instead of needing to mix things in a bowl like my original recipe for orange rolls (though we like those, too) -- these can be made in a mixer.  Similarly to my cinnamon rolls in a mixer, the dough is a little stickier, so you'll want to use wet hands and a wet knife when cutting and placing on the pan to rise.  These freeze perfectly, too, so you can freeze leftovers for orange rolls anytime! Enjoy!
Gluten free Orange Rolls
Fresh gluten-free orange rolls, piped with cream cheese frosting just out of the oven, so the frosting melts into them. Yum!

Gluten Free Favorite Orange Rolls in a mixer!

Makes ~24-30

Preheat oven to 350 F.  Line two cookie sheets with parchment paper or silicon baking liner.

In a mixer combine: (It's important to mix dry ingredients first in gluten-free cooking to avoid clumps)
2 cups brown rice flour
1 cup sorghum flour (or an additional cup of brown rice flour, but I prefer to add a little sorghum flour for natural sweetness)
3/4 cup arrowroot starch (or cornstarch)
1/2 cup sugar
1/4 cup tapioca starch/flour
1/4 cup potato starch
1 Tbsp xanthan gum
4 tsp rapid-rise/quick yeast
1 1/2 tsp salt

Add and mix in gently, then increase speed and mix on medium speed for 4 minutes, scraping occasionally:
1/2 cup butter, softened
1/2 cup water, room temperature
1/2 cup orange juice
1/2 cup milk
3 eggs

While your dough is mixing, prepare filling:
1/4 cup butter, melted
3/4 cup sugar
2 - 3 Tbsp fresh orange juice
zest of one large orange


Line two large sheets of plastic wrap side by side on the counter, overlapping a bit.   2-3 foot long pieces work well.  Spoon out large scoops of the dough and place along the middle of the plastic wrap. Pull out another two large sheets of slightly overlapping plastic wrap to cover the dough.  

You’ll then flatten/roll out the dough between the sheets of plastic wrap. You want a rectangle between 12" x 20" and 20" x 36".  It just depends on what size you want your rolls. I tend to make a larger rectangle and slice thinner rolls so we have more rolls to go round!  Carefully peel off the top layer of plastic wrap.  Spread the orange filling evenly over the top of the dough.
Gluten free Orange Rolls
A larger rectangle of orange roll dough with filling spread out before rolling up the dough.

Roll up the dough, using the plastic wrap to help.  Slice carefully. I like to dip my serrated knife in water between each slice and dip my fingers in water regularly to avoid sticking.  Slice ~1" thick slices and place on parchment-lined baking sheets.
Using a wet knife and hands makes clean cuts and avoids dough sticking.
Cut rolls, ready to rise. 

Let rolls rise uncovered in a warm location for ~30-40 minutes, until nicely puffed.  Bake at 350 F for 17-20 minutes, until light golden brown.  
Gluten free Orange Rolls
Orange rolls after rising, ready to bake.
Gluten free Orange Rolls
Orange rolls, fresh from the oven.  You don't want them any darker than these here.  I'd almost say aim for a little less brown than these. 

Remove from oven and place sheets on cooling racks.  Top rolls with frosting either while hot (and it melts into the rolls) or once cooled, for a slightly neater look.

Cream Cheese Frosting

Mix together:
3 oz cream cheese, softened
2 Tbsp butter, softened/melted
1/2 tsp vanilla
2 1/2 cup powdered sugar
1 tsp zest from orange
fresh orange juice, to desired thickness/consistency

Put frosting in a ziploc bag to pipe on top of the rolls OR spread with a knife or back of a spoon.
Gluten free Orange Rolls
Frosting piped onto orange rolls when hot out of the oven, so the frosting melts into them.  This is my favorite method to use.

Gluten Free Orange Rolls Recipe by Successfully Gluten Free!

Friday, 22 February 2019

Rosemary Focaccia Bread!

I realized that while I've been making my focaccia bread like this for awhile, I hadn't posted an update!  It's a bit thinner than my  thicker focaccia bread recipe, but we LOVE this one so much more!  It works perfectly as a thicker pizza crust, too.  Just make it like this (leave out the rosemary, if desired or replace with basil), bake, then add toppings and bake again! Yum! This was a delicious accompaniment to the salmon salad, oven roasted cod and oven roasted potato wedges/fries served today.  Enjoy!
A bit thinner than traditional focaccia bread, but so delicious and makes two pans! 
Homemade Focaccia Bread. Fresh from the oven and cooling before slicing and eating!

Rosemary Focaccia Bread!

Makes 2 pans of focaccia bread - you can make one pan for a thicker focaccia bread, but we've preferred the thinner version here. 

Preheat oven to 400F.  Line two cookie sheets with parchment paper.

In a mixer, combine the following dry ingredients:
3 cups Kristin's Gluten-Free Flour Mix
2 tsp xanthan gum
1 tsp salt
2 Tbsp quick-rise yeast
2 Tbsp sugar

Add in, mix slowly, then increase speed to medium. Beat 3-4 minutes, scraping once or twice:
2 cups warm water
2 eggs
4 Tbsp olive oil (I recommend using a flavorful, darker olive oil)

Divide dough and spread around parchment paper with the back of a spatula.
Ready to add olive oil and herbs on top!

In a small container, mix together:
3 Tbsp olive oil (flavored, if desired, or a flavorful darker olive oil)
1 - 2 Tbsp fresh rosemary, minced
2 - 3 tsp minced garlic
1/4 - 1/2 tsp pepper
dash salt (you'll sprinkle a little extra over the top later)

Spread the rosemary-olive oil mixture evenly between the two pans of dough. I like to scoop spoonfuls onto the dough and use the back of the spoon to spread around.  Sprinkle with a little extra fresh-ground salt, if desired.   Rise in a warm location at least 20 minutes.
Risen and ready to bake!

Bake at 400 F (375 F convection) for 20-25 minutes, until focaccia bread is nicely browned.  Remove from oven and immediately slide bread off parchment paper onto a cooling rack.  

Great fresh from the oven.  Or, you can cool and slice as strips, squares, or triangles! Enjoy! 
Cooling on wire racks. Yum!

Gluten Free Rosemary Focaccia Bread Recipe by Successfully Gluten Free!

Wednesday, 20 February 2019

Delicious Salmon Tartare or Salmon Salad

This salmon recipe is a recipe that every single person in the family - young to old - loves.  It surprised me, but the mix of flavors and the freshly cooked salmon are delicious. We tend to eat it too quickly for me to ever actually chill it in the refrigerator, but you can serve it warm or chilled.
I do prefer cooking the salmon, making it a salmon salad, rather than a tartare, but the original recipe is intended to be a proper "tartare" dish.  (Thanks @Dzeldaz for mentioning I should include this clarification).  Either way, tastes great. Enjoy!
Gluten Free Salmon Tartare
Freshly made Salmon Tartare - gone within the hour! 

Salmon Tartare OR Salmon Salad

Tartare recipe was provided by Harmon's grocery chef Freyka as part of their Seafood Festival, I've modified to be a cooked Salmon Salad version, too.

*Only do this first part, if you're wanting to use a cooked salmon.  If preferred, you can make this with a raw, high-quality salmon that is diced, but we prefer to cook it.  Hence, the I've included both names "tartare" and "salad" in the recipe title.  This was not my original recipe, and is intended to be made with raw salmon, but I like cooking the salmon first, and turning it into more of a salmon salad, (like a tunafish salad))*

Preheat oven to 425 F.

Place on a pan:
1 lb. salmon fillet

Top the salmon with:
2 Tbsp lemon or lime-infused olive oil
salt & pepper
1/4 - 1/2 tsp dried dill (or 1-2 tsp fresh, if available)

Bake salmon for ~18-20 minutes at 425 F.  Thin fillets will need the lower amount of time, thicker fillets may need an additional 3-4 minutes.

Mix together in a medium-sized bowl:
1 small shallot, finely diced
2 Tbsp dill pickles, finely diced
3-4 Tbsp capers, drained
2 Tbsp mayonnaise
1 Tbsp Dijon mustard (more, to taste, if desired)
1-2 dashes Worchestershire sauce
3-4 shakes Tabasco sauce, more or less, to taste
1/4 - 1/2 tsp salt, to taste
1/4 - 1/2 tsp freshly ground pepper, to taste

Mix together, and add in cooked salmon (no skin!) and mix gently with a fork to break up the salmon and stir thoroughly.  Taste, and adjust with Dijon mustard, Tabasco and salt & pepper, to taste.

This is wonderful served with gluten-free crackers or  homemade french-style gluten-free bread, sliced and toasted. 

Gluten free Salmon Salad or Tartare Recipe by Successfully Gluten Free!

Monday, 18 February 2019

Mushroom Risotto

When flavorful mushrooms are in season, it's a great time to whip some mushroom risotto.  Mushroom risotto is a perfect comfort food for crisp fall days.  I tend to mix it up in terms of what mushrooms end up in this risotto depending on what is fresh and available.  I like to use a mix of strong and mild flavored mushrooms.  If you like a more mellow dish, you can add a little spinach and ham in your risotto (as described below).  Leave our the ham for a perfectly delicious vegetarian dish.  Happy eating!  Enjoy!
Gluten Free Mushroom Risotto
A tasty meal everyone will enjoy!

Mushroom Risotto - gluten free

Serves 4-6

Heat in a large frying pan over medium heat:
2-3 Tbsp olive oil

Add and cook until mushrooms are nicely softened:
1 small onion or 1 large shallot, diced
1 - 1 1/2 cups mushrooms, sliced (mix of baby portabella & button is nice for a mild dish, but use your favorites)
1 tsp garlic, minced (optional)

Push vegetables to the side, then add and let saute 1-2 minutes:
1 cup arborio risotto
Gluten Free Mushroom Risotto
Sauteed mushrooms have been pushed to the edge to cook the risotto for a couple minutes before adding broth.

Add 3 cups water plus 4-5 tsp Asian Mushroom Seasoning (OR 3 cups GF chicken broth OR 3 cups water + 3 tsp GF chicken bouillon paste) 1 cup at a time over about 15-20 minutes.  Stir regularly and let most of each cup of liquid absorb before adding the next.  You may need to lower the heat to medium-low, so it cooks nice and slowly.

Along with first cup of water/broth add:
1/4 - 1/2 tsp tumeric
salt & pepper
Gluten Free Mushroom Risotto
The risotto rice will slowly absorb the liquid over the 15-20 minutes.  In order to have a less mushy rice, adding the liquid little by little over time works best, I find. 

You can make the risotto creamier or more dry depending on how much liquid you let absorb/cook off during this time.

For a more mellow mushroom risotto - along with the last cup of water add:
3/4 cup finely diced fresh baby spinach (optional)
3 slices ham, finely diced (optional)

When you're almost done cooking, add:
salt and pepperto taste

Remove from heat and stir in:
1/8 - 1/4 cup fresh grated parmesan cheese (optional, but adds a great flavor and I almost always add a bit of parmesan to my risotto)
Mushroom Risotto with ham and spinach
Mushroom risotto with a little ham and spinach added. Mmm.. delicious!

Gluten free Mushroom Risotto Recipe by Successfully Gluten Free!

Friday, 1 February 2019

Amazing Chocolate Zucchini Brownies!

These brownies have been loved by everyone.  The trick is to grate the zucchini with a very fine grater.  And, of course, the lovely little layer of chocolate on the top adds a pop of extra sweetness.  Enjoy!
Gluten Free Zucchini Brownies!
Zucchini Brownies, ready to eat! 

Amazing Chocolate Zucchini Brownies - gluten free!

Makes a 9 x 13 pan of brownies

Preheat oven to 350 F.

Mix together:
1 1/4 cup really finely grated zucchini, packed into measuring cup
1/3 cup light olive oil
1 egg
1 tsp vanilla bean paste (or 1 tsp vanilla extract)

Add, stirring until thoroughly combined:
1 cup Kristin's Gluten-Free Flour Mix
3/4 cup sugar 
1/2 cup cocoa powder (I like to use a rich, dark cocoa powder)
1/4 cup mini chocolate chips
1/2 tsp salt

Spread brownie batter evenly on the bottom of a 9 x 13 pan lined with parchment paper.  Bake at 350 F for 20 minutes.  Set brownies on a wire rack and prepare frosting (so you can pour over a warm, but not hot brownie).

Brownies fresh out of the oven.  Remove from oven and then make the chocolate glaze and pour on top while still warm! 


Chocolate Glaze Frosting (to be spread on the brownies while warm):
(You can halve this if you want a lighter glaze, but I like this amount)

In a large, 4-cup measuring cup in the microwave, melt:
3/4 cup butter

Mix in, then heat 45-60 seconds in the microwave:
1/3 cup cocoa powder (I like to use a lighter cocoa powder, like Hershey's, for frosting)

Add and mix in:
5 Tbsp milk
1 tsp vanilla extract or vanilla bean paste

Mix in, and stir until smooth:
2 3/4 cup powdered sugar

Spread glaze over warm/hot cake.  Slice cake and serve warm or cooled.  Enjoy !


Another picture of the yummy zucchini brownies. Mmmm...

Gluten free Chocolate Zucchini Brownies Recipe by Successfully Gluten Free!

Monday, 28 January 2019

Small Pearl Tapioca Pudding

Tapioca pudding is a wonderful and easy pudding-style treat that everyone enjoys around here.  I like to use a mixture of canned coconut milk, regular coconut milk and lactose-free whole milk, but I've made it with all sorts of varieties of milks.  It's great warm and chilled. Enjoy!
A serving of small pearl tapioca pudding - enjoyed in my house by ages 4 to 87! 

Small Pearl Tapioca Pudding - gluten free!

Set tapioca pearls to soak either overnight to make tapioca in the morning or in the morning to make your tapioca at night by doing the following:

In a 2 cup measuring cup, combine and soak 8-24 hours:
1/2 cup small pearl tapioca 
1 1/2 - 1 3/4 cup water - to make 2 cups

In a saucepan mix together:
2 1/2 cups milk (using a combination of canned coconut milk and other milk varieties works great)
1/3 cup sugar
1 egg
1/4 - 1/2 tsp salt
1/4 tsp cinnamon (optional - it will give it more of a rice pudding flavor if you use it)
soaked tapioca pearls, drained and rinsed thoroughly


Tapioca cooking over medium heat - make sure to mix regularly or you'll end up with tapioca sticking/burning on the bottom of your pan! 

Bring to a boil over medium heat, stirring regularly.  Once tapioca comes to a boil, let thicken for a minute.  Remove from heat and add:
1 tsp vanilla extract or vanilla bean paste

Serve warm or put in a bowl with plastic wrap tight to the surface to cool.  Refrigerate once tapioca isn't piping hot.  Tapioca will thicken more as it cools.  Enjoy!

Gluten Free Small Pearl Tapioca Pudding Recipe by Successfully Gluten Free!